The Classic Living Room of My Dreams

I am super excited to be sharing our completed living room with you!!!  It’s hard to believe that it’s come this far from where we started, but one of the reasons we bought this place was its overall improvability.  I like everything customized MY way, and it’s nice not have to make any structural changes to achieve results, or to pay a higher price for a home that’s finished, but not necessarily what you would have chosen.  So, now we have EXACTLY what I wanted and it turned out even better than I dreamed.  See the complete source list below each photo!

*This post may contain affiliate links. Please see full disclosure at the end of the post.

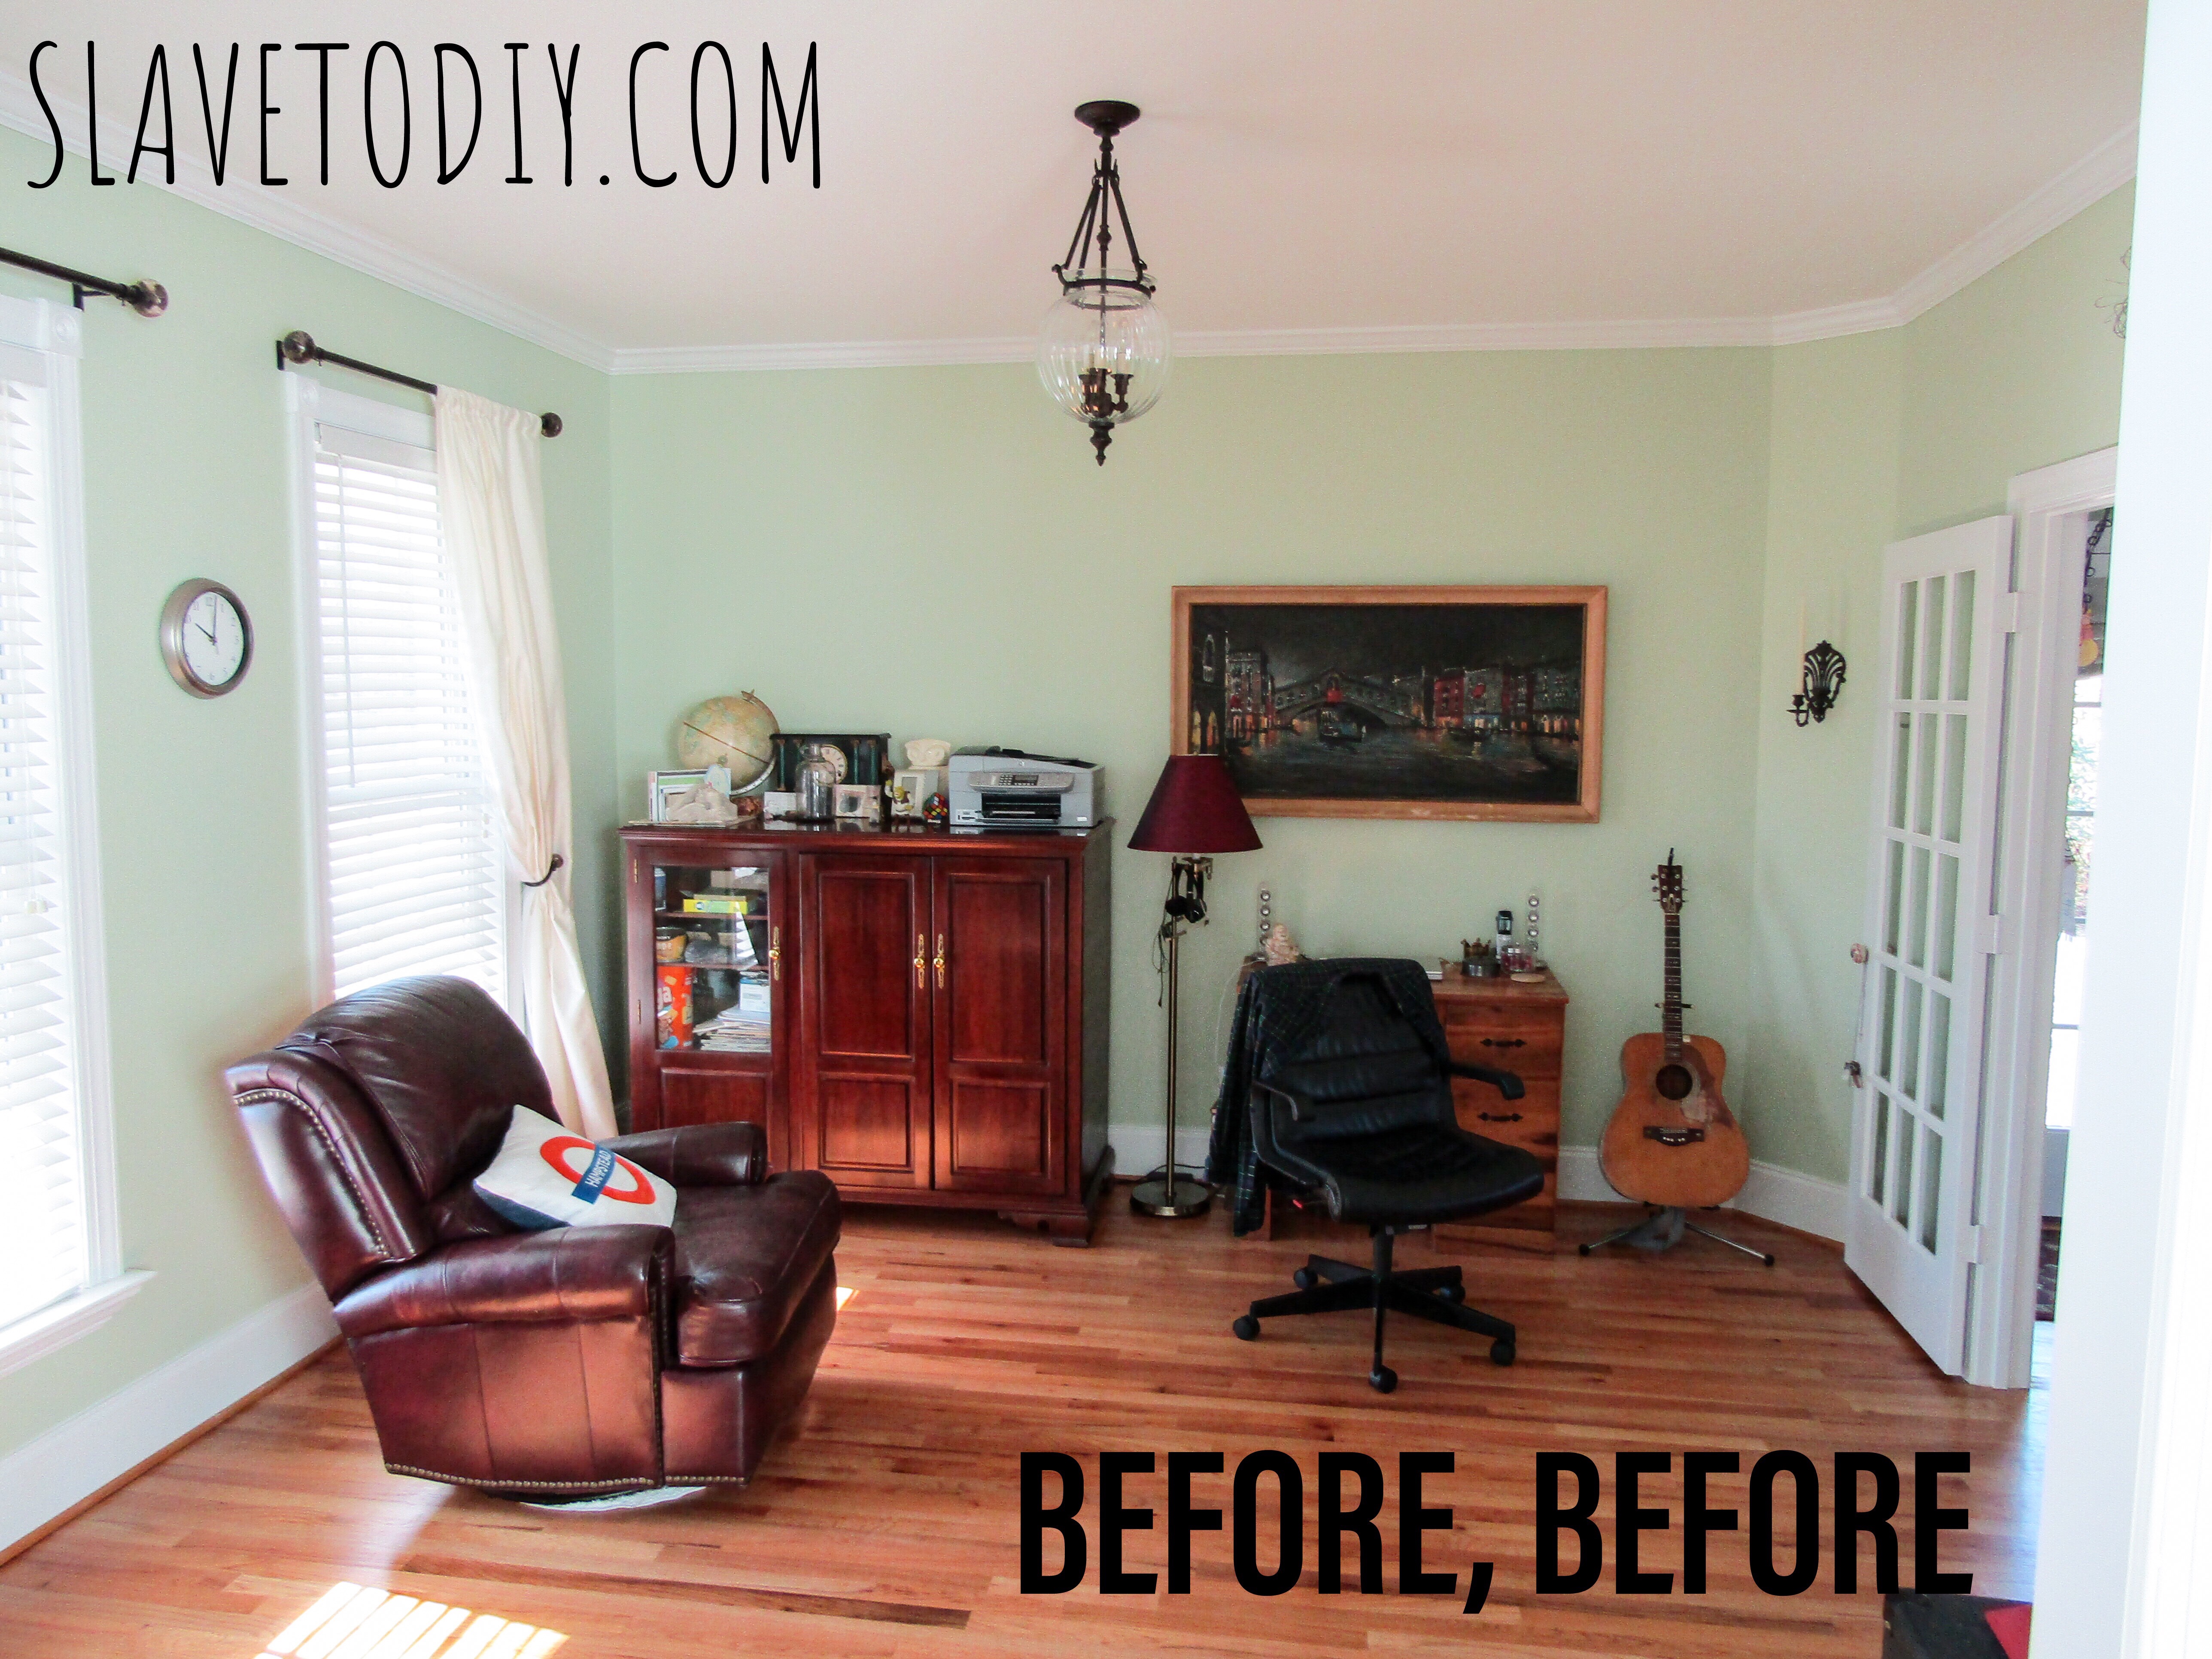
So, here’s a flashback to what this place looked like before we moved in (eeeeek!).  But, with the high ceilings and great windows, it was ripe for an elegant update.  The house was super clean and ready for a facelift.

ec032231-9fac-436c-b2e9-43cb91c3eeb6

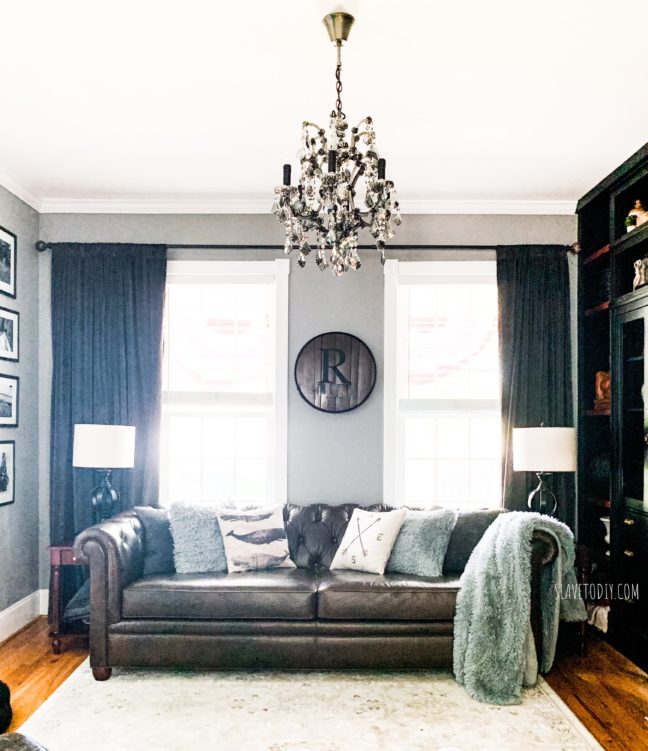
It is difficult to believe that this is the same room, but I am completely in love.  Check out the incredible results:


Classic living room with Pottery Barn Chesterfield sofa, RH 19th Century Rococo Iron & Crystal Round Chandelier, and RH knock off (DIY) velvet curtains

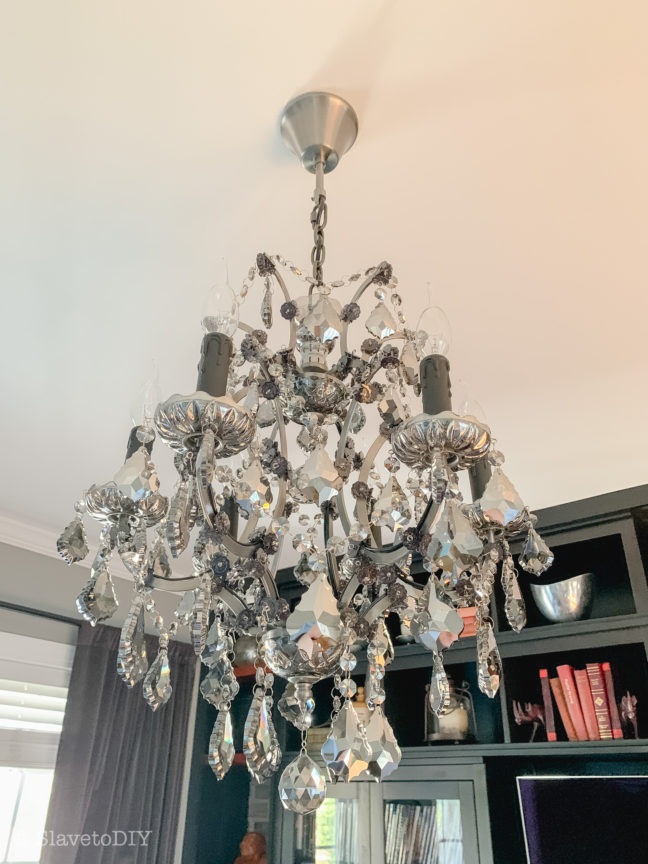
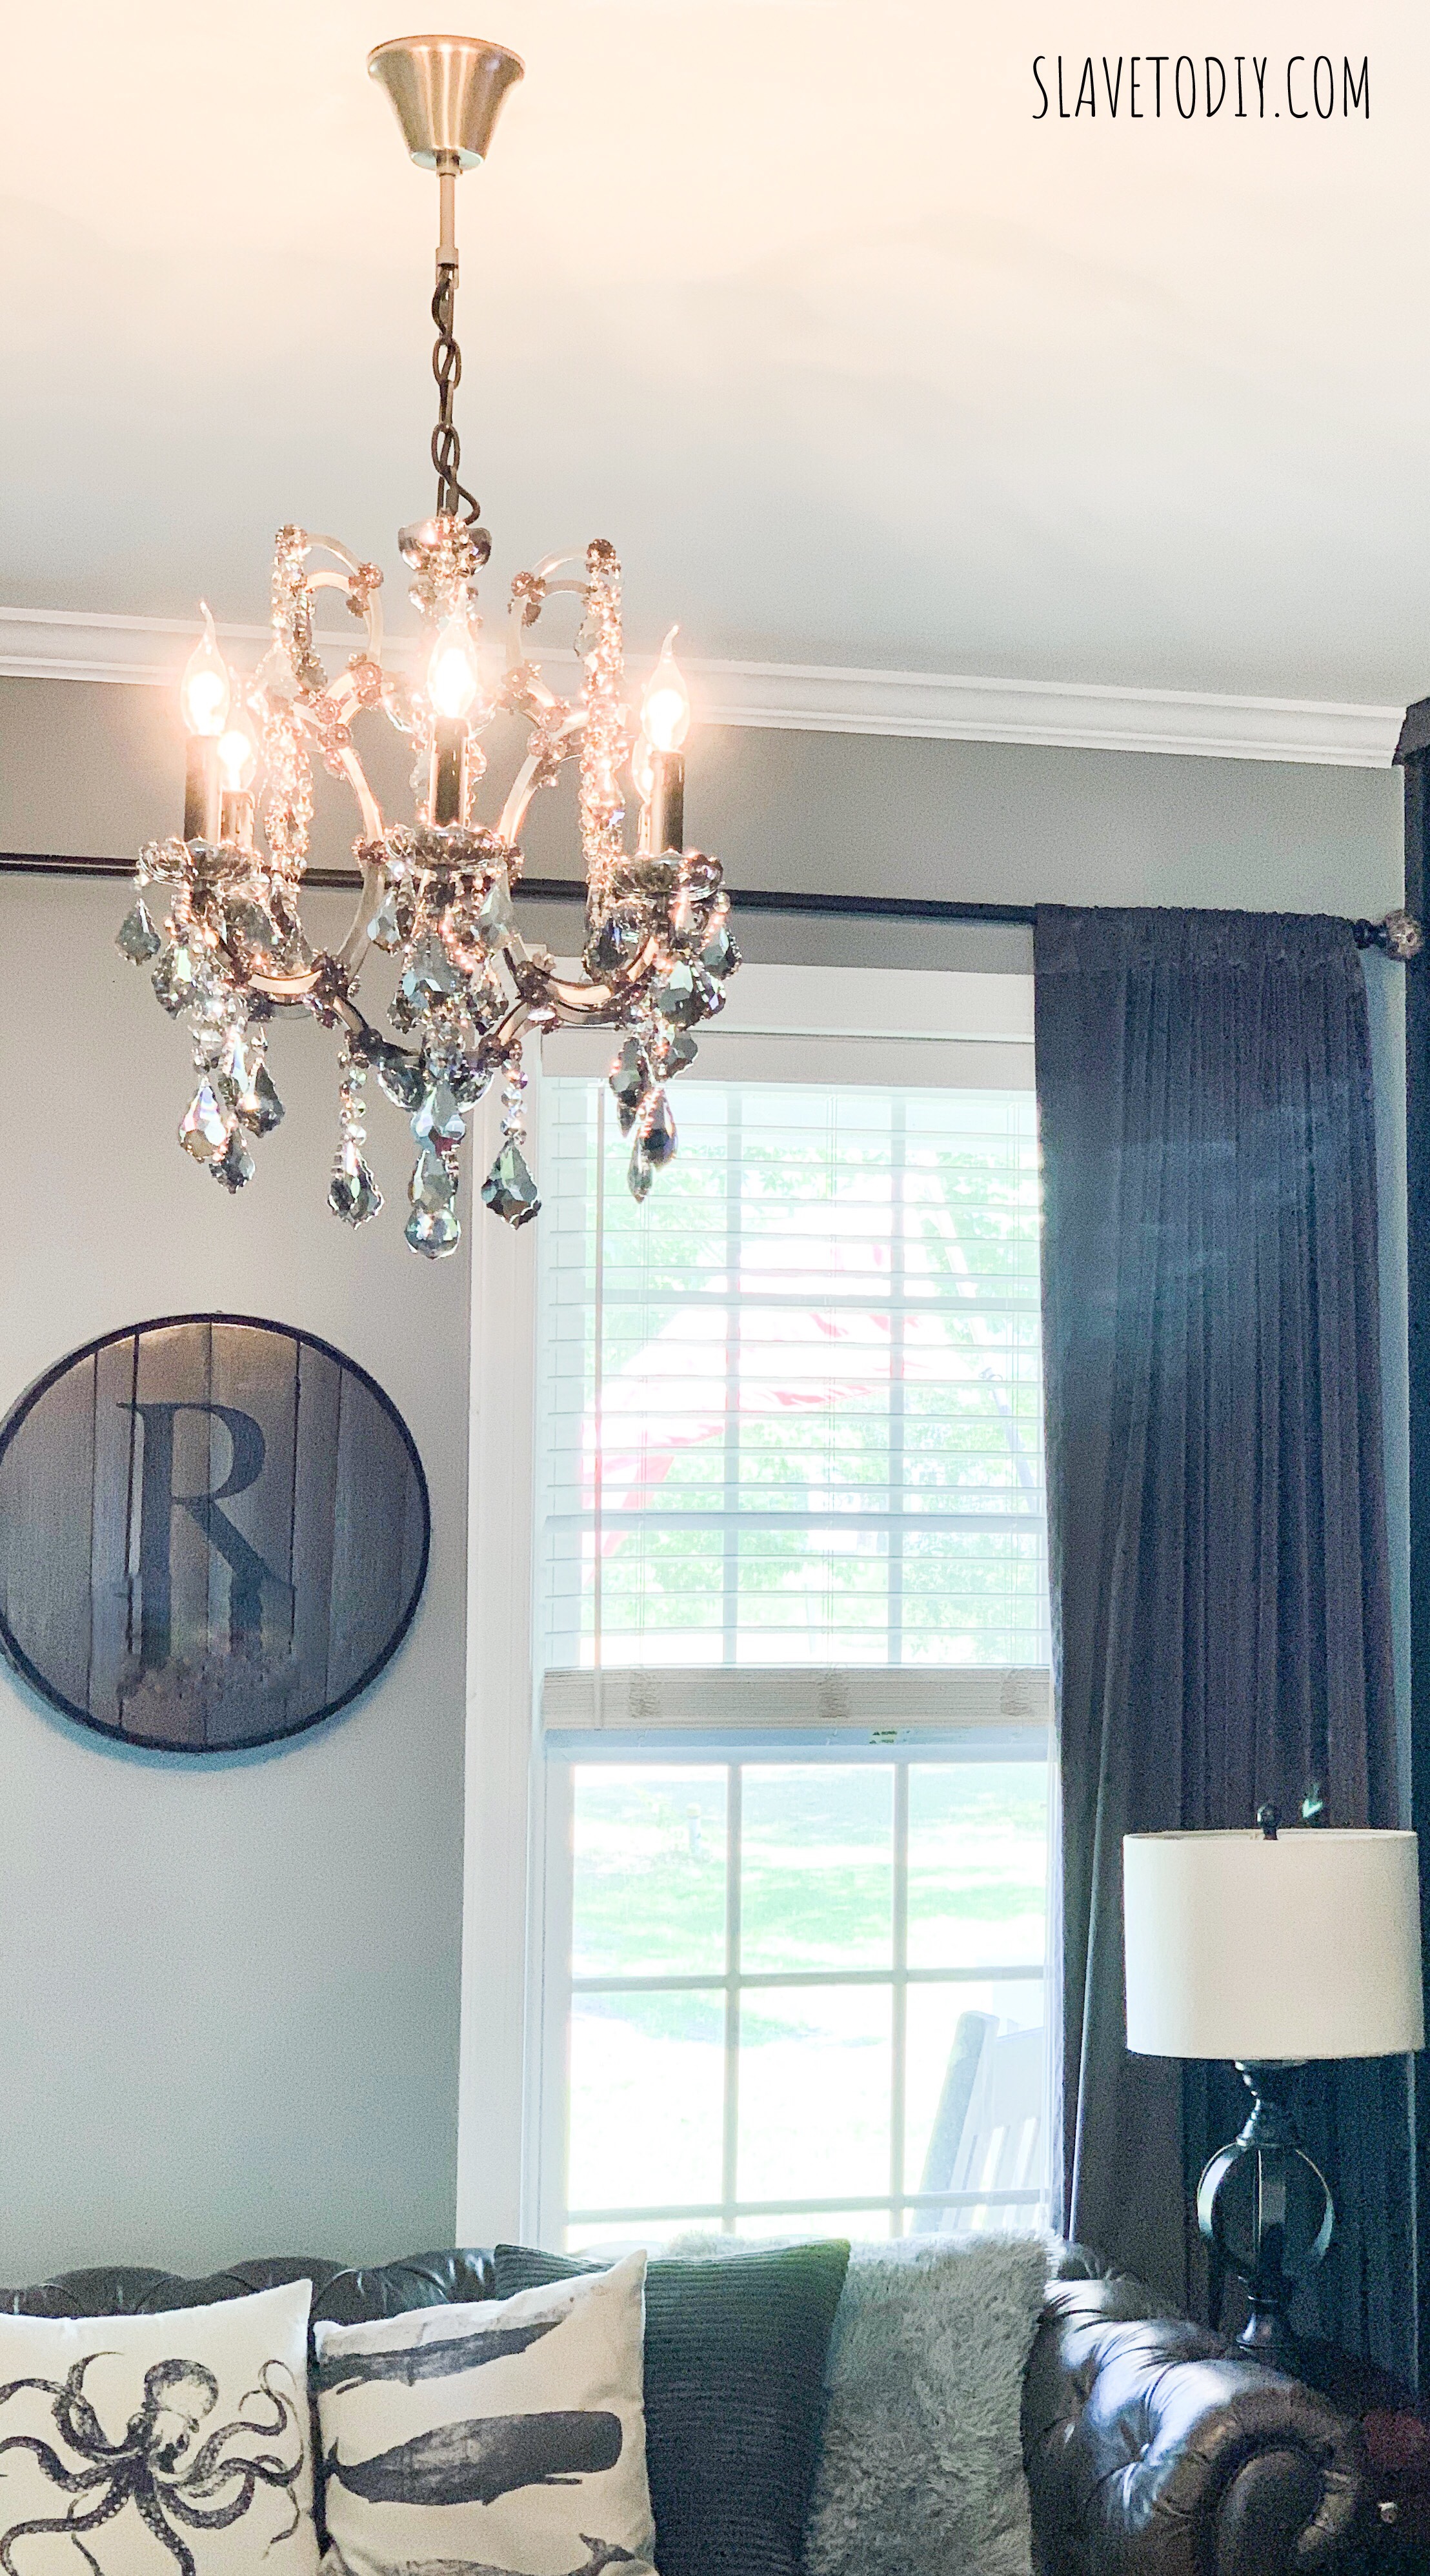
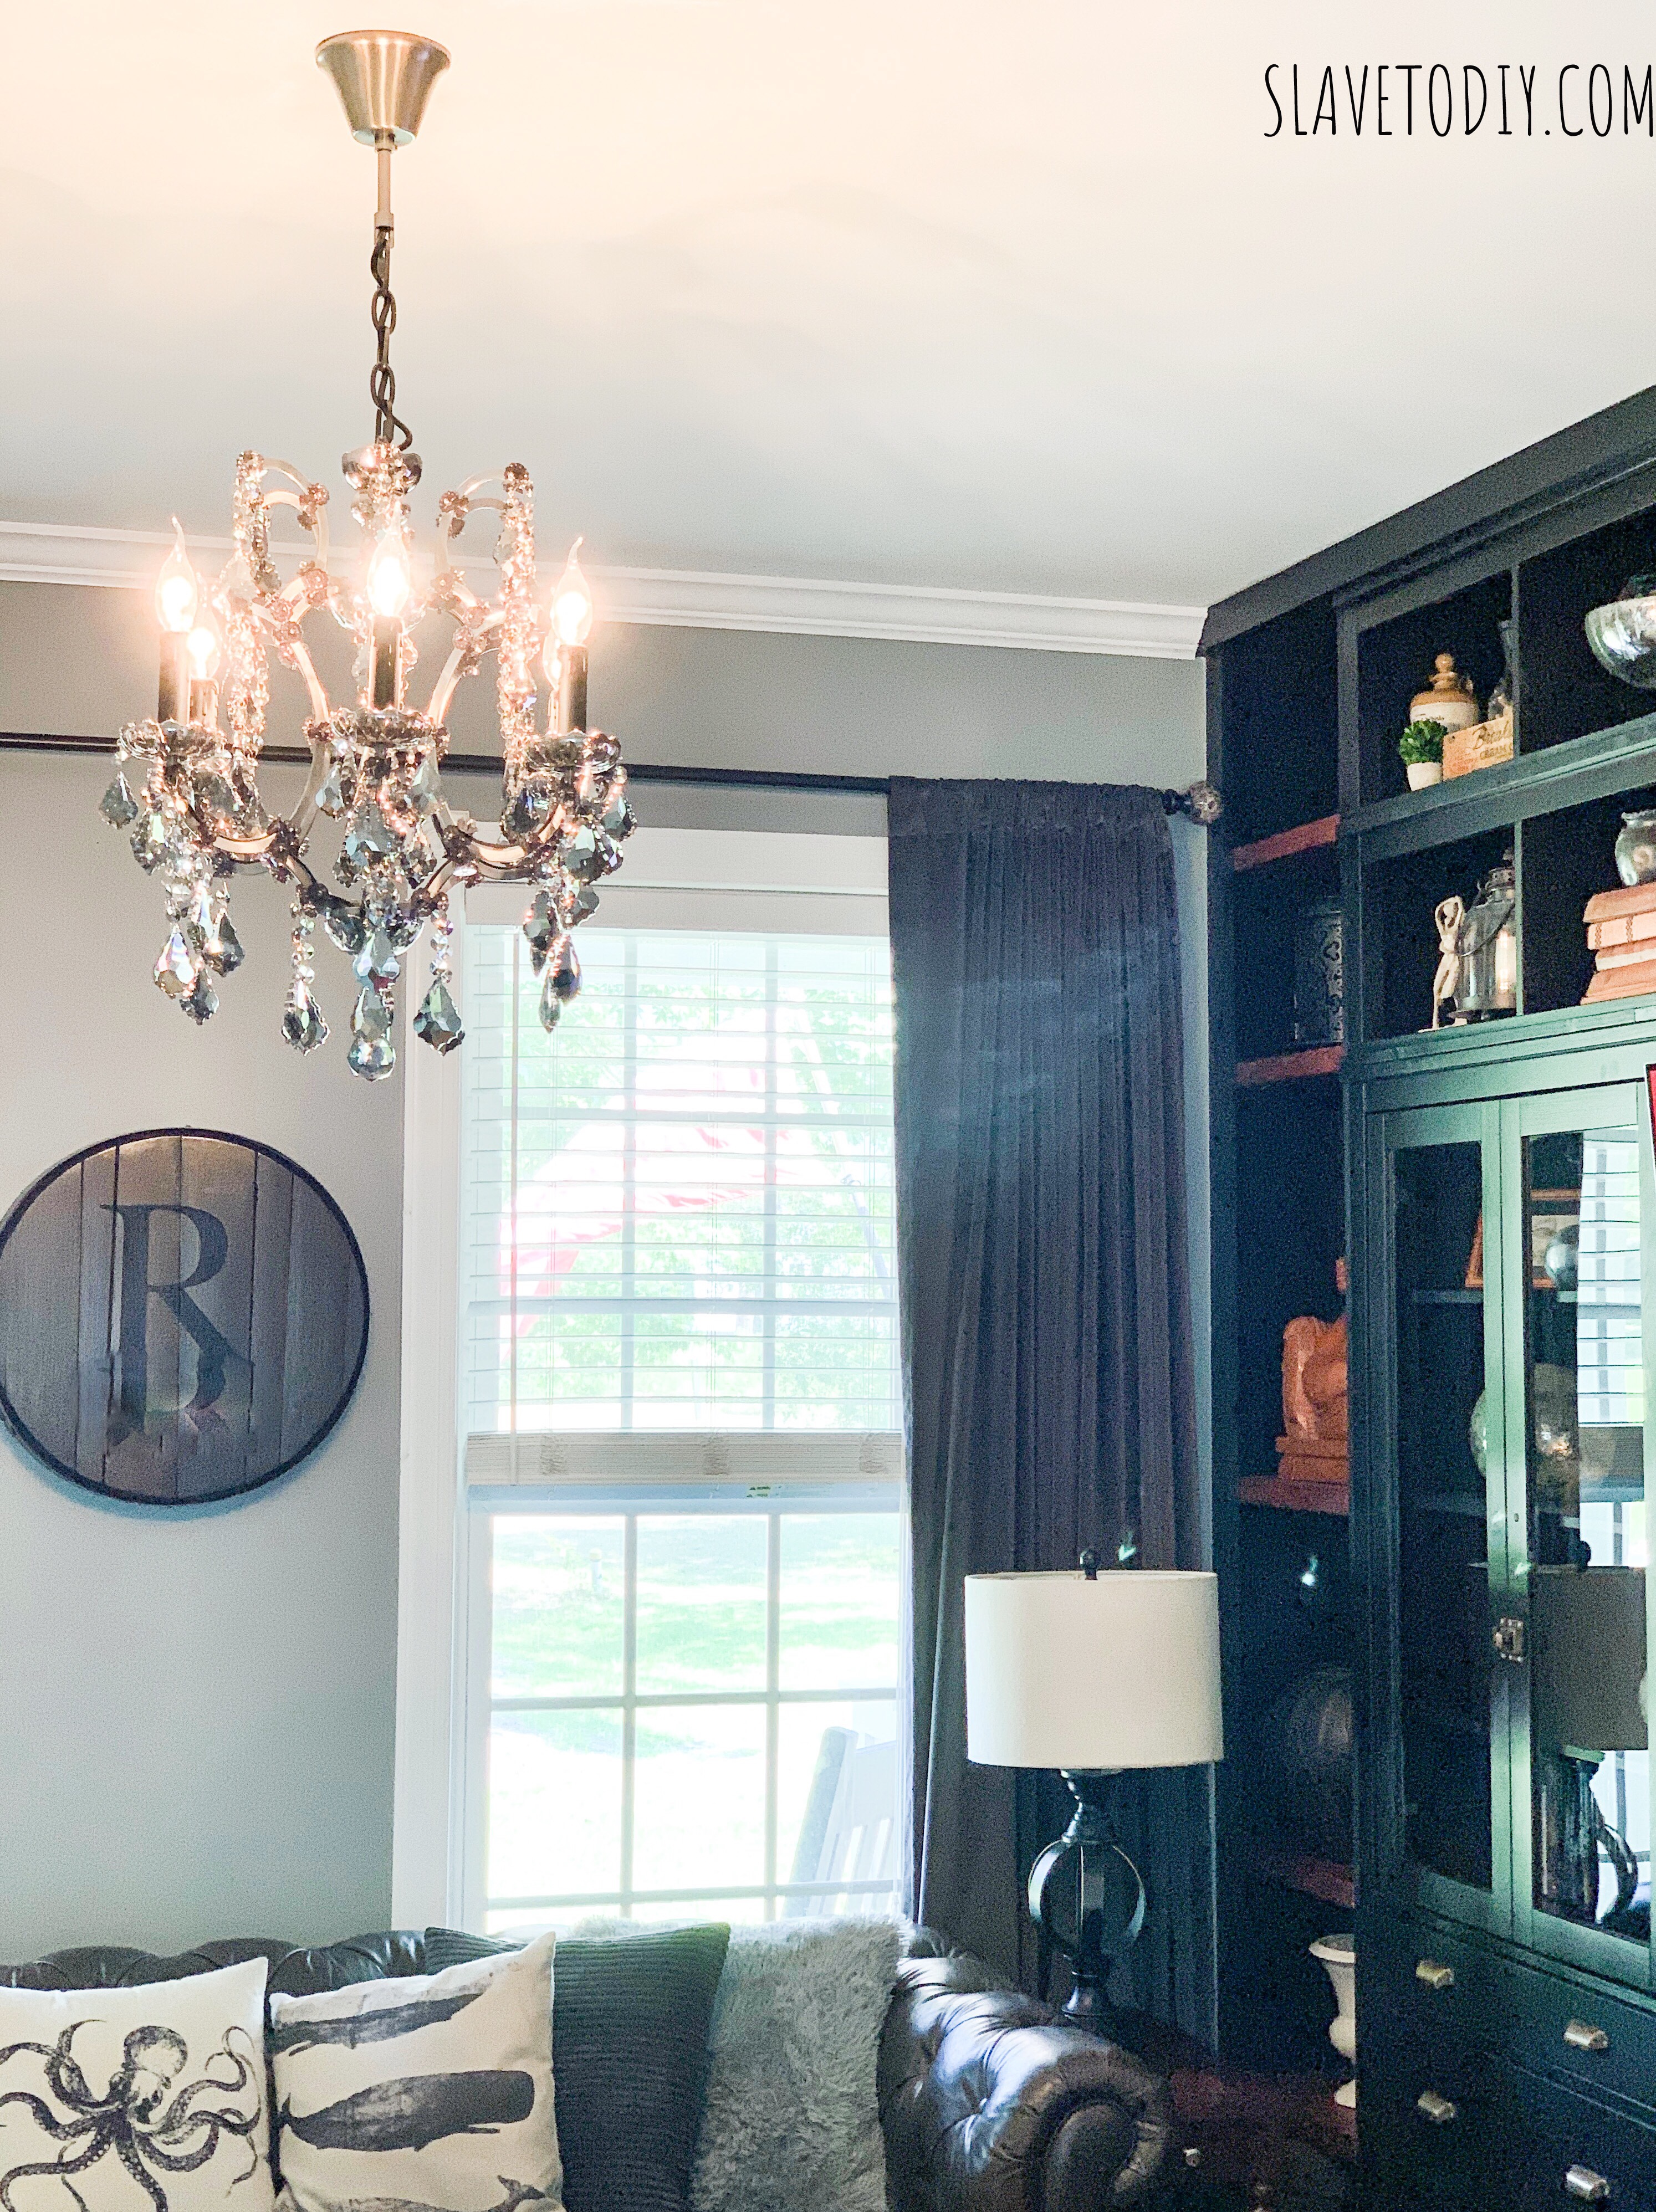
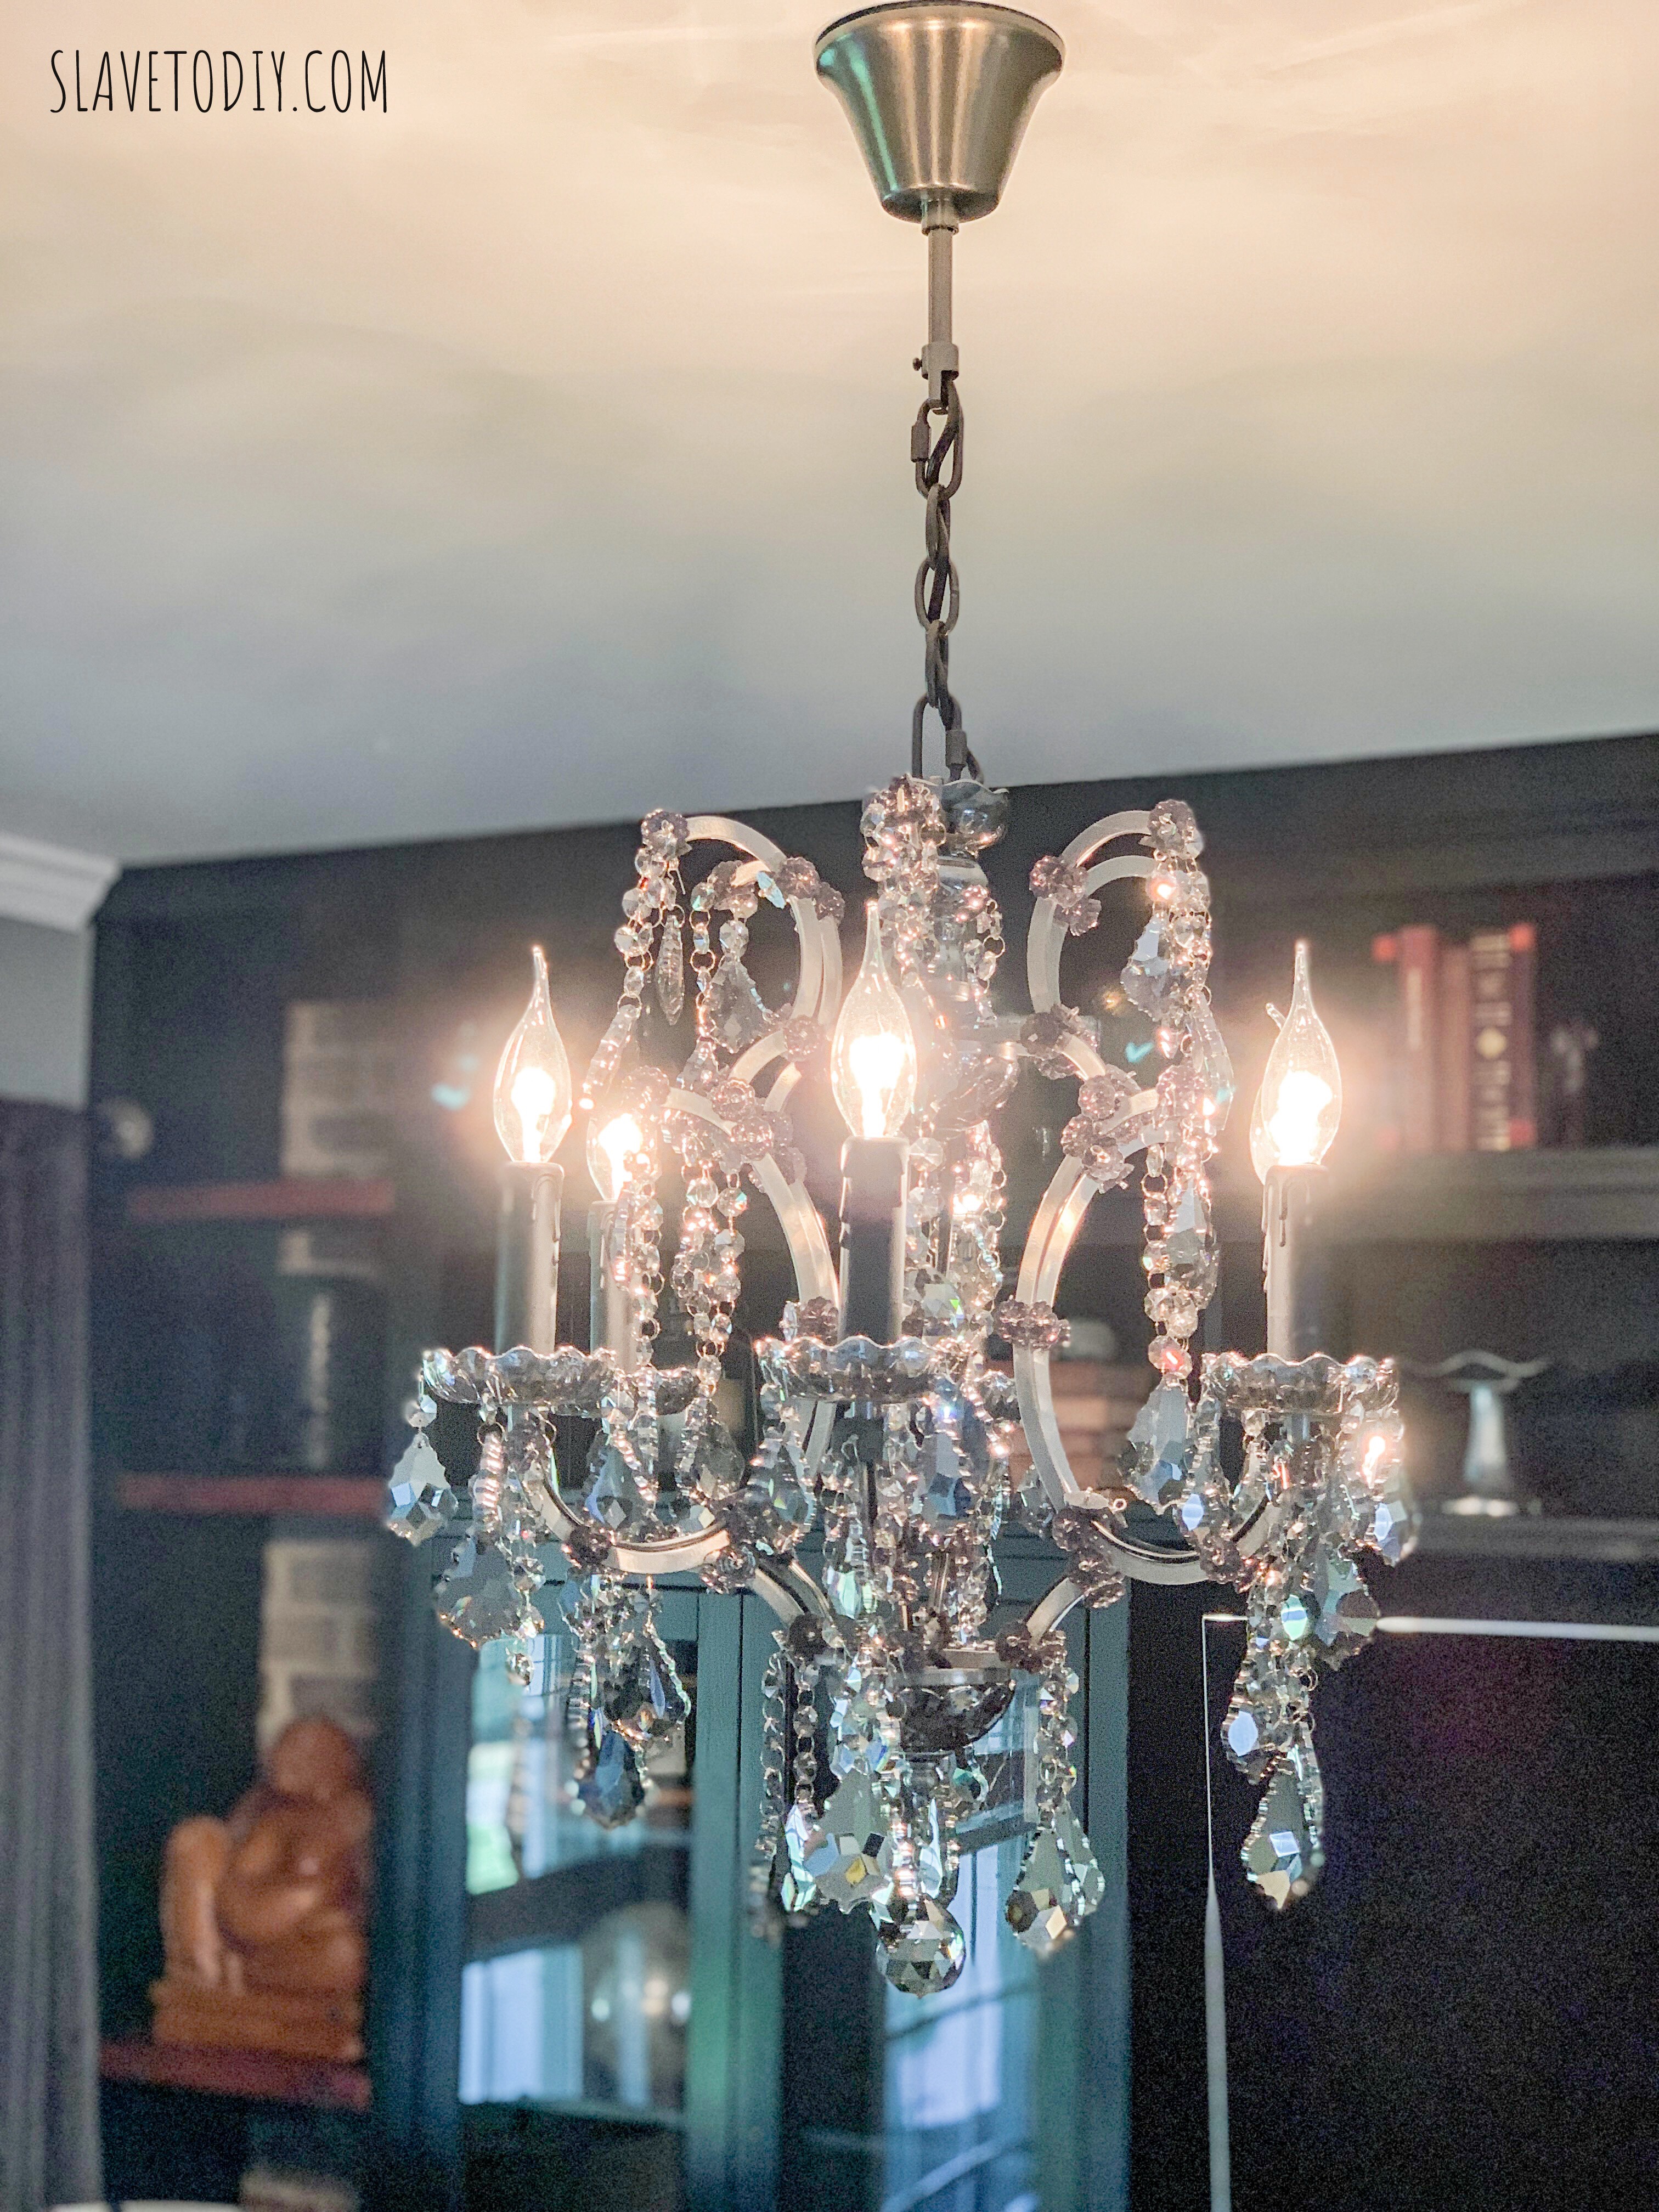
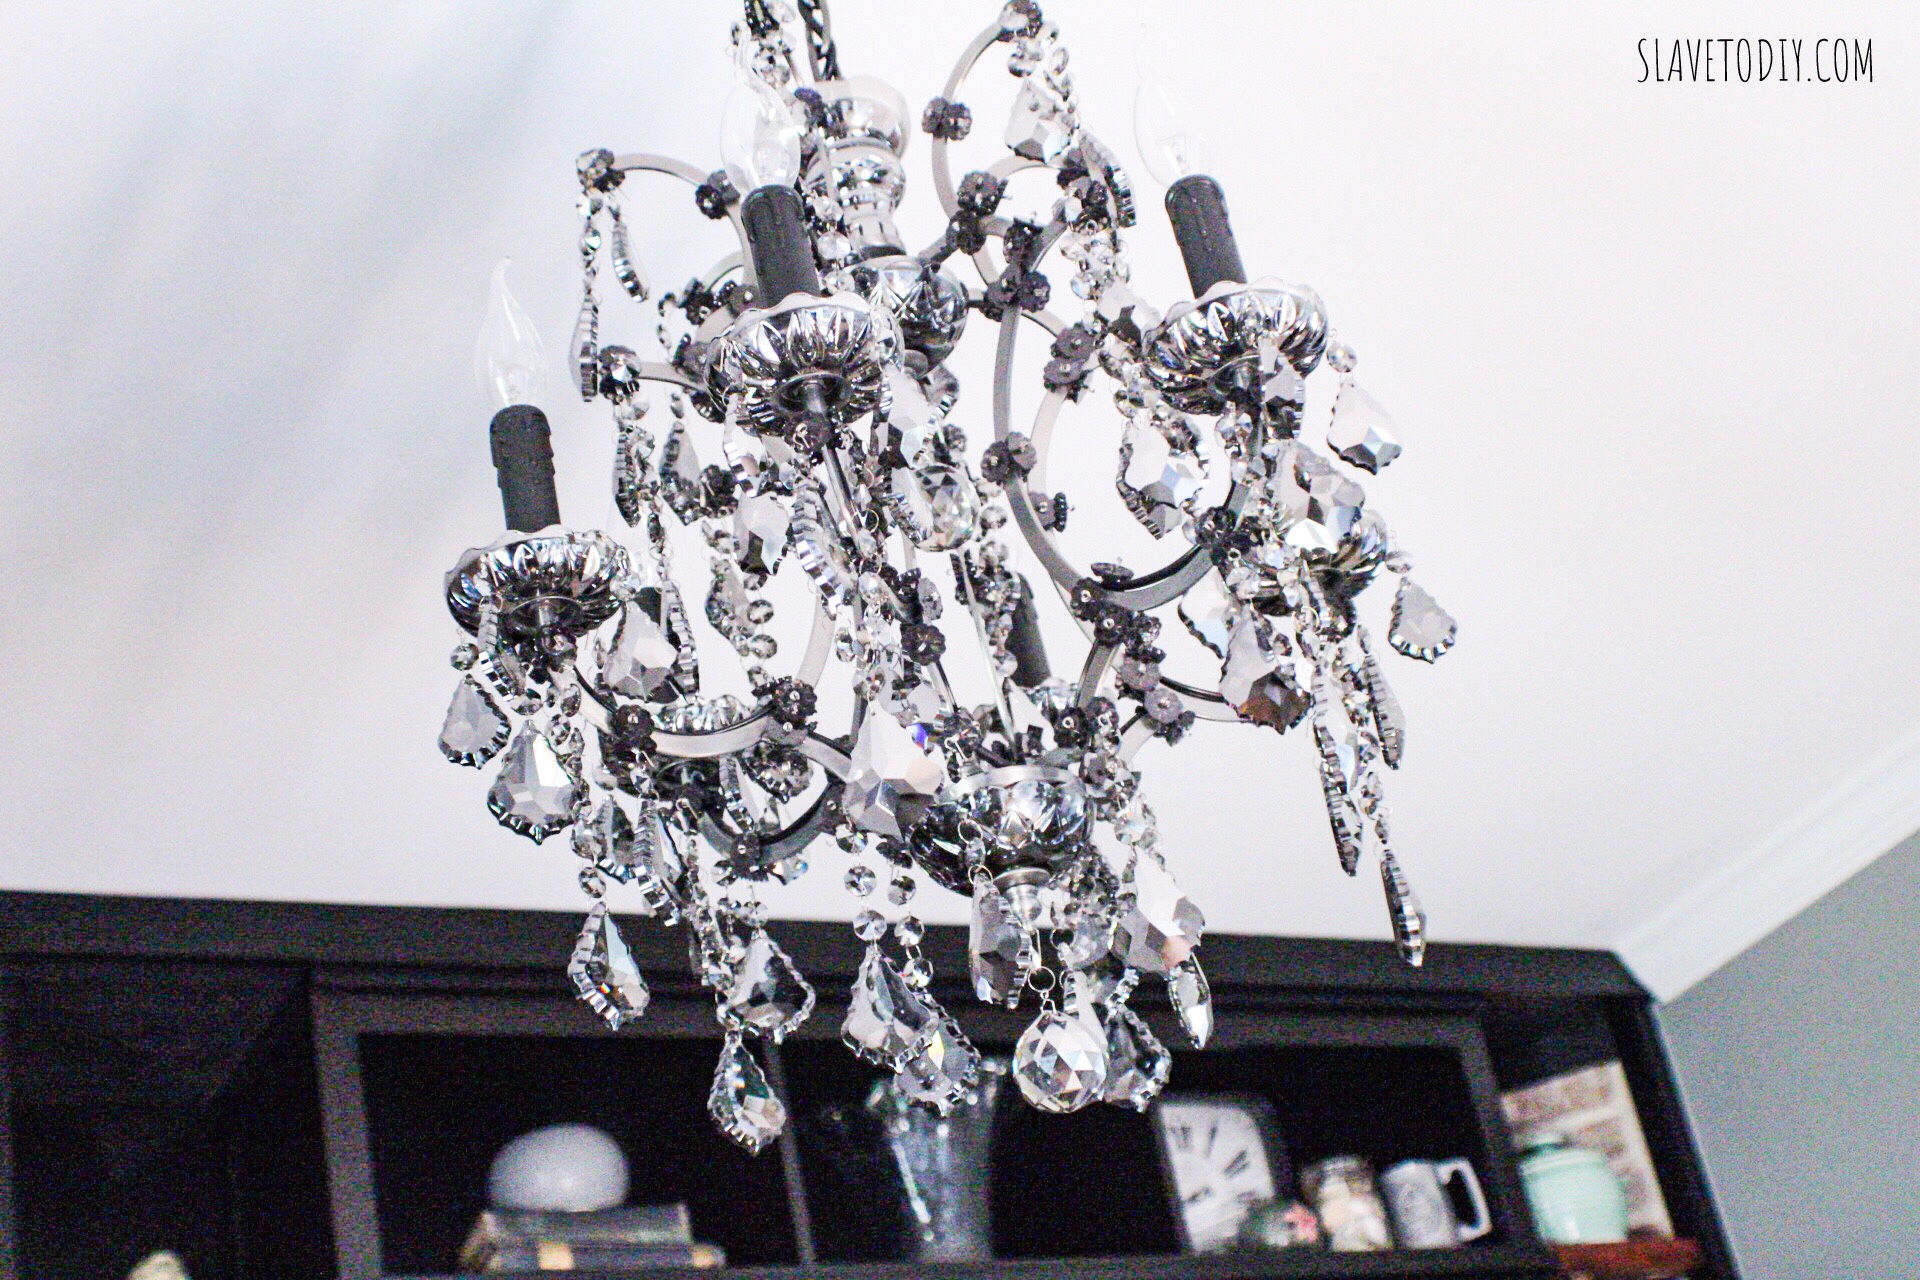
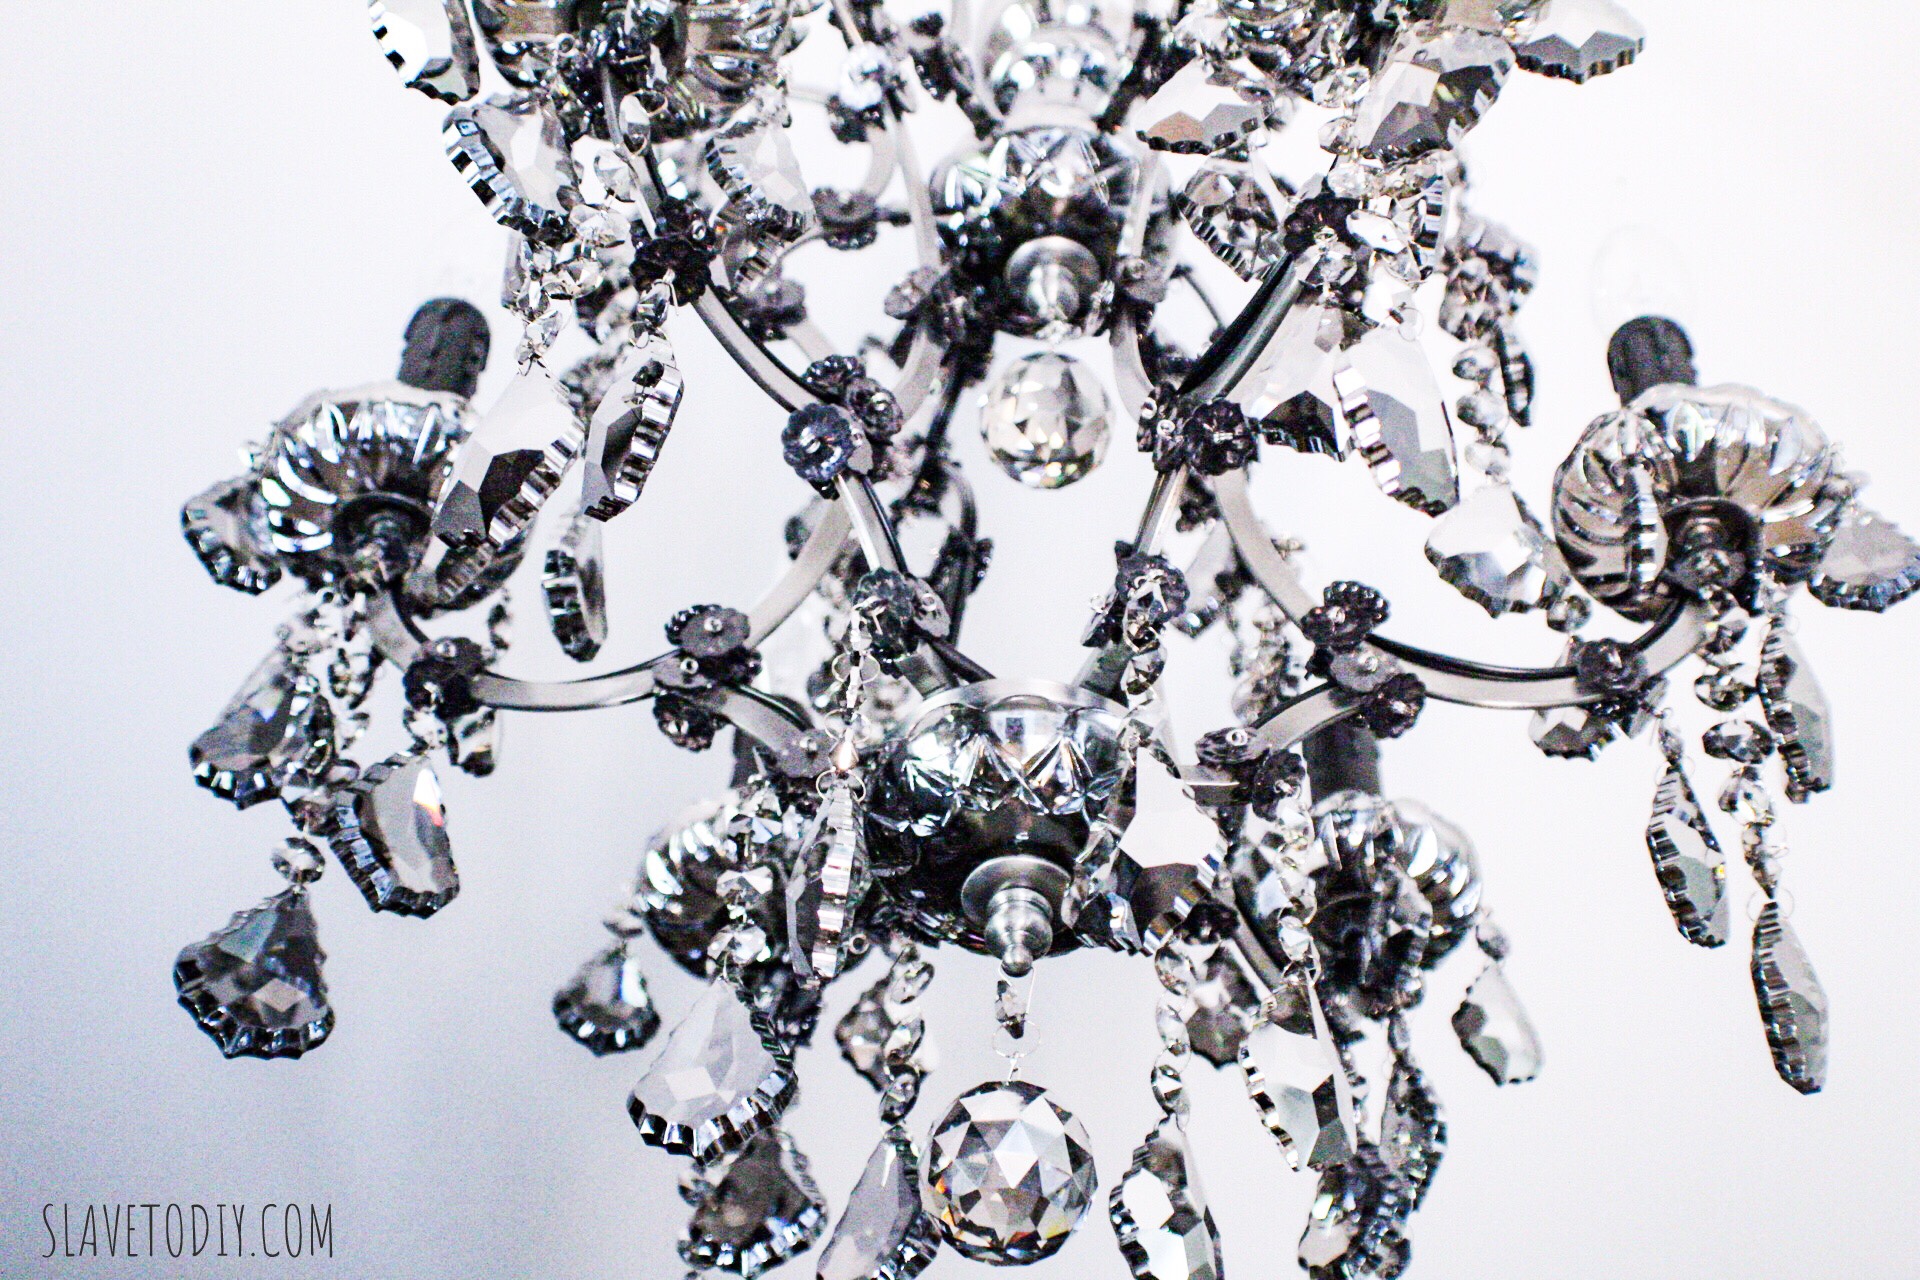
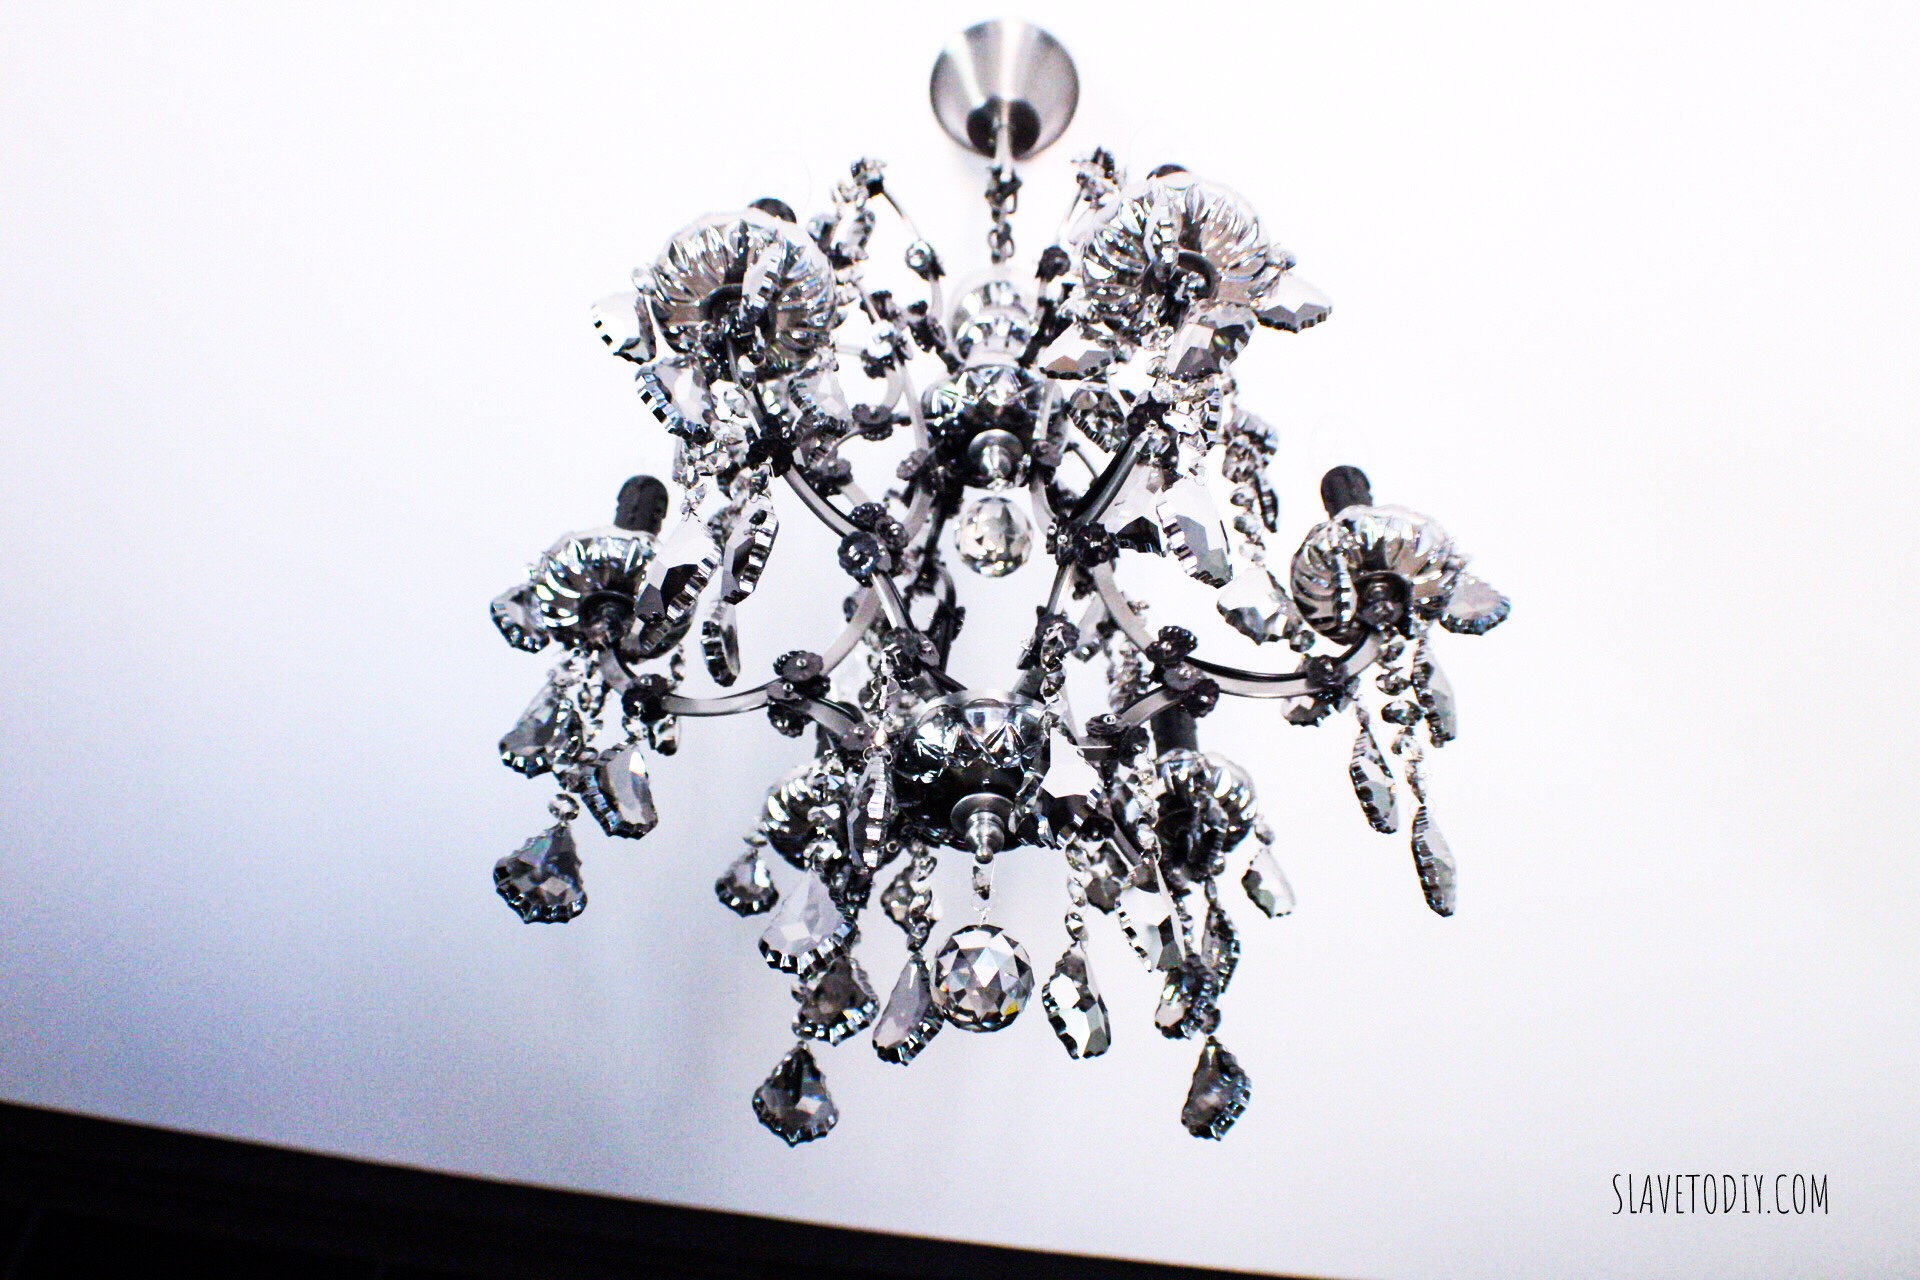
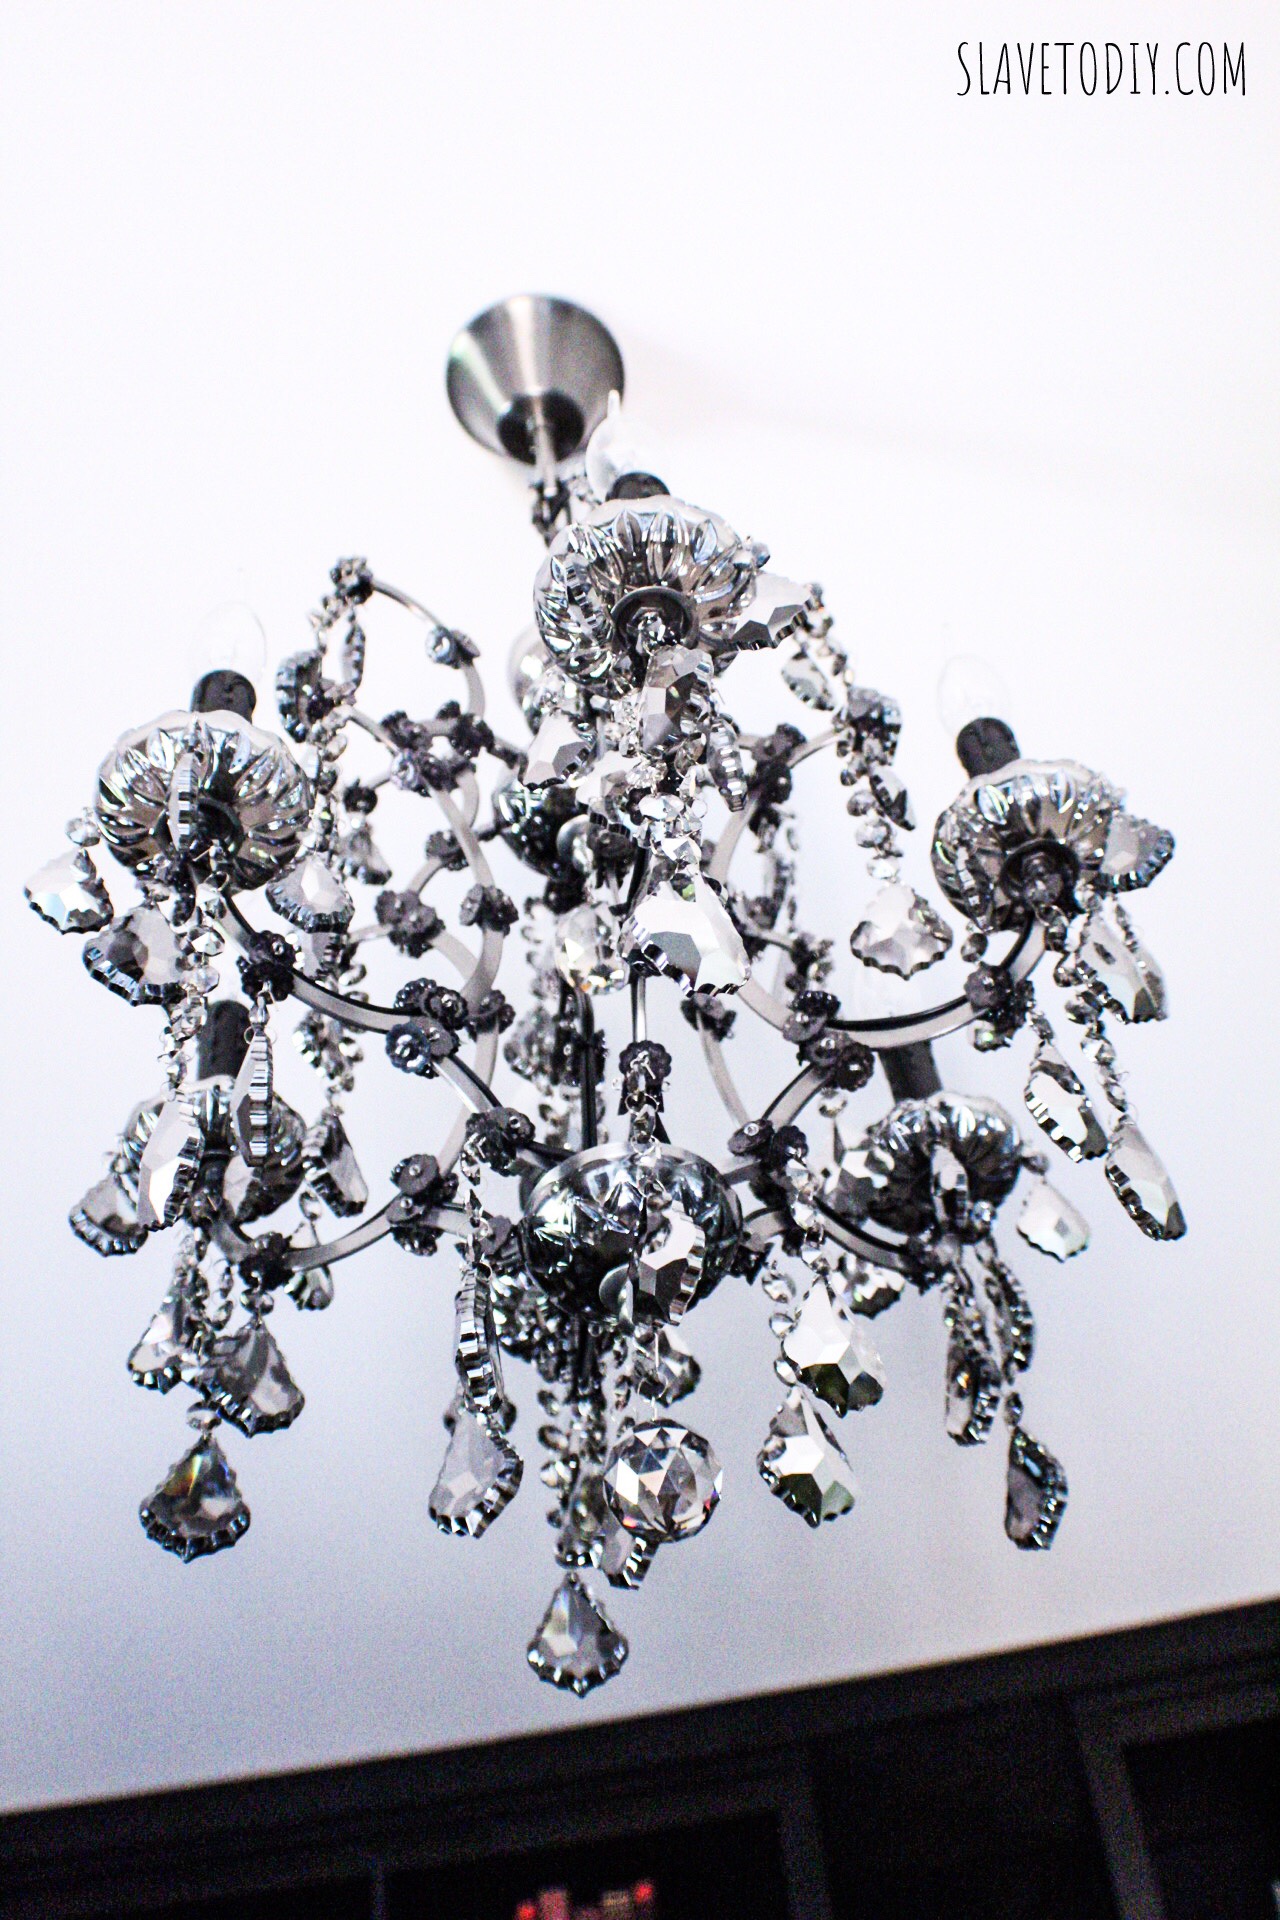
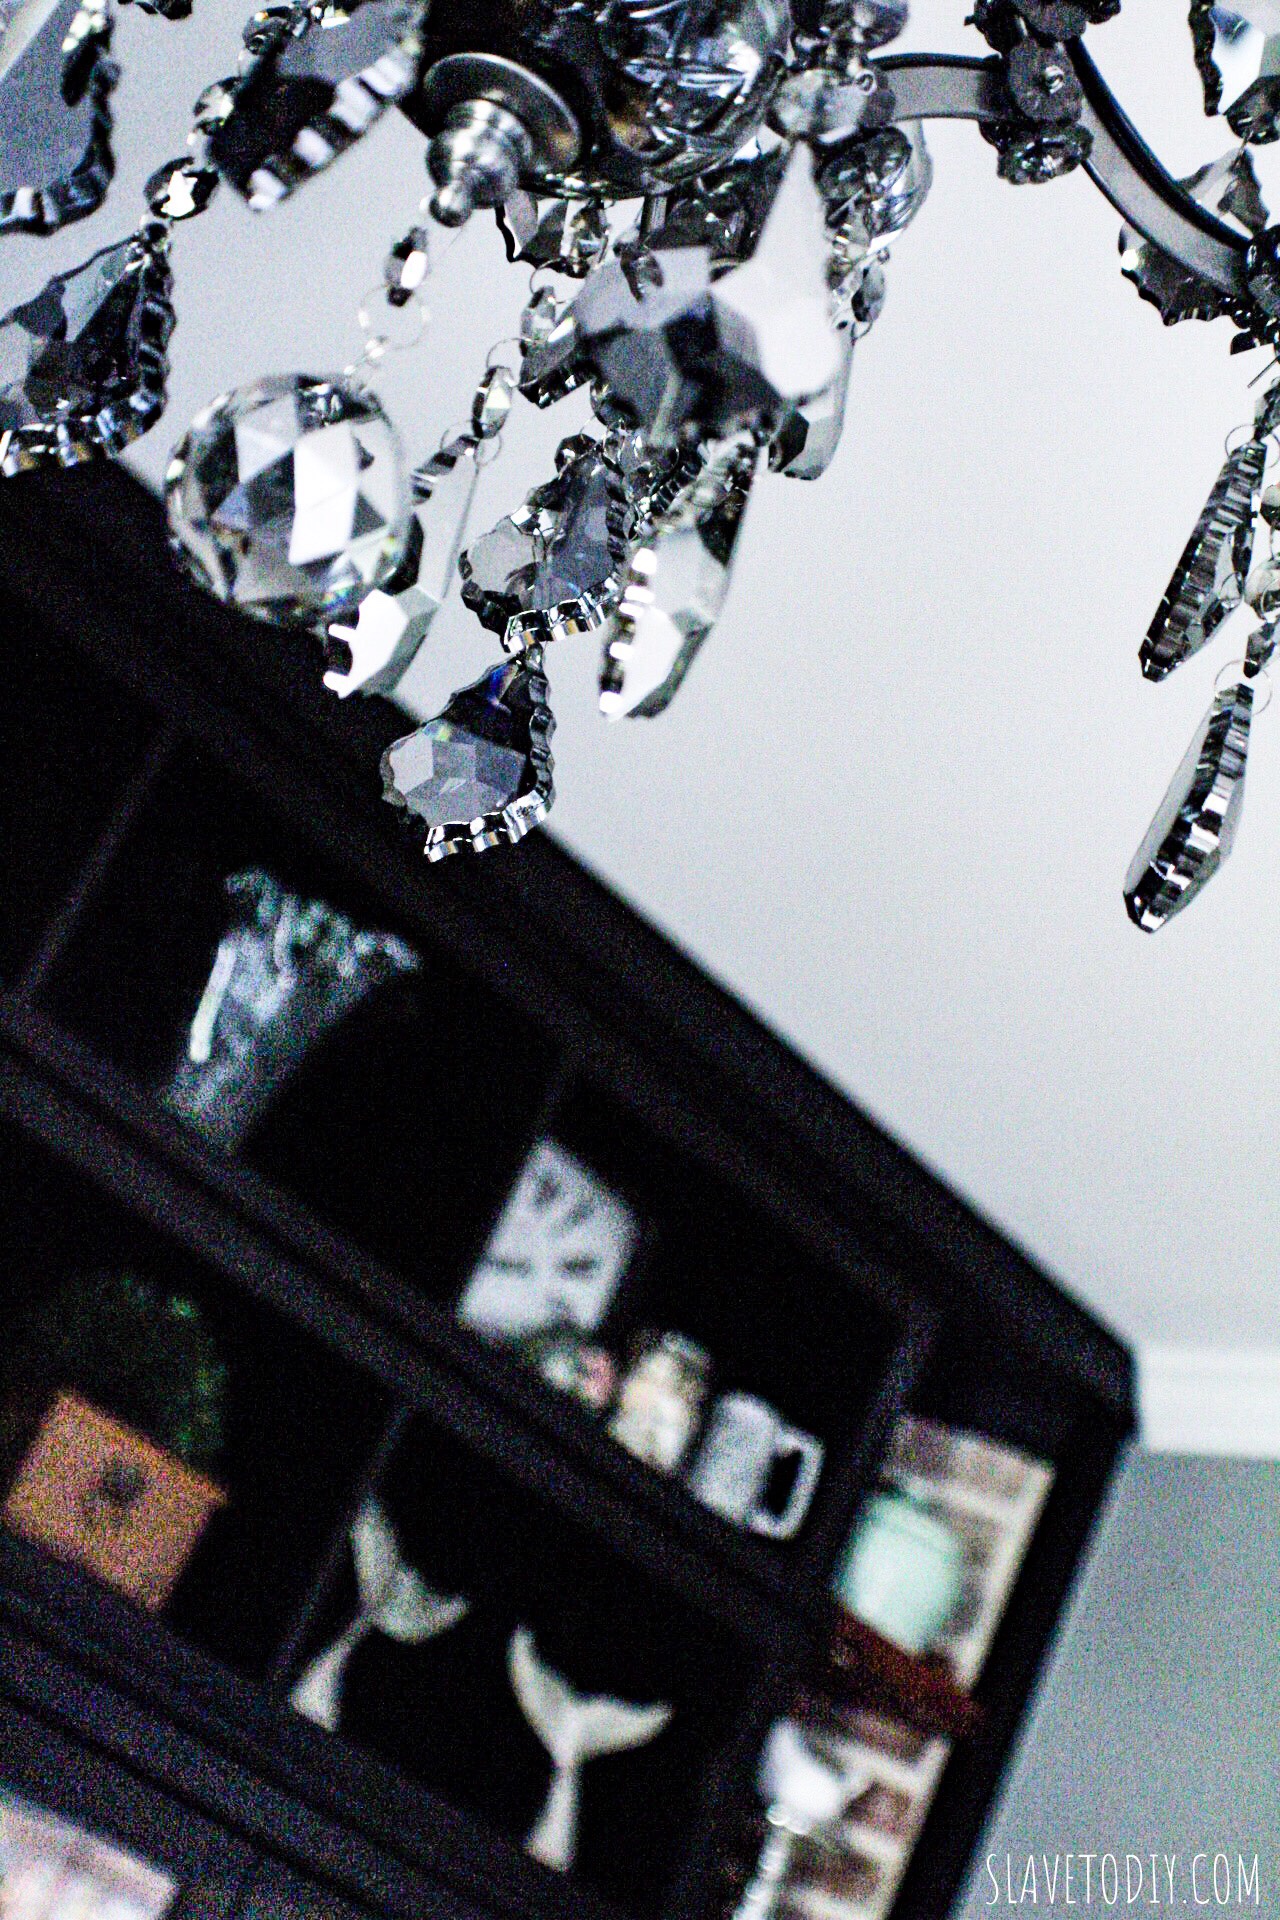
The fantastic light fixture from RH is the crown jewel of the space and really takes it to another level.  It is the 19th Century Rococo Iron & Crystal Round Chandelier in Matte Natural Iron/Smoke Crystal and it is breathtaking.

I started out with a great foundation piece from Pottery Barn, this Grand Chesterfield Sofa in Vintage Cocoa Leather that has held up great to kids, two cats, and a dog that occasional jumps up when we’re not looking.

The curtain rods with marble end caps were super reasonable and I got them at my local Lowe’s.

Also from Lowe’s are the metal globe lamps that flank the couch.

The side tables are from wally-world and are decent (they’re not show-stoppers because they are playing a support role here).

The customized Bourbon Barrel top is from Etsy and the shop name is KYBourbonBarrel.  This was a gift for my husband for Christmas and we just love it.

The velvet curtains were sewn by my mother and you can find the source links and project tutorial here.

The rug is from Home Depot and it’s one of my favorite finds.  It doesn’t feel cheapy and it wasn’t a small fortune like similar ones I like from Pottery Barn.  I wish I had a sourced a few others from there that I got online and didn’t totally love.

The pillow covers and blanket are all from Amazon: the whalecompass rose pillow covers, dark gray corduroy pillow covers, and fuzzy light gray blanket and pillow covers.

Hemnes IKEA Builtins in Black with Custom Hardware

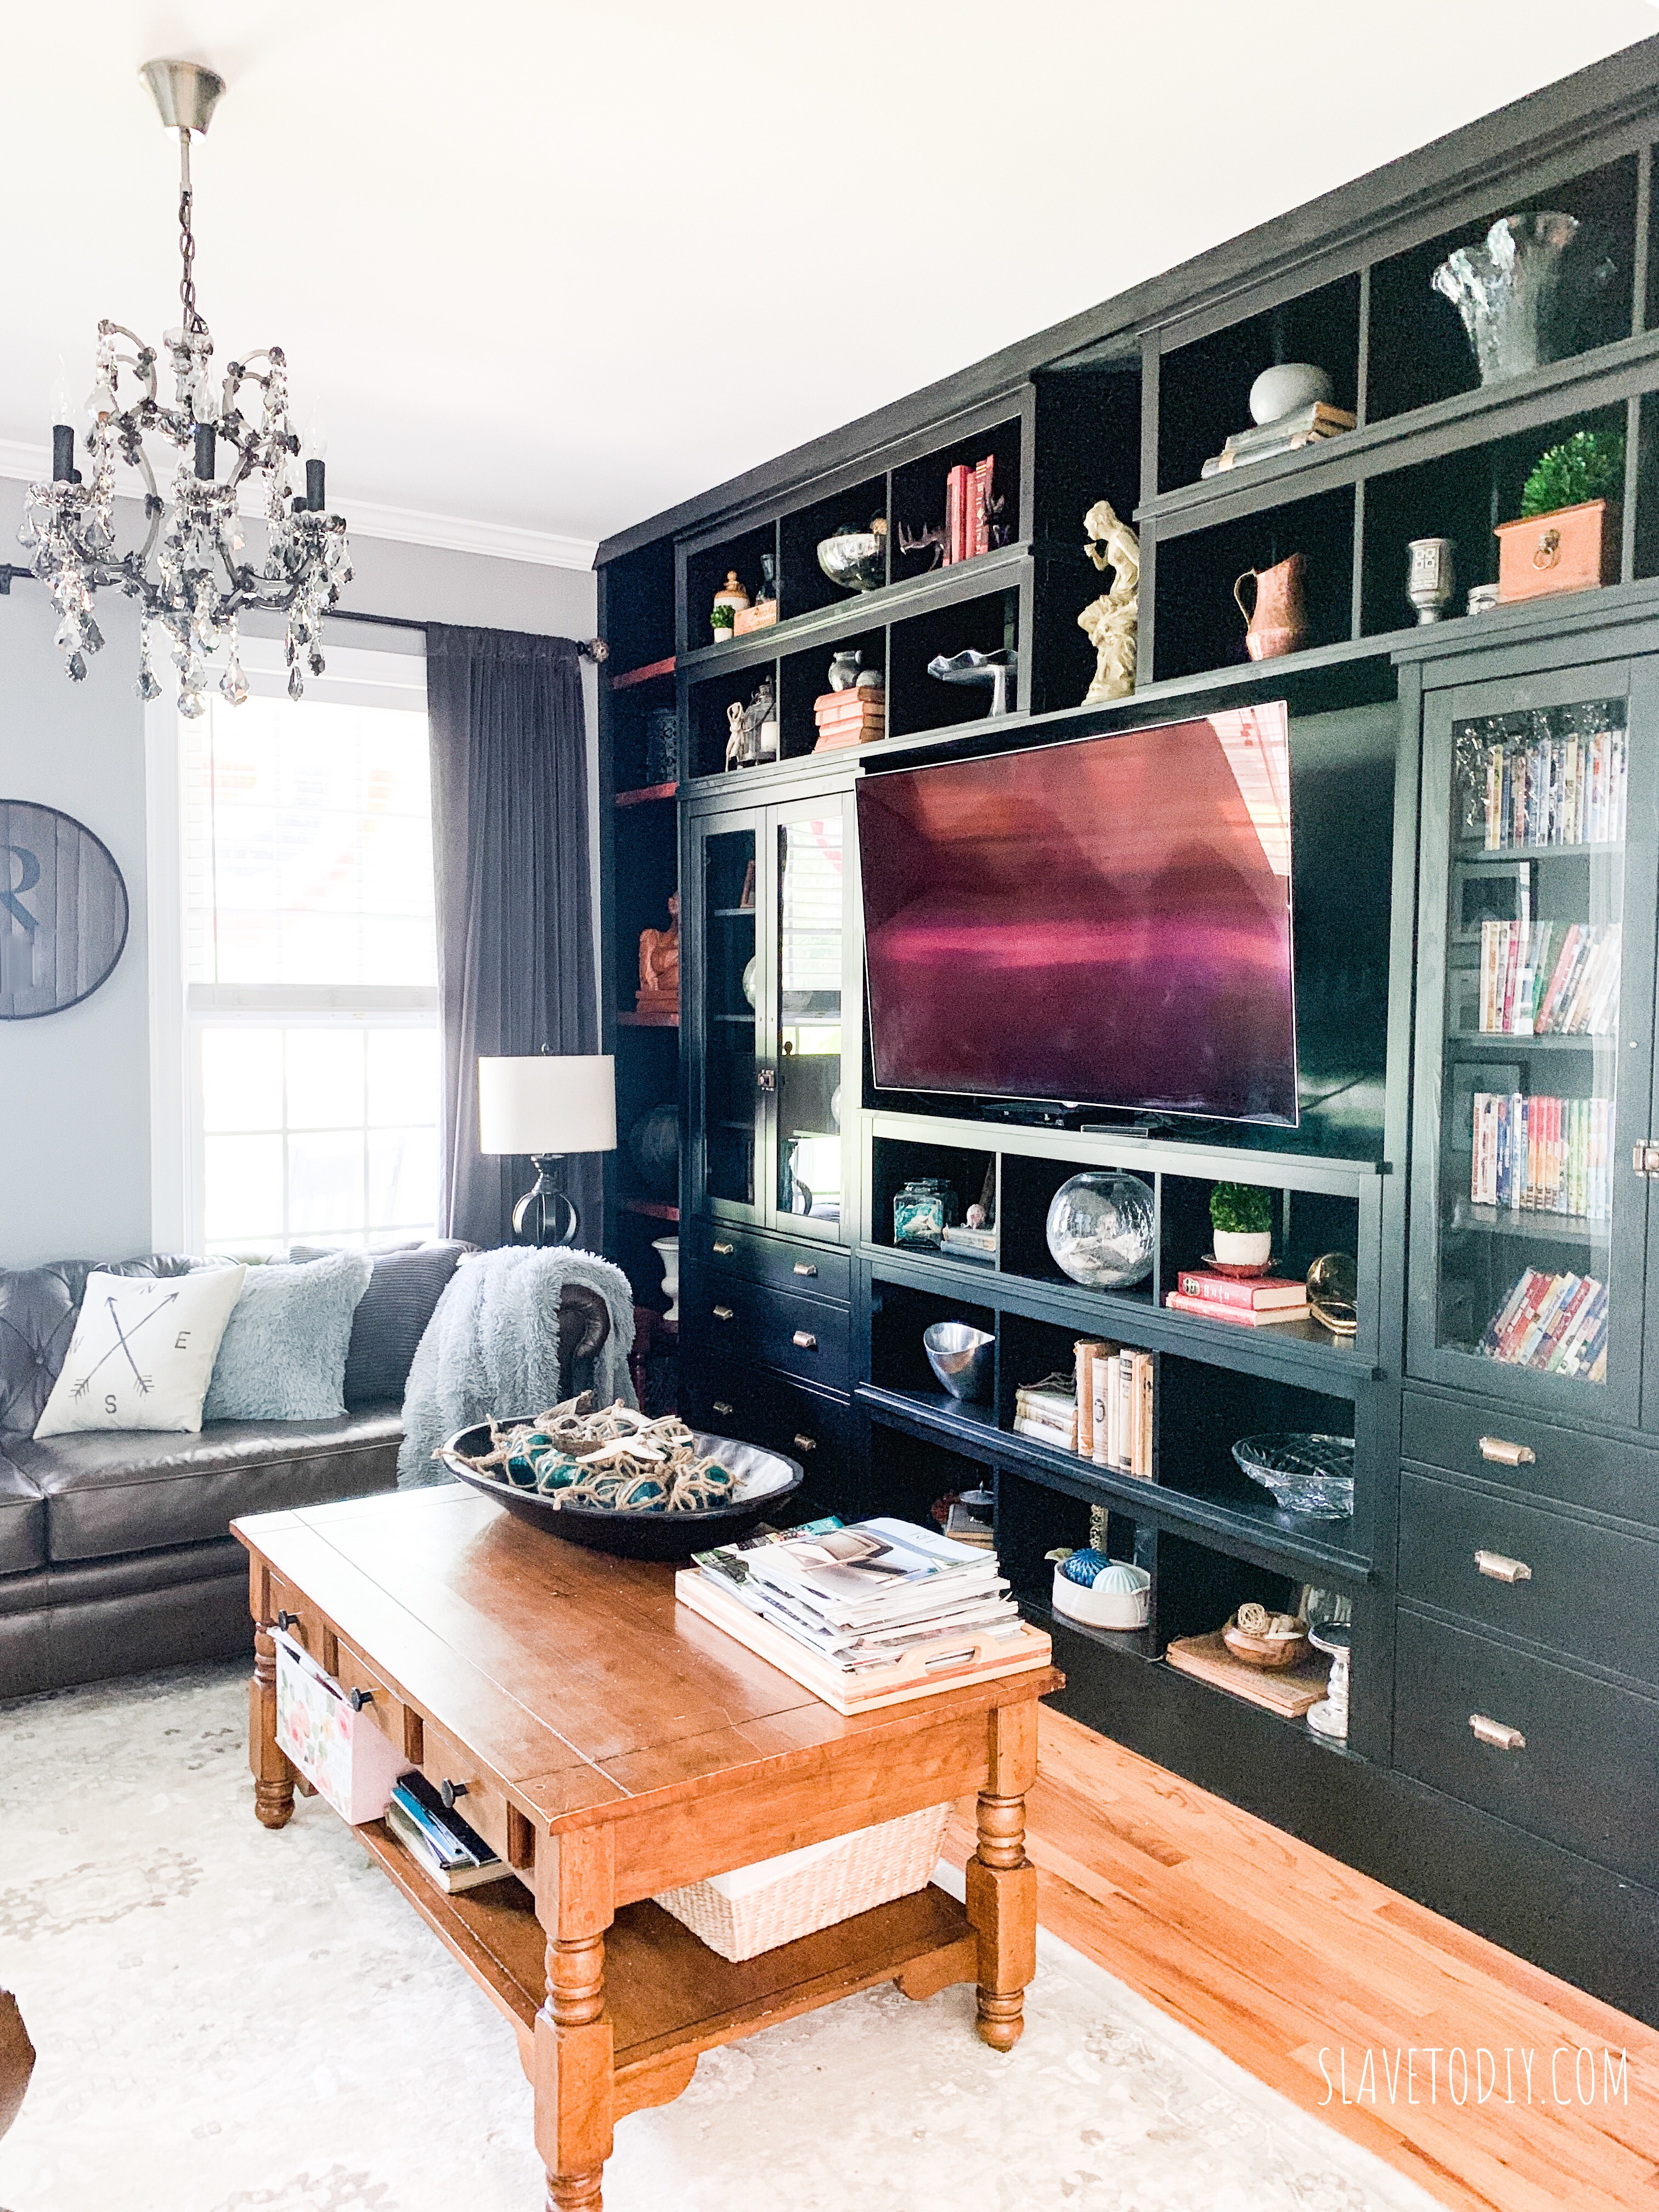
Above are the semi-custom IKEA builtins that Rainman built for me.  You can find the components on the IKEA website  and the tutorial here.

We updated them with Antiqued Brass Bin Pulls and Antique Brass Cabinet Latches from House of Antique Hardware and it really changed the look of the whole unit.  The tutorial is here.

The beautiful, solid (and did I mention heavy) dough bowl is from Pottery Barn, although I’m not totally sure they have this dark wood one anymore.  In it are found driftwood, a starfish, and Japanese Fishing Floats.

The room was designed around the curved television so that it can be viewed well from almost any angle.  Rainman researched and decided on the LG 4H in a curved model.  It’s pretty awesome.

Classic Living Room with black builtins, leather chesterfield sofa from Pottery Barn, and Chandelier from Restoration Hardware

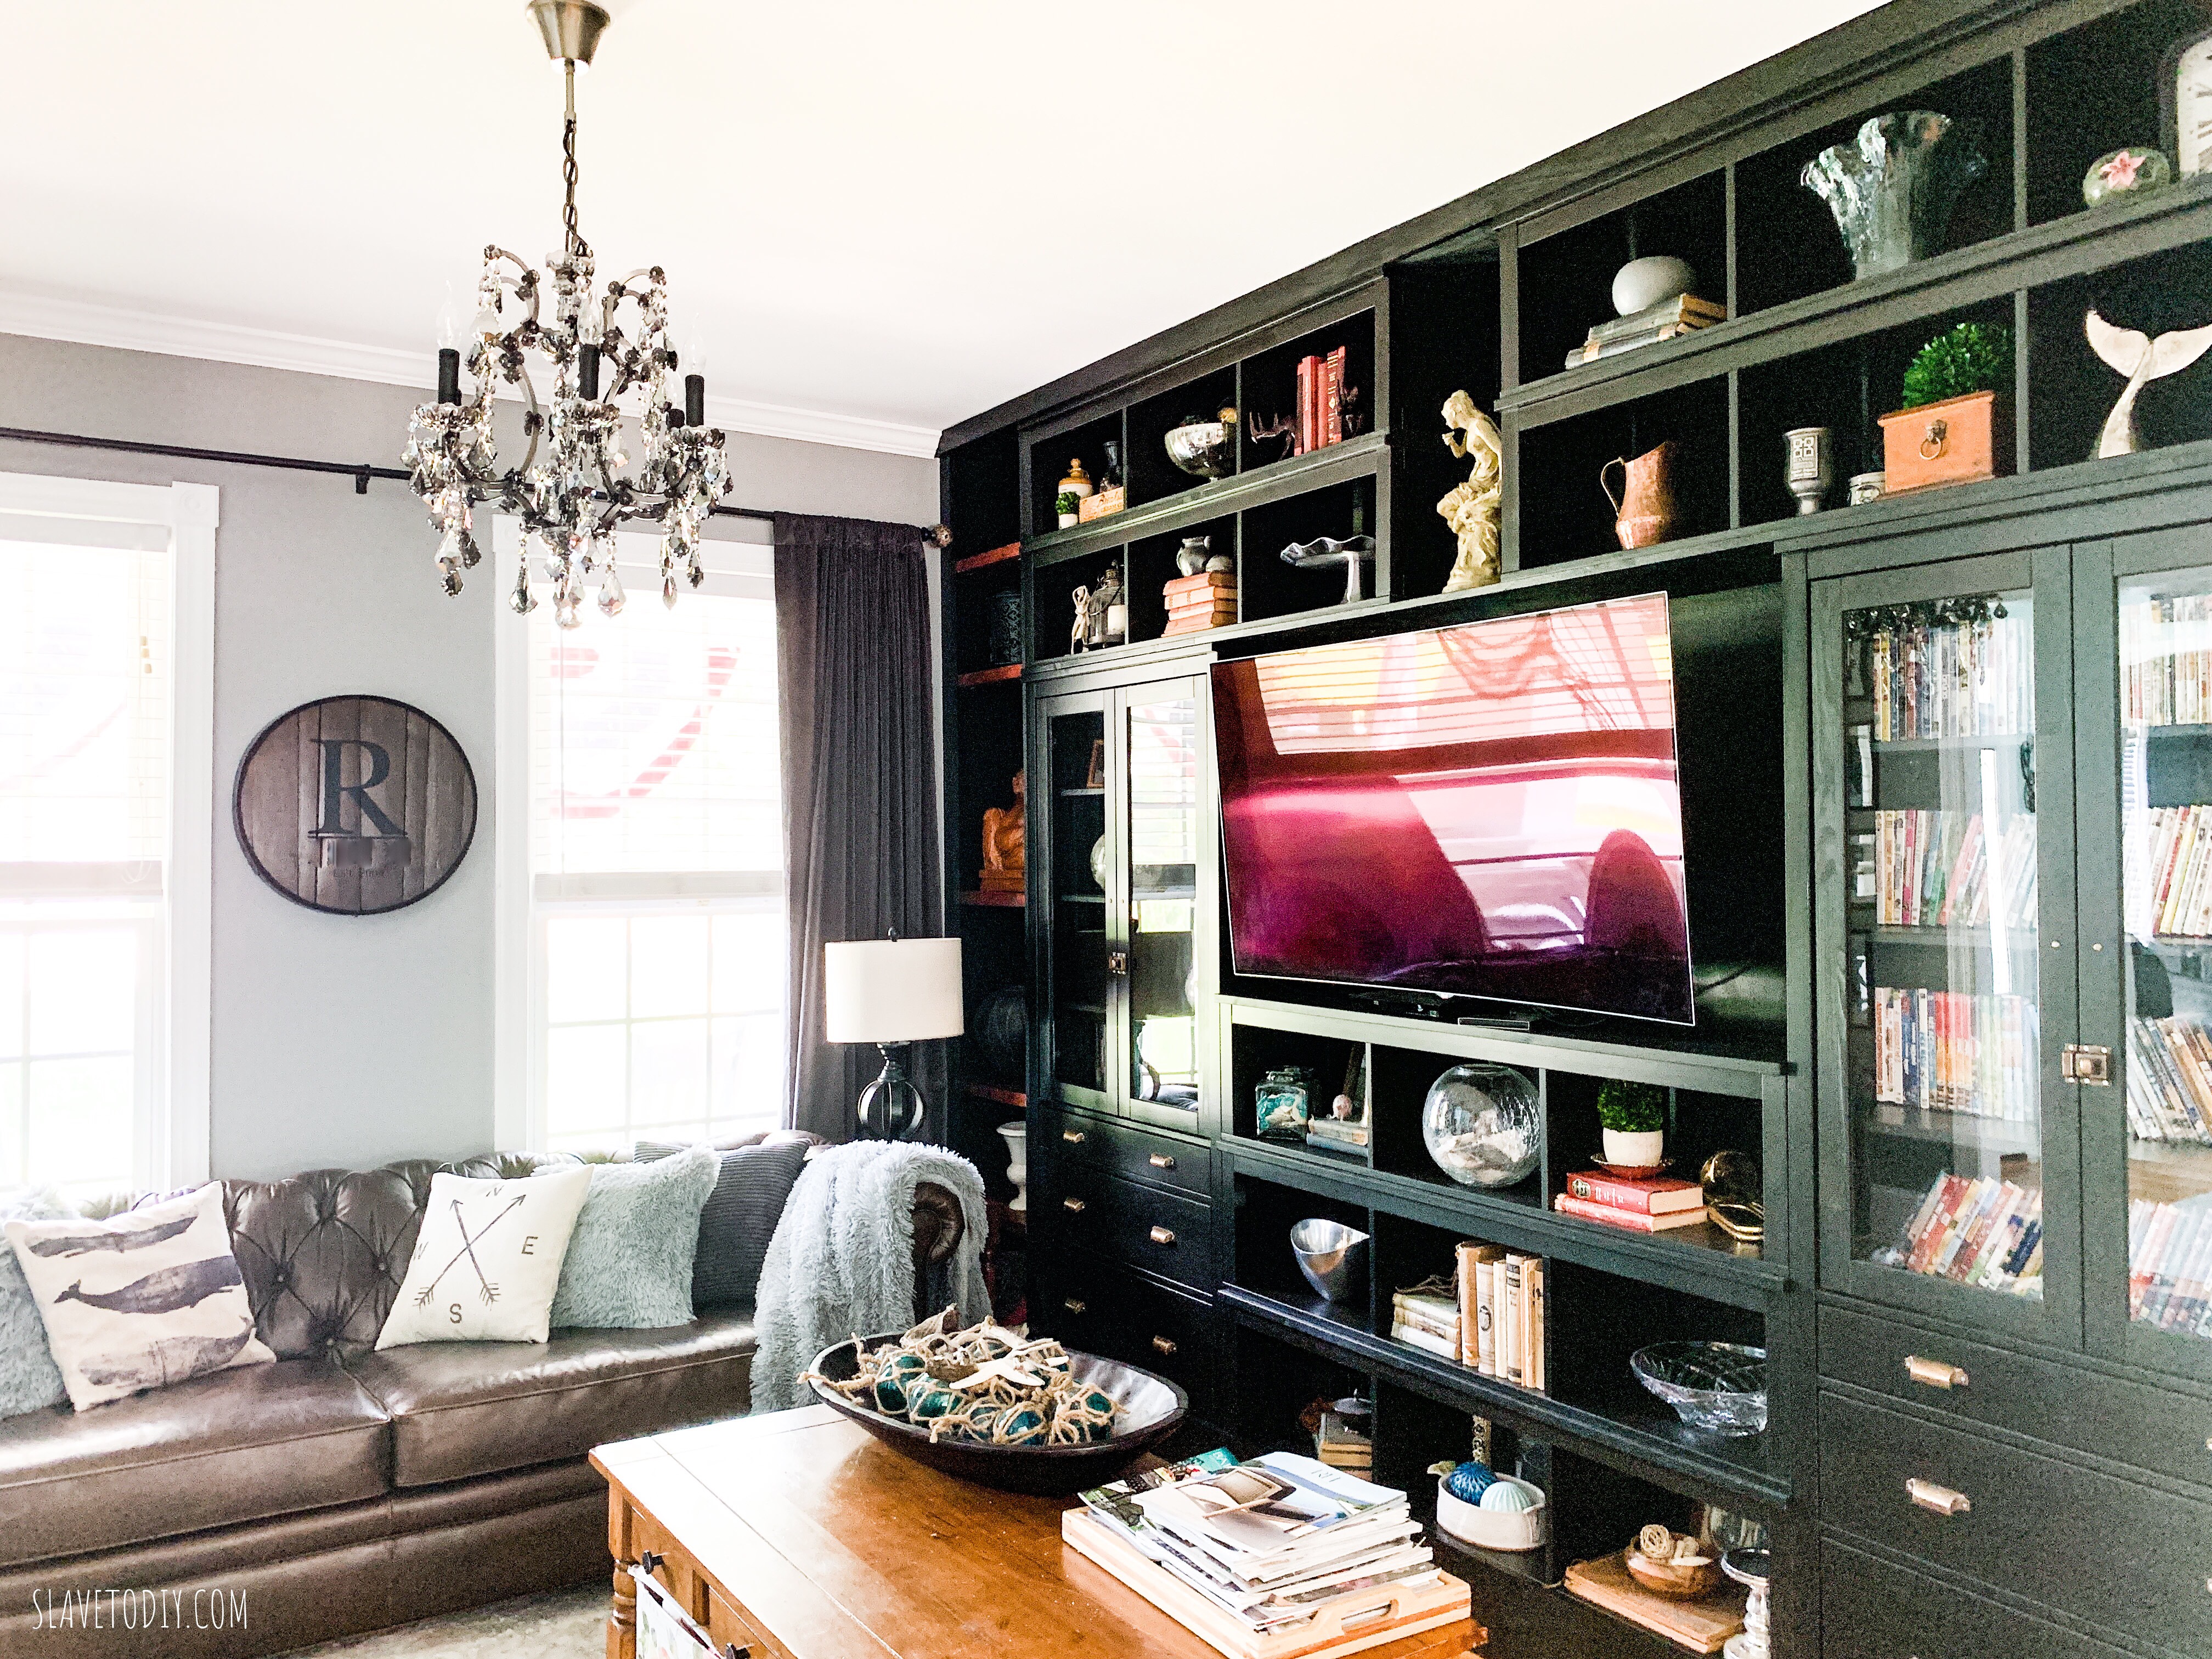
Most of the items in the builtins are things that I’ve collected over the years but there are a few that I’ve purchased recently to fill in just a few areas.  I believe in builtins because you need them, not to arbitrarily spend money for storage and display space that you don’t need.


IKEA black builtins, brick veneer, custom wood shelves flanking the builtins, RH Chandelier

The little punches of green are super important on the builtins and I love getting REAL preserved boxwood.  My artisan of choice is on Amazon and Etsy, Door and Decor.  The wreath below is from her, also, and her work is stunning.  The prices are slightly less than West Elm or other online vendors and her creations are far superior.


Rainman’s chair, with Kim Taylor Reece photography in Koa wood frames, Preserved Boxwood Wreath from DoorandDecor (Etsy)

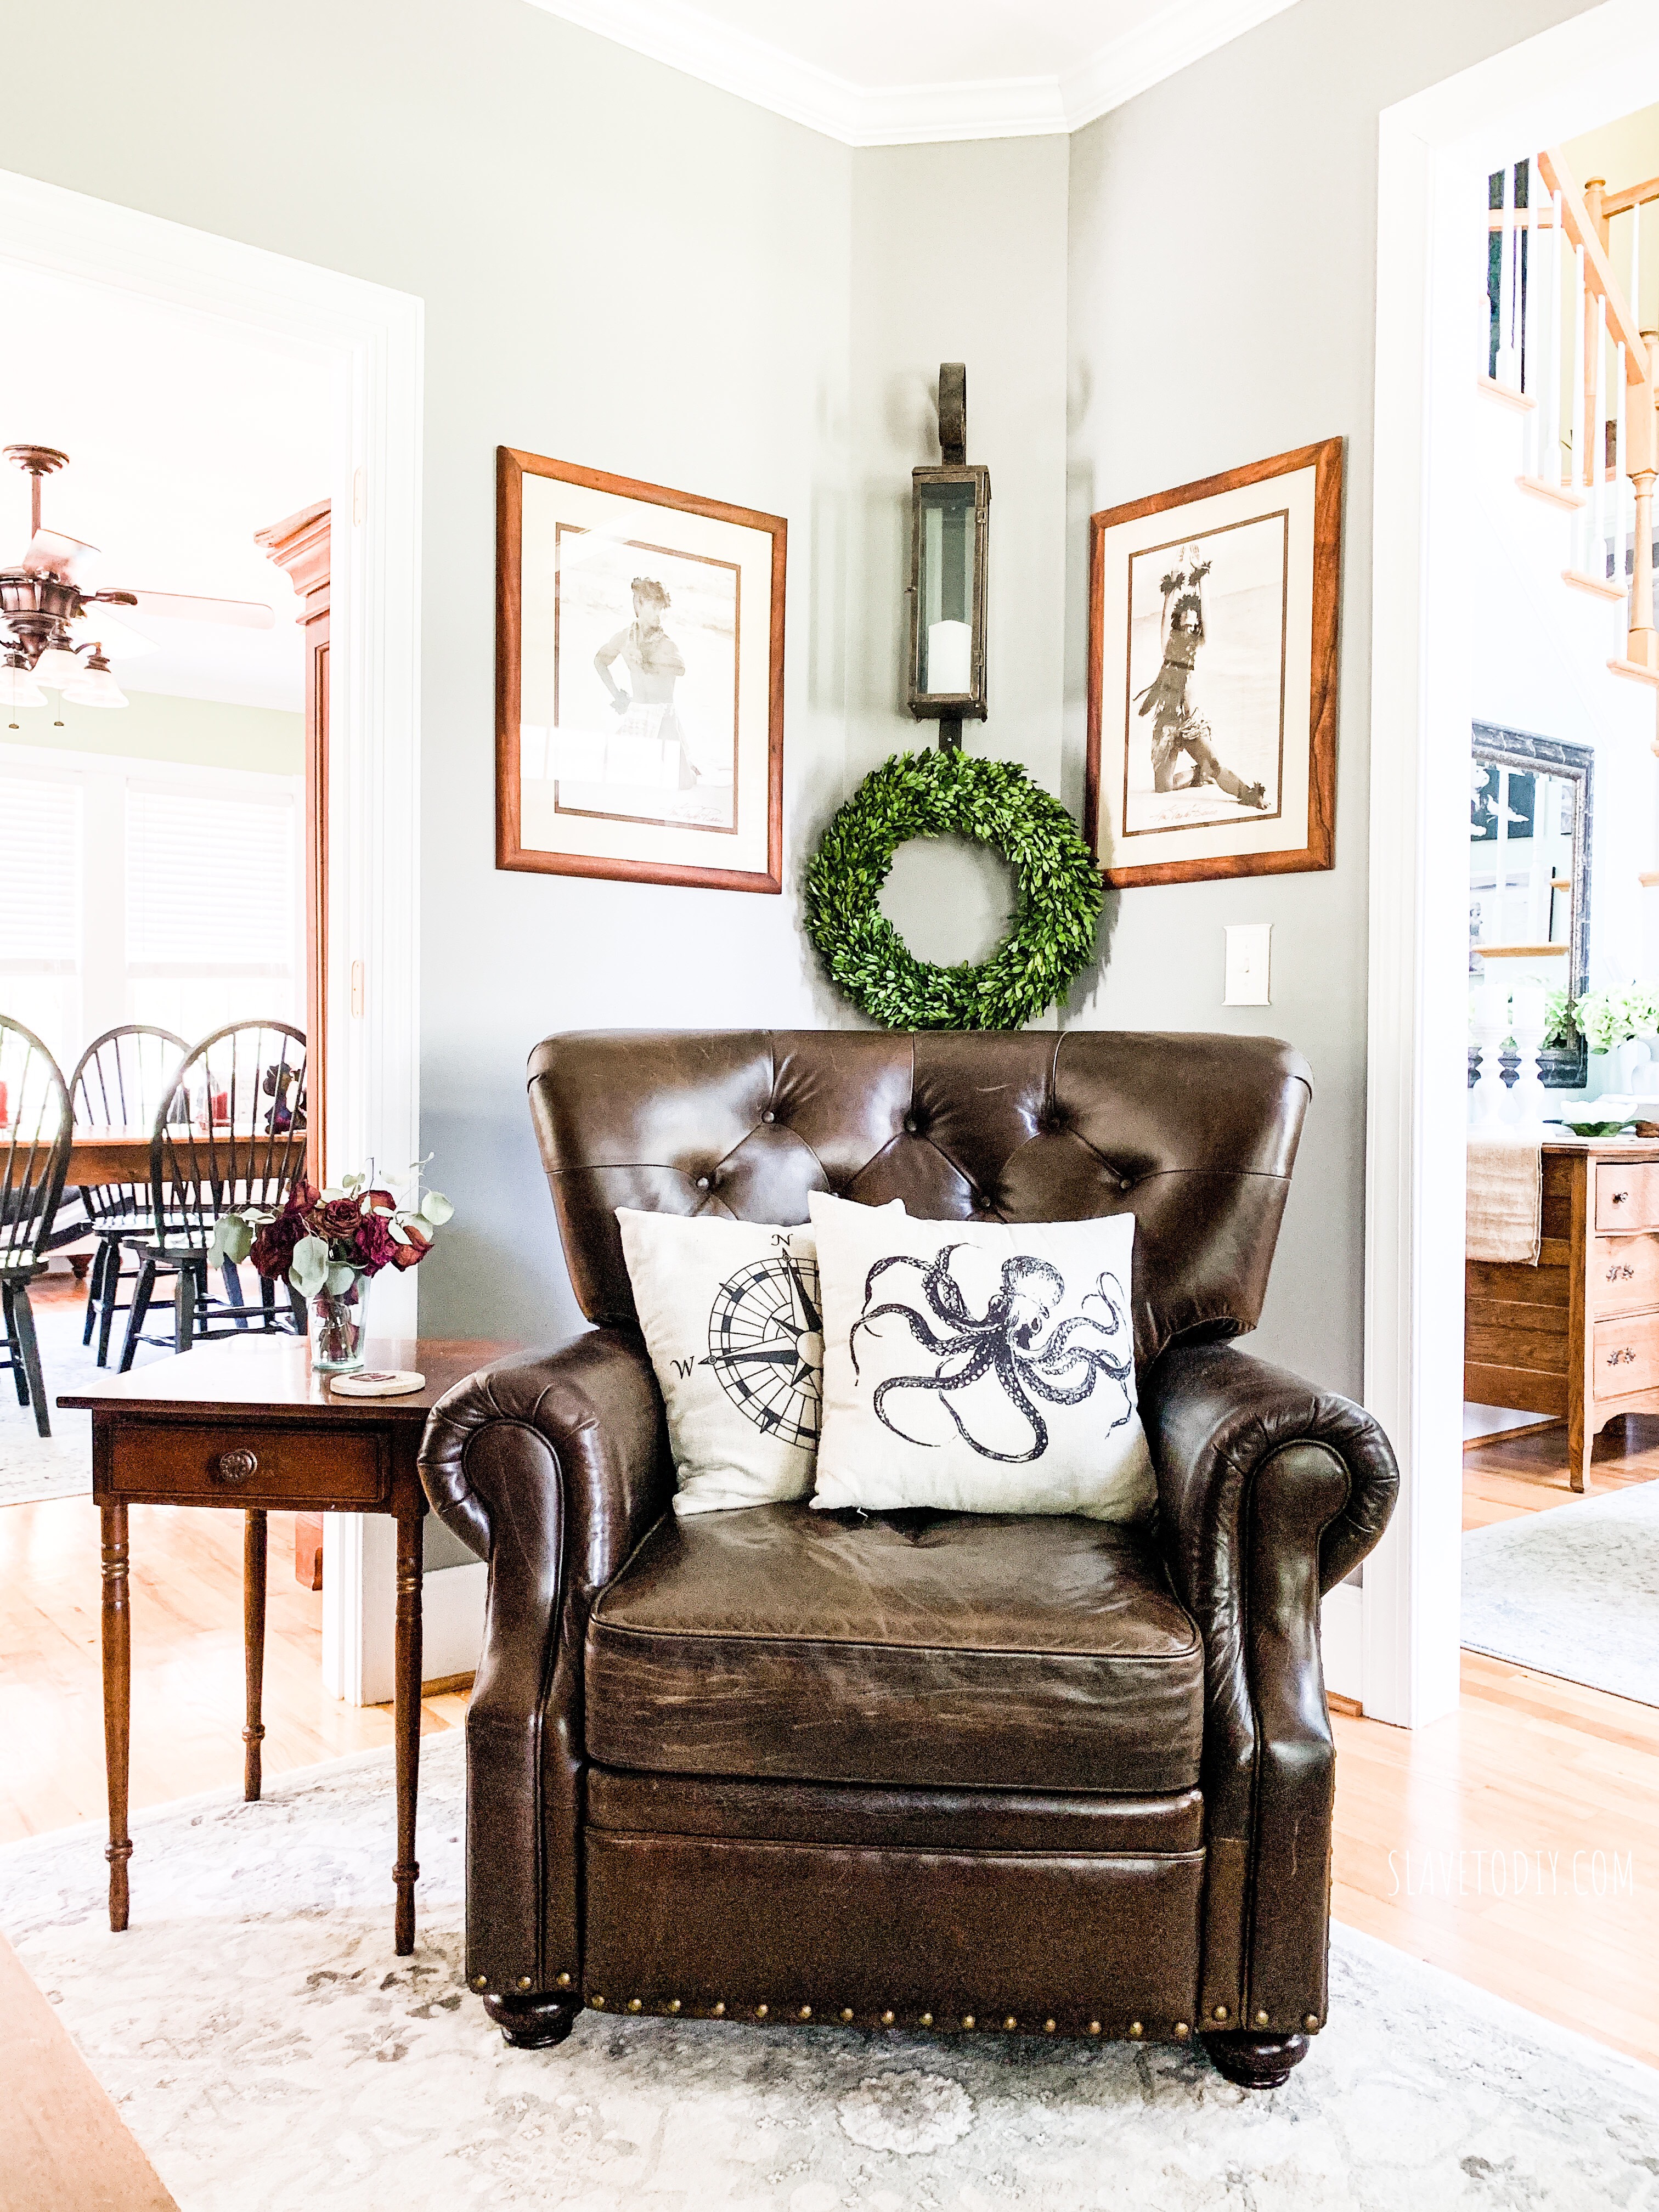
To match the chesterfield sofa, we purchased the Lansing Leather Recliner in Vintage Cocoa from Pottery Barn.

The tutorial for the dried rose arrangement is here and the table is an antique hand me down from my mom.

The Octopus Pillow Cover and Compass Rose Pillow cover are both from Amazon.  The lantern looks very nice but I wasn’t super excited about the construction, so I won’t recommend it.

So glad you came to check out our finished adult living room!  Thanks for stopping by and check out our other updates, projects, and design inspiration on our Blog.  Cheers!

*Legal stuff:

I am honest about my experiences with different products and write because I enjoy it.  I do however, have the opportunity to earn money for my writing, also.

Slavetodiy.com is a participant in the Amazon Services LLC Associates Program, an affiliate advertising program designed to provide a means for sites to earn advertising fees by advertising and linking to amazon.com.  Amazon offers a small commission on products sold through their affiliate links.  Each of your purchases via our Amazon affiliation links supports our cause at no additional cost to you.

If a blogger links to an Amazon product (with a special code for affiliates embedded in the link), and a reader places an item in their “shopping cart” through that link within 24 hours of clicking the link, the blogger gets a small percentage of the sale.  Amazon links are not “pay per click.”  If you click on the product link and stay around Amazon and purchase something else, however, I will get a commission on that sale.

Slavetodiy.com is also a VigLink affiliate advertiser which works similarly.

DIY Stonewall: Stacked Stone Fieldstone Hydrangea and Rose Garden

For those of you have been following our progress, you know I was mortified that we hadn’t completed the front garden project.  We did a massive, beautiful stacked stone garden around the front porch but the garden along the walk leading from the driveway to the front door was still sad, neglected, and downright awful.

*This post may contain affiliate links. Please see full disclosure at the end of the post.

This is the “after,” but it took a few weeks to get there, working a little bit each day:

c7d75b0b-7267-4a96-a7f7-bac089aee829


So, this is what that “garden” looked like before I finally insisted Rainman go buy me some rocks (like we didn’t already have enough on our plates).  We had already cleared for the future patio and had deposited excess dirt into it, piled up around the bushes, with the bonus of random pavers that braced Christmas lights.  Just beautiful.  Sigh.

638dbc3e-57ec-4285-91b0-fb9467c6cd9e
Before.  Awful, unfinished landscaping project.

Ugh.  It’s really bad.  Please look away.

View from the porch of the bad garden.

The sand-base is the home of the future brick patio.  This is another “before” photo.  So, I’m not going to go into the project as exhaustively as I did on the last one, this is sort of an abbreviated photo tutorial.  For detailed instructions (totally the same process!) check out A Classic Stacked Stone Garden Wall, Phase One and Classic Stacked Stone Garden, Phase Two.  As for this guy, here goes.

Base layer for dry stacked stone garden with gravel and stone.

First we did the base to make sure we had a stable foundation.  We mimicked the curve coming off the steps so the future patio will be the right shape.  We used the bricks since that side will be higher (a step up to the brick patio) and that way we didn’t waste any stone.

Another shot of the base layer in on the dry stacked stone garden.

It didn’t occur to me at this point what was really bothering me.  But, I’ll get to that.

The curve around the Crepe Myrtle with stacked stone garden base

I really love this gentle curve around the end of the garden.  It’s a great shape.

Another shot of the rock base for the dry stack stone garden wall.

This shows how the base took shape.

Dry Stacked Stone Garden wall going in.

So, I was standing there looking at it: this future garden and Rainman asks me a simple question.  “You don’t like those bushes do you?”  And, of course, that was exactly what was bothering me.  It would’ve been WAY more simple if I had asked him to remove them BEFORE I began the wall installation, but he didn’t even fuss at me.

Dry Stacked Stone Garden wall taking shape.

So, the deal with the garden wall installations is that Rainman can’t help.  It’s sort of like playing tetris, except that the pieces aren’t the same and you have to be a little creative.  It’s an art, really.  So, he did what he could: he broke up the weeds and filled in gravel where I needed it.  He also lugged rocks of various sizes over to where I was working so that I could build faster.  He’s really very awesome, this Rainman of mine.

Leveling the dry stacked stone garden

When we get to this stage of the game, where final leveling is happening, his help, and his eye are essential.  I still don’t let him touch any rocks, but he gets me a line so we can get the wall ready for capstones.

Topsoil going in on the dry stacked stone garden

In order to get the garden ready for capstones and landscaping fabric I needed the rest of the topsoil in so I put the teenagers on duty, running back and forth to the topsoil and mulch place.

Getting dry stacked stone garden levelled and ready for landscaping fabric and mulch.

So, we finally got it mounded where I wanted it, and let it rest overnight with a good soaking rain so we were sure it was good and settled and the levels were where I wanted them.

Dry stacked stone garden with landscaping fabric and capstones going in.

Once the soil was in and mounded the way I wanted, we added landscaping fabric and capstones.  Don’t EVER skip the landscaping fabric.  You’ll be sorry you did.

Dry stacked stone garden complete with mulch and ready to plant!

Once we had the landscaping fabric and capstones in, it only took two scoops of mulch to get a nice thick layer.  Now I could really look at my blank palette and make plant decisions.

Enter a caption

This little tree frog took up residence on one of the porch columns and kept us company almost the whole project.


Dry stacked stone garden from the driveway.

This is a shot of the garden from the driveway.

Both dry stacked field stone gardens together and finished!

For the tutorial on step-by-step stacked stone garden wall installation see our blog post here.

The total cost on this section of the garden was:

  • 2 pallets of stone: $610
  • Gravel base scoop: $37.36
  • 2 Sta Green Ultimate Weed Barrier: $70
  • Landscaping Fabric Pins (leftover from another project)
  • Two Scoops Mulch: $74.72
  • Four Incrediball Hydrangea and a Rose Bush from Spring Hill Nurseries: $147.55
  • Seven Scoops Topsoil: $134.54
  • Total: $1074.17

Can you imagine how much it would’ve cost to hire someone to do this?  I’m not saying it’s easy, but it IS a project you can do one afternoon at a time.  And it’s VERY, VERY satisfying and rewarding to see what a beautiful thing you created.

Thanks for reading along and check out more of our projects on our blog.  Cheers!


*Legal stuff:

I am honest about my experiences with different products and write because I enjoy it.  I do however, have the opportunity to earn money for my writing, also.

Slavetodiy.com is a participant in the Amazon Services LLC Associates Program, an affiliate advertising program designed to provide a means for sites to earn advertising fees by advertising and linking to amazon.com.  Amazon offers a small commission on products sold through their affiliate links.  Each of your purchases via our Amazon affiliation links supports our cause at no additional cost to you.

If a blogger links to an Amazon product (with a special code for affiliates embedded in the link), and a reader places an item in their “shopping cart” through that link within 24 hours of clicking the link, the blogger gets a small percentage of the sale.  Amazon links are not “pay per click.”  If you click on the product link and stay around Amazon and purchase something else, however, I will get a commission on that sale.

Slavetodiy.com is also a VigLink affiliate advertiser which works similarly.

6 Household Items You Can Stop Spending Money On Right Now

Every month I get a delivery from Amazon of stuff I need to reorder. Every month. One month it occurred to me: Do I really need all this disposable stuff? The answer is easy. No. So I found easy, eco friendly substitutions for almost all of the items, and started saving upwards of $100 a month.

Every little step we take trying to be more frugal, and to throw fewer things away, ultimately saves us money and helps the environment just a little bit. It’s a matter of changing our minds, our habits, and teaching our children to do the same.

*This post may contain affiliate links. Please see full disclosure at the end of the post.

Here are the items I dropped from my monthly purchase list and what I replaced them with (most replacements are a one time purchase):

1) Dryer Sheets- $5.98 a month

Replace with wool dryer balls and essential oils.  That’s a one time purchase of like eight bucks for the dryer balls, and you can stop buying boxes of dryer sheets.  Less packaging waste, cardboard, money saved!  Plus I get to use all those essential oils I bought and haven’t used, so now I’m in there mixing scents like a boss. Boom.

8db77386-2d96-4bec-a178-0c42346cbe30
Wool dryer balls and essential oils replace disposable dryer sheets like a dream

Speaking of essential oils, we also stopped buying plug-in scents, because we already have the essential oils and diffusers.  Free up your outlets and get a healthier option with WAY less waste and cost by using an essential oils diffuser/humidifier.

IMG_2335
Lighted diffuser/humidifier replaces disposable plug in scents

2) Paper towels (or drastically reduce their use)- $38.84 a month (big families use a lot of these!!!)

At the dining table: Replace with cloth napkins.  Dude, you’re doing laundry, anyway.  My laundry is always moving, so throwing these in with an existing load costs you nothing (plus, my kids think we’re all fancy now eating with cloth napkins at dinner). They’re inexpensive and hold up well to frequent washing.  I went with black for everyday use to best hide stains.

For kitchen clean-up: Replace with bar towels.  I get that there are some things you don’t want to put into your washing machine.  I’m not cleaning up dog mess or cat vomit with these, but I figured out that most messes I was using paper towels to clean up, I could totally use bar towels (and they can be washed quickly with existing loads just like the cloth napkins).  These are rough, inexpensive flour sack towels and I love them.

IMG_2329
White flour sack towels for kitchen clean up

3) Ziploc bags $9.48 a month, gallon size $19.20 a month

Left-overs and refridgerator items: Replace with Glass Pyrex Containers.  I have two sets of these and they are one of my favorite things in the kitchen.  YOU DON’T NEED THOSE BAGGIES!  (I cringe thinking of how many baggies I’ve used over the years that should’ve gone into a covered glass container).  I love that all my little leftovers are super easy to see and they stack nicely in the fridge.  I also send them to work with Rainman and the containers don’t get ruined by spaghetti sauce because they’re glass.

For pantry storage (dried goods) I use salvaged (re-used) jars.

23a8d68f-b1c2-4c54-b64c-8ba19b5a1ba0
My temporary pantry with Anchor Hocking Jars for large storage and upcycled jars for dried goods

For freezer bags: Replace with reusable silicone bags or other containers.  It doesn’t take any more effort to use these for pre-prepped freezer meals, and it’s so worth it.  And I don’t have to buy the disposable bags anymore.  This was one of the things I worried about MOST with transitioning away from baggies: RE-storing my meat, premade meals, soups, etc in the freezer, but they work GREAT, and seal well also.  The baggy below is the medium sized silicone bag with frozen tomoto soup stored in it. I have never had a leak and they are top rack dishwasher safe.

IMG_2328
Re-usable silicone bags for freezer and fridge storage

Below is a collection of my jars ready to hold odds and ends that would normally go in plastic baggies.  We use them for everything from chocolate chips, to nuts, to leftover sauces.

6b542e6c-c049-42c2-8111-9361db44bd19-1
Up-cycled jars for pantry dried goods

4) Plastic bags for your produce at the grocery store and grocery shopping bags

These are the WORST!  They can’t be recycled!  Replace with green produce bags, you can bring them to the store with you to get your produce: win, win. They really, for real make your produce last longer. That saves you even more money.  And you don’t have to throw those non-recyclable produce bags in the trash.

Disposable bags are easily replaced with buying Reusable Grocery Bags one time (many areas are banning single use plastic bags altogether).  These are inexpensive, washable, and foldable so they store nicely.

c2e2e274-492f-4212-a479-dfa4e4f64209
Green produce bags REALLY work

5) Disposable Spaghetti Sauce Containers

Replace with Classico Sauces… But, dude. Did you know that Classico Sauces are intentionally made in reusable containers? It is actually our favorite sauce anyway, but I keep all of the containers and use them for storing nuts, etc. Why buy containers when these are basically free?  After we use them, I soak the label off, run them through the dishwasher, and voila, free storage container.  By the way, this is one of the items that I buy in Prime Pantry that is quite a bit cheaper than my local grocery store.

d6490e80-93b6-4184-a938-cb96d31c2195
Re-usable Classico Jars

In other news, my son just got home from school and busted me taking pictures of spaghetti sauce.

By the way, I definitely think that re-claimed glass jars make for Pinterest-worthy pantries and they’re FREE.

5ba725a0-2ae4-4114-ab98-269d5851c8cd-1

One of the most important parts of the DIY process for us is trying to find ways to reuse items and make our home as self-sustaining as possible.  It’s a long journey but I’m happy to share so we can work toward helping our wallets and our planet!

For more on where to find free jars and the best oversized pantry jars for all your dried goods, check out our post on The Best Upcycled and New Jars For Your Farmhouse Pantry!

As a bonus to helping out your wallet, one of the most important steps in reducing your household waste (less carbon going to the landfill), is composting.  My compost container sits right in front of my chopping board, and it gets emptied into it’s bigger partner that lives outside when it’s full. And what do I get? Free fertilizer!  This one is super cool because it has charcoal filters that prevent the smell from escaping, which is fairly important.

6 Household Items You Can Stop Spending Money On Right Now

I have two of these, different brands, but I’m pretty sure they’re all the same manufacturer:

And the big compost bin for outside (I like mine enclosed so it doesn’t stink up the backyard but a bin that you stir occasionally works just as well):


Cheers to taking steps toward saving money and creating a sustainable household! Check out more of our DIY, project, and inspiration posts over on our blog.  Cheers!

*Legal stuff:

I am honest about my experiences with different products and write because I enjoy it.  I do however, have the opportunity to earn money for my writing, also.

Slavetodiy.com is a participant in the Amazon Services LLC Associates Program, an affiliate advertising program designed to provide a means for sites to earn advertising fees by advertising and linking to amazon.com.  Amazon offers a small commission on products sold through their affiliate links.  Each of your purchases via our Amazon affiliation links supports our cause at no additional cost to you.

If a blogger links to an Amazon product (with a special code for affiliates embedded in the link), and a reader places an item in their “shopping cart” through that link within 24 hours of clicking the link, the blogger gets a small percentage of the sale.  Amazon links are not “pay per click.”  If you click on the product link and stay around Amazon and purchase something else, however, I will get a commission on that sale.

Slavetodiy.com is also a VigLink affiliate advertiser which works similarly.

RH Restoration Hardware 19th C. Rococo Iron & Crystal Round Chandelier Product Review

Did you notice that it’s super hard to find reviews on RH light fixtures (or anything else Restoration Hardware sells)? I have to tell you, I was a little afraid… the shroud of secrecy surrounding the quality of the items, and lack of happy customer (or any) reviews, left me feeling a bit wary. So, I hope I can shed a little light on my RH “experience” and provide an honest review (I still have fear about a hypothetical RH strong arm guy coming to bust my knee caps, but here goes…): oh, by the way. I’m not an affiliate. I think their snobbery prevents affiliatery (dude, that’s not a word, I just made it up), so you can be sure of my unadulterated, completely honest opinion.

*This post may contain affiliate links. Please see full disclosure at the end of the post.

First, let’s be totally up front. Restoration Hardware’s marketing team and strategy are second to none. They are selling class. Period. It’s unbelievably brilliant and diabolically well executed. Every purchase says: welcome to the champagne life. But, is it true? Are their products that much better?

I’ve had my eye on a light fixture at RH for a while. I visited it at night on their website, shielding my iPad just in case Rainman was just pretending to be asleep and really wanted to know what I was cyber stalking.  Several times I almost caved and bought a knock off (everything that was similar had a lot of chrome, which was too glammy), but I stayed strong and finally bit the bullet. Enter the 19th century rococo chandelier in smoke into my life. It was the perfect piece to complete a recent adult living renovation and I just couldn’t say no.

RH Restoration Hardware 19th C. Rococo Iron & Crystal Round Chandelier Product Review

As we have been busy on a MAJOR DIY deck addition, the box sat unattended for several weeks before my Rainman discovered me looking sad one night and rolled up his sleeves. What we thought would be a simple installation was not quite, but I’ll tell you all about it.

RH Restoration Hardware 19th C. Rococo Iron & Crystal Round Chandelier Product Review

But, first, back to that deck renovation.  So, the deck needed to go in before child-next graduated from high school so there was an appropriately awesome place for his friends to hang out, not inside with all of the boring adults (and no one sued us when they fell through the old, rotting deck).  Surprise, surprise, as we were peeling back siding to install the ledger board, Rainman and my father in law discovered rot.  It went halfway up the back wall and surrounded the door.

RH Restoration Hardware 19th C. Rococo Iron & Crystal Round Chandelier Product Review

This was the same door that eventually I wanted to close in anyway, and was going to have a kitchen cabinet behind it, because we would also rip out windows and install custom steel doors instead.  Nevermind that this other renovation was nowhere near ready to start, financially or otherwise, I was like, “fill it in.”  We’re already doing this, and I’d rather not install a new door that we’re going to take out and close in later.  And, as anyone knows who has DIYed a kitchen reno, there’s no time like the present to start it, and no time like right before you sell the house to finish it!  Needless to say, I was a bully, and Rainman was not happy.

RH Restoration Hardware 19th C. Rococo Iron & Crystal Round Chandelier Product Review

Well, I couldn’t leave the blank wall without a cabinet.  And if you’re going to get the cabinet you might as well get the matching one for the base of the banquette island you planned.  And if you’re already paying the unlimited furniture delivery fee (which is unfortunately $399 in my area because I live out in the sticks), you might as well buy that fixture you’ve had your eye on.  It’s like I was saving us money already. (I feel like I’ve maybe been reading those “If You Give A Mouse A Cookie” books to the little one too much lately).

RH Restoration Hardware 19th C. Rococo Iron & Crystal Round Chandelier Product Review

So, I had my fixture.

RH Restoration Hardware 19th C. Rococo Iron & Crystal Round Chandelier Product Review

Rainman just wanted to make me happy, and generally, fixture hanging is a weekday evening type of deal.  Straightforward and satisfying.  Unless there are like 200 crystals that have to be individually attached.  But, it’s fine… it would be better if there were gloves but they’re not included (I still need to go back and get all of the fingerprints off the crystals). I ordered white cotton gloves from Amazon and they’re ready for me whenever I get to it (there was no way I was stopping progress to wait on gloves).

RH Restoration Hardware 19th C. Rococo Iron & Crystal Round Chandelier Product Review

So, the actual fixture installation was pretty straightforward (although the directions are a bit lacking). I believe the prevailing assumption is that anyone buying this is going to have a pro install it and not their own personal slave Rainman after work one evening, so I guess I get that the wiring diagrams weren’t totally great.  The real kicker was that the number of crystals doesn’t actually match the installation guide and you basically can’t get there from here.  But, it may be that it’s a matter of personal preference how you’d like the crystals to hang, I’m not totally sure.

RH Restoration Hardware 19th C. Rococo Iron & Crystal Round Chandelier Product Review

What I didn’t get from the product info before I received it (and you can’t see in their pictures) is that the body of the fixture is in matte iron – which sort of reminds me of industrial steel beams before they start rusting.  It’s beautiful, just not what I expected.  The black wrought iron seen in some of the pictures is only on the clear crystal option.  I love it just as much, I just figured it was worth noting since it wasn’t entirely apparent to me upfront.

RH Restoration Hardware 19th C. Rococo Iron & Crystal Round Chandelier Product Review

The verdict: (drumroll please) I would ABSOLUTELY recommend the fixture.  It’s gorgeous and dazzling (like, going to need a dimmer), it is the crown jewel in the living room that took it from nice to, OMG-where’d-you-get-that?  I love watching the light dance off of the beautiful smoke crystals in different patterns as the sun moves around the house during the day and the shadows it creates when the sun goes down.  It’s breathtaking.

Although we didn’t have any issues with this particular fixture, there were some blemishes on one of the cabinets.  I offered to have them send me replacement hardware, but as that was out of stock, they send a team to pick up the cabinet and bring me a whole new one.  No trouble, no fuss, no problem.  The customer service is fantastic, and their dedicated delivery teams are super professional and friendly.

Apparently they have some ludicrously good warranty on all of their stuff (which I honestly didn’t know when I hit “play” on the purchase), so even though the products are a bit *cough *cough on the pricey side, we’ll be buying from them again.  It’s well worth the extra money to have heirloom quality pieces.

Thanks for hanging out with us today and check out more of our DIY, projects, and decor on our blog.

Cheers!


*Legal stuff:

I am honest about my experiences with different products and write because I enjoy it.  I do however, have the opportunity to earn money for my writing, also.

Slavetodiy.com is a participant in the Amazon Services LLC Associates Program, an affiliate advertising program designed to provide a means for sites to earn advertising fees by advertising and linking to amazon.com.  Amazon offers a small commission on products sold through their affiliate links.  Each of your purchases via our Amazon affiliation links supports our cause at no additional cost to you.

If a blogger links to an Amazon product (with a special code for affiliates embedded in the link), and a reader places an item in their “shopping cart” through that link within 24 hours of clicking the link, the blogger gets a small percentage of the sale.  Amazon links are not “pay per click.”  If you click on the product link and stay around Amazon and purchase something else, however, I will get a commission on that sale.

Slavetodiy.com is also a VigLink affiliate advertiser which works similarly.