I’ve been dreaming of an antique mirrored backsplash since I first saw it on a simple home bar. The mirrored tiles are everything from one solid sheet, to tiles with beveled edges, to larger flat tiles. When I started researching where to buy the tiles for our own home bar backsplash (because of course I just HAD to have one) I was mortified. Those suckers are expensive. There are some sellers on ETSY selling these for $60 a square foot… which is well out of any budget I’m willing to spend on a backsplash. But look how beautiful they are!
*This post may contain affiliate links. Please see full disclosure at the end of the post.
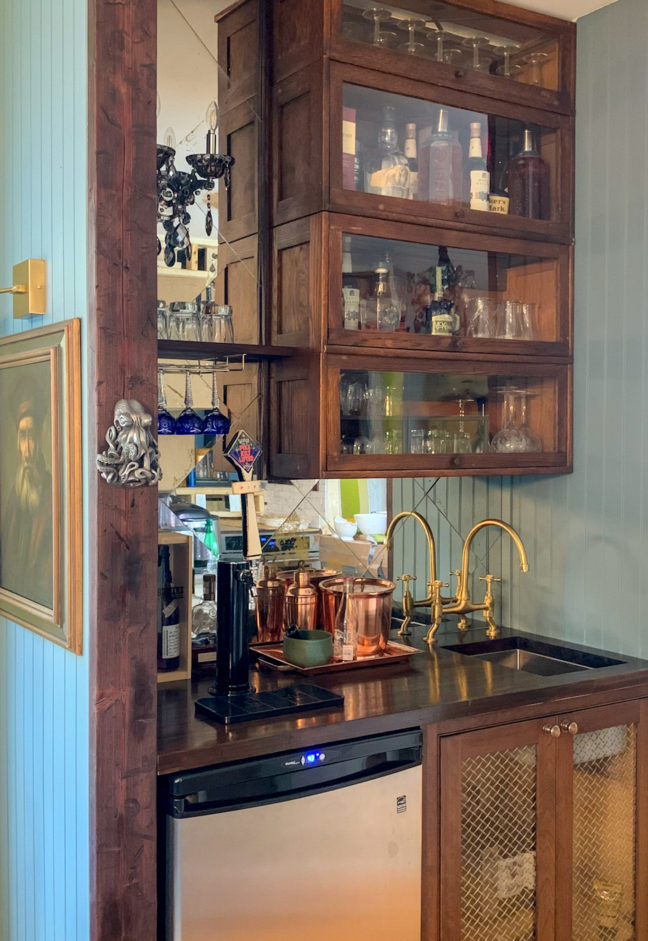
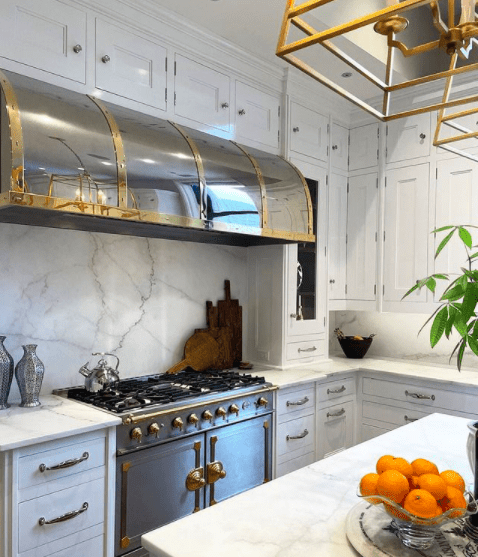
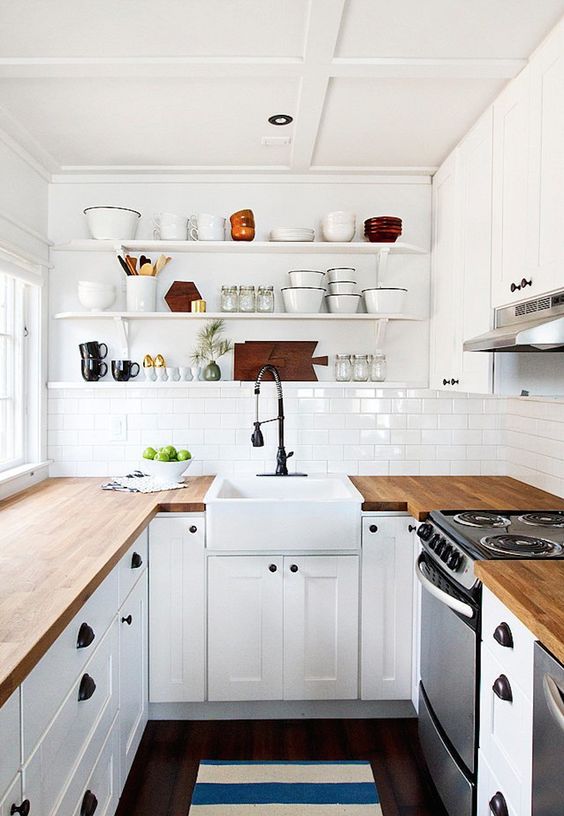
Home bar by @chandosinteriors on Instagram
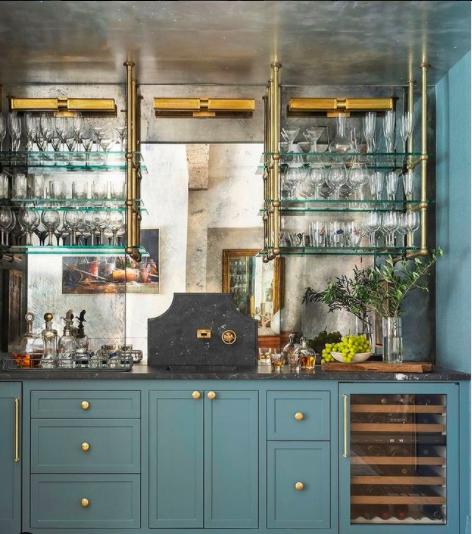
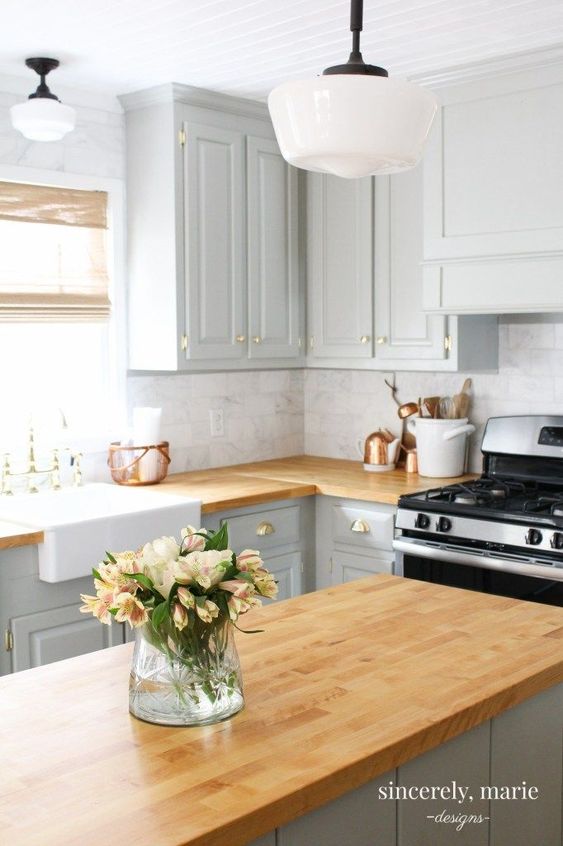
Home bar by @meredithmcbrearty and @eleanor_roper_interiors_style
So, what did we do? We DIYed it (of course). And it came out JUST as dreamy as those designer looks.
Before I start the tutorial, please know that this process is quite labor intensive and makes a huge mess. I recommend doing this with a buddy, a spouse, or a helper (my body was screaming at me for two days after the paint-stripping process because I had underestimated the amount of up and down and crouching). But, what do you get out of it? An awesome, one of a kind backsplash!
I did quite a bit of research and looked at a LOT of pictures before I got out the plastic dropcloth and laid out the mirrors. I encourage you to look at the finished photos of ours and adjust your plan accordingly. I wanted a lighter antiqued look with a glow… but if you want more antiquing, or a different color underneath, it will still look great!
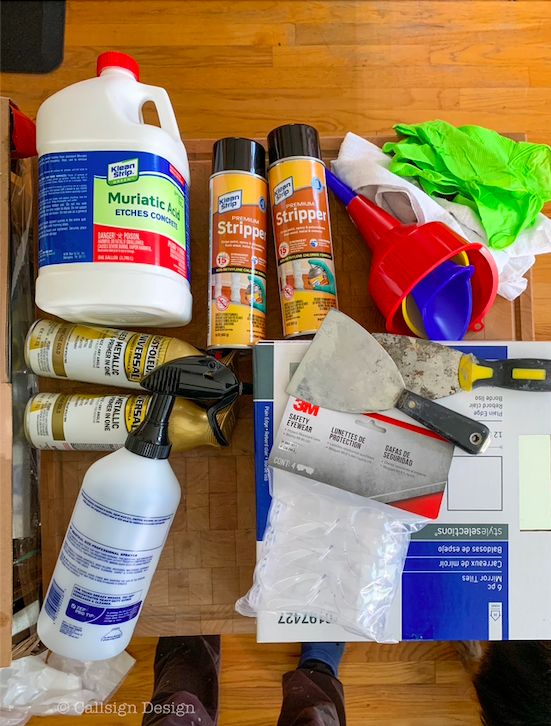
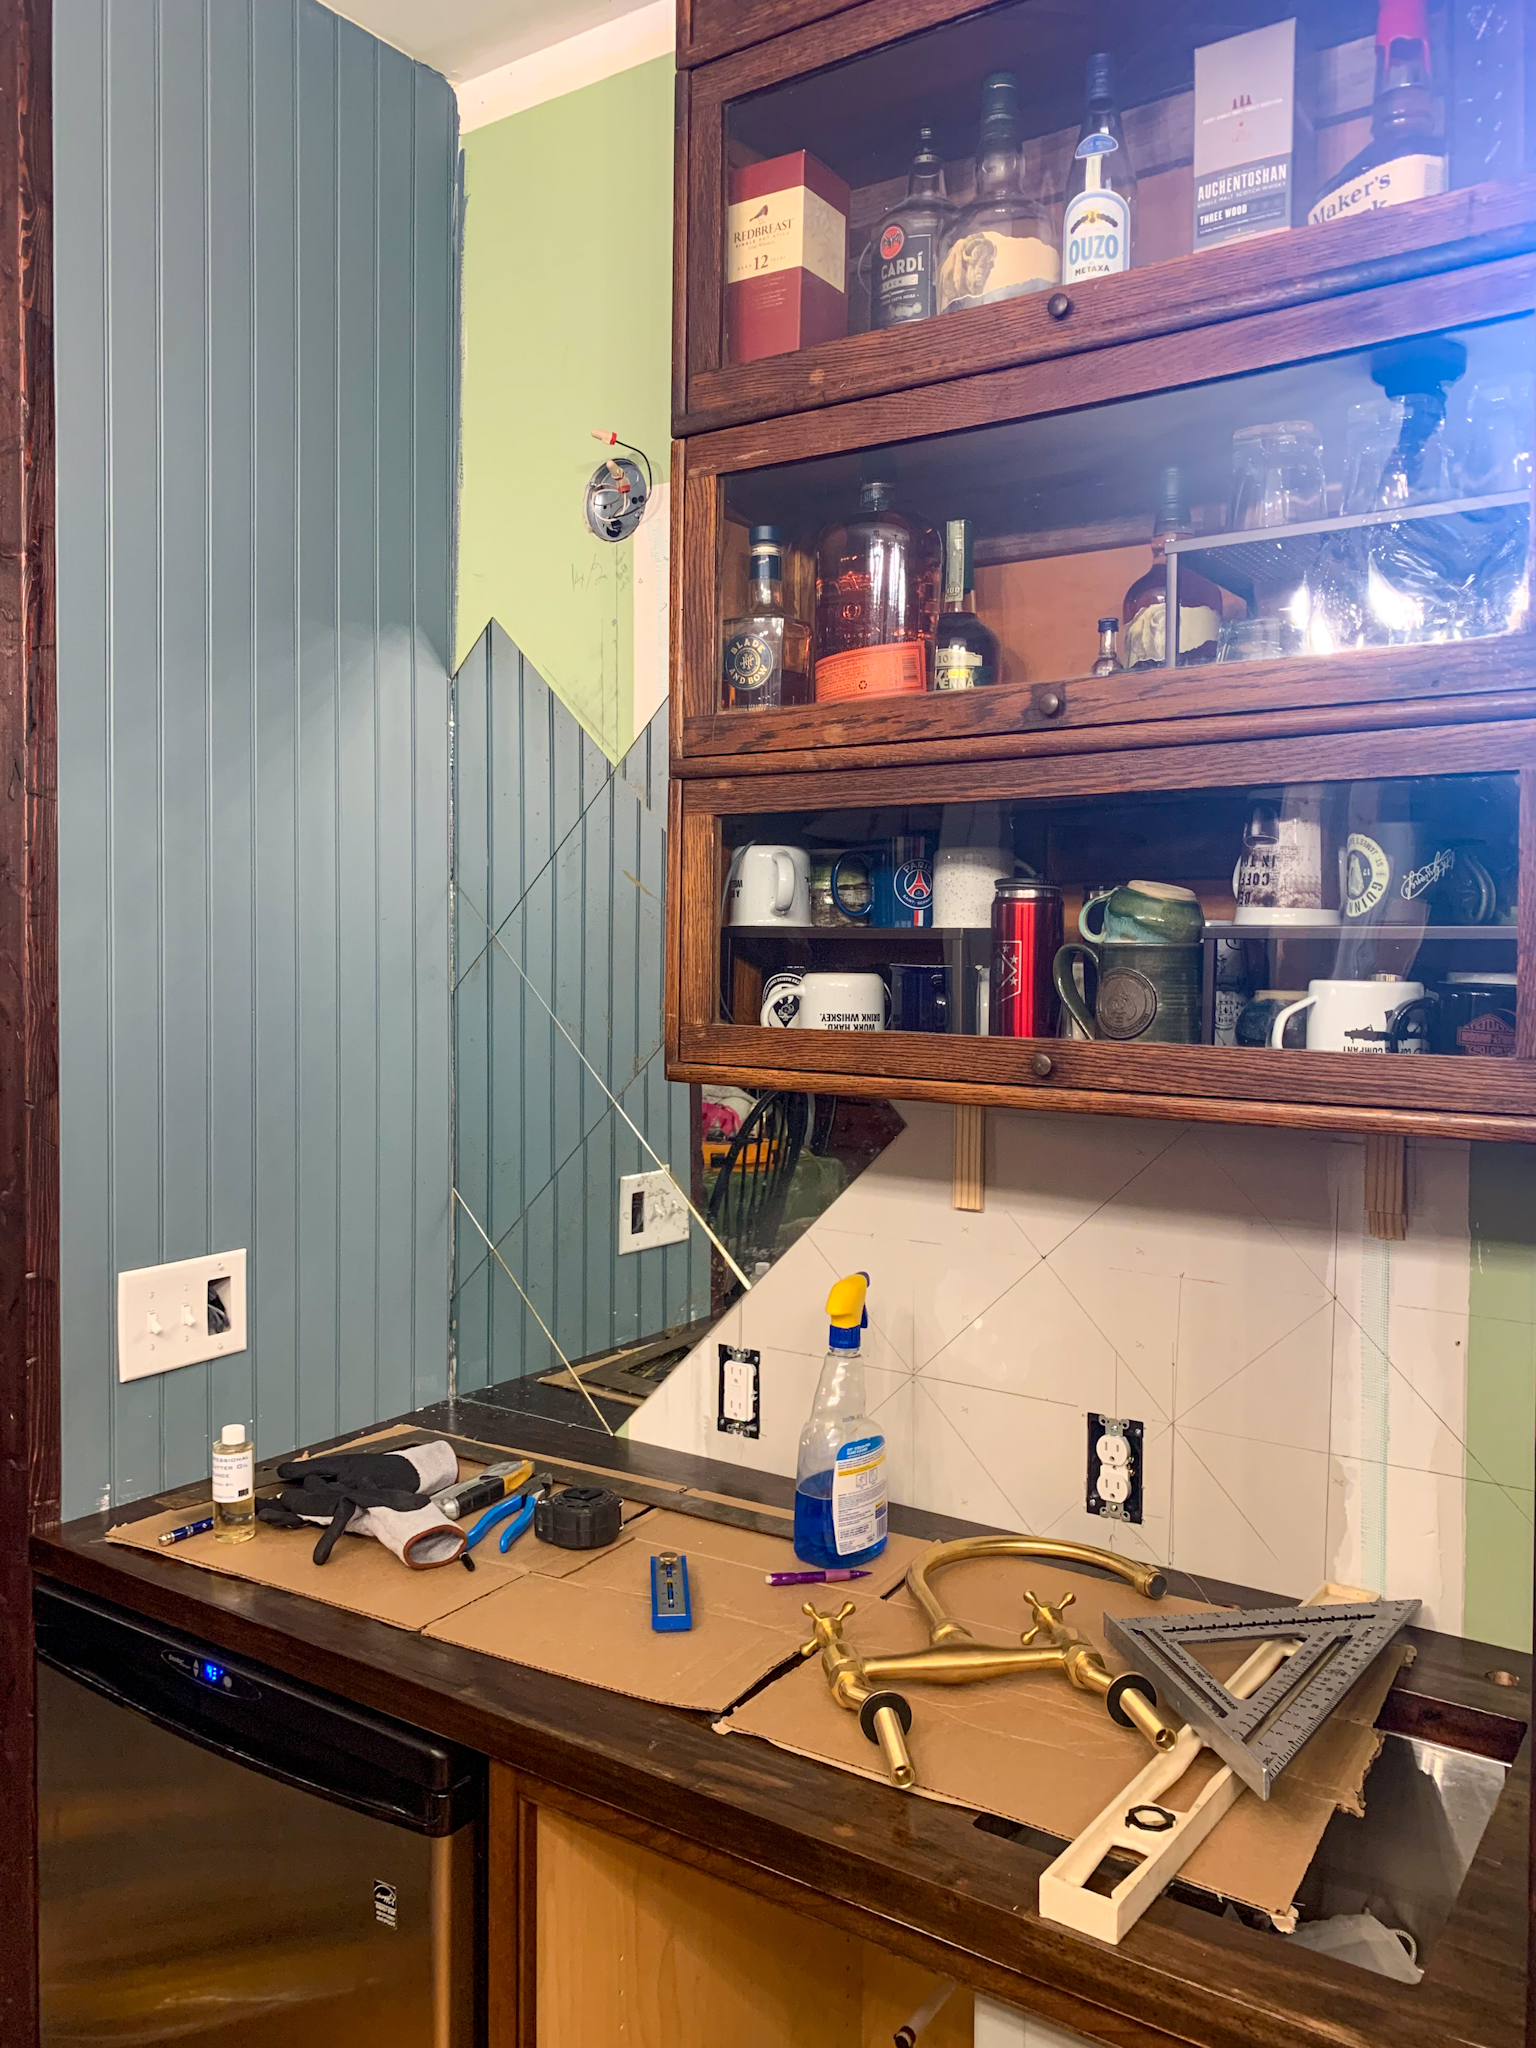
So, this is what our materials looked like before we began, but I can tell you up front that we made at least one MAJOR adjustment. Unless you’re doing a VERY small project, the stripper shown is not going to do the trick. I ended up using a bucket of stripper we had previously used on an antique mirror someone had painted, and slopping that on really did the trick (a full materials list is at the end of the post).
What you’ll need: two plastic drop cloths, muriatic acid, stripper, disposable gloves, eye protection, funnels, gold or gray spray paint, a spray bottle, 12×12″ mirror panels (you can cut these down later if you’d like smaller tiles), and a good putty or mudding knife. I apologize for some of the progress photos being missing: once I got into the middle of the stripping process I couldn’t stop and I had goop and acid on my gloves.
Supplies you’ll need to antique mirrors
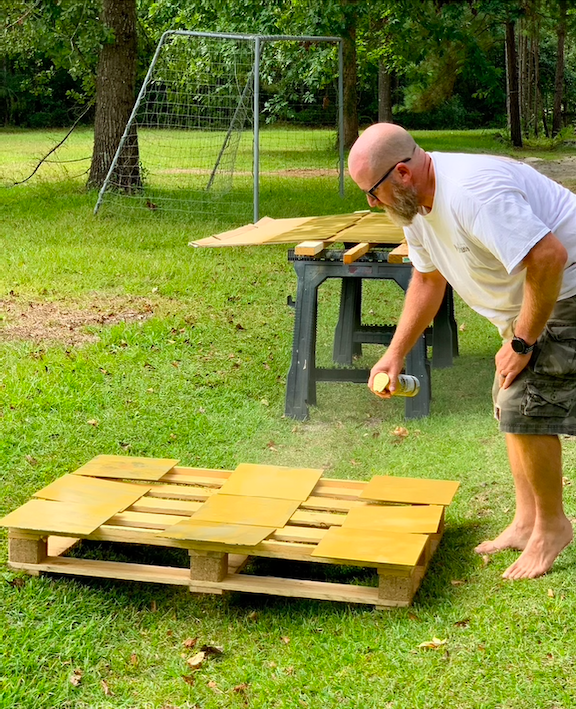
1 Put down your plastic sheet somewhere you can work and where you can get messy (we did this project on a deck we’ll be tearing out later).
2. Lay out your tiles so you can walk between them.
3. Put on your gloves and eye protection and slather the back of each tile (there is a thick layer of paint) with a good coat of stripper. To clarify, every step of this process, the “front” or glass face is down… you are only manipulating the backside finish.
Pro tip: Mirrored tiles are made up of three layers: Glass, silver reflective material, and a thick painted backing that protects the silver. This step removes the painted backing. It will lift EASILY when it is ready: don’t scrape at the mirrors or it will scratch through all of the layers and be visible later (ask me how I know).
How To Get That Antique Mirror Backsplash For a Fraction of the Price and Install it Like a Pro
4. When the backing is lifted (set it aside next to the tiles on the plastic drop cloth), spray off the back of each tile with water.
5. Move the tiles to a safe place, face down, where the front glass will not get scratched (we moved them to a smooth concrete slab and had individual paper towels down to protect the glass surface of each tile.
6. Put some dawn dishsoap on the back of each tile, wipe it down thoroughly (keep the hose running next to you here) rinse and dry it (it helps to have two people working on this step, one cleaning one drying). What you should have left at this point is just the silver backing. If there is leftover paint, that’s okay, it’s not going to show through, that area just will not be antiqued.
7. The next step it is VERY CRITICAL you are wearing protective eyewear, gloves, and clothing as you’ll be dealing with muriatic acid. Carefully use the funnel to pour muriatic acid into the spray bottle (I would use a NEW spray bottle to ensure you’re not mixing any other chemicals with the acid).
8. Gather up your used drop cloth (that should be very wet and filled with used goop) and put a new plastic dropcloth down so you don’t have any chemical reactions with the acid step. Lay your mirrored tiles glass side down again, spaced out.
9. This is sort of the fun part: now you’re antiquing! If you want heavy pieces of the silver gone you can spray it on more liberally. Mist the acid around the edges of the panels for a natural antiqued look, spraying some tiles more heavily and some less. Then you just let the acid do it’s work. Keep some clean rags on hand to blot excess acid in case you spray too much. You’ll be able to see when the acid is finished doing it’s work: you’ll be able to see through the clear glass to what’s beneath.
10. Get your hose out and spray off the panels to clear the acid.
11. Move the panels back to your washing and drying area and repeat the process of washing and drying (don’t forget to protect the face of the glass!). Your panels are now ready for paint!
How To Get That Antique Mirror Backsplash For a Fraction of the Price and Install it Like a Pro
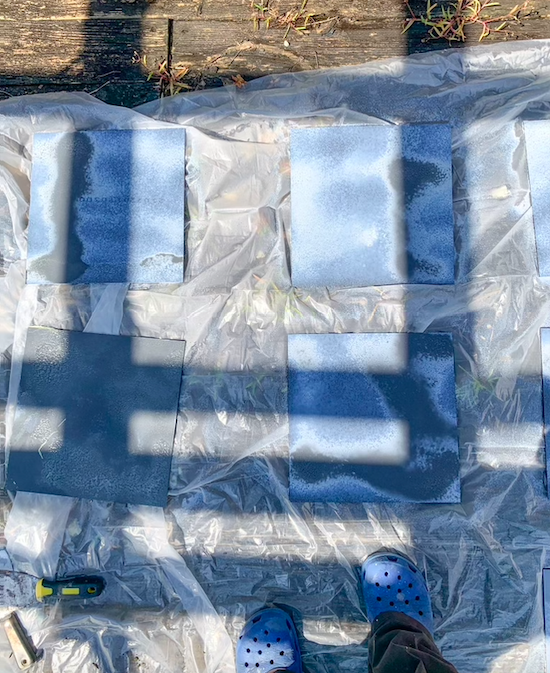
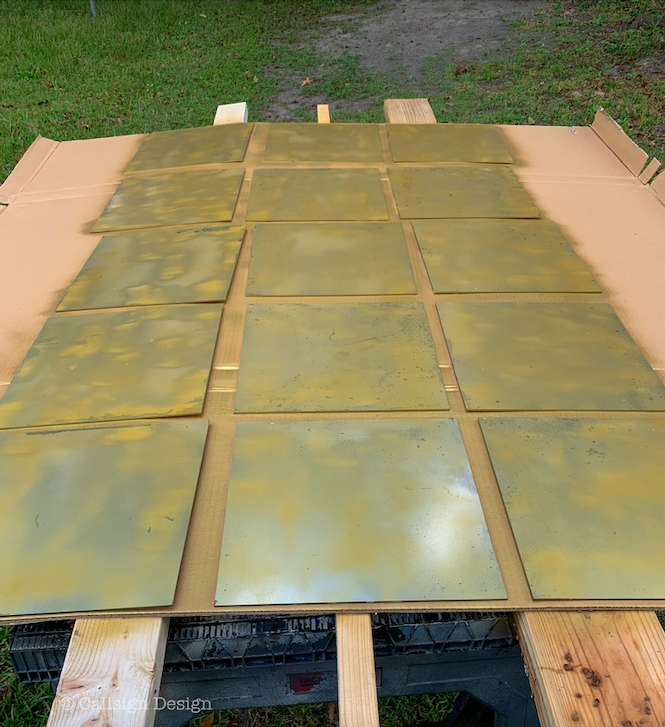
12. We chose an antiqued gold spray paint instead of gray to give our panels a lighter, gilded feel, but gray works also if you’re into a moodier look.
13. Lay out the panels in a place where you’ll have plenty of time to let them dry, glass side down. Rainman did two good layers of gold spraypaint with the panels laid out on cardboard, allowing the layers to dry inbetween.
14. When they are completely dry, you can store them stacked with cardboard between the panels to prevent scratching.
How To Get That Antique Mirror Backsplash For a Fraction of the Price and Install it Like a Pro
In the photo above, you can see the dark spots through the first layer of paint: those are the spots the acid etched into the panels, and where you will see through to the paint.
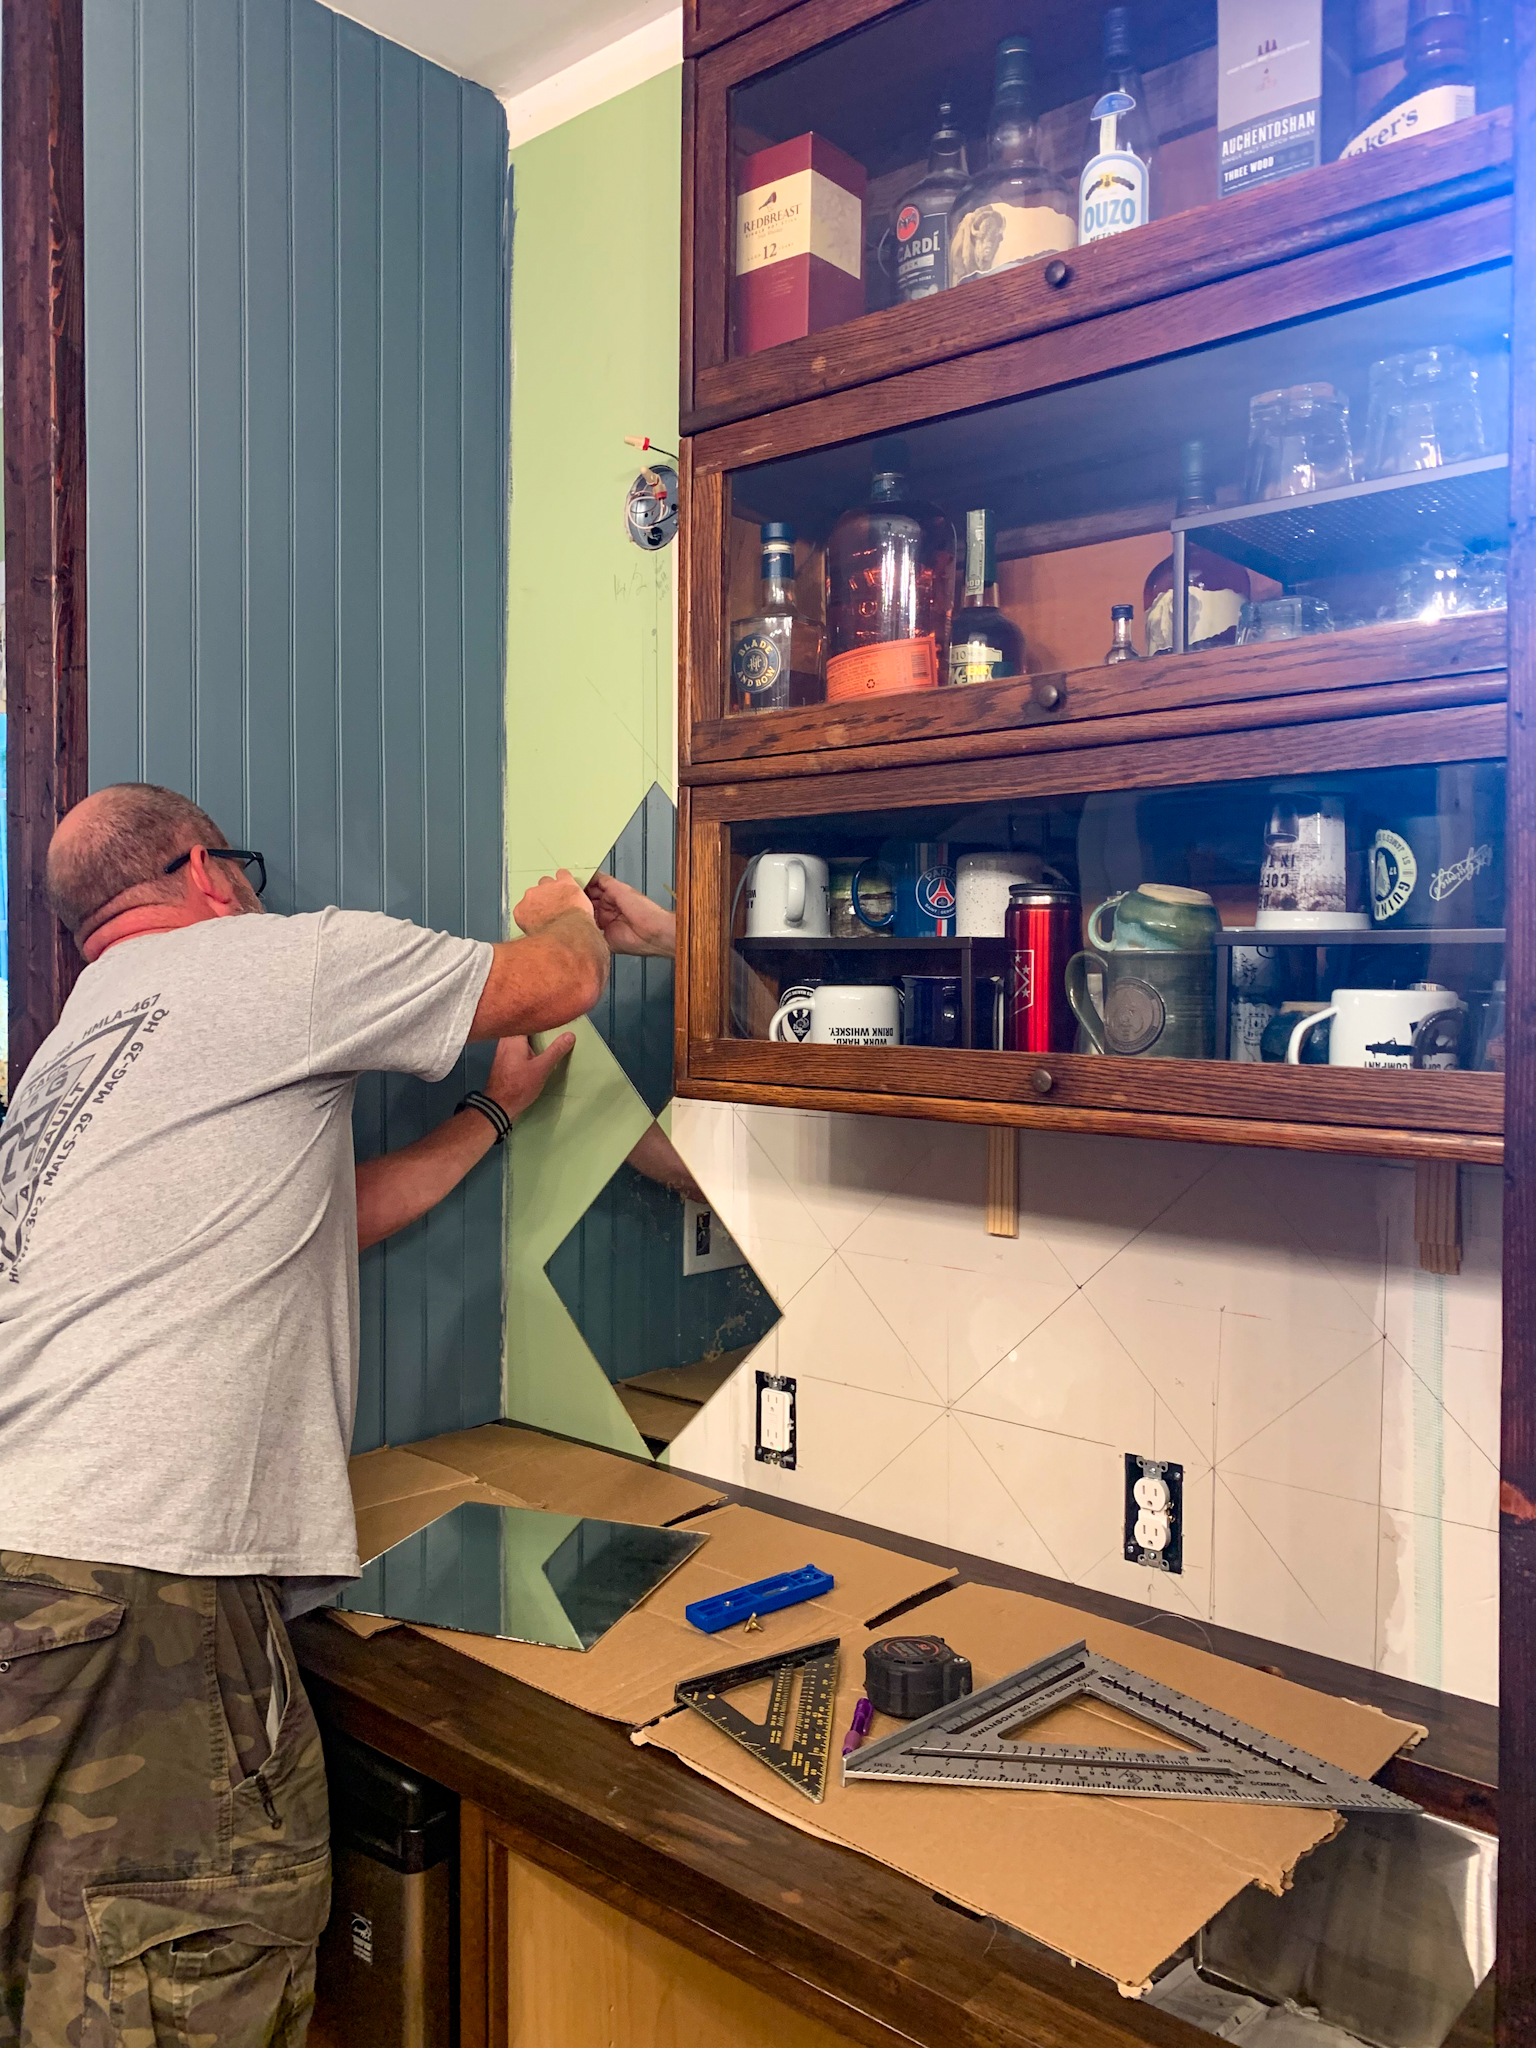
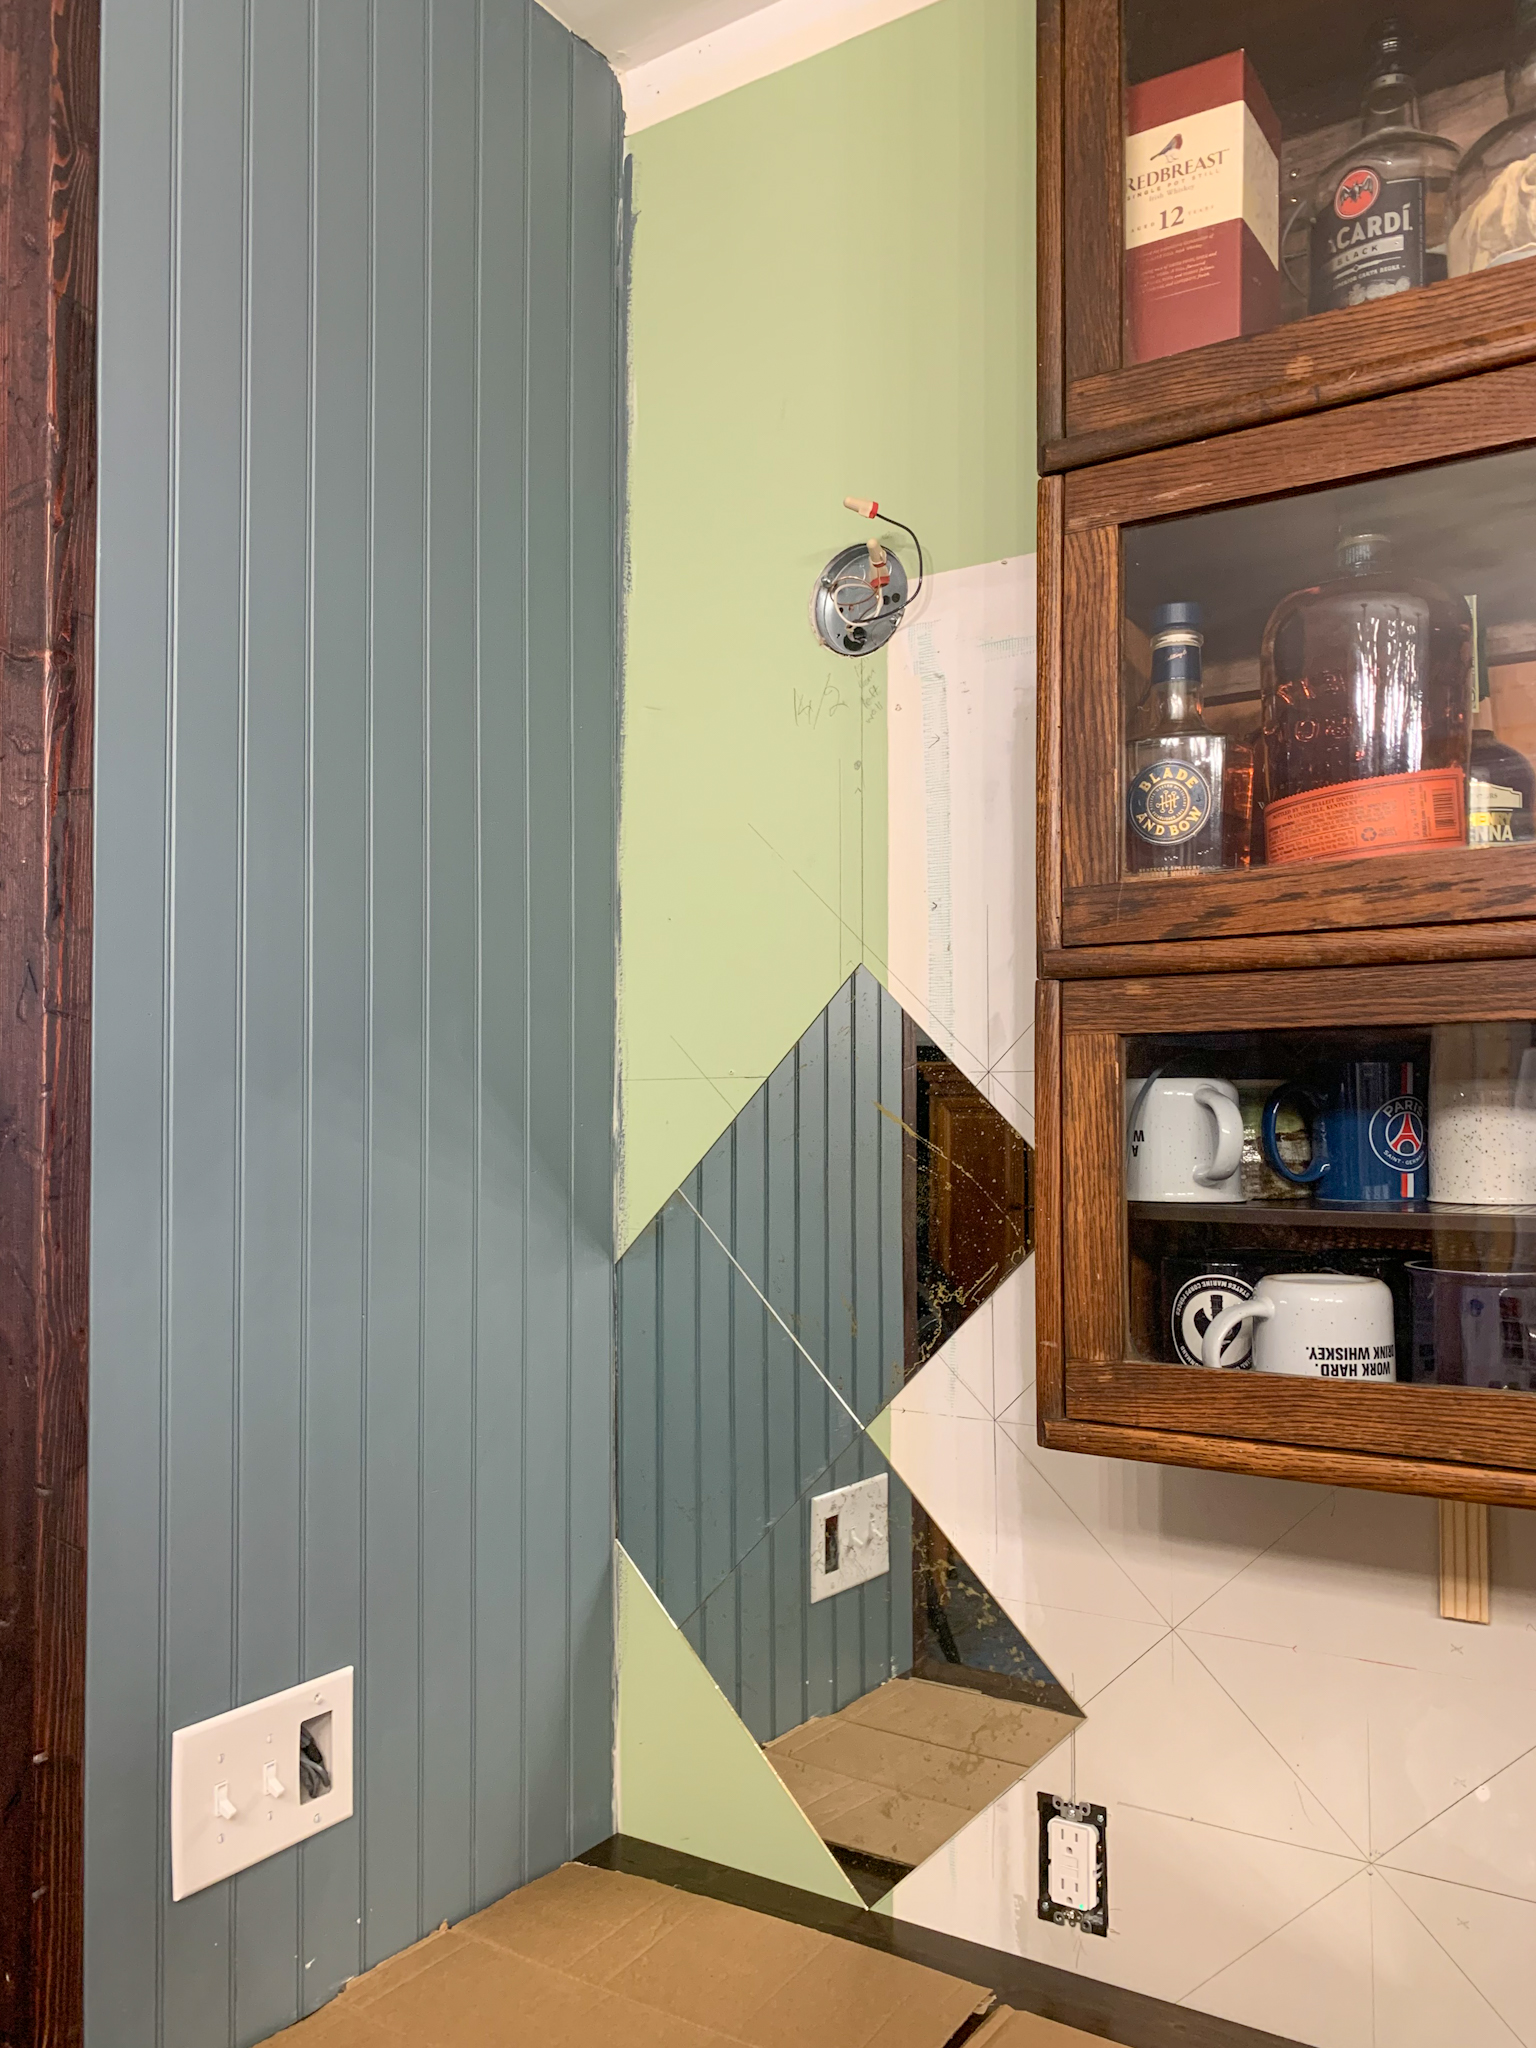
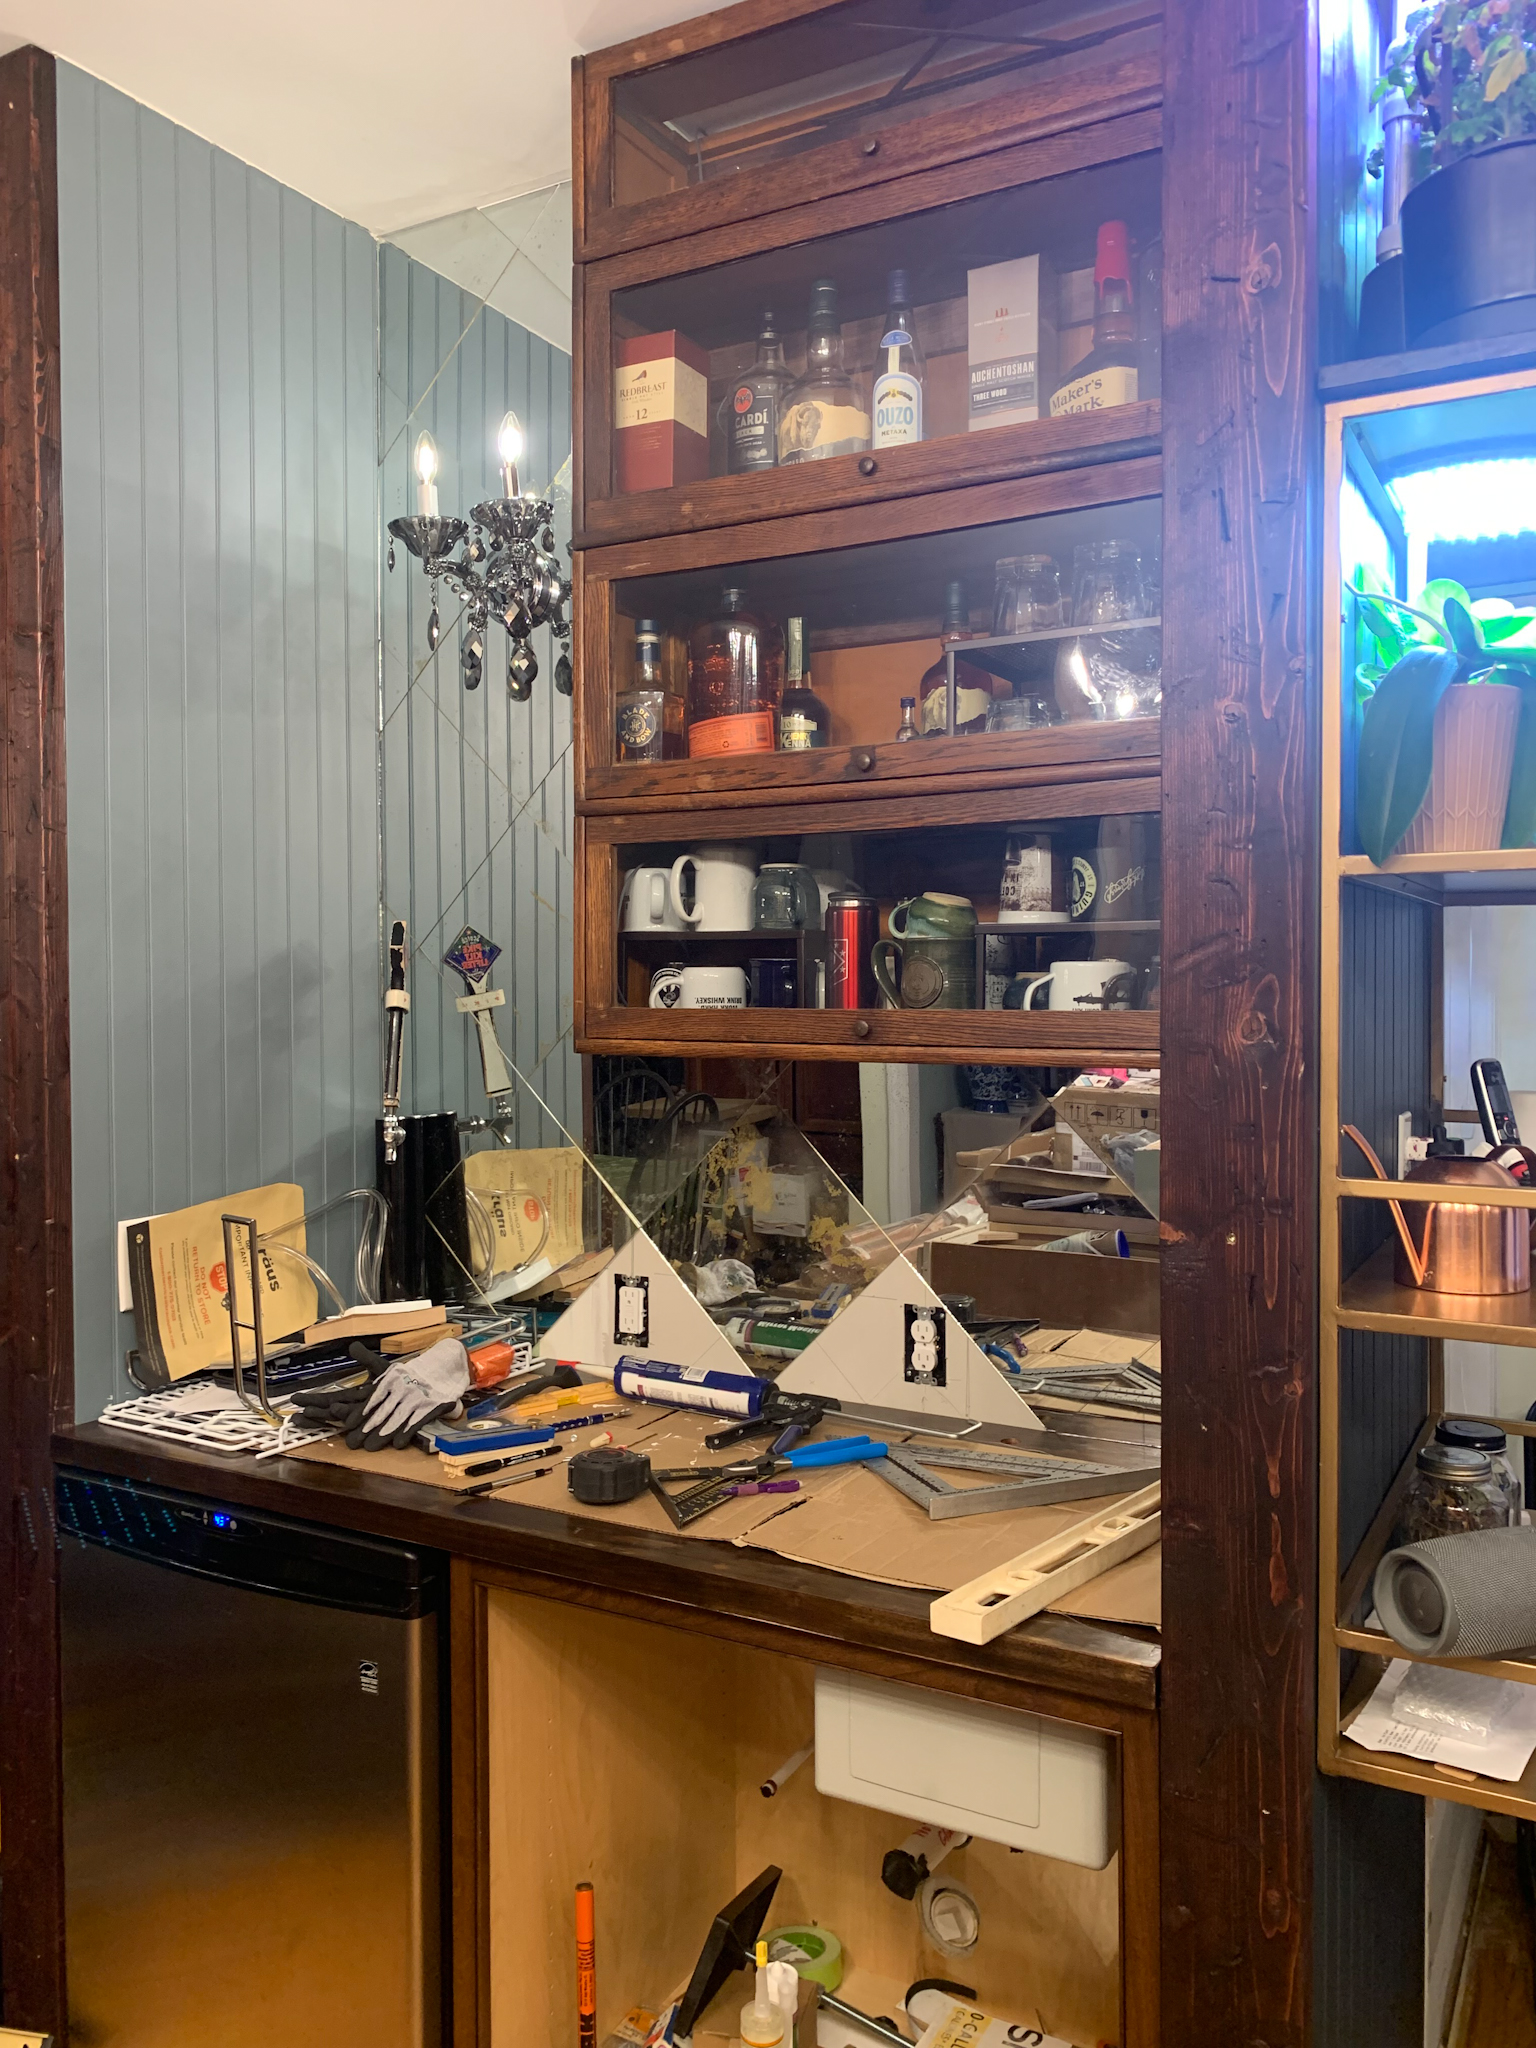
Now to the really fun part: cutting glass/mirrors isn’t difficult, but I recommend planning ahead for getting around outlets, light fixtures, or plumbing fixtures. There are one million tutorials on Youtube on how to cut glass or mirrors… so I recommend you look those up (the glass cutting tools I linked below are all that we needed to do cuts).
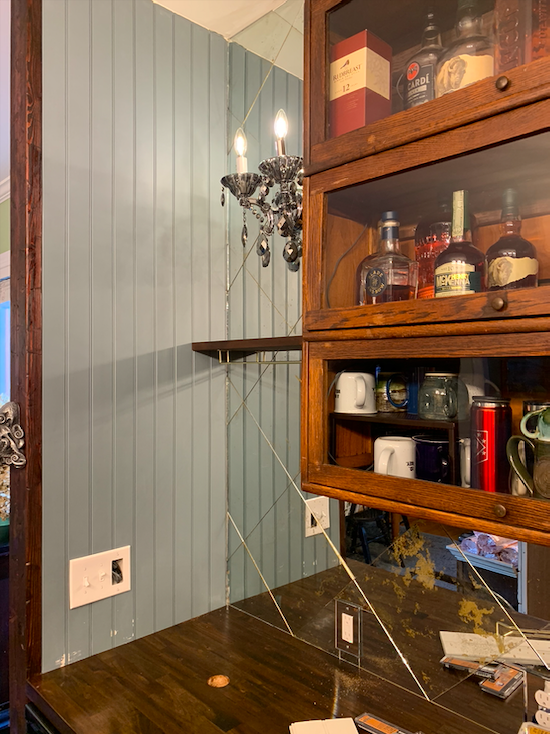
15. I recommend drawing out the tiles on the wall to make sure your cuts will be do-able. I also recommend doing test cuts on scrap before you start cutting your antiqued tiles (these tiles are only $3.50 apiece so don’t forget to grab some extra at the store). If you have cut outs to do for outlets or light fixtures, getting these on an edge or a corner is CRUCIAL. Otherwise, you will end up with cuts that show (we only had a couple and it still looks great, but if we did it again I would plan around that).
Pro tip: Make sure your wall is flat. If you have bumps, imperfections, or mounds the tiles will not lie flat.
16. Put mirror mastic on the back of the mirror as directed. If you start at the bottom, the mirrors hold each other up until the mastic dries.
How To Get That Antique Mirror Backsplash For a Fraction of the Price and Install it Like a Pro
How To Get That Antique Mirror Backsplash For a Fraction of the Price and Install it Like a Pro
How To Get That Antique Mirror Backsplash For a Fraction of the Price and Install it Like a Pro
How To Get That Antique Mirror Backsplash For a Fraction of the Price and Install it Like a Pro
How To Get That Antique Mirror Backsplash For a Fraction of the Price and Install it Like a Pro
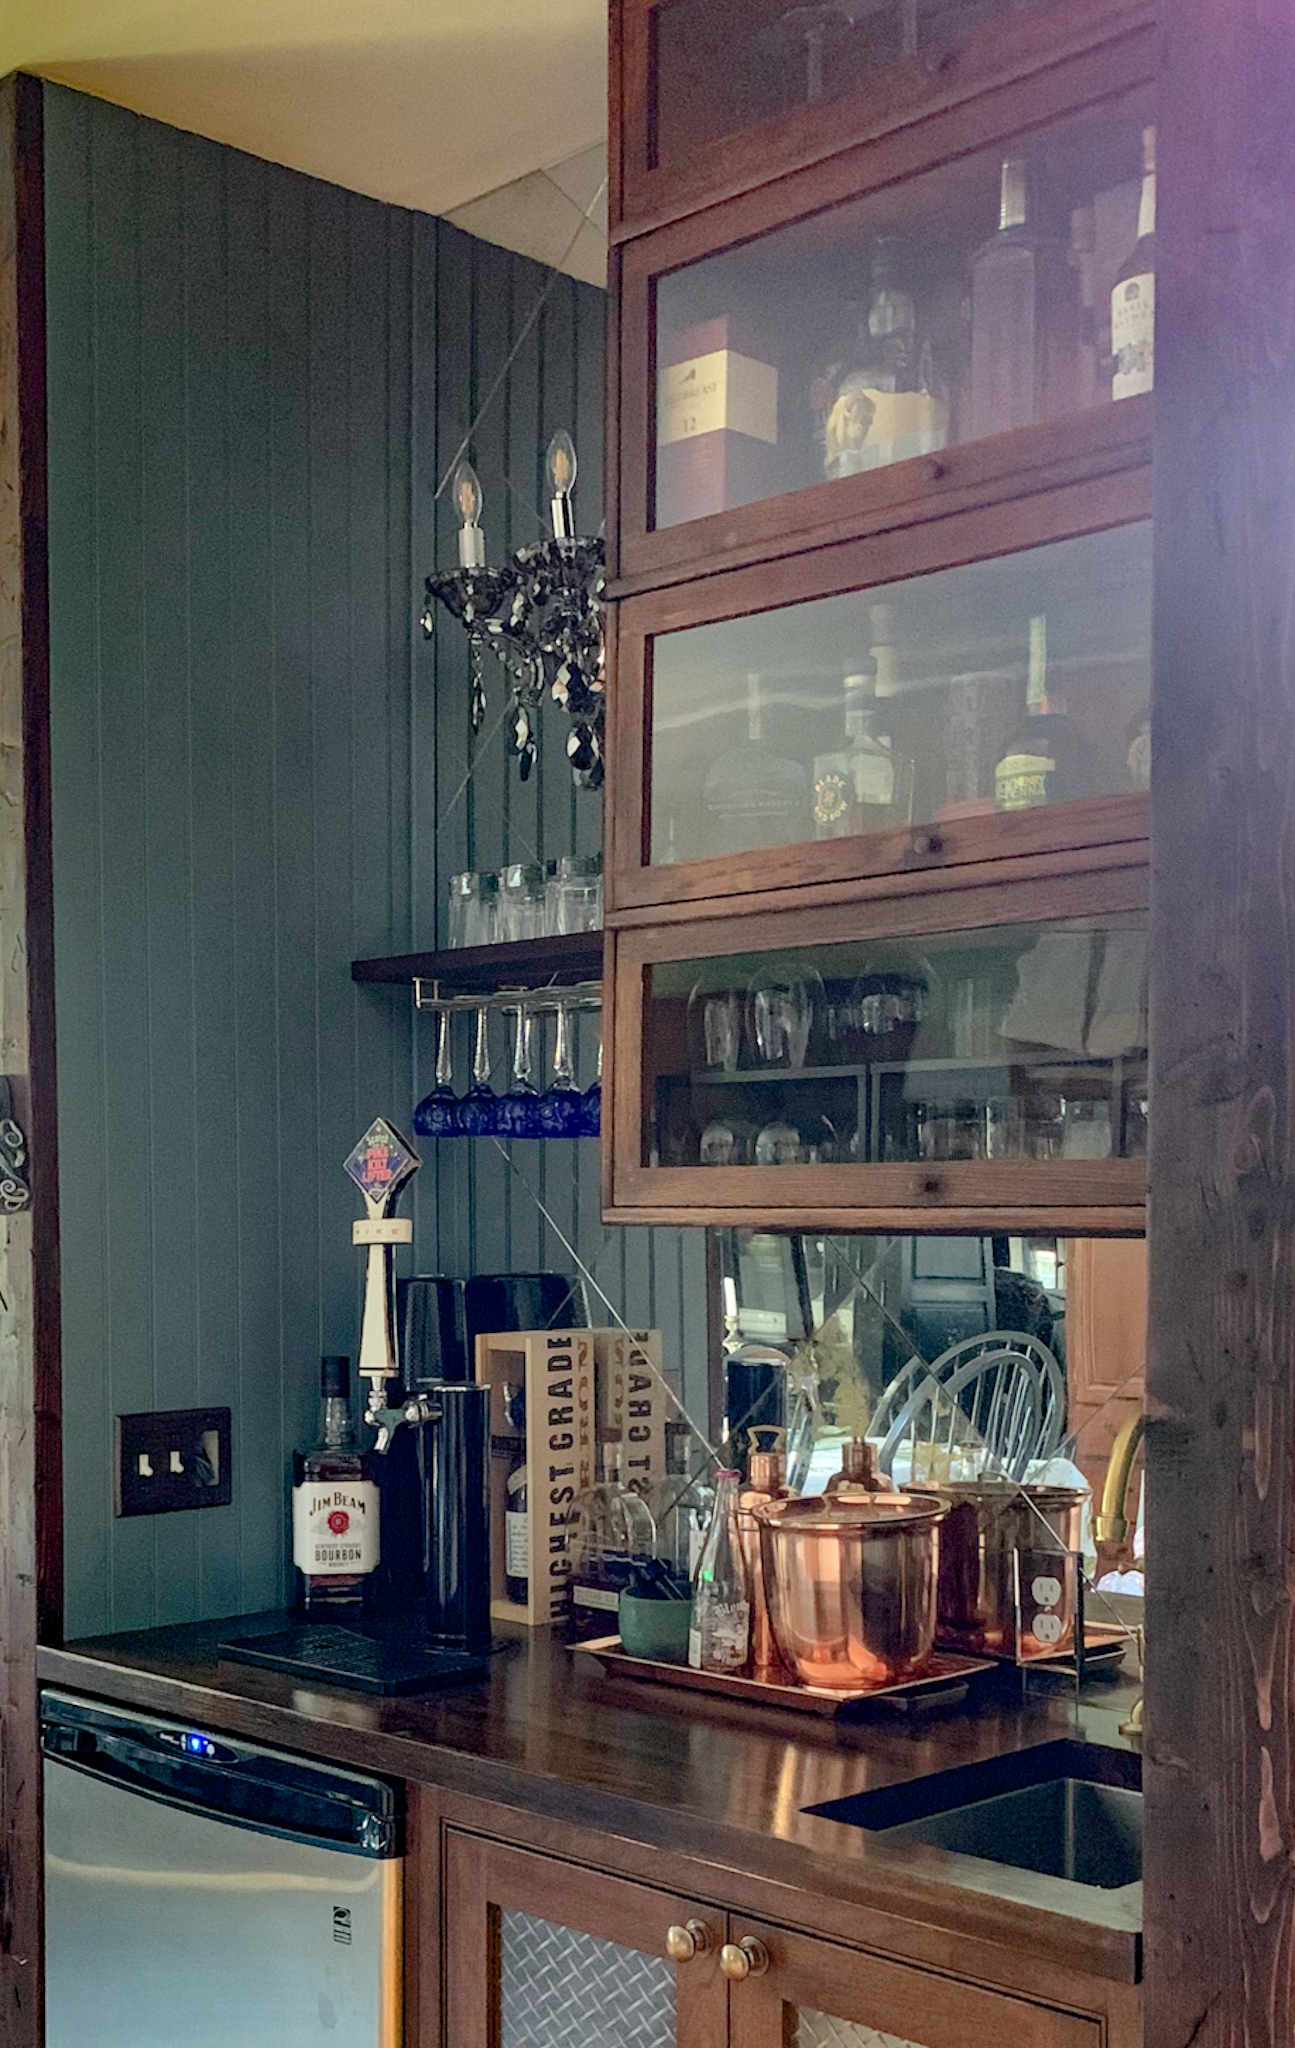
Want to see the finished product??? We’re pretty proud of how this bar came out, and the antique mirrored backsplash is a big part of it. You’ll have to forgive the reflection in the mirror showing our unfinished kitchen… but, you get the idea! Cheers!
How To Get That Antique Mirror Backsplash For a Fraction of the Price and Install it Like a Pro
How To Get That Antique Mirror Backsplash For a Fraction of the Price and Install it Like a Pro
*Legal stuff:
I am honest about my experiences with different products and write because I enjoy it. I do however, have the opportunity to earn money for my writing, also.
Slavetodiy.com is a participant in the Amazon Services LLC Associates Program, LTK, and other affiliate programs: affiliate advertising programs designed to provide a means for sites to earn advertising fees by advertising and linking to amazon.com and other sites. These programs offer a small commission on products sold through their affiliate links. Each of your purchases via our affiliation links supports our cause at no additional cost to you.
If a blogger links to a product (with a special code for affiliates embedded in the link), and a reader places an item in their “shopping cart” through that link within 24 hours of clicking the link, the blogger gets a small percentage of the sale. These links are not “pay per click.” If you click on the product link and stay around and purchase something else, however, I will get a commission on that sale.
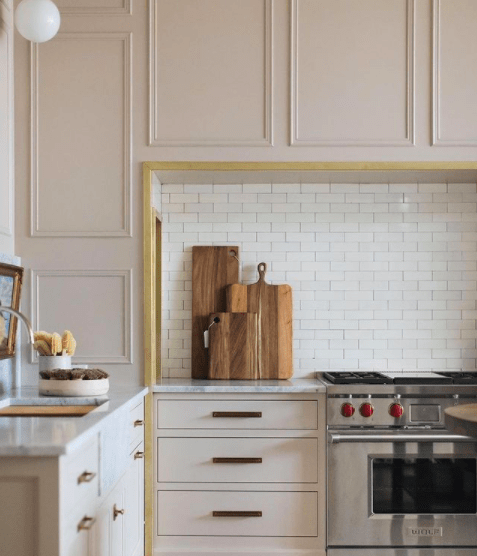
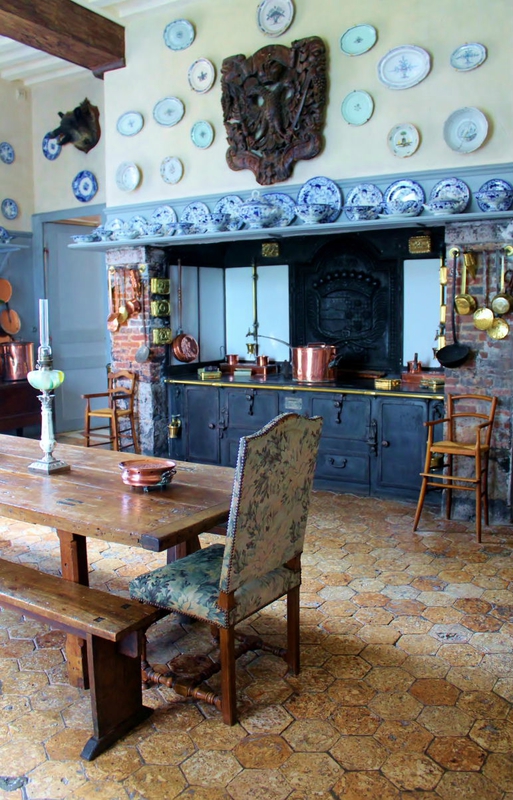
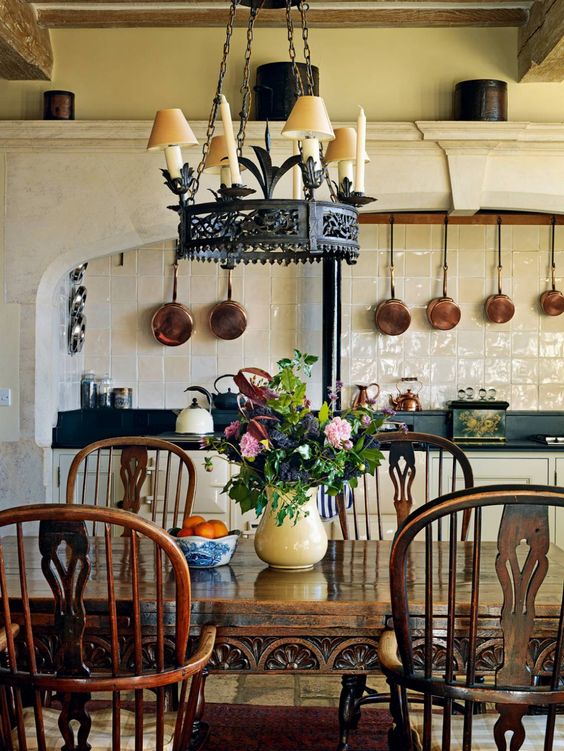
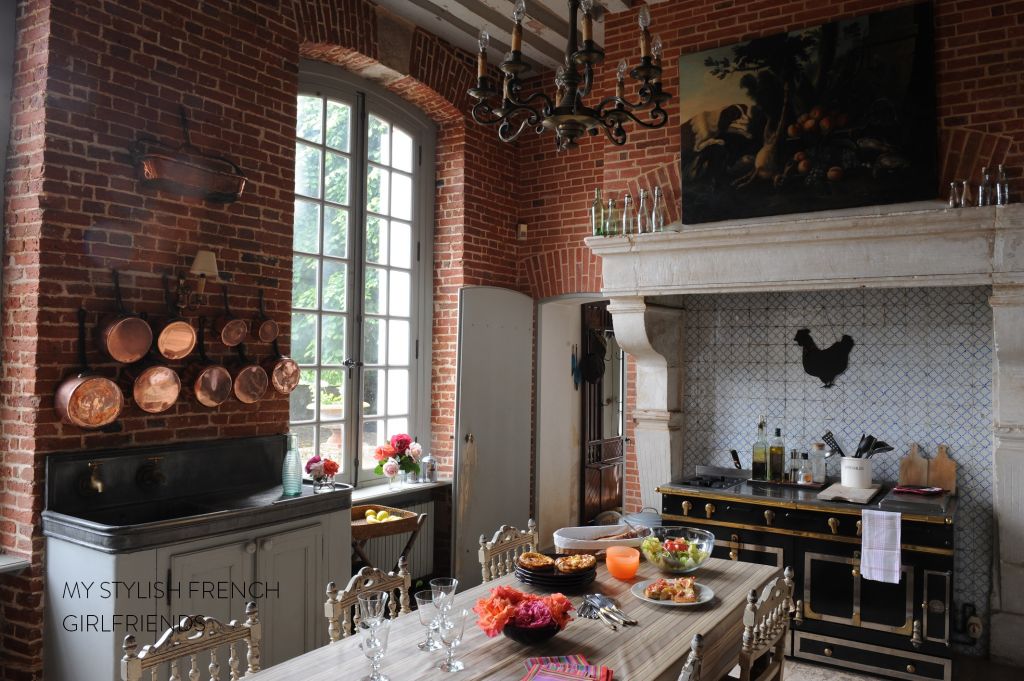
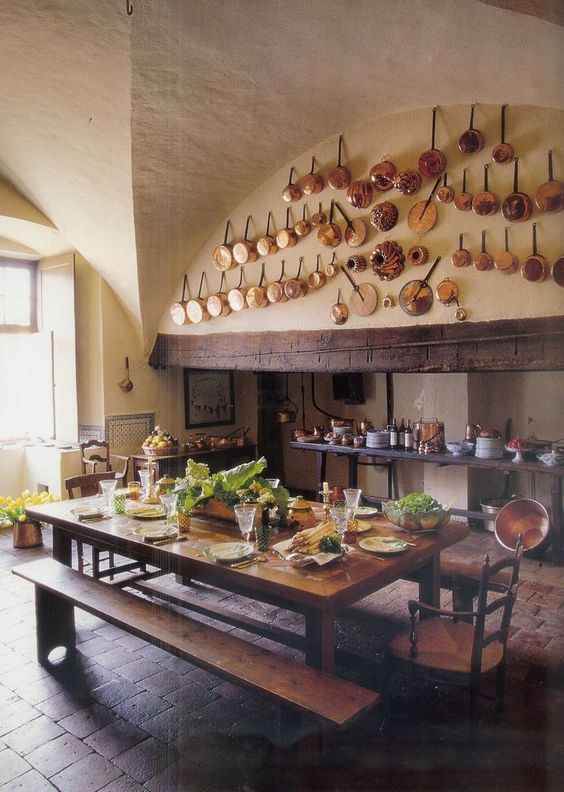
We are in the middle of a kitchen renovation, which is sure to last through the next century (the renovation part, I mean). However, the pace of said renovation gives me the time to make sure that EVERY detail is correct. As I have been researching the perfect forever kitchen for the last five years (who am I kidding, it’s been more like forty) I absolutely fell in love with the concept of rangehood surrounds.
Since I have smoked the house out searing steak on a weekly basis for the last decade, I already knew that we needed a kitchen exhaust fan, or more specifically, a rangehood. Having a kitchen hood vent is imperative for people who actually cook. We were living in a kitchen with AN UNVENTED microwave over the stove. Also see: “why bother” in the dictionary. That is the worst ever possible solution to sucking smoky air out of your house and is honestly something builders like because it’s cheap and easy. Well, I’ve got their number.
*This post may contain affiliate links. Please see full disclosure at the end of the post.
Anyway, have you seen all of those delicious British kitchens? Well, they’ve had this figured out for… well, I think forever. Duh, if you’re cooking, you need a hood. Even if theirs are a bit more understated than their more extravagant American counterparts, the idea is the same:
A command post, at the center of the kitchen, from which you rule your house: where you sing to obnoxiously loud mom music and shout back at kids from across the house “I can’t hear you” as you prepare something you weren’t sure what it was going to be until you started adding ingredients (or on rare occasions, trying to follow a recipe). Read: the maternal-Zen-zone from which location you create foods made of pure love and chubby mom sweat.
These spaces must be both beautiful and functional, so I have a few rules:
I absolutely must have counterspace on either side of the range. Seriously, the enclosures I see where it’s only the stove would in no way be conducive to actual cooking (but they sure are pretty). I recommend AT LEAST 24 inches of countertop on either side of the surround- we’re going with 30 a side.
Use materials that can’t get scorched. If you’re cooking so professionally that you need one of those gigantic hoods that you have to keep the cat away from (lest they are sucked into the intake like a runaway tornado) don’t you think you might risk some cabinet scorching? What about grease splatter? There shouldn’t be ANYTHING THAT CAN GET BURNED within the surround. (We are doing a mix of copper sheet backsplash with sealed marble tile, METAL UPPER CABINETS, and a copper hood. Everything will be safe from harm.)
It must be able to do whatever I want it to do. If I want to cook hibachi and make three-foot high flames, the hood better be able to handle it. Even though adding a hood that is anything over 400 CBMs requires an air exchange system, it is absolutely worth it. I usually get the most powerful ANYTHING that is offered, just to be sure.
(Speaking of which) Quick story: When I was researching hoods, I had the most appalling experience with an HVAC tradesman. I called him to get a quote on installing ducting in our kitchen for a range hood. He asked me how many CBMs my hood was going to have. I told him it was 1200 CBMs and he said, “Oh, you don’t need one with that many CBMs.” Please play that back in your head with the most absolutely misogynistic Eastern North Carolina accent you can conjure.
I took a deep breath, and said, “I’m listening.”
He proceeded to explain to me, in the most demeaning manner possible, how EVEN HE only had a 600 CBM hood and he had a big house made for entertaining, unlike mine, which he had never seen.
Now, I have strict rules about phone etiquette. I have taught my children by example that it’s very important (and almost ALWAYS works in your favor) to be kind to anyone on the phone. This applies to calling ANY CUSTOMER SERVICE ever. They deal with complaints all day, right? So, when you call them be the most patient customer they’ve ever had and be the one little bright shining light in their day! I have literally had customer service folks send me free stuff and thank me profusely for being nice to people whose fault it WASN’T that whatever problem it was happened. Catch my drift? Now here’s this guy, who I am about to ask to do a job for me, and I know that griping at him or complaining is not going to get me anywhere.
Well, I can tell you, I was two more condescending comments away from breaking my own phone rules. If I could’ve reached through the phone and grabbed him by the neck, I would’ve been unmoved by him choking on the gum he was loudly smacking in my ear between patronizing tidbits of advice.
He ACTUALLY said to me: “your husband’s going to be pissed at you if you’re running that fan in the kitchen and he can’t hear his football game.” I almost fell over.
So, after this man had given me his dissertation on why women like me don’t know jack or dog-poo about ducting or machines in general, I politely asked him, “So, say I wanted you to install this AND an air exchange system. Could you do it?”
“Well yeah, but it would be more money.”
“Okay that’s fine.” After he complained for a few more minutes about me wanting something I clearly didn’t need, he stopped short and told me if I was getting a rangehood it absolutely HAD to be a Wolf and nothing else would do (and I was being cheap if I decided to go with anything else), and pointed me toward “his” appliance salesman buddy in the next town.
By the time I got off the phone I was bewildered and… well…. I was PISSED (which is a relatively unnatural state of being for me). My husband got home from work and got a half an hour recount of the conversation I had with this… well I’ll leave out what I called him.
So Rainman politely asked me, “So, why don’t you call someone else?”
To be honest, this thought had not occurred to me. I was so wrapped around the axle I wanted to meet this guy so I could beat him at his game.
But I slowly deflated… and used a lifeline. I called my friend next door that had just had a beautiful new house built, and she gave me the number of their HVAC contractor- who came to the house, asked what I wanted done, devised a plan, and gave me a price. Oh, and he didn’t treat me like I had recently come to our world from another planet. They will have my business until I die.
Pro tip: The one thing that kept coming up over and over again during this discussion is that anything over 400 CBMs empties your house of air very quickly and that air is replaced by OUTSIDE air via the air exchange system (you know, the one Captain-pompous-pants didn’t want to install). I was warned that if that happened my home would be suddenly muggy in the summer or suddenly freezing in the winter. That is true, and it’s a concern. But it is also true that every time I sear meat it smokes my house out and we have to open all the doors and windows (and wrangle cats and a dog). You know what this does? You got it! Muggy and hot in the summer and freezing cold in the winter. I hope you can see me rolling my eyes from here.
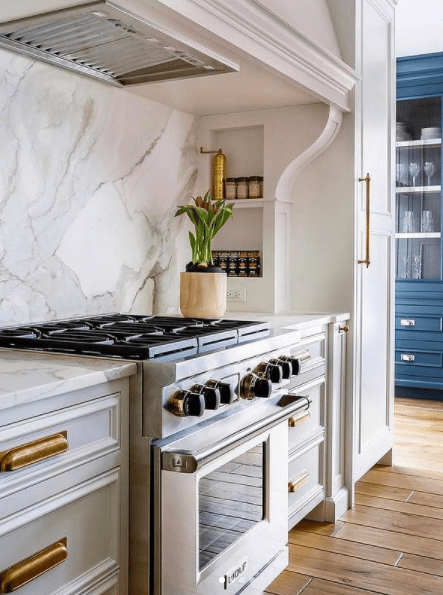
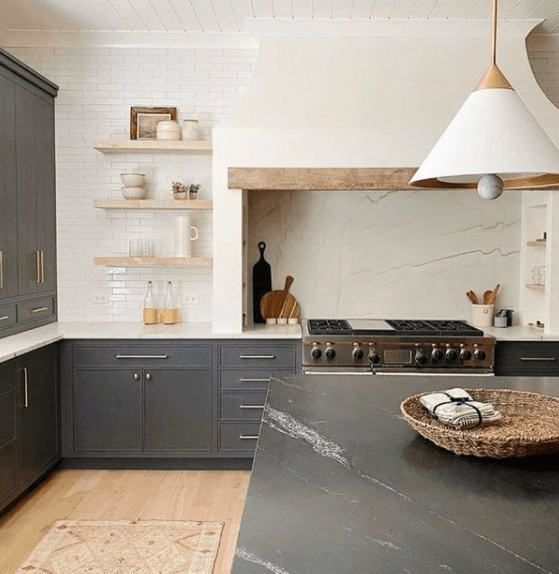
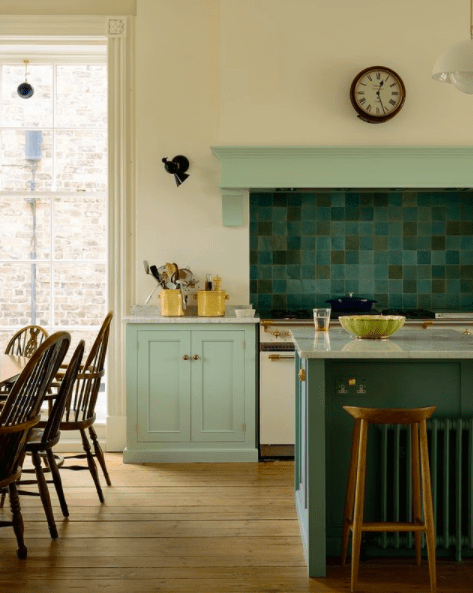
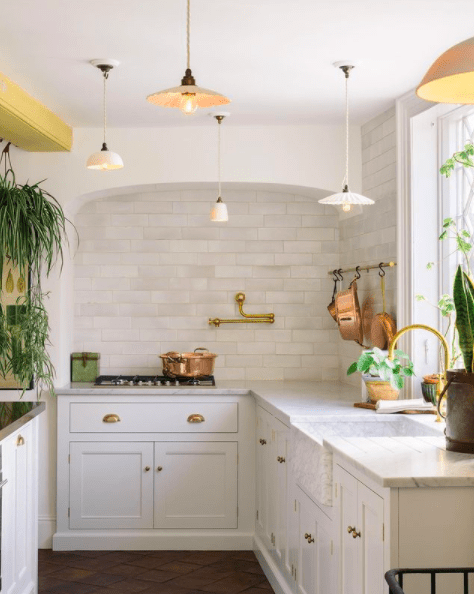
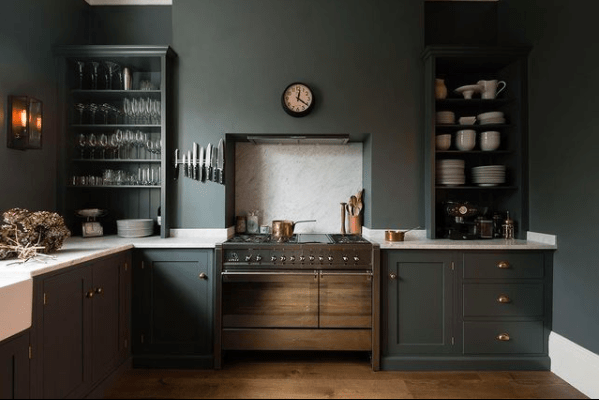
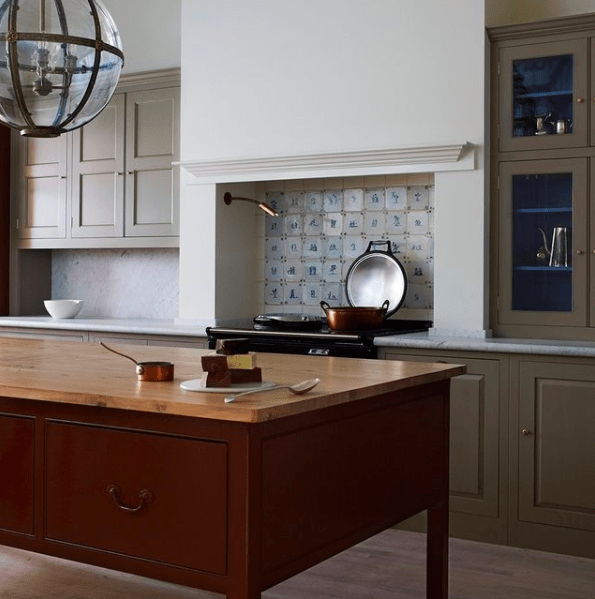
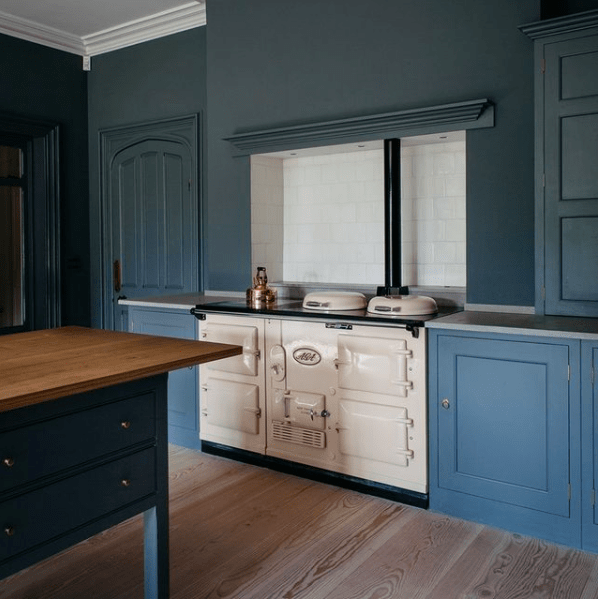
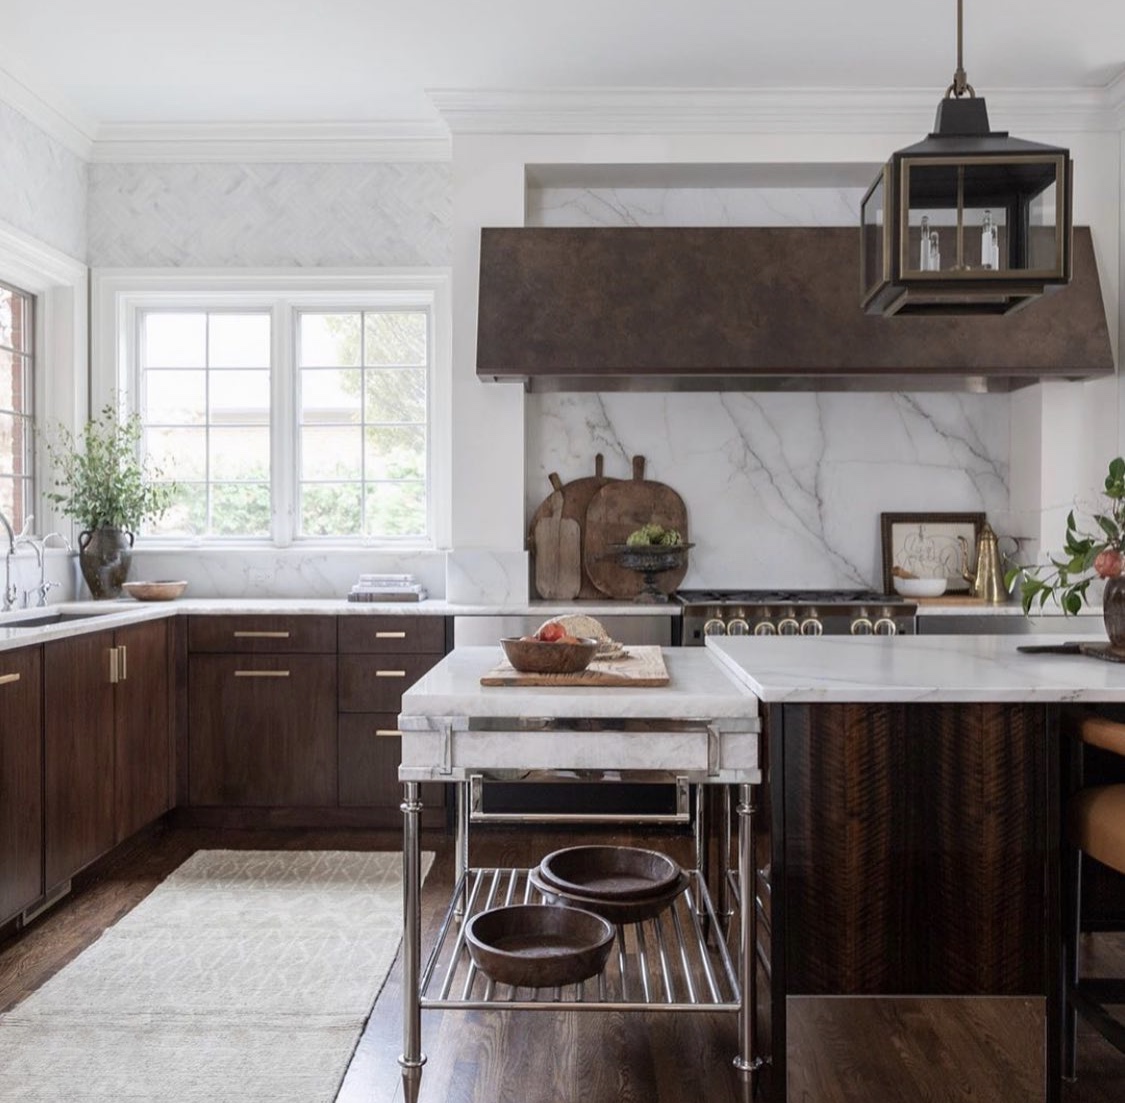
But I digress. Here are a few neat ideas for rangehood surrounds I think you’ll enjoy:
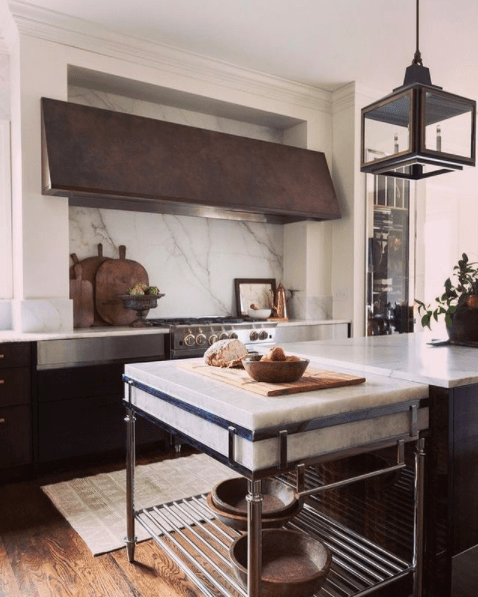
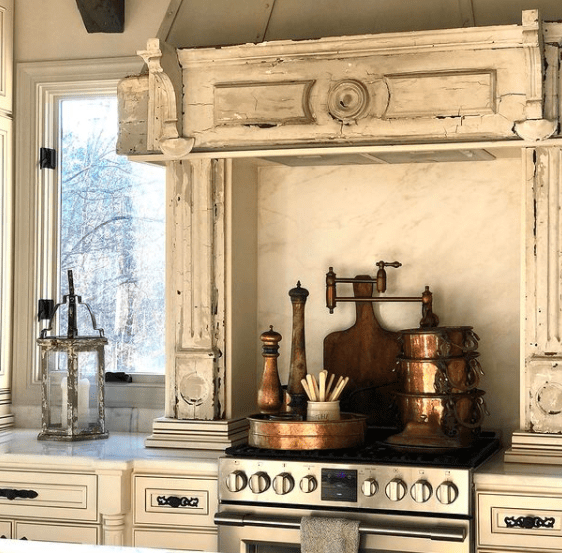
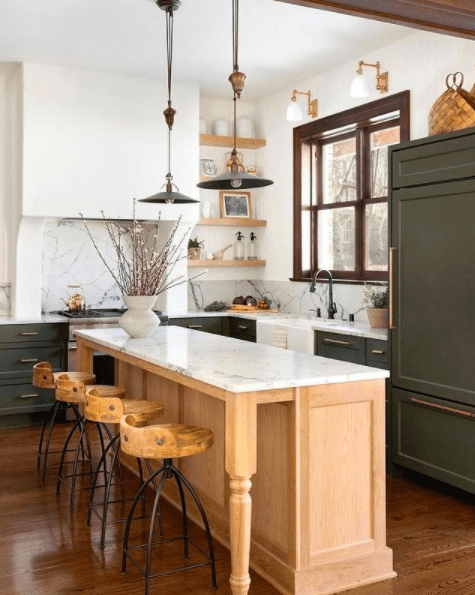
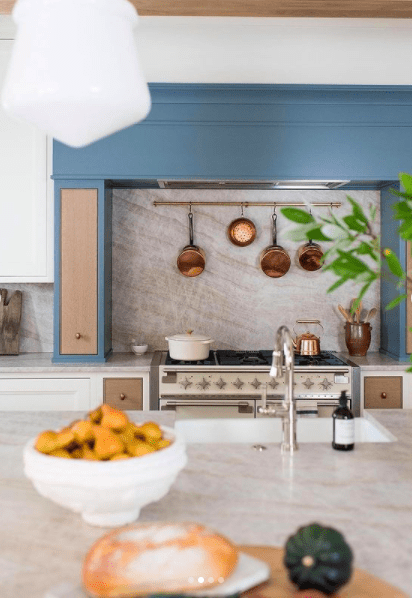
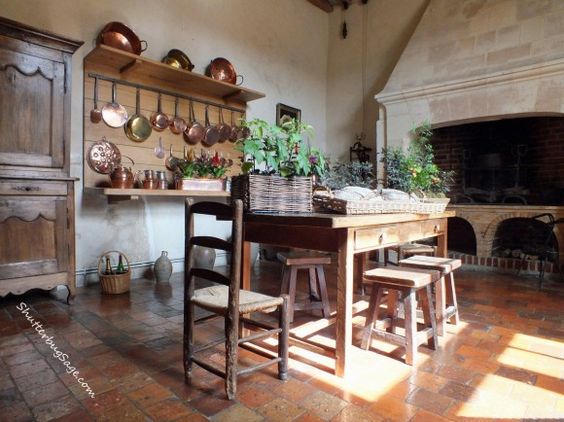
Via @lisastatondesign on Instagram
Via @edwarddeeganarchitects and @karenloffing on Instagram
Via @jenferrandi on Instagram
Via @christopherpeacock on Instagram
Via @firstclassinteriors on Instagram
Via @thebrittanyhouseatoakhill on Instagram
Via @kitchenpostsdaily on Instagram
Via @whitneyparkinson on Instagram
Via @jeanstofferdesign on Instagram
Via @whitneyparkinson on Instagram
Via @katemarkerinteriors on Instagram
Via @devolkitchens on Instagram
Via @devolkitchens on Instagram
Via @devolkitchens on Instagram
Via @plainenglishkitchens on Instagram
Via @plainenglishkitchens on Instagram
Via @ckandm Instagram
What do you think? Could you see your space with a rangehood surround? I’m dying to show you ours!!!
Check out more of our design inspiration and high-end DIYs over on the blog!
Cheers!
*Legal stuff:
I am honest about my experiences with different products and write because I enjoy it. I do however, have the opportunity to earn money for my writing, also.
Slavetodiy.com is a participant in the Amazon Services LLC Associates Program, an affiliate advertising program designed to provide a means for sites to earn advertising fees by advertising and linking to amazon.com. Amazon offers a small commission on products sold through their affiliate links. Each of your purchases via our Amazon affiliation links supports our cause at no additional cost to you.
If a blogger links to an Amazon product (with a special code for affiliates embedded in the link), and a reader places an item in their “shopping cart” through that link within 24 hours of clicking the link, the blogger gets a small percentage of the sale. Amazon links are not “pay per click.” If you click on the product link and stay around Amazon and purchase something else, however, I will get a commission on that sale.
This site also contains affiliate links through //Commerce/Sovrn. //Commerce or our Publishers may be compensated when you click through links on our site.
For those of you that follow along with us, you already know that we’ve been in the middle of kitchen planning, designing, and installing on a kitchen in another state. I am in North Carolina and the kitchen that I designed for my mom’s forever home is in Vermont. Luckily for me, my sister and brother (who is our “contractor” and carpenter) are in Vermont and have done almost all of the heavy lifting themselves. My sister, who owns the home, has painted more than she ever wanted to paint in her life.
When we began talking about this project (when the property that adjoined my sister’s farm came up for sale), I think it was sometime around February (2020). When we started actually planning it, the idea was for my brother to have everything ready for me and my husband to drive up and help with the installation (especially because he thinks some of the design choices I made are a major pain in the butt). But, then this weird thing happened: a pandemic. Our trip obviously got delayed. But, on the positive side, my sister and brother were able to continue working on the rehab and the kitchen just about full time since everything was closed due to Covid.
Sneak Peek (the AFTER):
Before and After Pictures of Grandma’s New Vermont Cottage Kitchen: Sponsored by Lily Ann Cabinets and designed by @callsigndesign on Instagram and @slavetodiy on Pinterest.
*This post may contain affiliate links and is sponsored by Lily Ann Cabinets. Please see full disclosure at the end of the post.
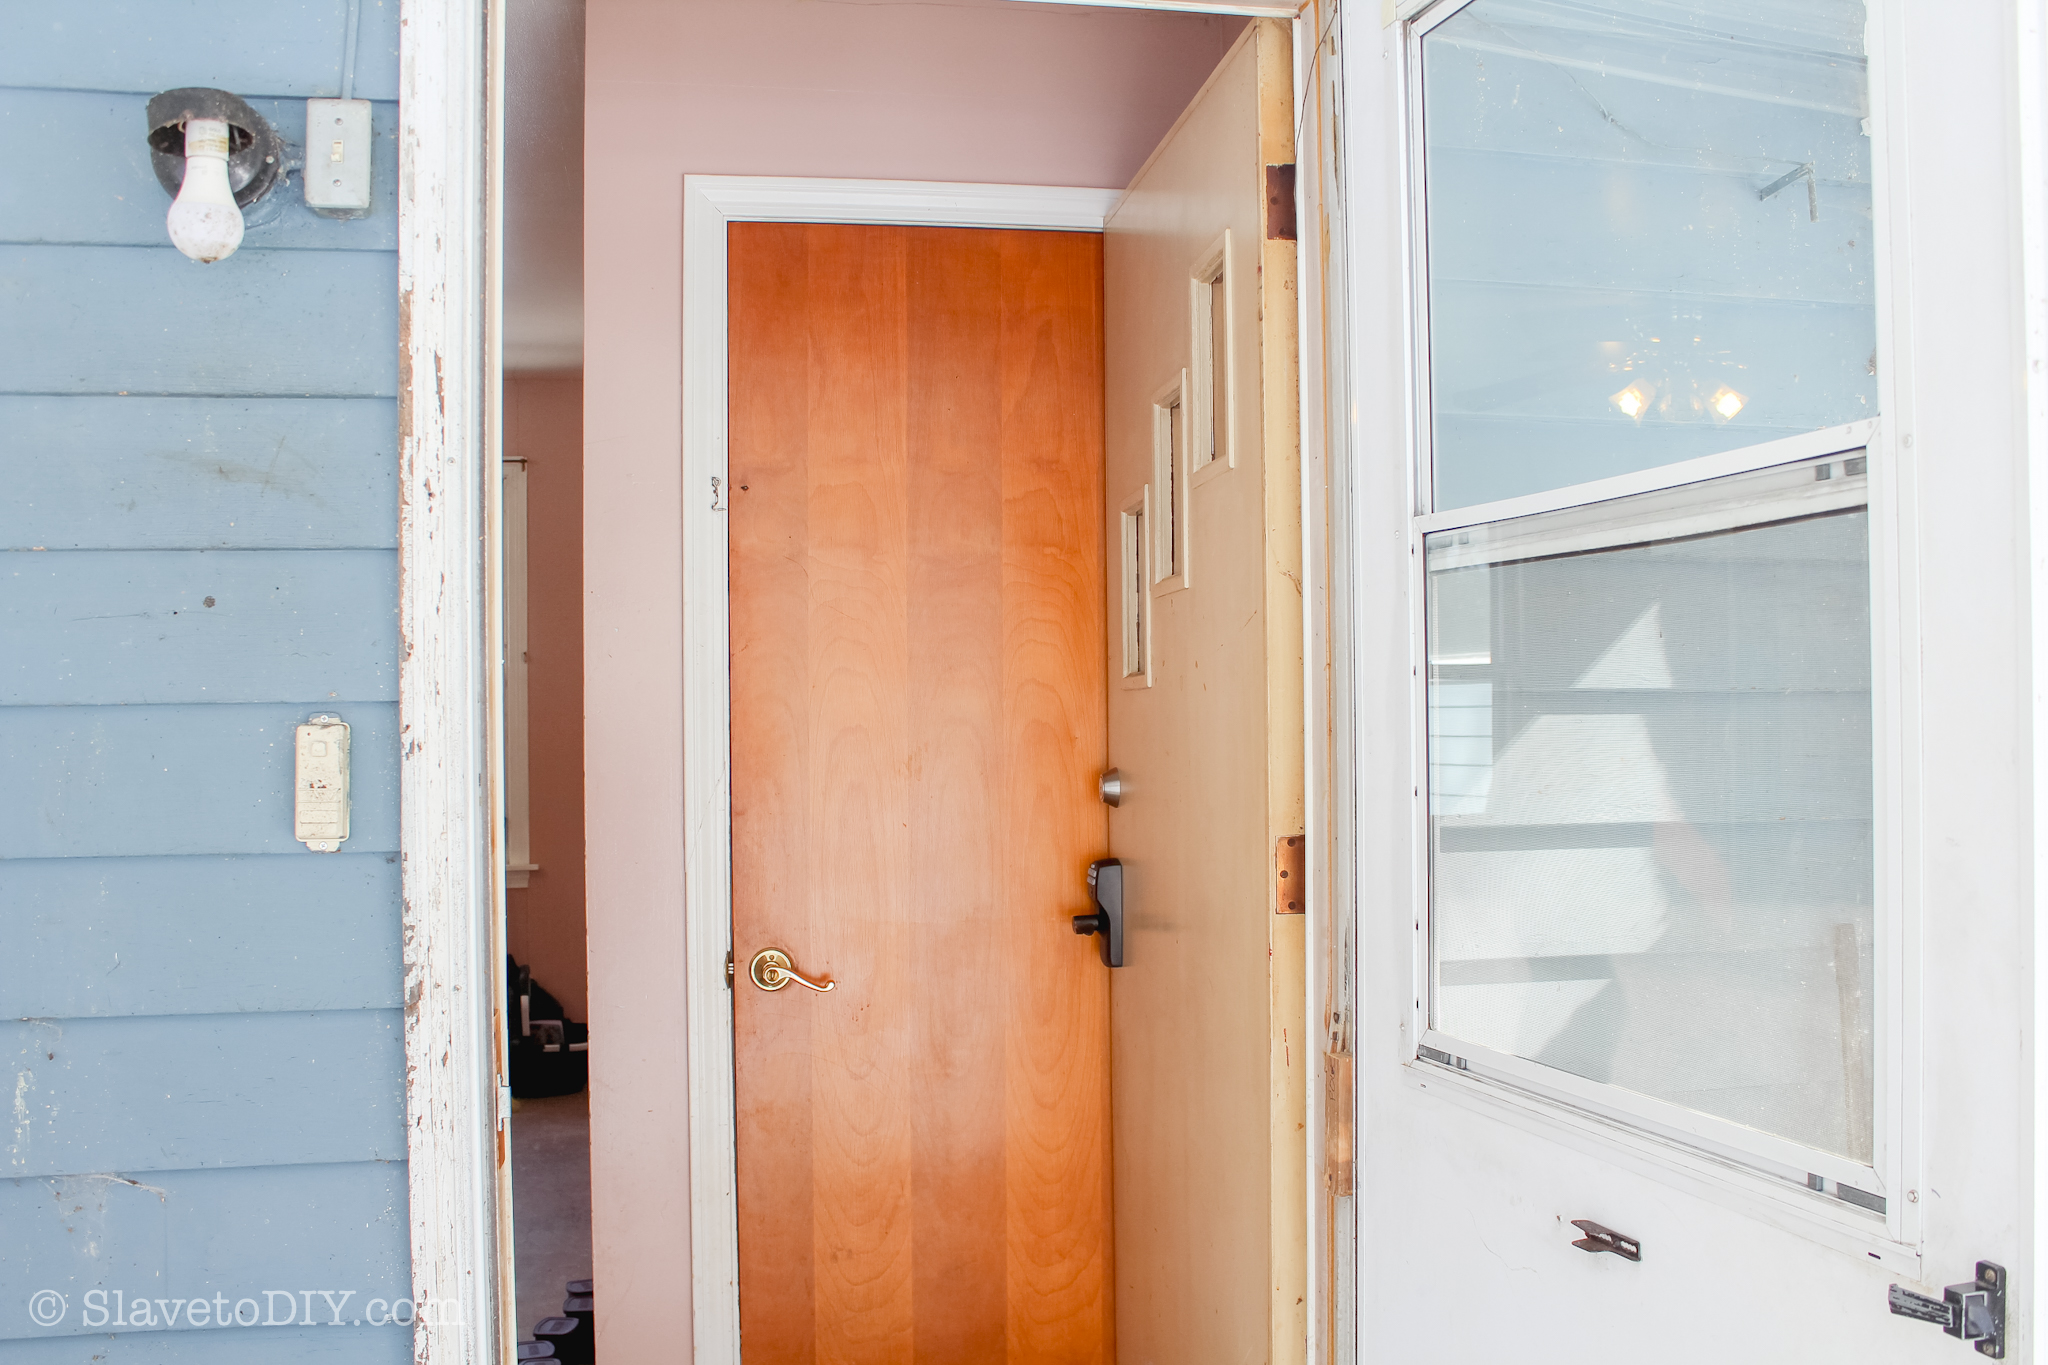
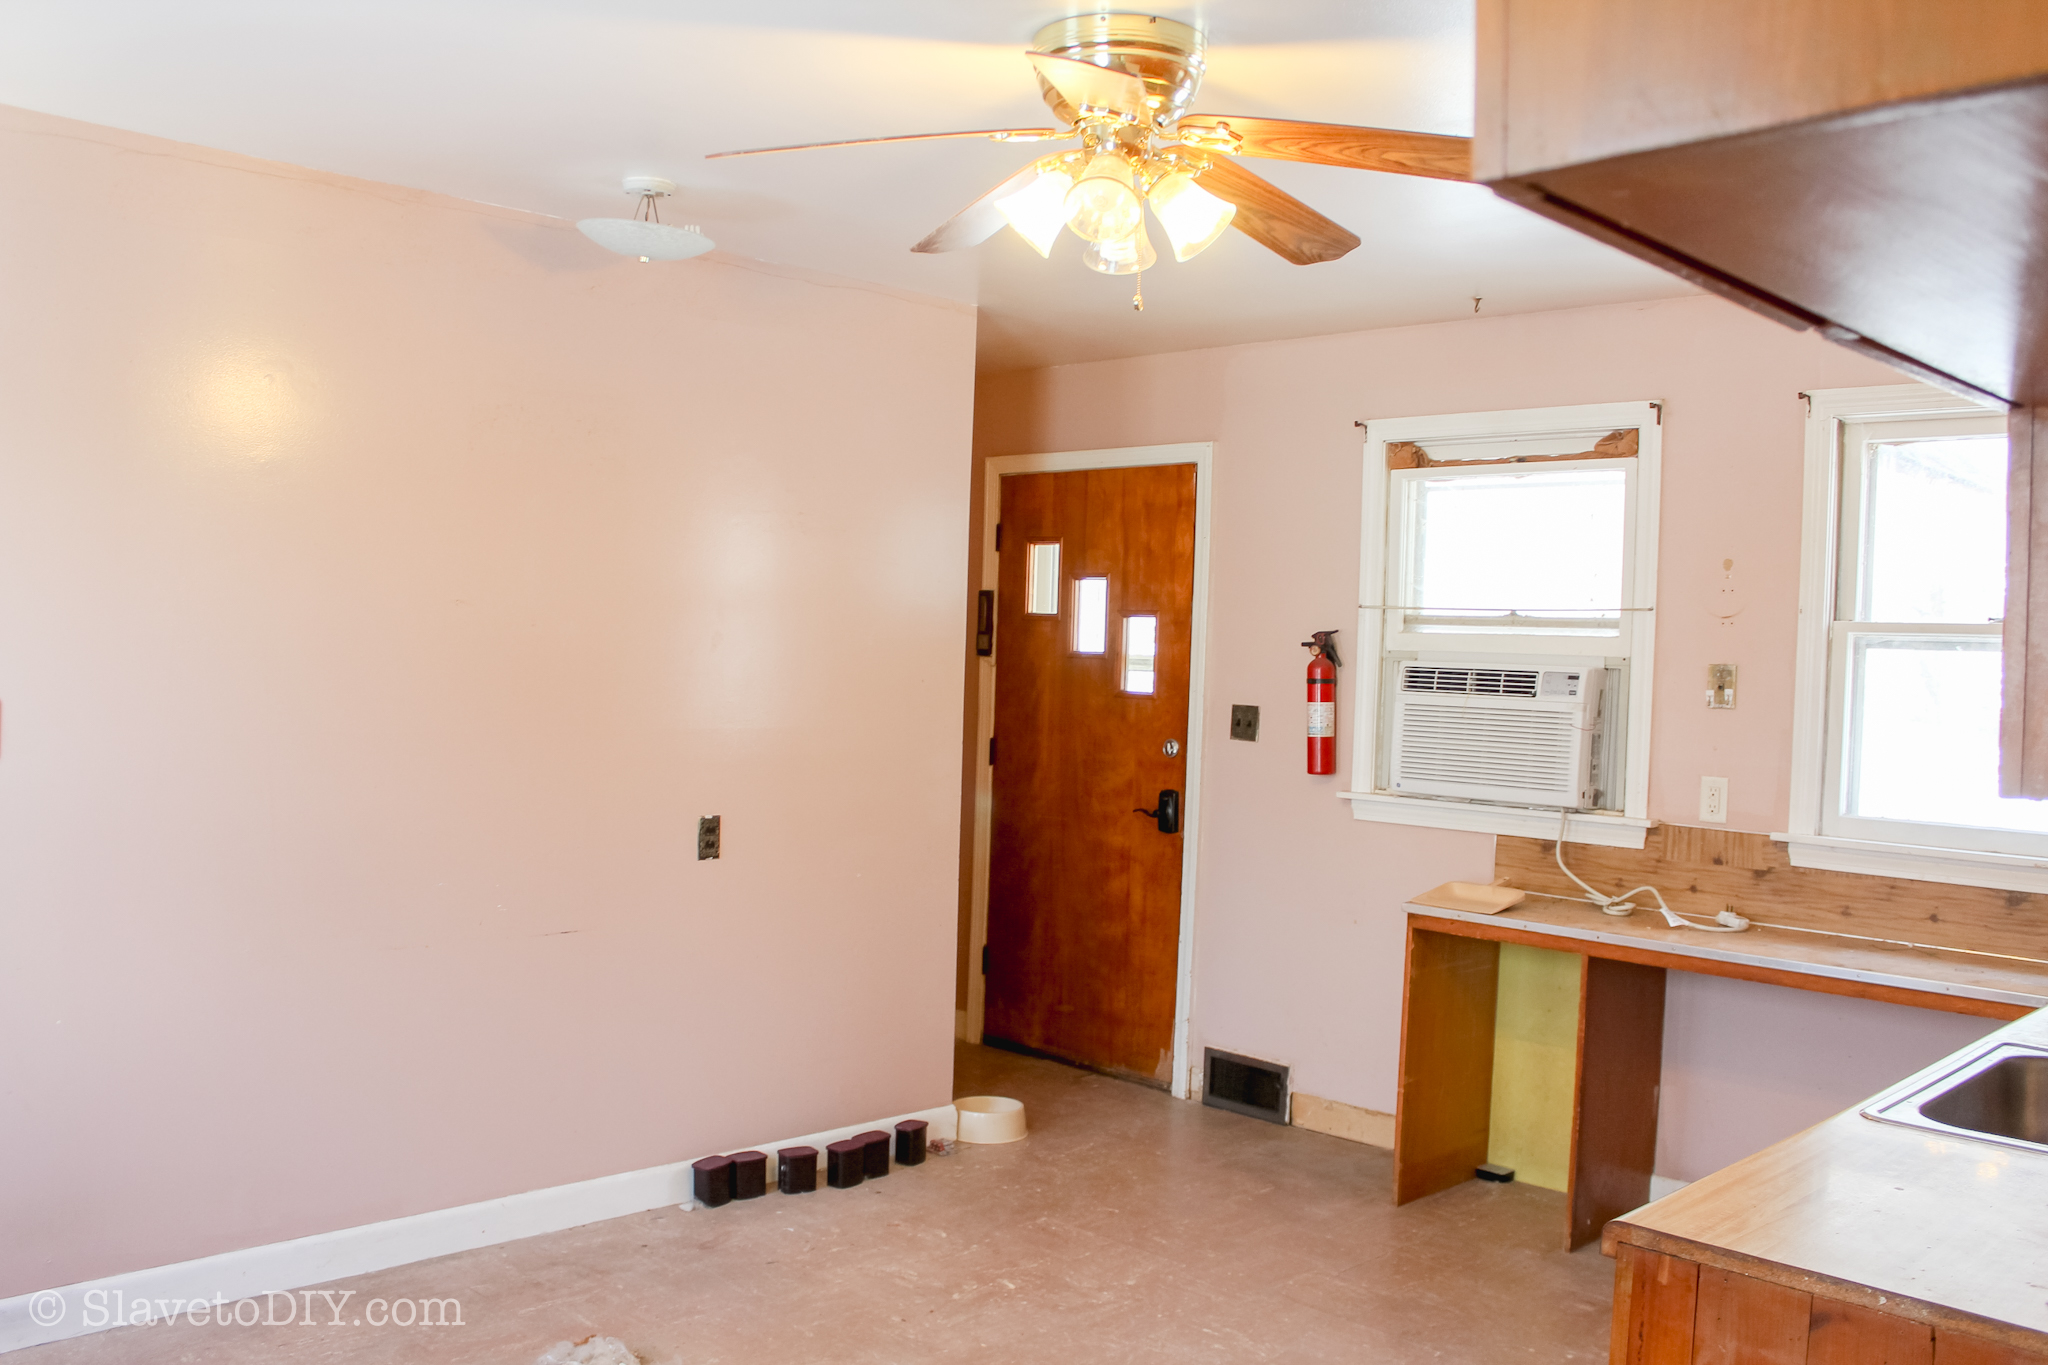
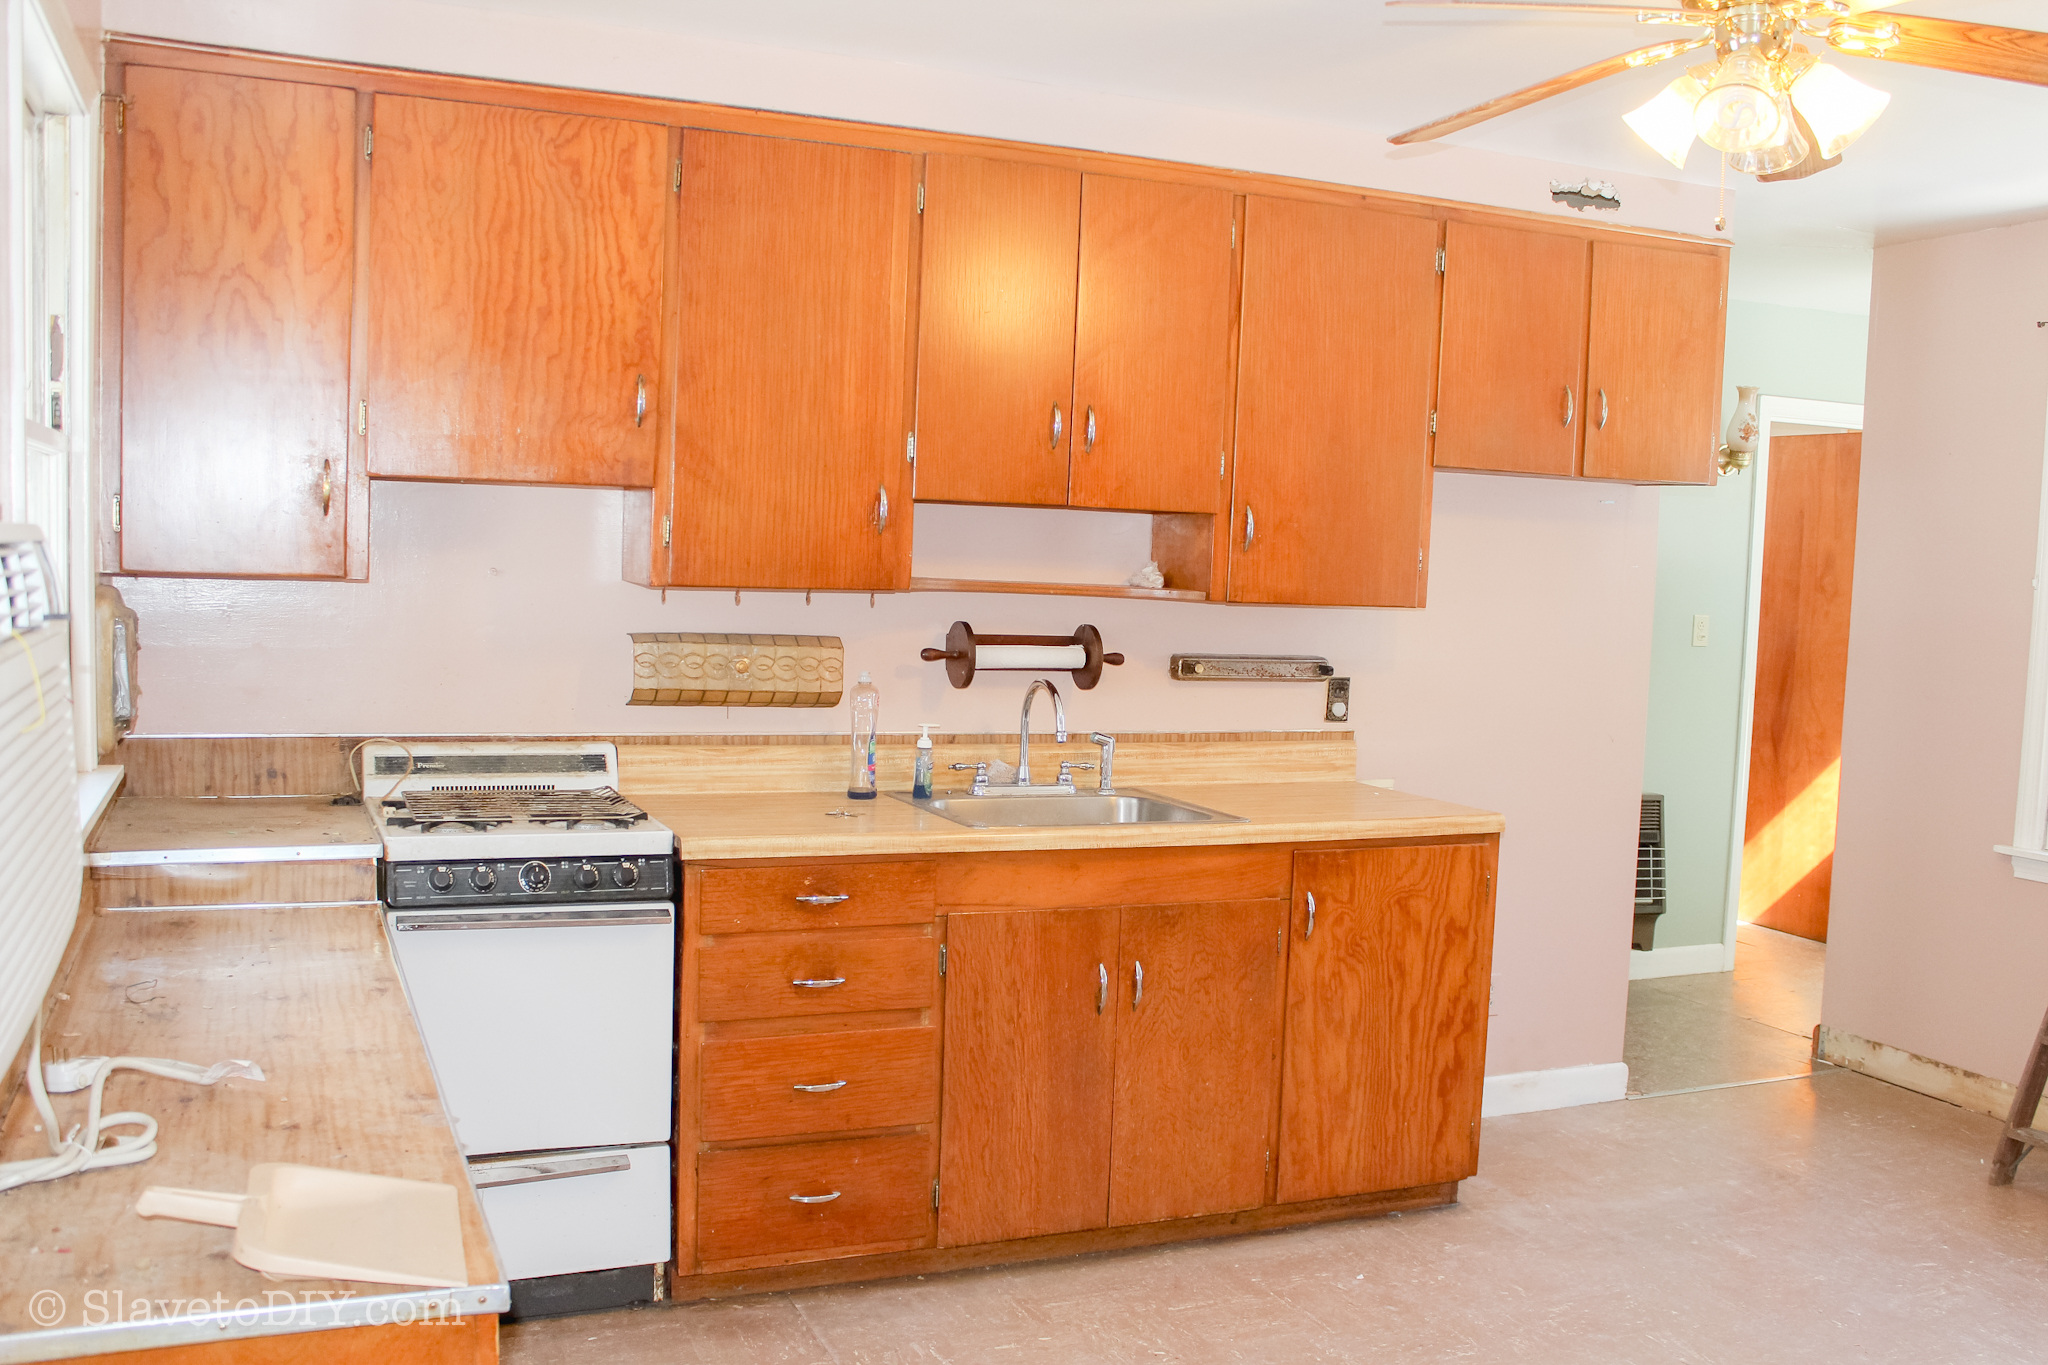
The Before
I was able to get a decent idea of the space from talking to my sister and lots of pictures and video chatting. I came up with a preliminary design that would save her time and money by leveraging the existing layout. We agreed it would be a nice kitchen.
In addition to detailed wall measurements, locations of lights, switches, plumbing, etc, I was working from the following before pictures:
Before and After Pictures of Grandma’s New Vermont Cottage Kitchen: Sponsored by Lily Ann Cabinets and designed by @callsigndesign on Instagram and @slavetodiy on Pinterest.
Before and After Pictures of Grandma’s New Vermont Cottage Kitchen: Sponsored by Lily Ann Cabinets and designed by @callsigndesign on Instagram and @slavetodiy on Pinterest.
Before and After Pictures of Grandma’s New Vermont Cottage Kitchen: Sponsored by Lily Ann Cabinets and designed by @callsigndesign on Instagram and @slavetodiy on Pinterest.
The Design Style
I talked to my sister at length about the intended style of the house (she was doing a complete renovation, not just the kitchen). The house was, at the time of purchase, sort of a bad mid-century look. We agreed that “Vermont Cottage” was a good style to strive for, throwing in some modern conveniences, and some new cabinetry. Trying to save her money on the reno, I had suggested we try to paint and re-use some of the cabinets, but it would not have been as polished of an end look.
However, if it’s a total tear down, I have some great tips to save you money. The main component of a kitchen remodel is the cabinetry. There are so many cabinet options and they can run from $100 each to thousands of dollars each.
Thousands of dollars. “For a CABINET???” you ask. Oh yes, for a cabinet.
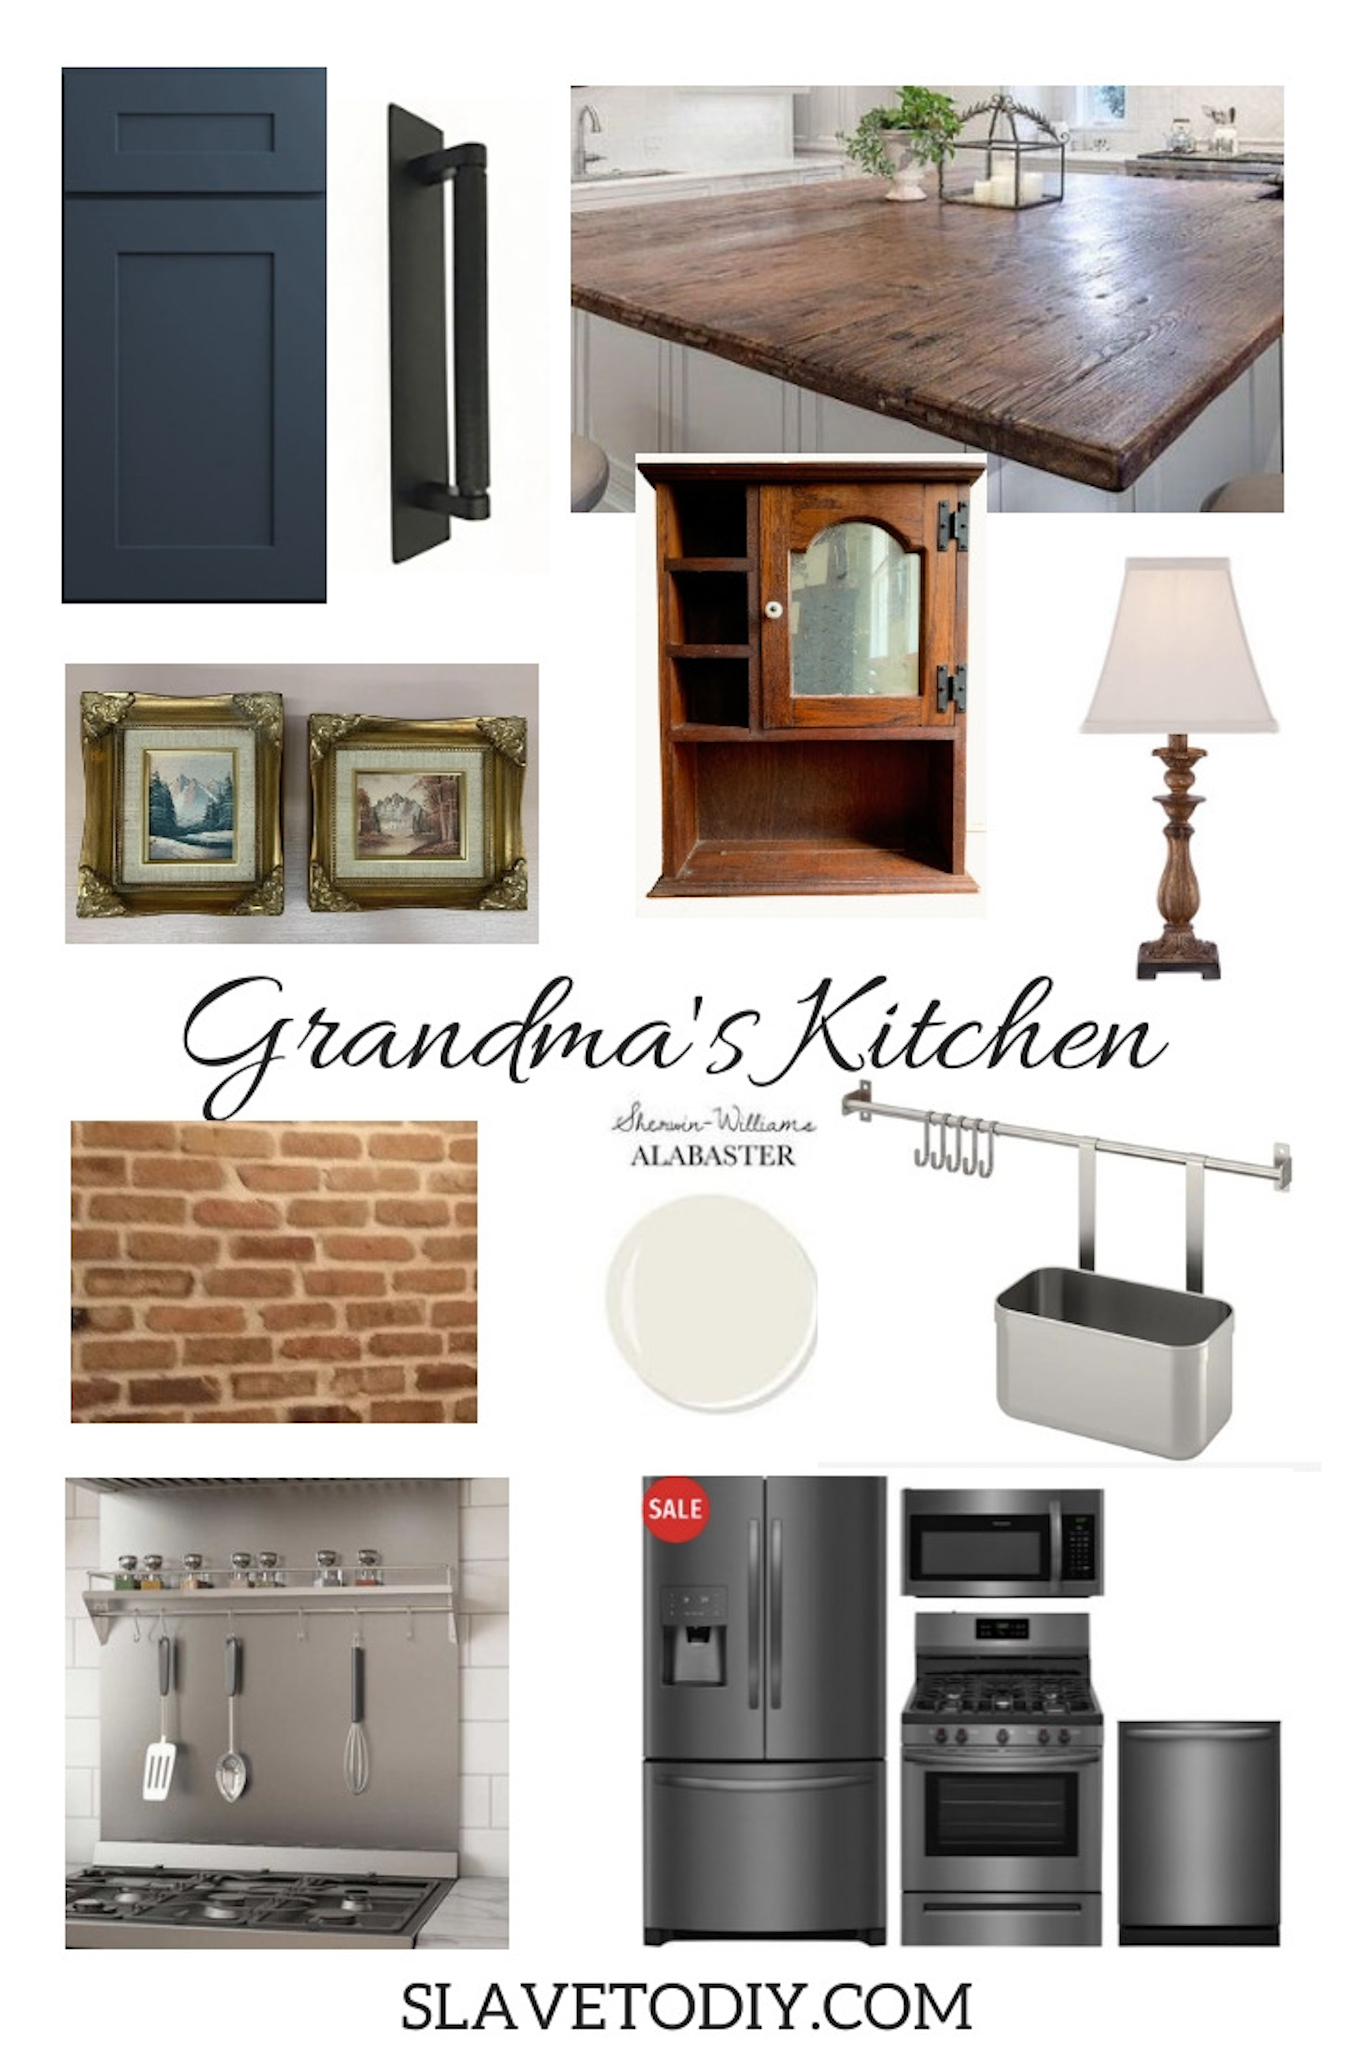
Anyway, here is the original “Vermont Cottage” mood board that I made for my mom’s forever kitchen to give my sister an idea of how I wanted the finished space to feel. You may notice that it has some polished elements, some rustic elements, and some commercial/industrial level elements also.
Before and After Pictures of Grandma’s New Vermont Cottage Kitchen: Sponsored by Lily Ann Cabinets and designed by @callsigndesign on Instagram and @slavetodiy on Pinterest.
For my mom and her husband, we had some specific design considerations on top of the usual desire to create a timeless kitchen:
Her husband cooks greasy steaks on high heat almost daily: Although a dedicated hood was not in the budget, we chose a microwave that was capable of venting to the outside. We also planned a stainless steel sheet as a stove backsplash to make clean-up easier.
Her husband is a mechanic: If any of you have a mechanic in your house, you know that black fingerprints are a fact of life. We chose dark stainless for the appliances and beefy black hardware to minimize smudges.
My preliminary design had options to use the existing layout and cabinets, add some cabinets and move the sink under the window, and to add some cabinets and bridge shelves from IKEA to the wall that was blank in the kitchen. This design was the most budget friendly.
Then my sister brought my brother in to look at the space before we agreed on a design. He said, “let’s open it up.” Read: please scrap your entire layout. We’re doing this differently.
The problem was: inbetween the closed off kitchen and living room were two walls and a staircase that went to the basement. Apparently, for carpenters that wear superman capes, this is a non-issue. He informed us he was going to move the staircase to the other end of the living room, frame the hole in, build a new staircase with kneewall, and we would have one BIG, FANTASTIC, open living space.
So, I revised my plan, which doubled the cabinet space we would have in the kitchen, plus the overall aesthetic was going to be awesome!
The Design Plan
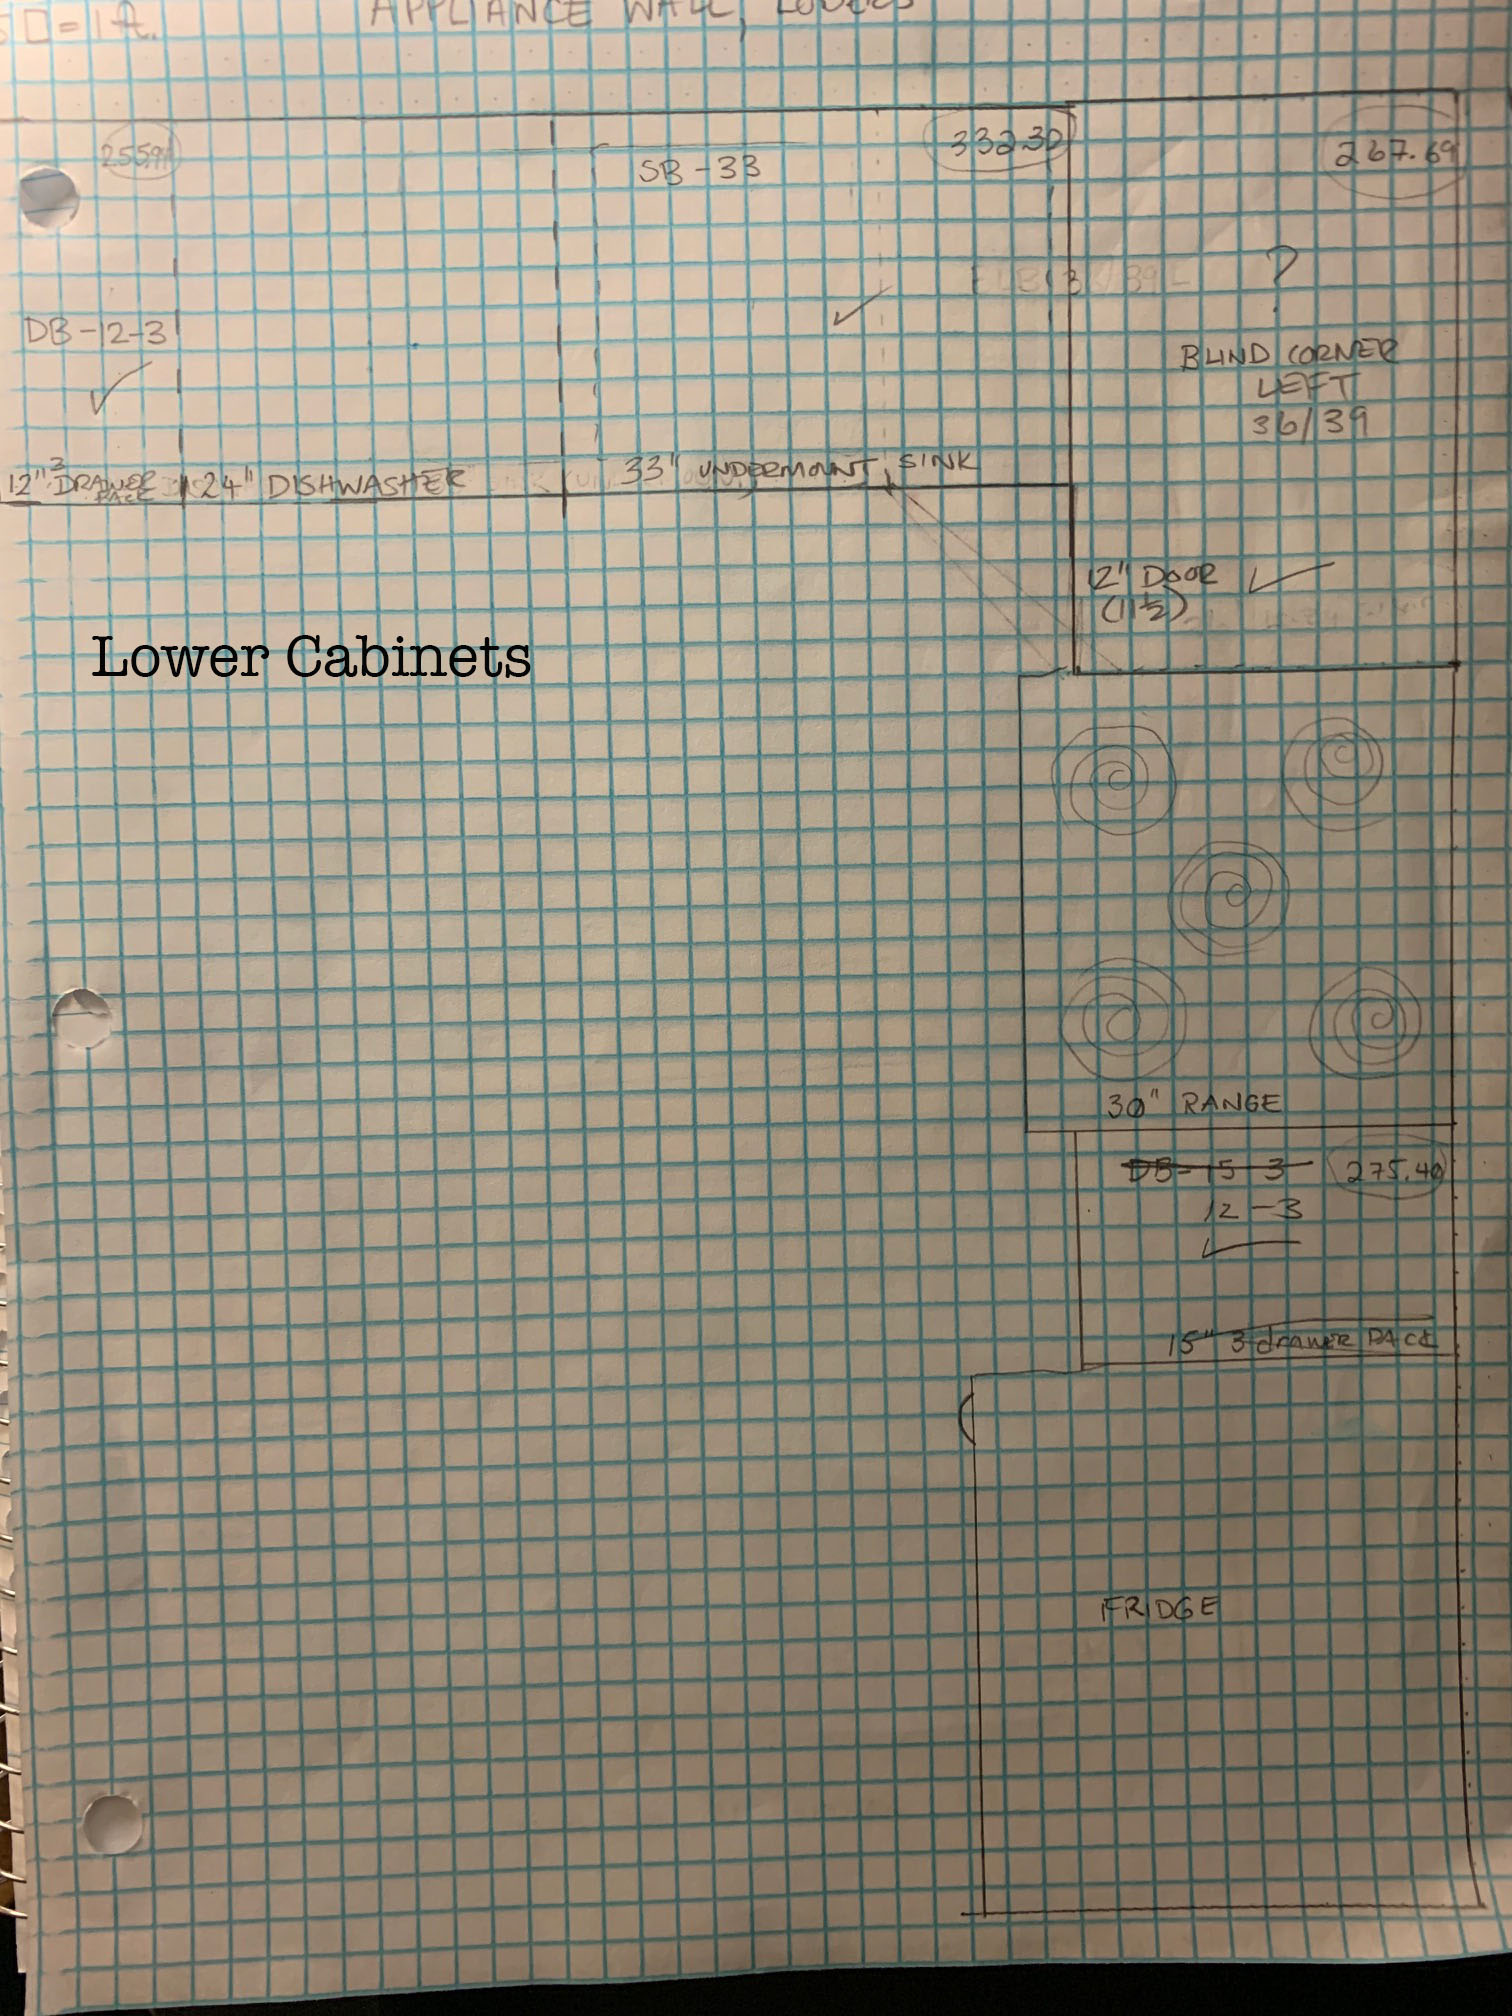
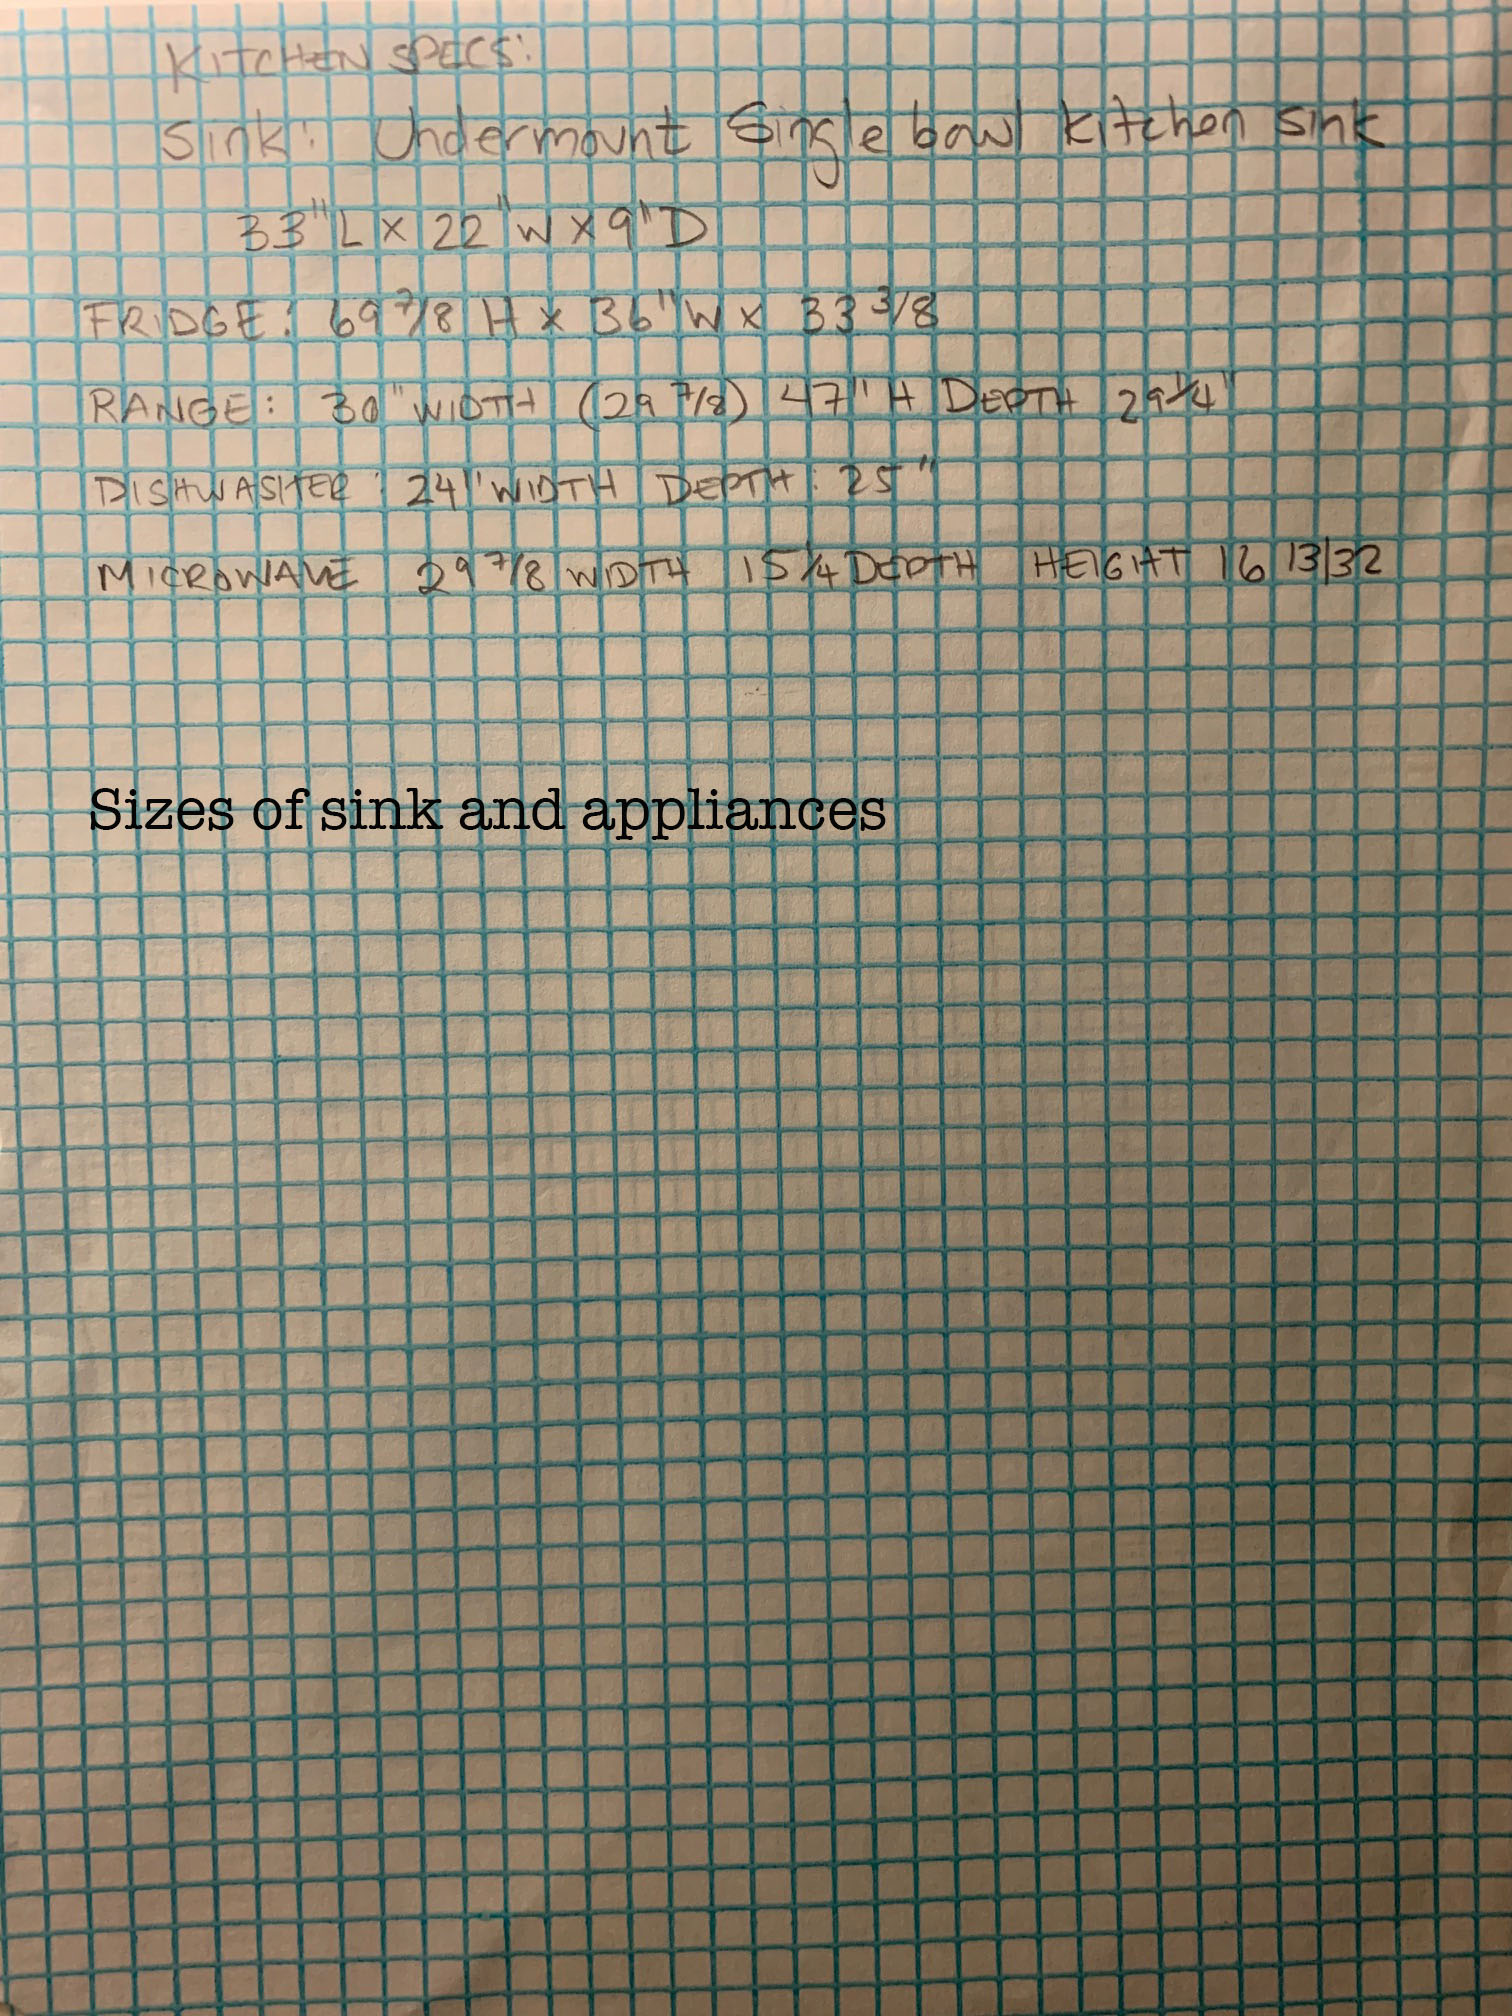
I got out my graph paper (yes, I am old school and I still use graph paper for my designs) and was back to the old drawing board. I put my wall measurements and locations of fixtures, etc (including appliance measurements) down onto graph paper and then proceeded to start filling in standard size (non-custom) cabinet sizes to see how much of the space I could use. It turns out, I was able to use almost every inch of the back wall and create a nice big kitchen.
While I was designing I was also researching pricing for cabinets. YIKES. There are a lot of options, and some of them, even their off the shelf prices (non-custom cabinets) are pricey. I’m always trying to find a good deal, especially when I’m spending someone else’s money. I found a company that was running a sale that has good reviews and had a cabinet style I liked. They also offered design services, so I figured getting a pro to look at my design couldn’t hurt, and I was curious to see what they would come up with.
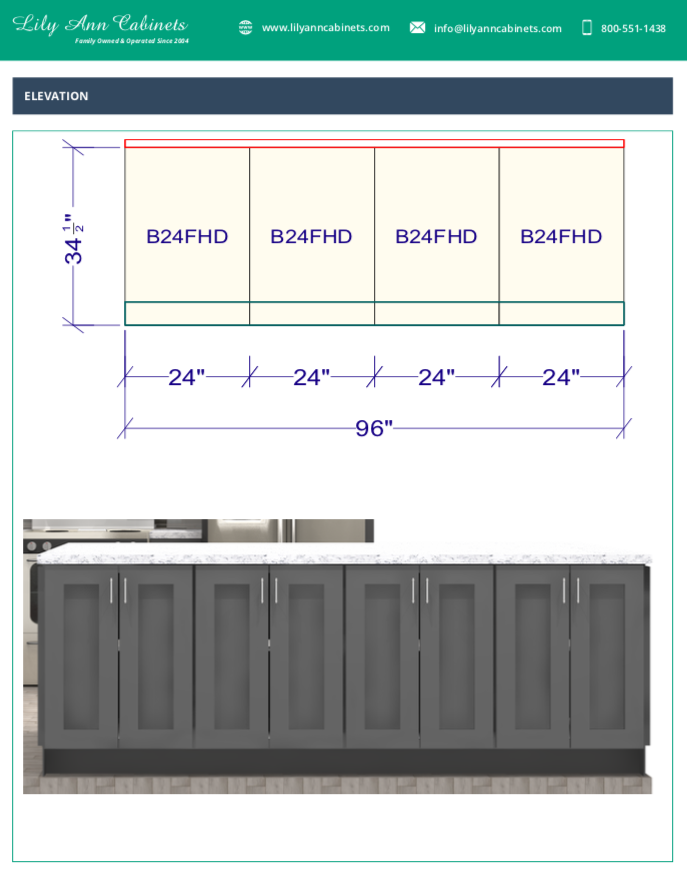
This is what I sent them (I also told the designer we wanted to do an island with four base cabinets on each side):
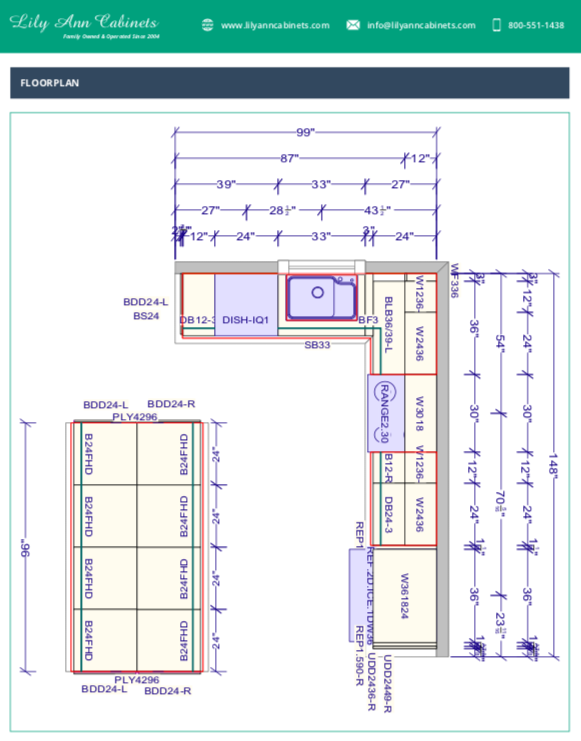
How To Measure For, Design, Order, and Install Your Dream Kitchen From RTA Cabinets: Graph Paper Design for the lower cabinets
How To Measure For, Design, Order, and Install Your Dream Kitchen From RTA Cabinets, Sink and appliances information
Fancy, right? Ha.
Tip: You don’t need anything near as detailed as what I sent to the cabinet company. You can send them basic wall dimensions with locations of outlets, plumbing and light fixtures, and doors and windows, and they will design the kitchen for you!
Well, this is what they sent me back (and why we ultimately went with the company):
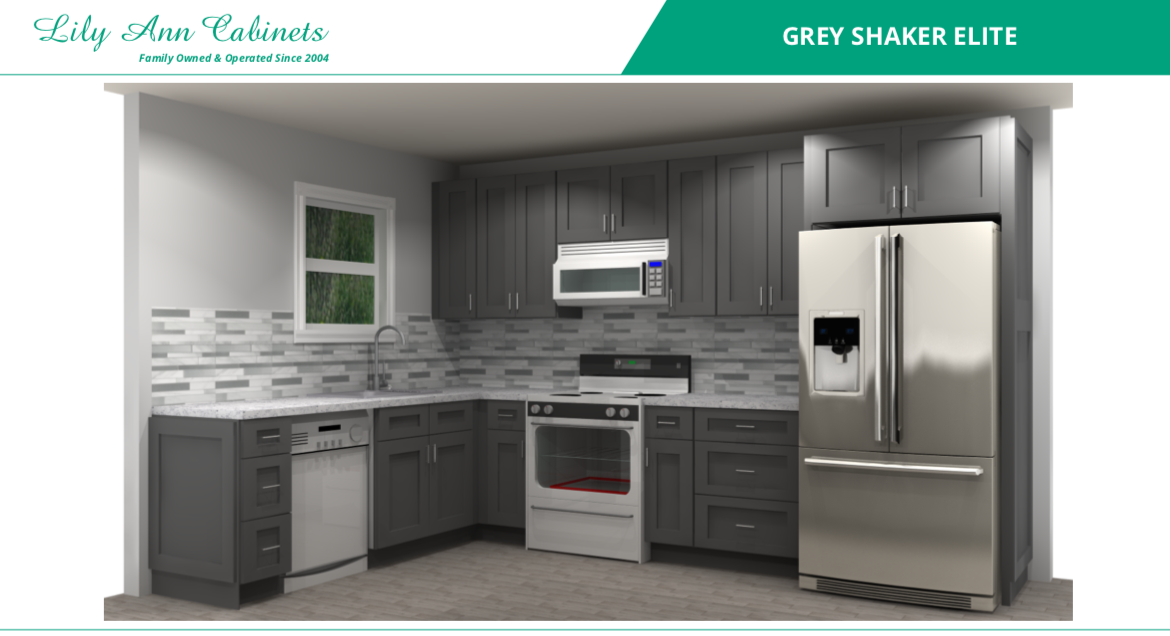
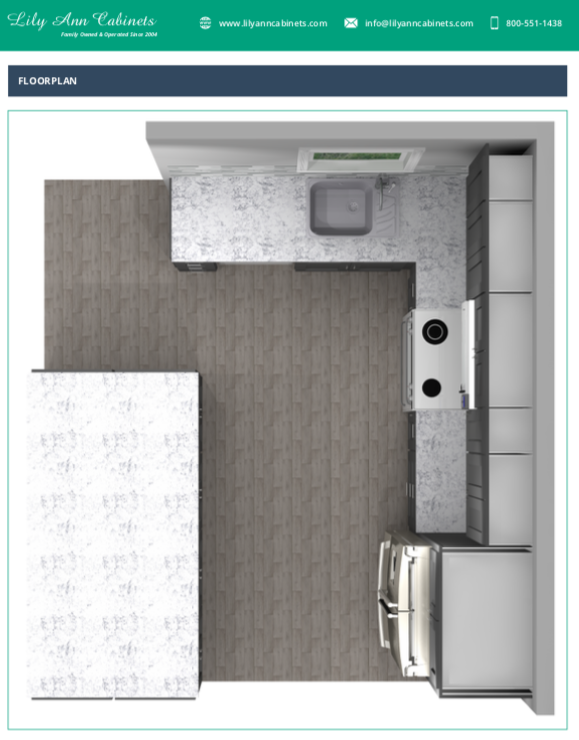
How To Measure For, Design, Order, and Install Your Dream Kitchen From RTA Cabinets: Lily Ann Cabinets Design Files
How To Measure For, Design, Order, and Install Your Dream Kitchen From RTA Cabinets: Lily Ann Cabinets Design Files
How To Measure For, Design, Order, and Install Your Dream Kitchen From RTA Cabinets: Lily Ann Cabinets Design Files
How To Measure For, Design, Order, and Install Your Dream Kitchen From RTA Cabinets: Lily Ann Cabinets Design Files
How To Measure For, Design, Order, and Install Your Dream Kitchen From RTA Cabinets: Lily Ann Cabinets Design Files
How To Measure For, Design, Order, and Install Your Dream Kitchen From RTA Cabinets: Lily Ann Cabinets Design Files
How To Measure For, Design, Order, and Install Your Dream Kitchen From RTA Cabinets: Lily Ann Cabinets Design Files
How To Measure For, Design, Order, and Install Your Dream Kitchen From RTA Cabinets: Lily Ann Cabinets Design Files
How To Measure For, Design, Order, and Install Your Dream Kitchen From RTA Cabinets: Lily Ann Cabinets Design Files
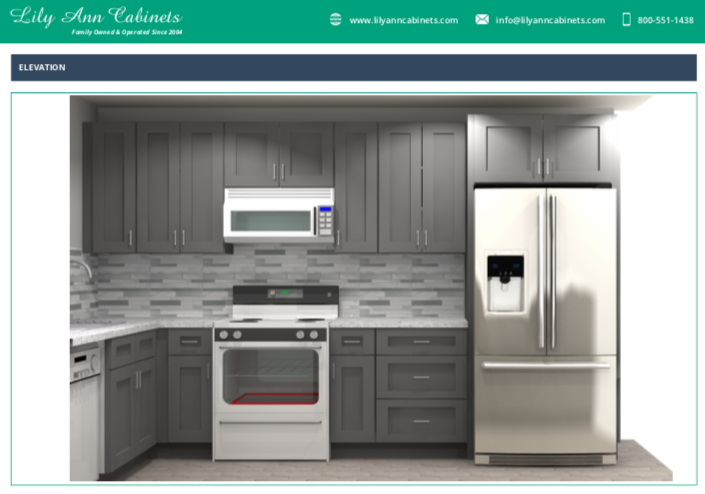
I was super impressed with the designer’s knowledge, and they have a whole tech team dedicated to rendering 3D images of your kitchen so you can easily visualize EXACTLY how it’s going to look.
I think it was about this time that I asked the company if they would like to sponsor our kitchen (we received a discount on the price of the cabinets), so we teamed up with Lily Ann Cabinets for the cabinets, and decided to go with RTA to save my sister some money on the ever-growing budget for the project. (Pssst, don’t tell them, but we were going to use them anyway because they were already the least expensive manufacturer I could find).
Ready to get started? My readers can use the code SDIY2018 at checkout to get 5% off your Lily Ann Cabinets order!
RTA cabinets are “ready to assemble” and my husband and I had previously installed some in our old kitchen, so the RTA thing didn’t scare me at all. My brother, on the other hand, flat refused to assemble them (and when he’s adamant I just go with it), and insisted we do it when we came for the kitchen install. We agreed and we moved forward with our planning.
Except, remember that whole COVID thing? The entire design and ordering process was accomplished by Lily Ann employees working from home, and the order assembled and shipped by a skeleton crew in their warehouse. Our planned working trip over the kids’ Spring Break was smack in the middle of the lockdown. And our ability to plan another trip was completely on hold with really no end in sight.
I sent the designer my sketch on Feb 28, 2020 and the cabinets were delivered April 14, 2020. The whole process, from starting the design to delivery of the cabinets, was less than seven weeks and that was during the pandemic lockdown.
Tip: Don’t hack up the old cabinets with a sledgehammer like the TV shows do. Why?
1) It’s super messy. Instead: you just need to remove a few screws to pop the whole thing off the wall.
2) You can either re-use the cabinets in your garage for extra storage or you can donate them to the Habitat For Humanity Re-store and get a donation slip from them that you can write off on your taxes (they’ll even come pick up your donations!).
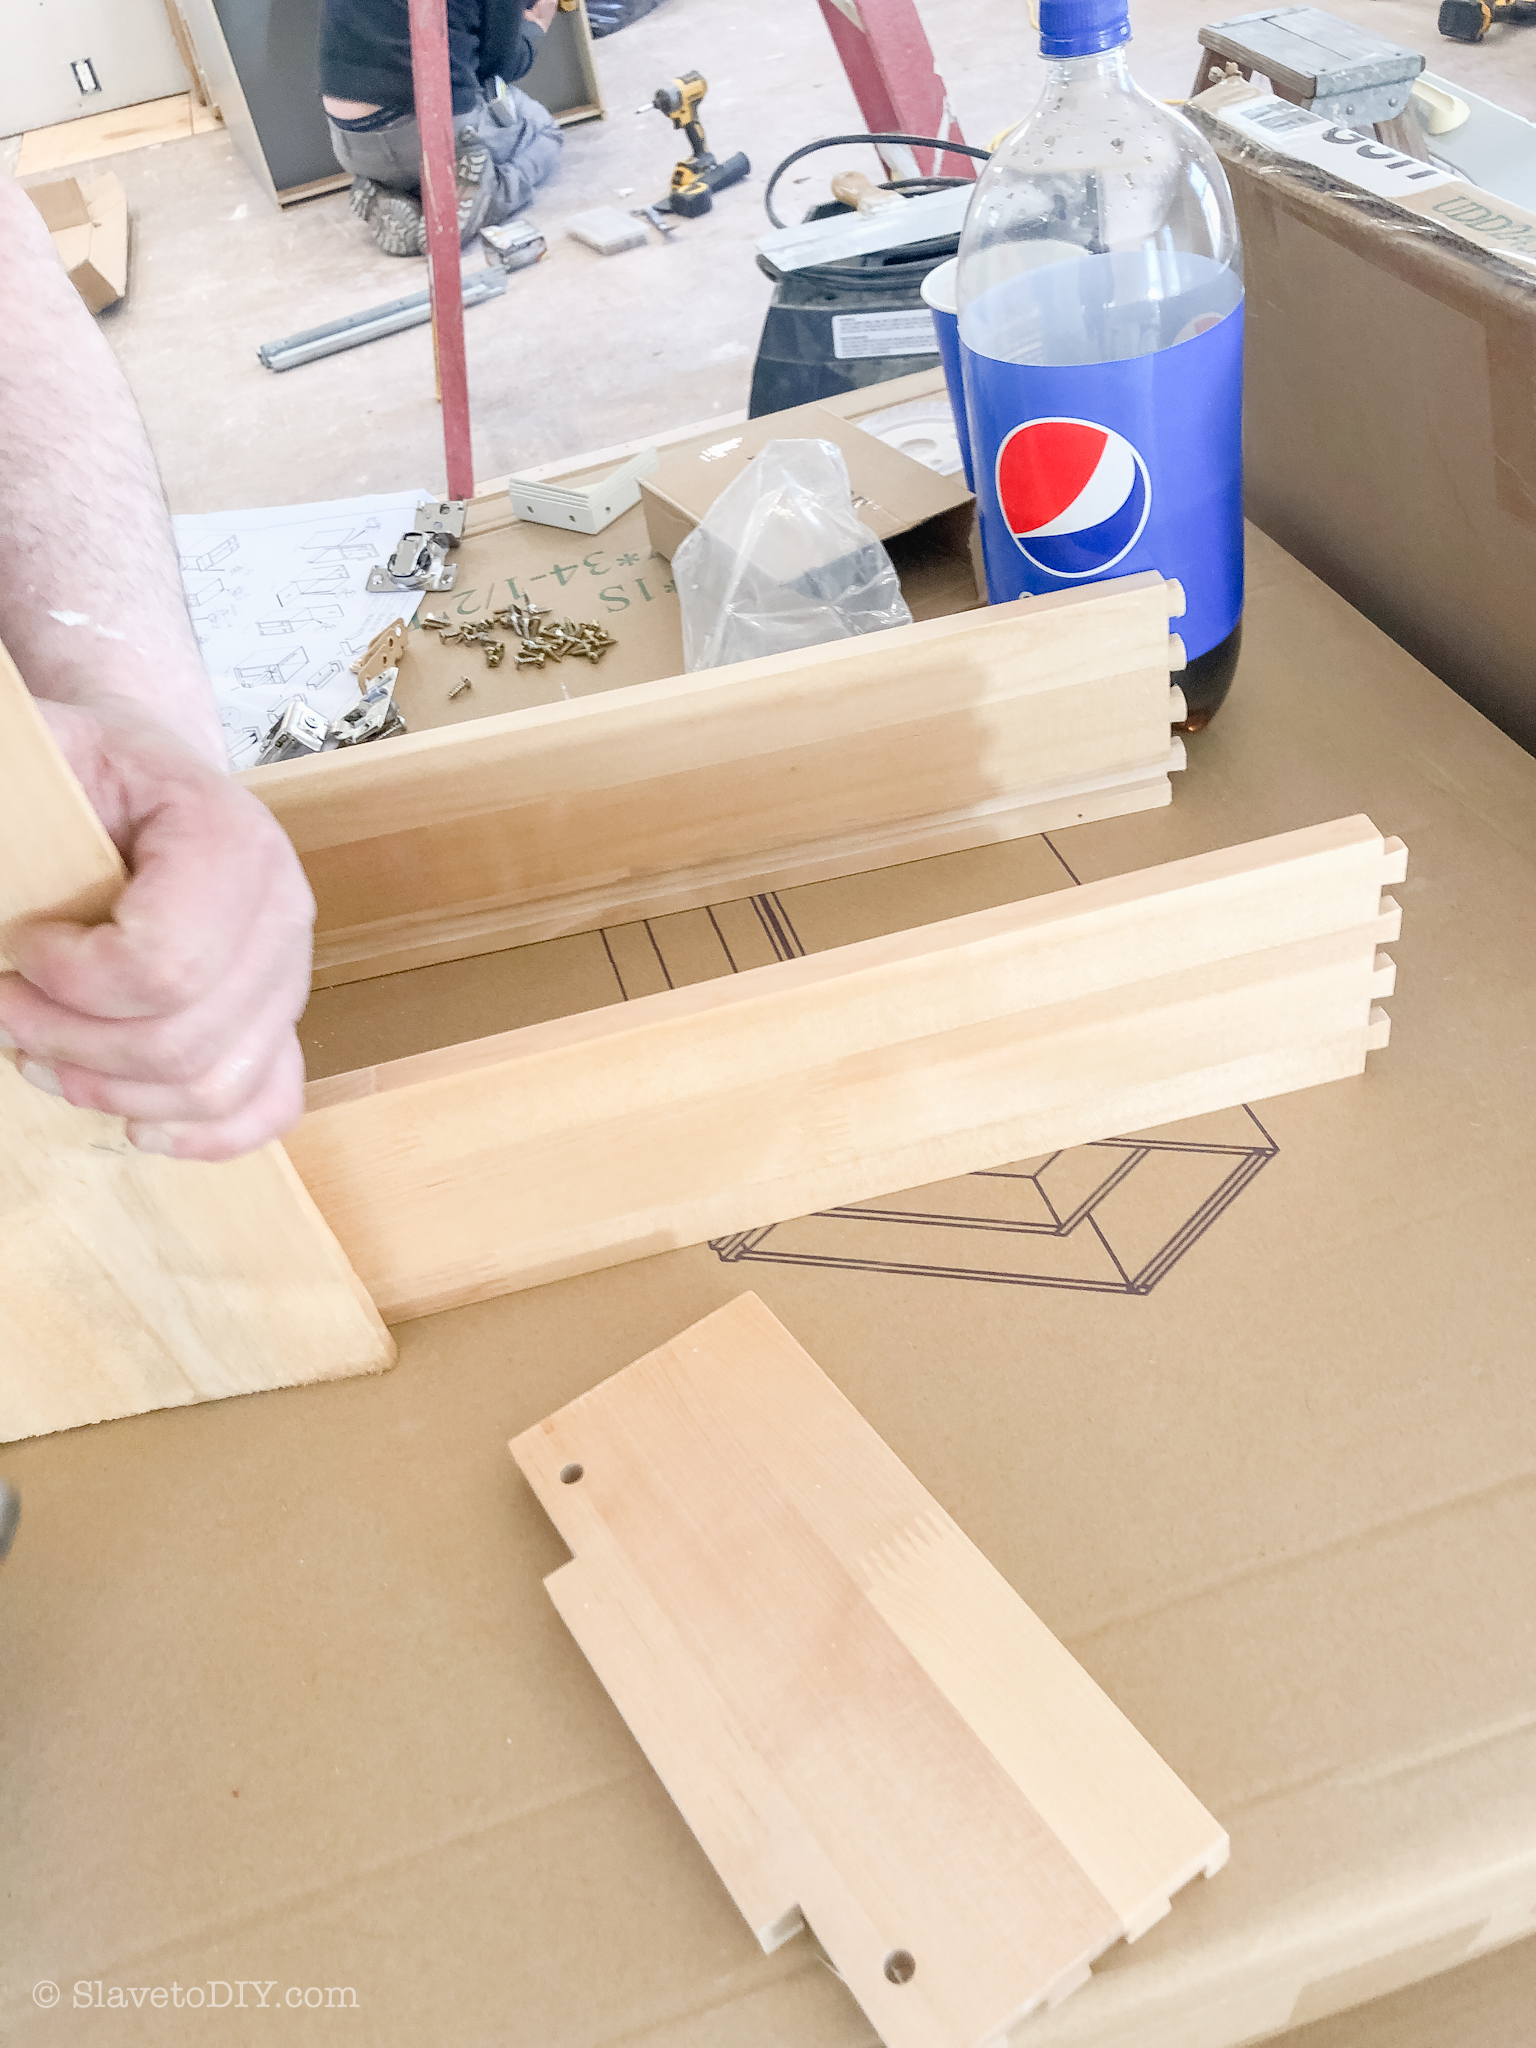
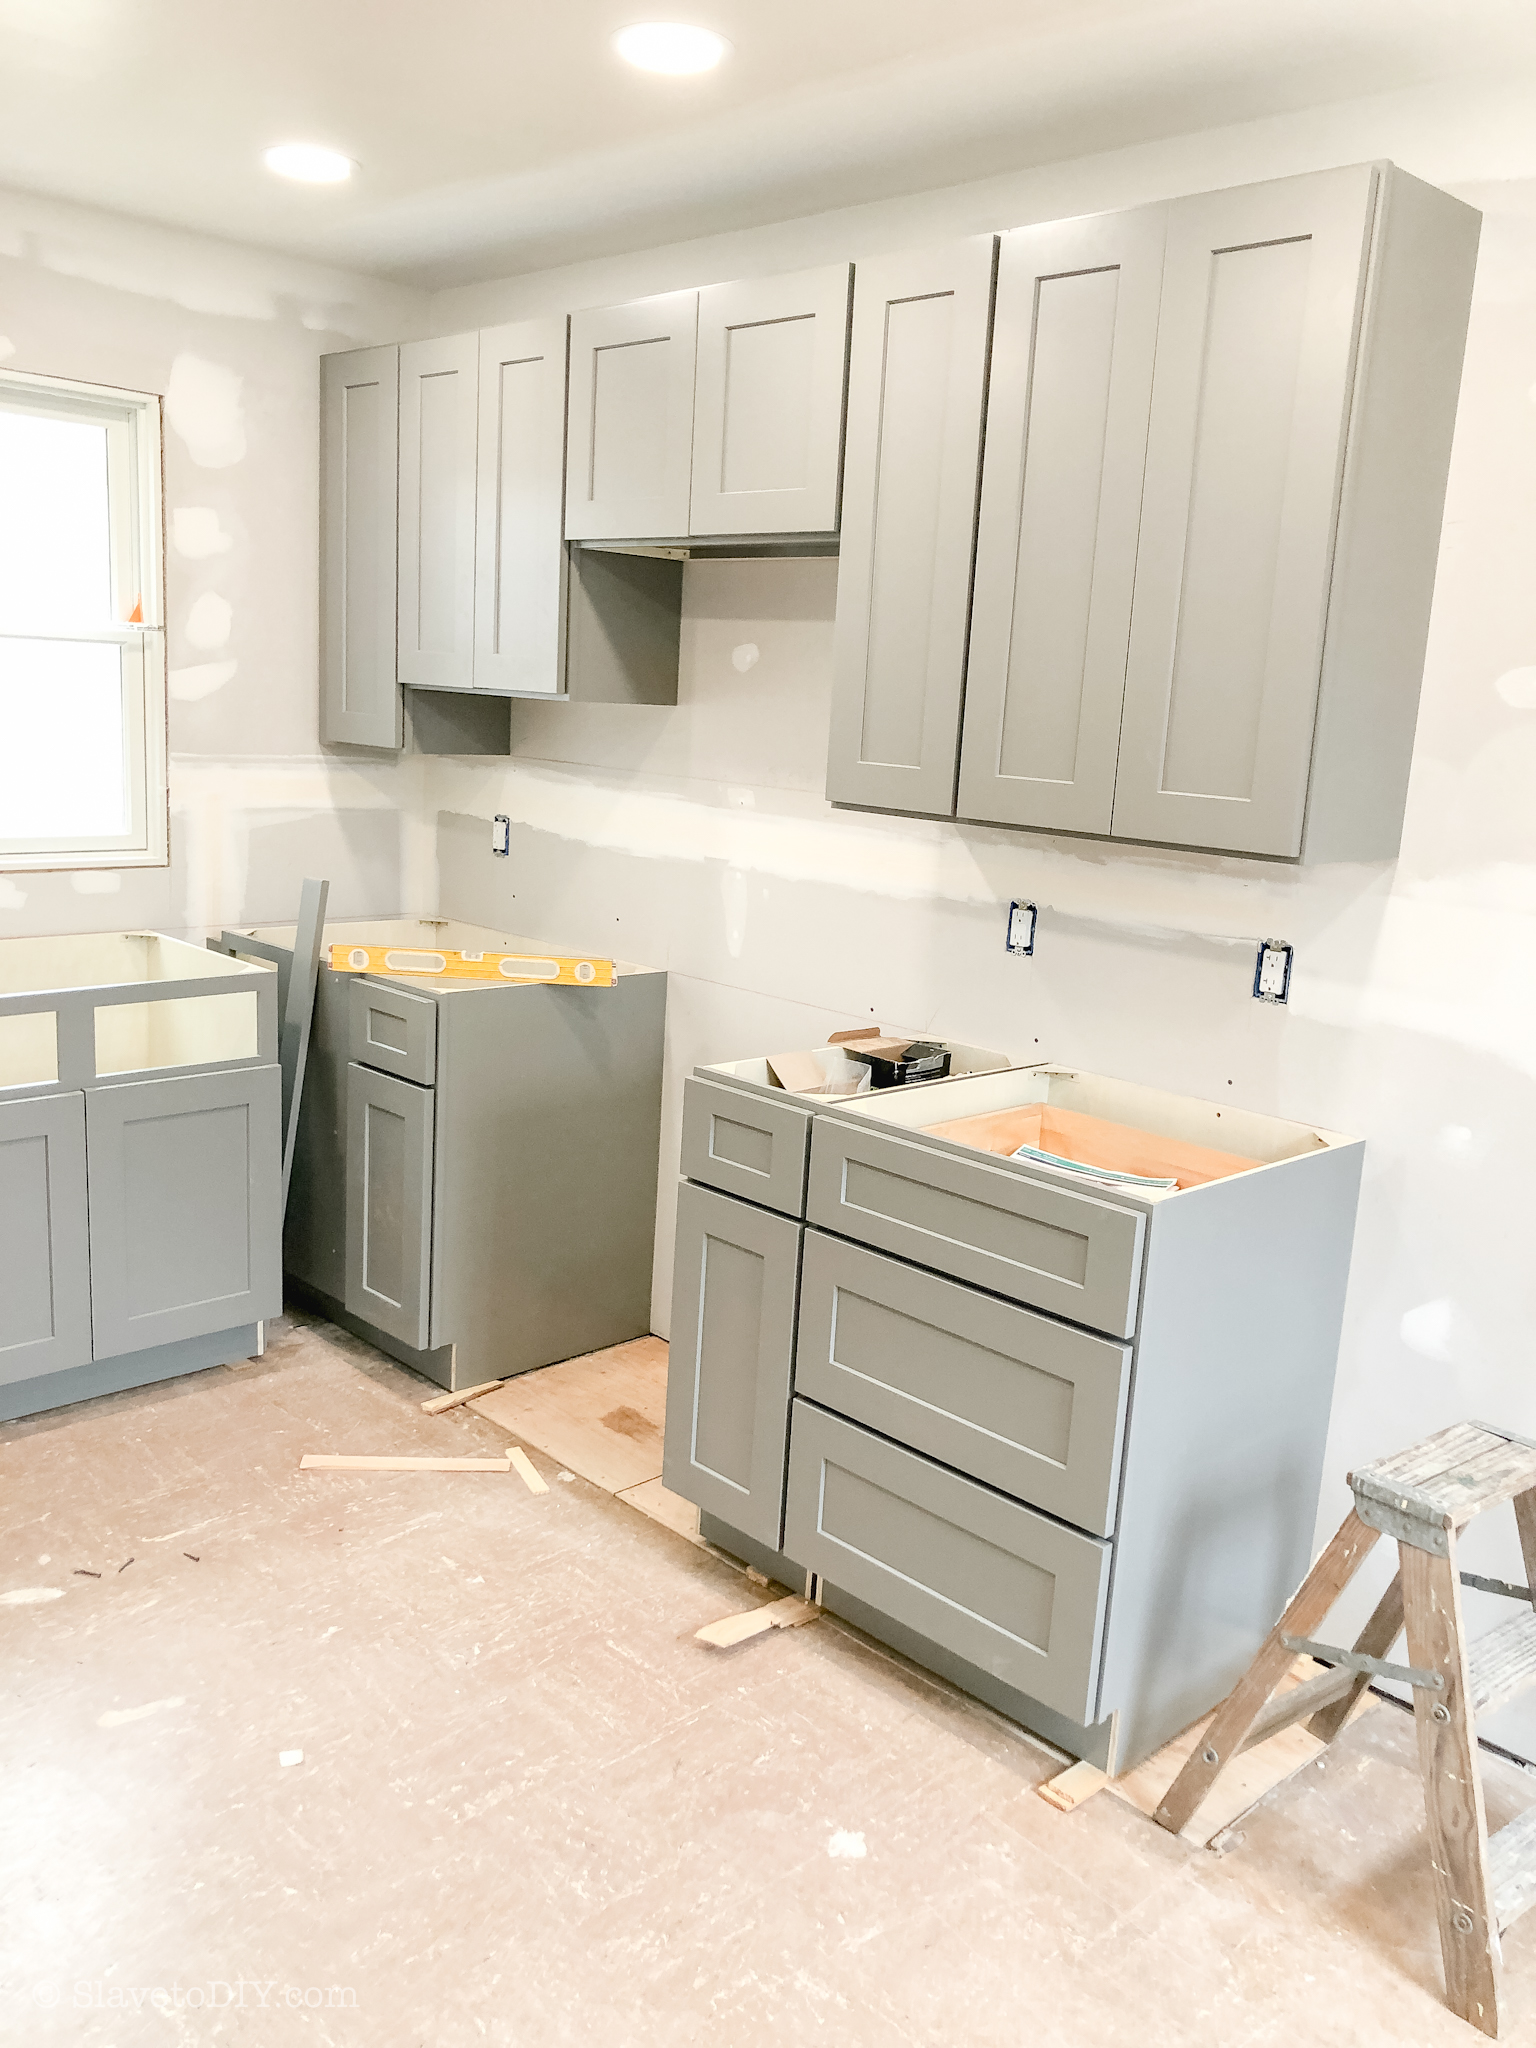
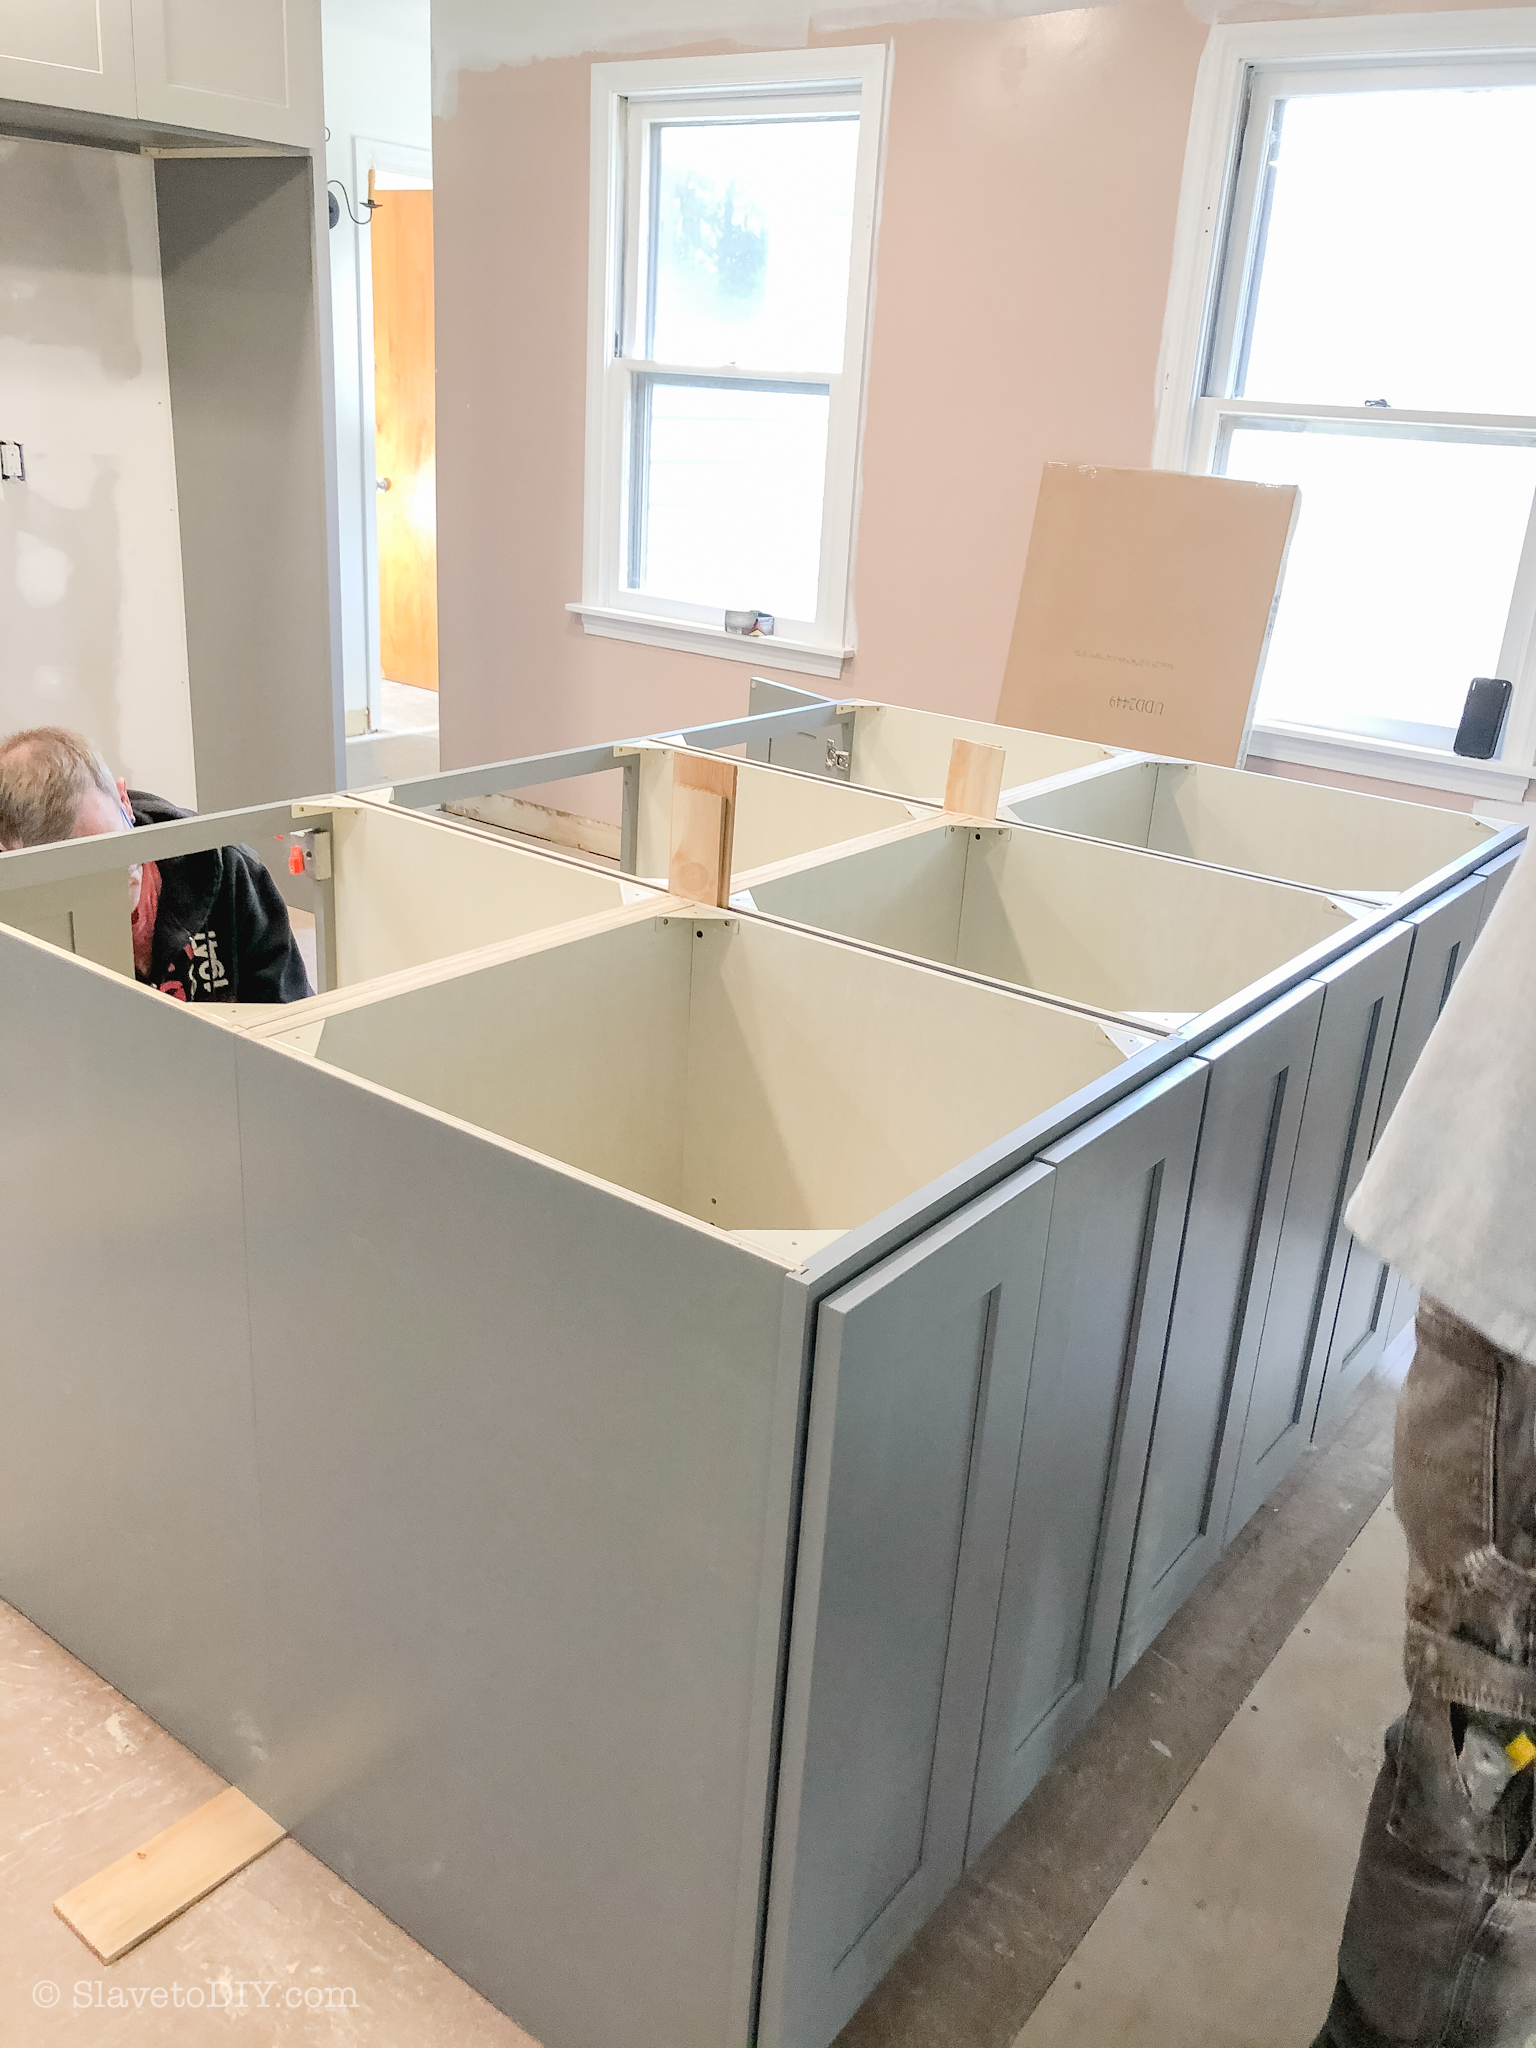
Cabinet Assembly
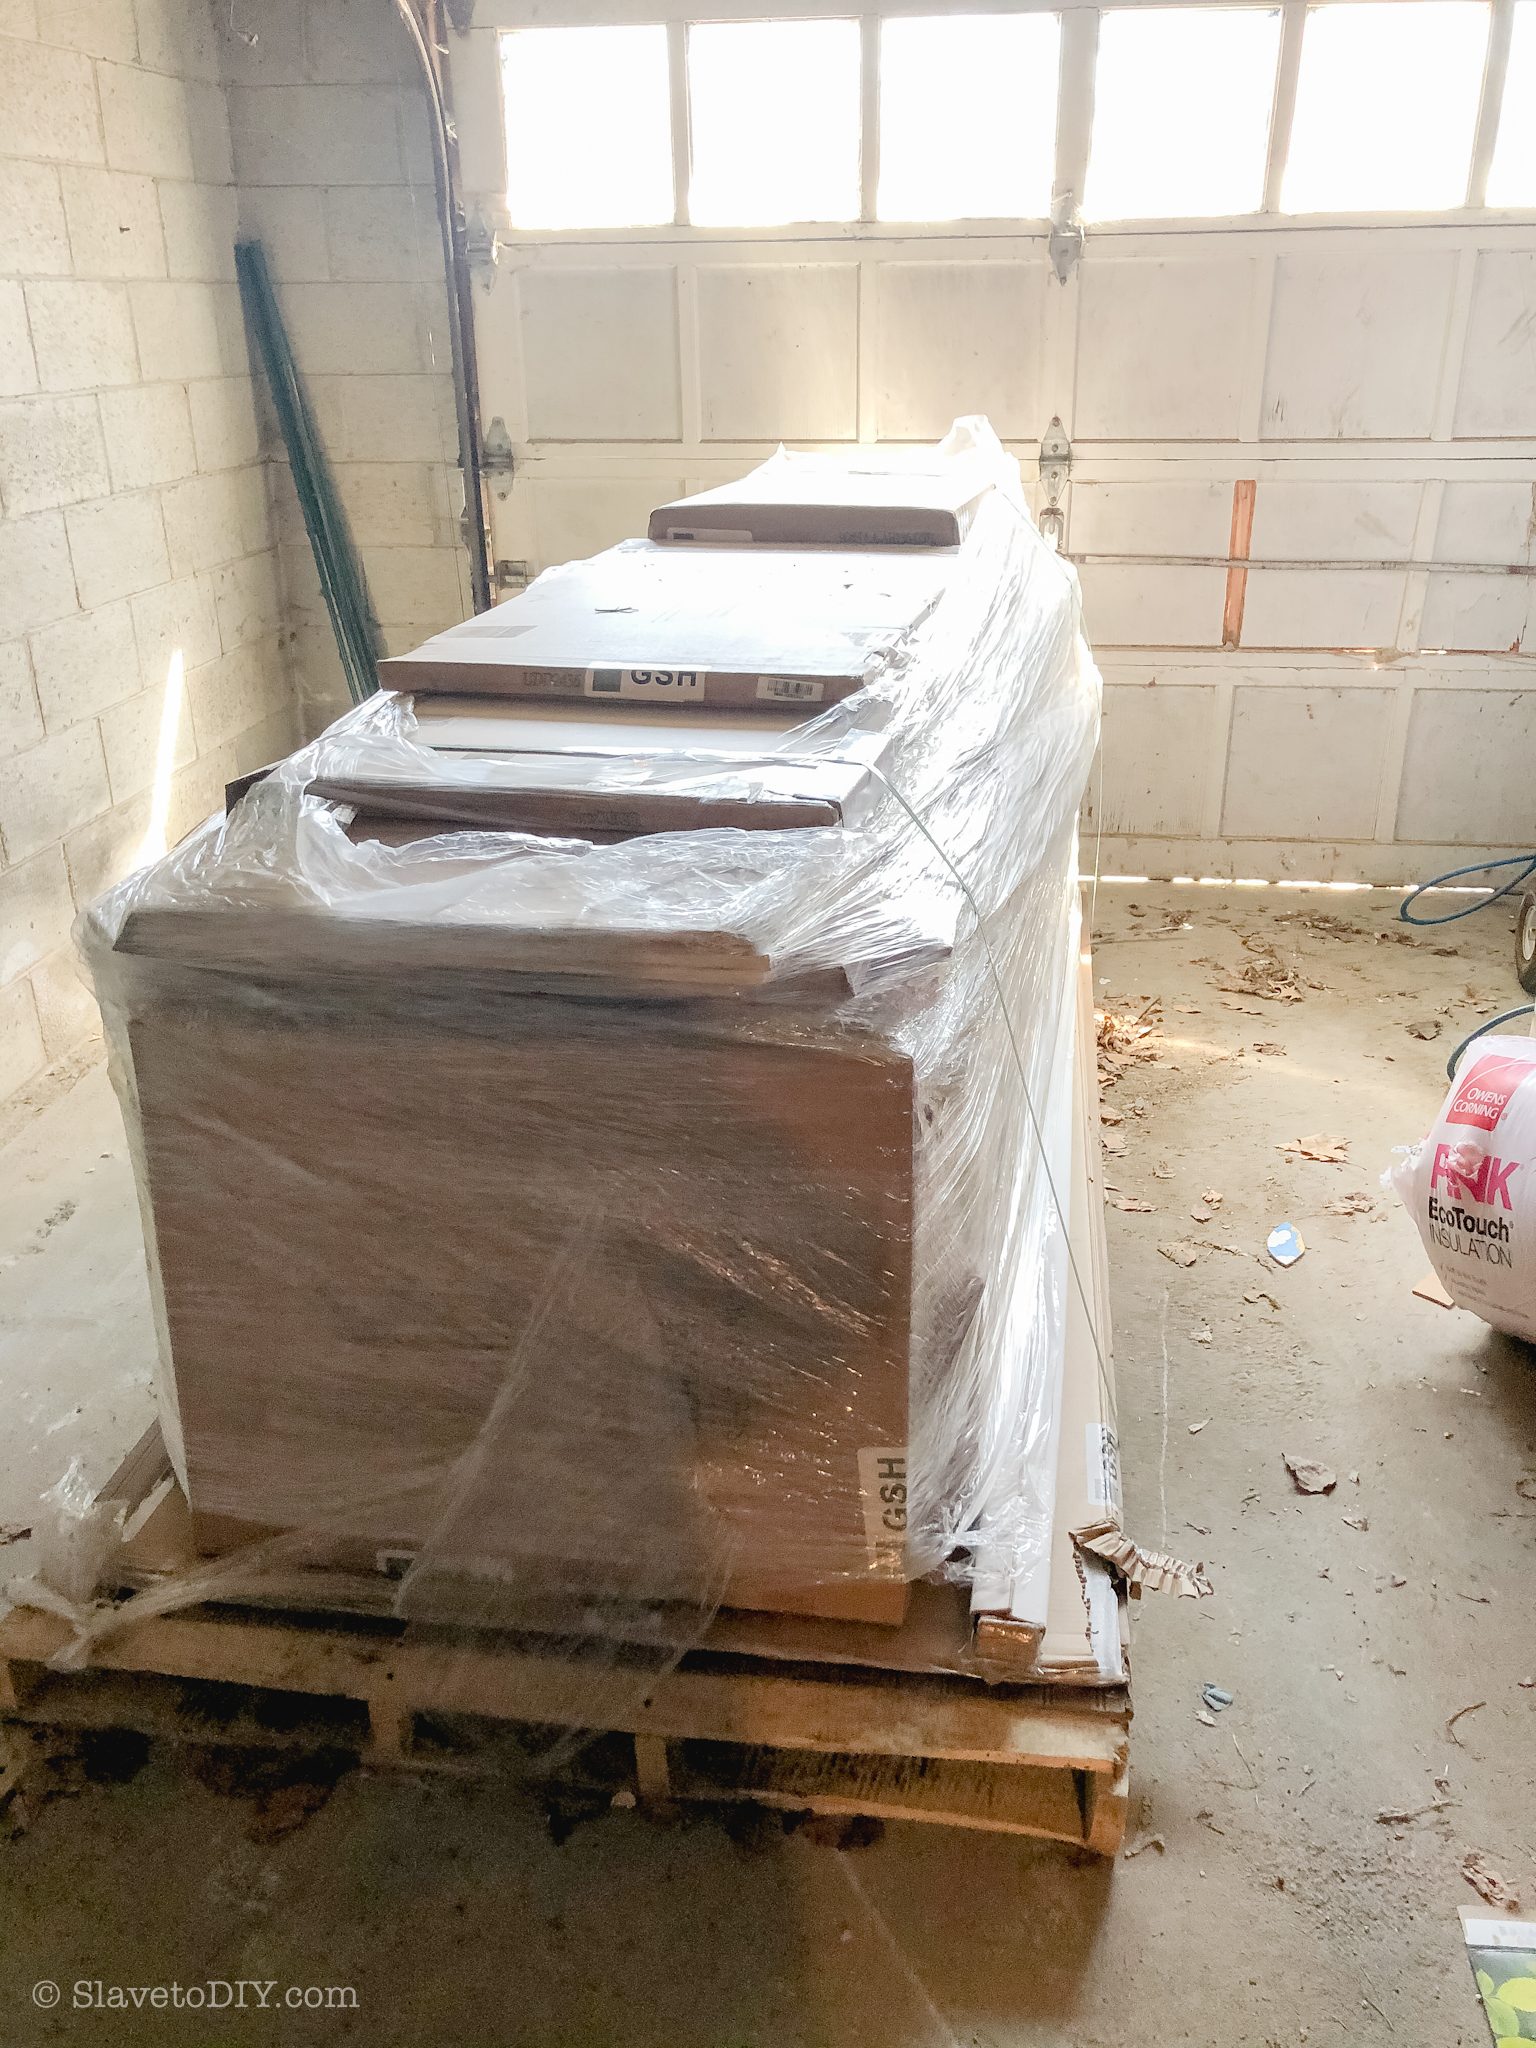
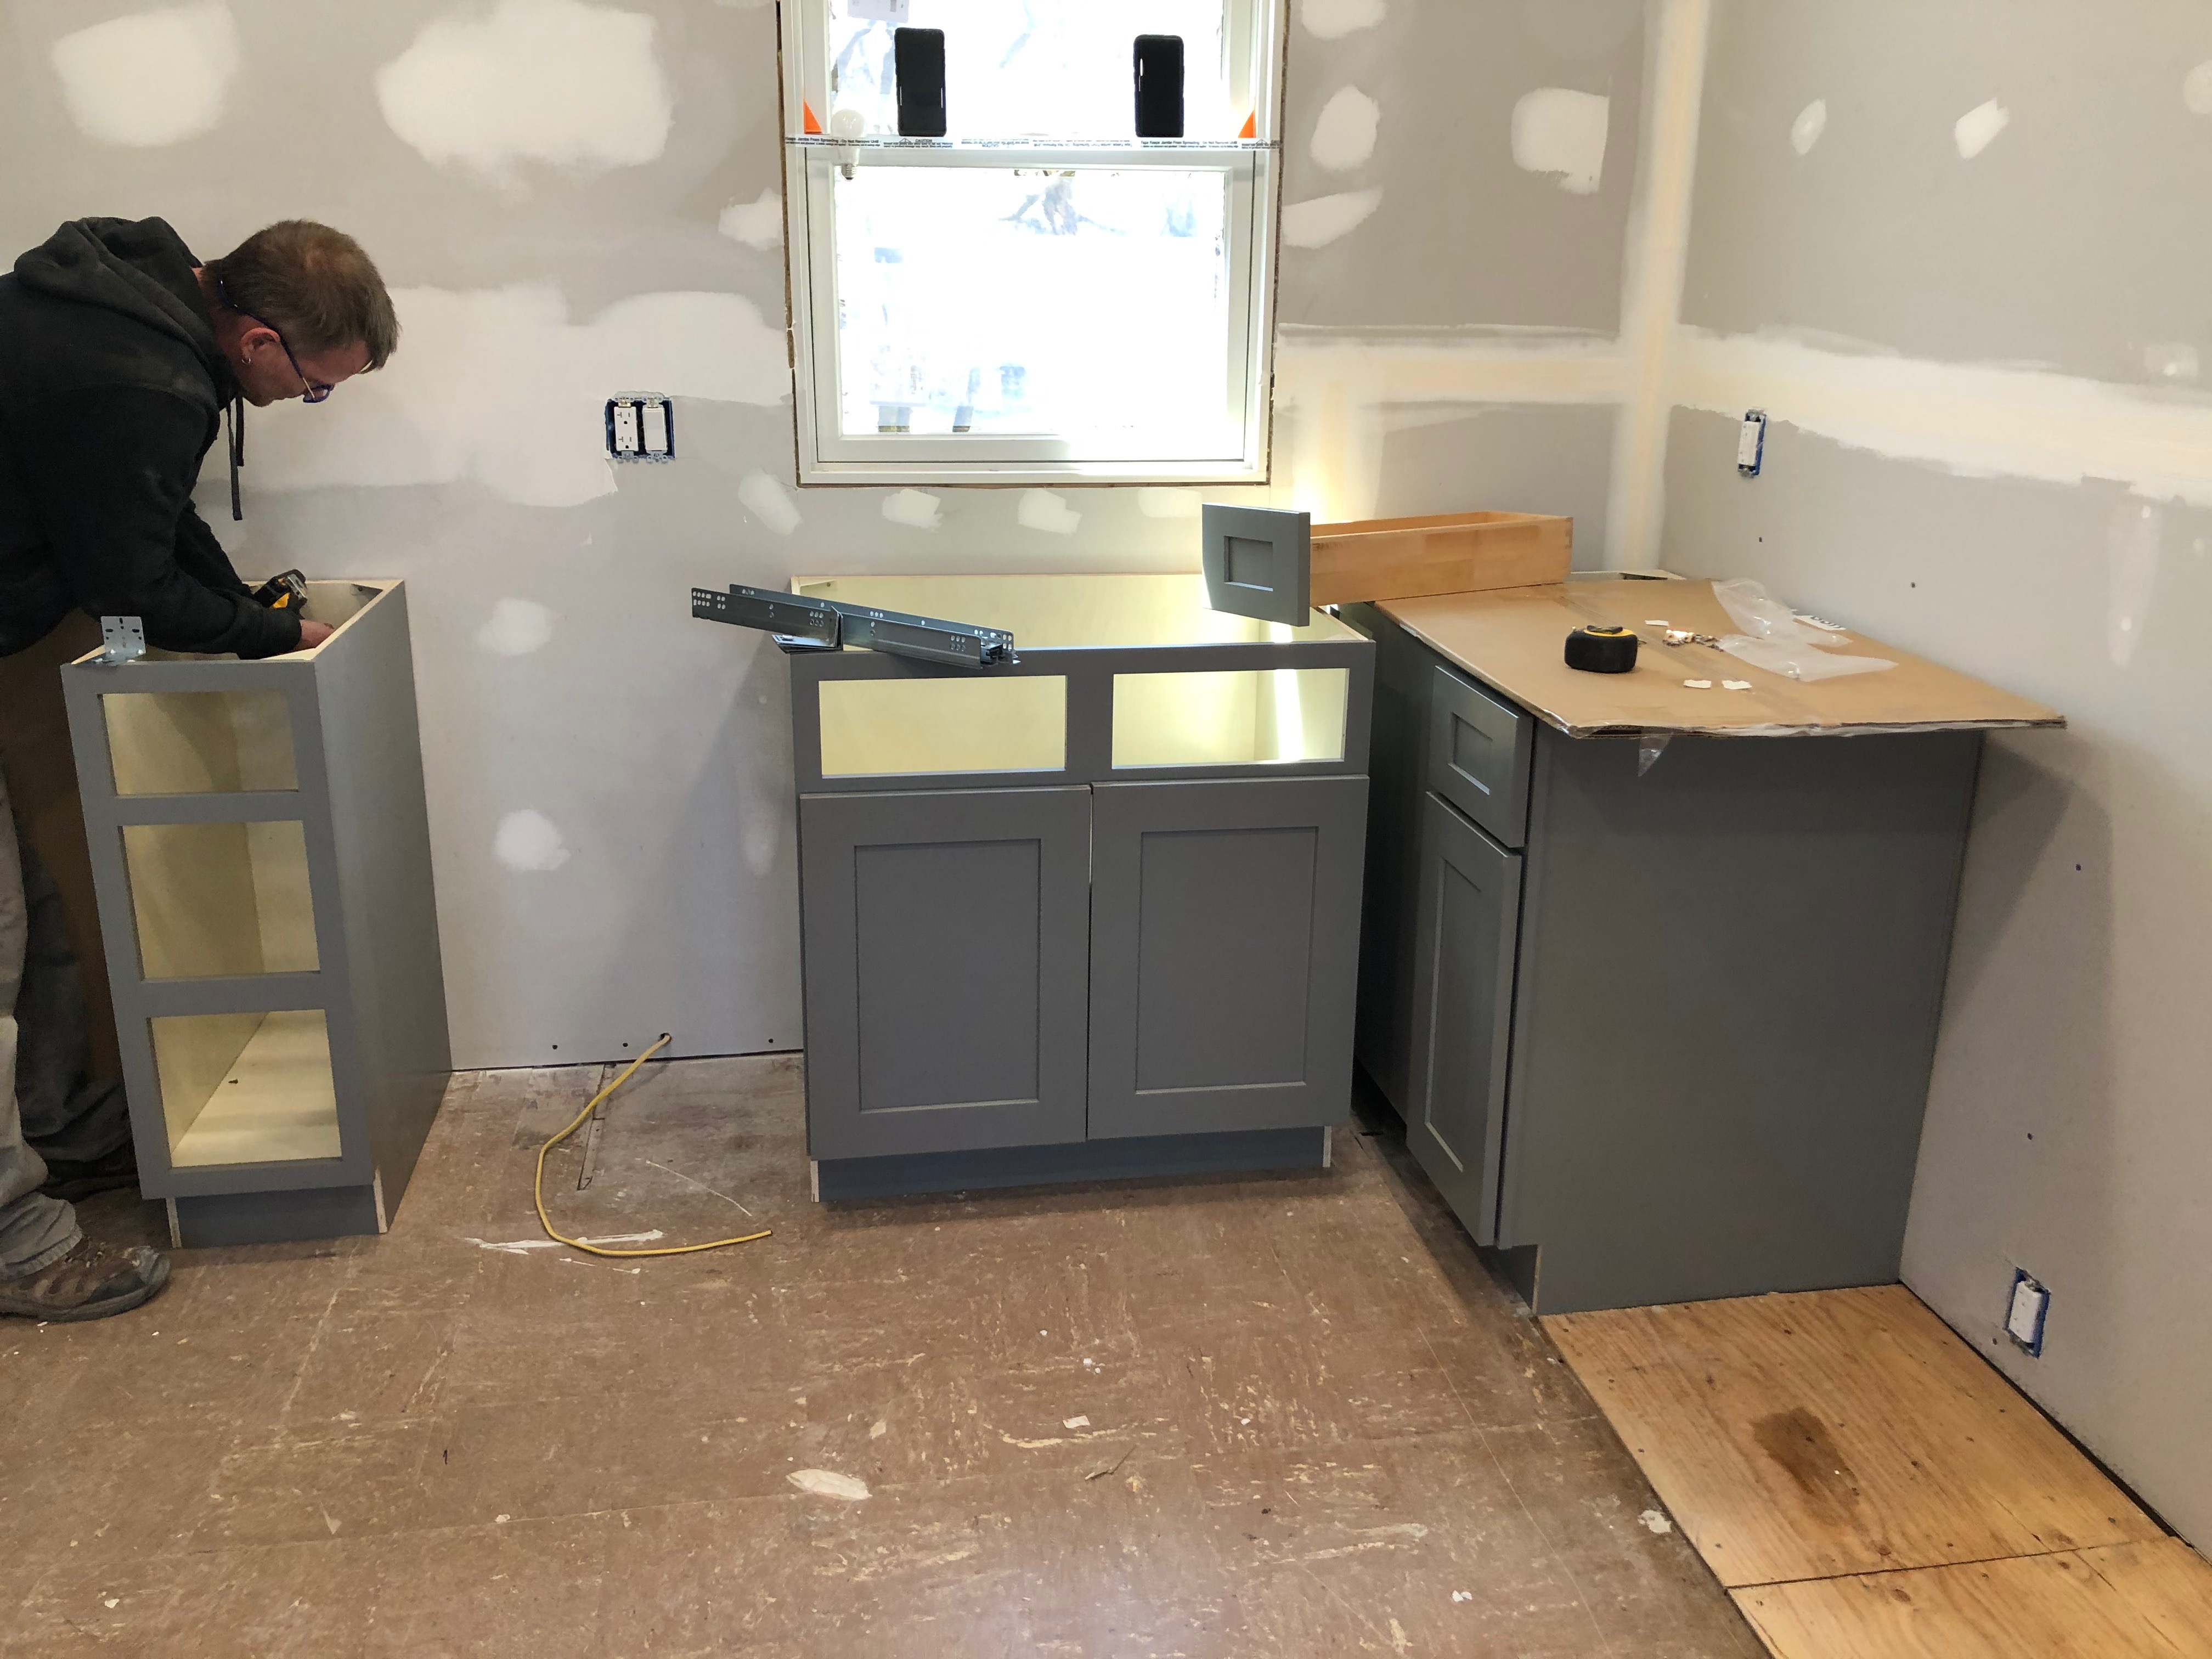
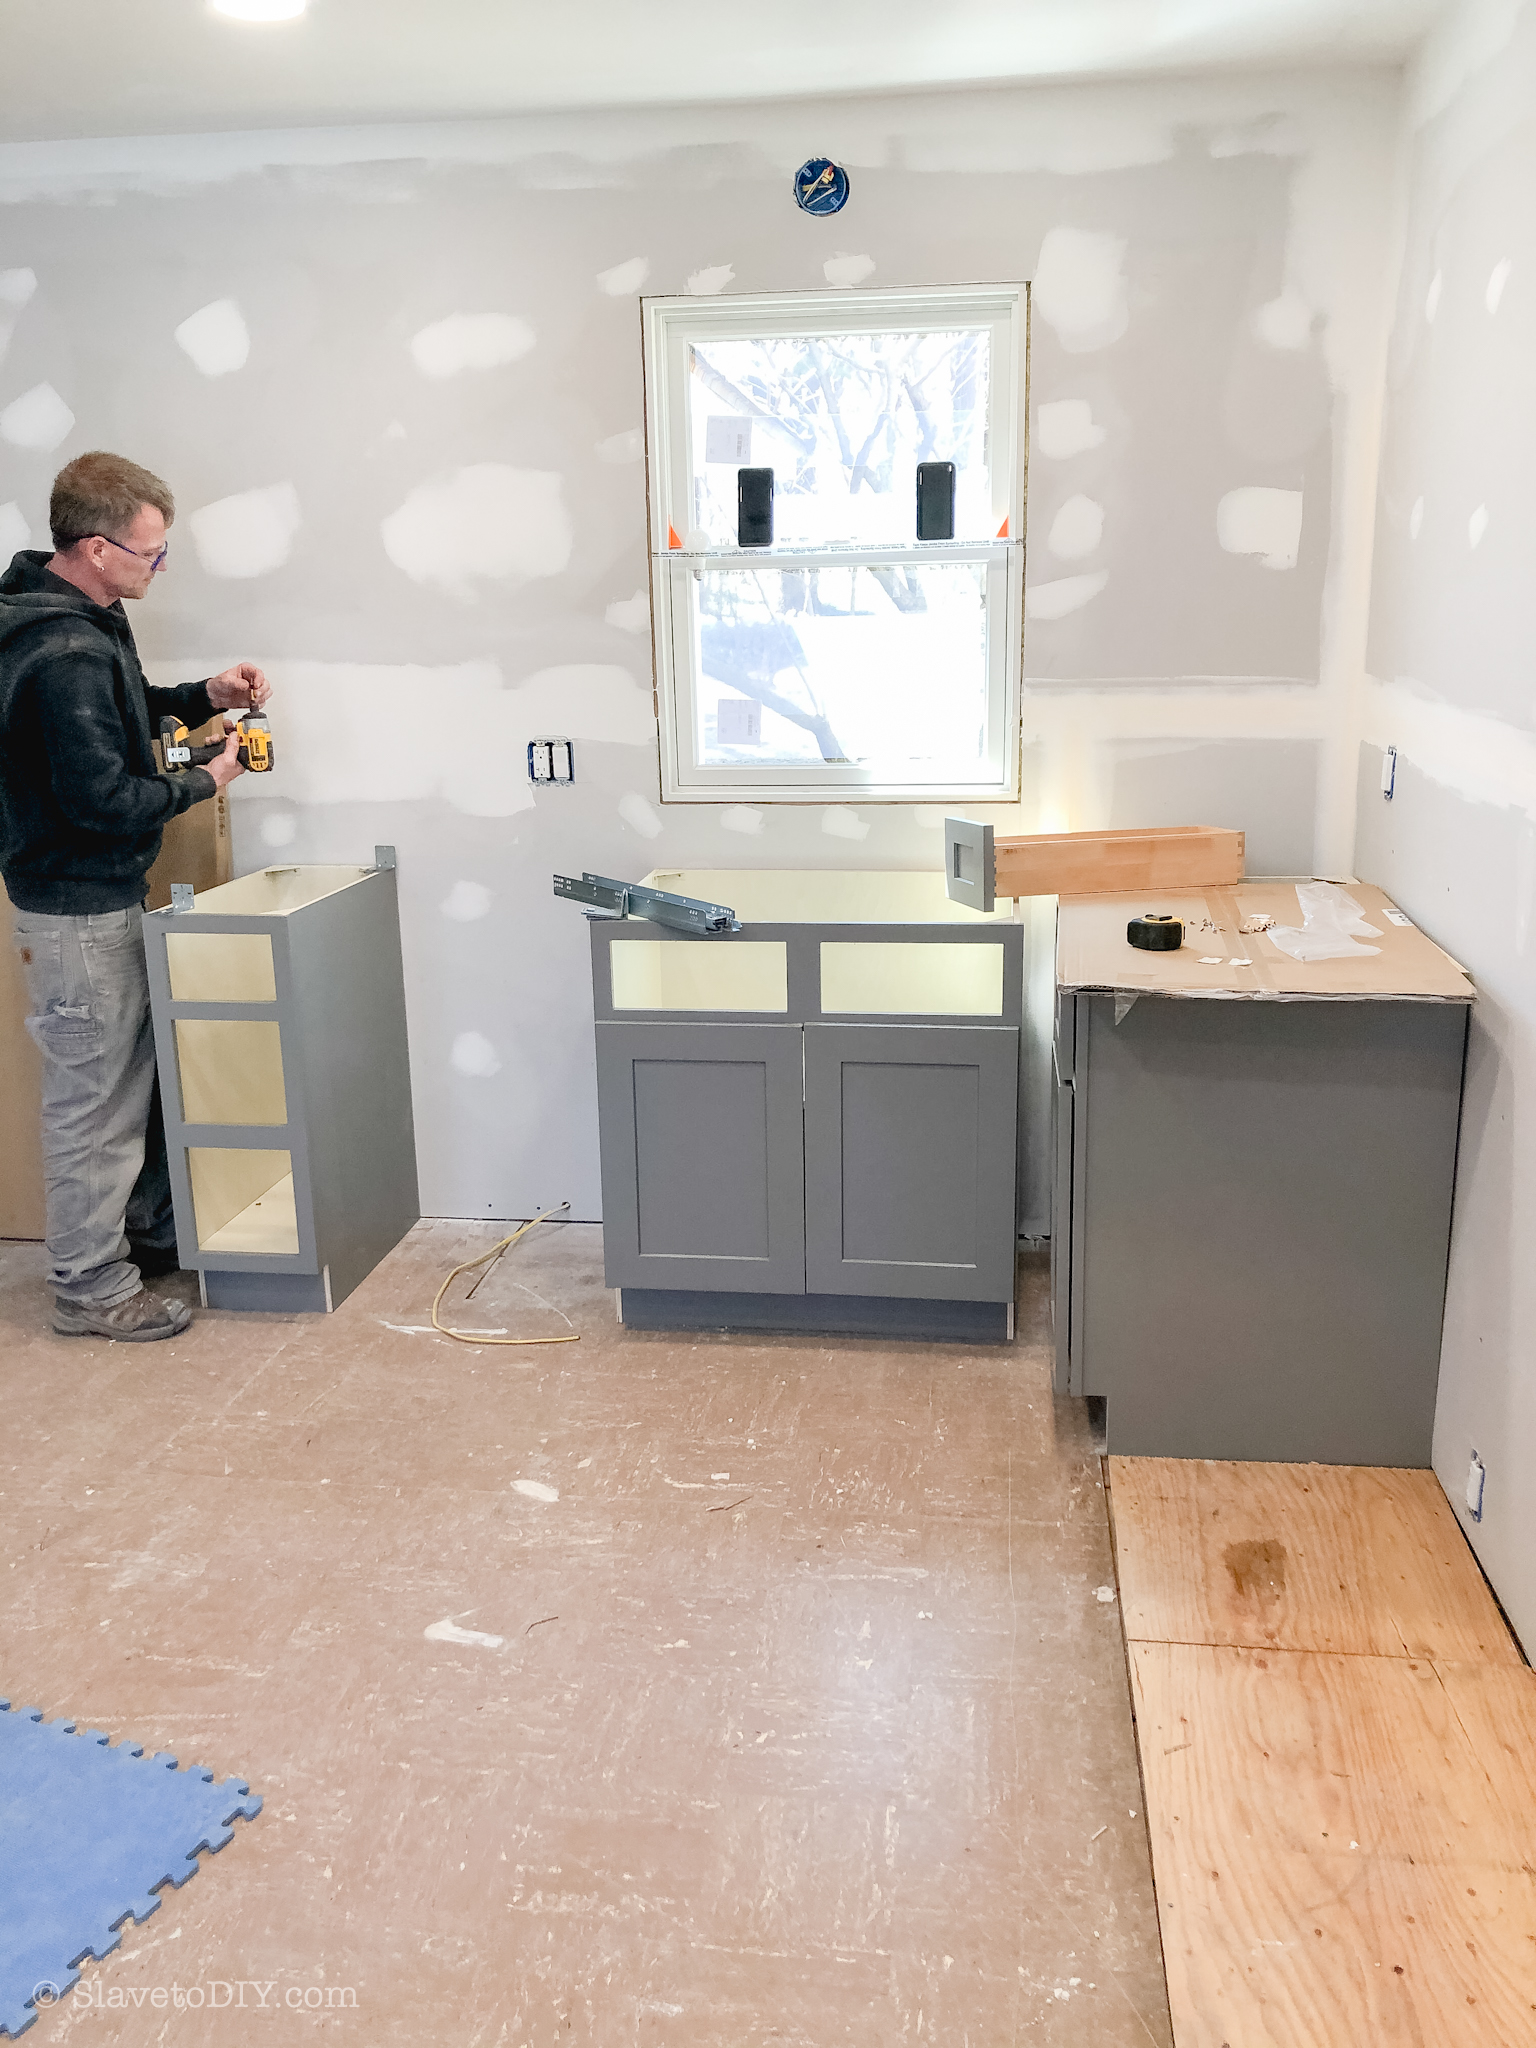
By this time, the cabinets had been delivered and were sitting in a neatly packed palette in the garage. I think my brother started getting antsy, because he was going to put the flooring down after the cabinets went in, and we were still on a travel lockdown. So, suddenly I started getting pictures of cabinets going together and up against the wall.
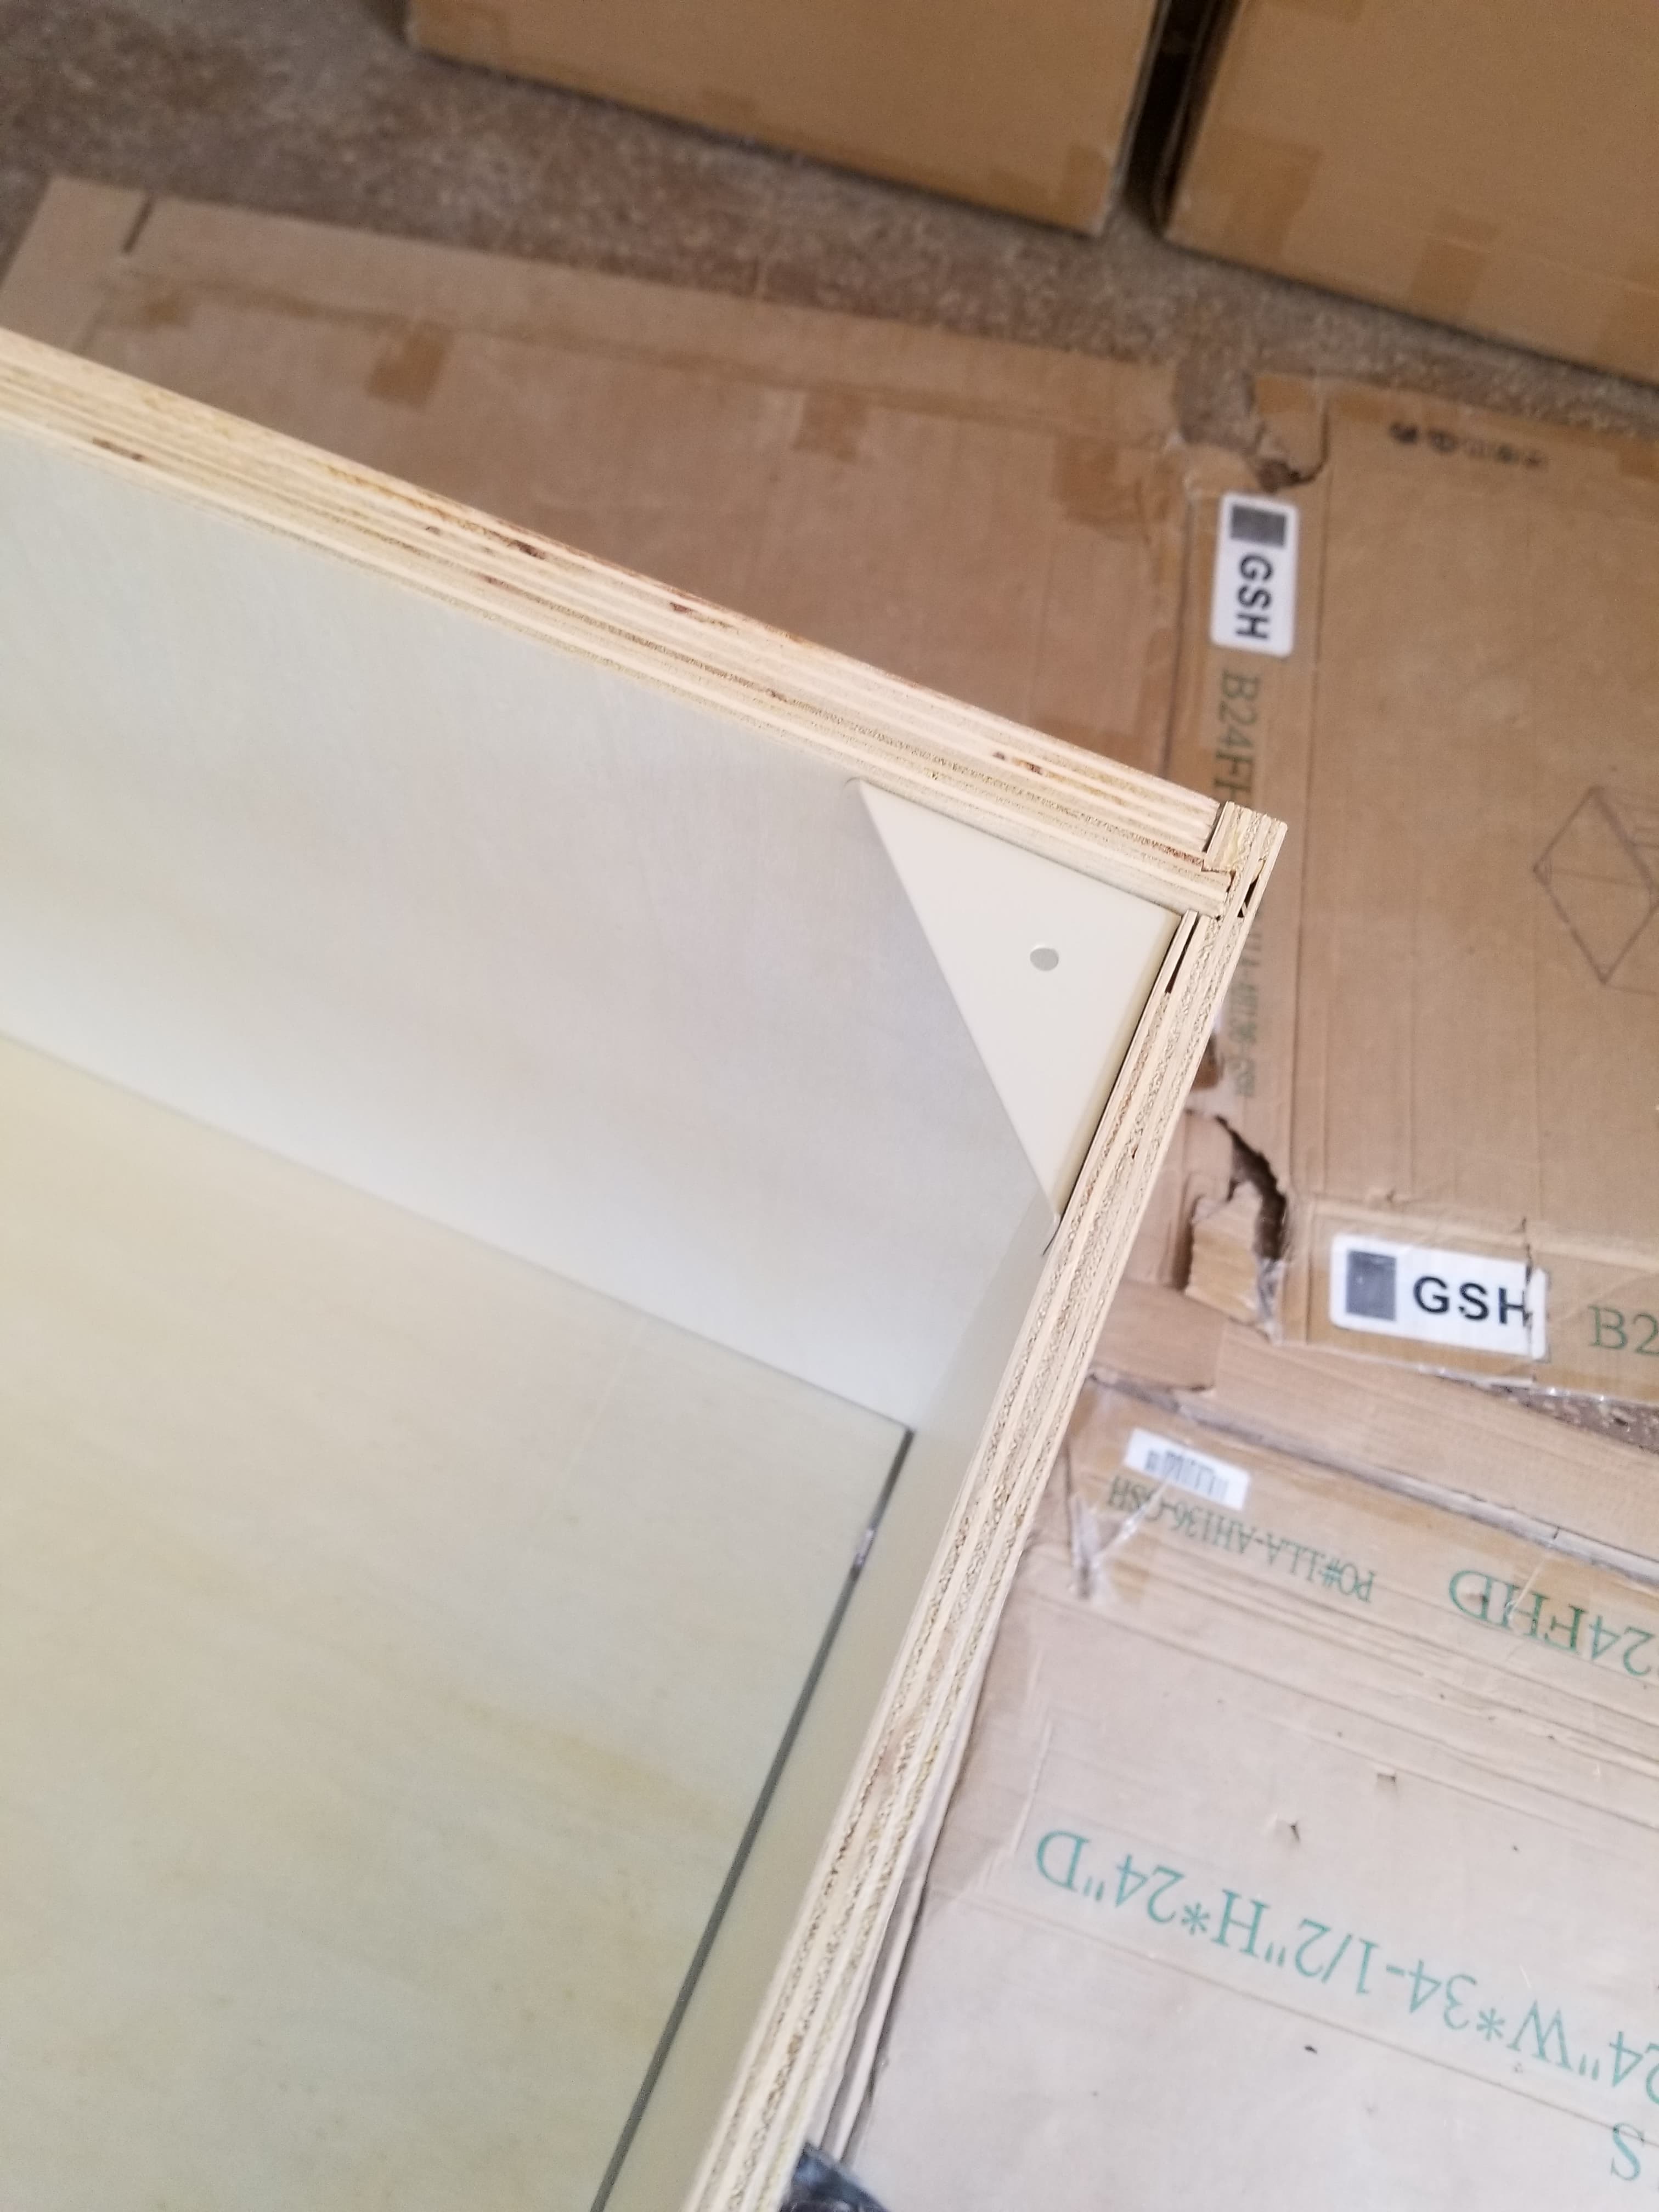
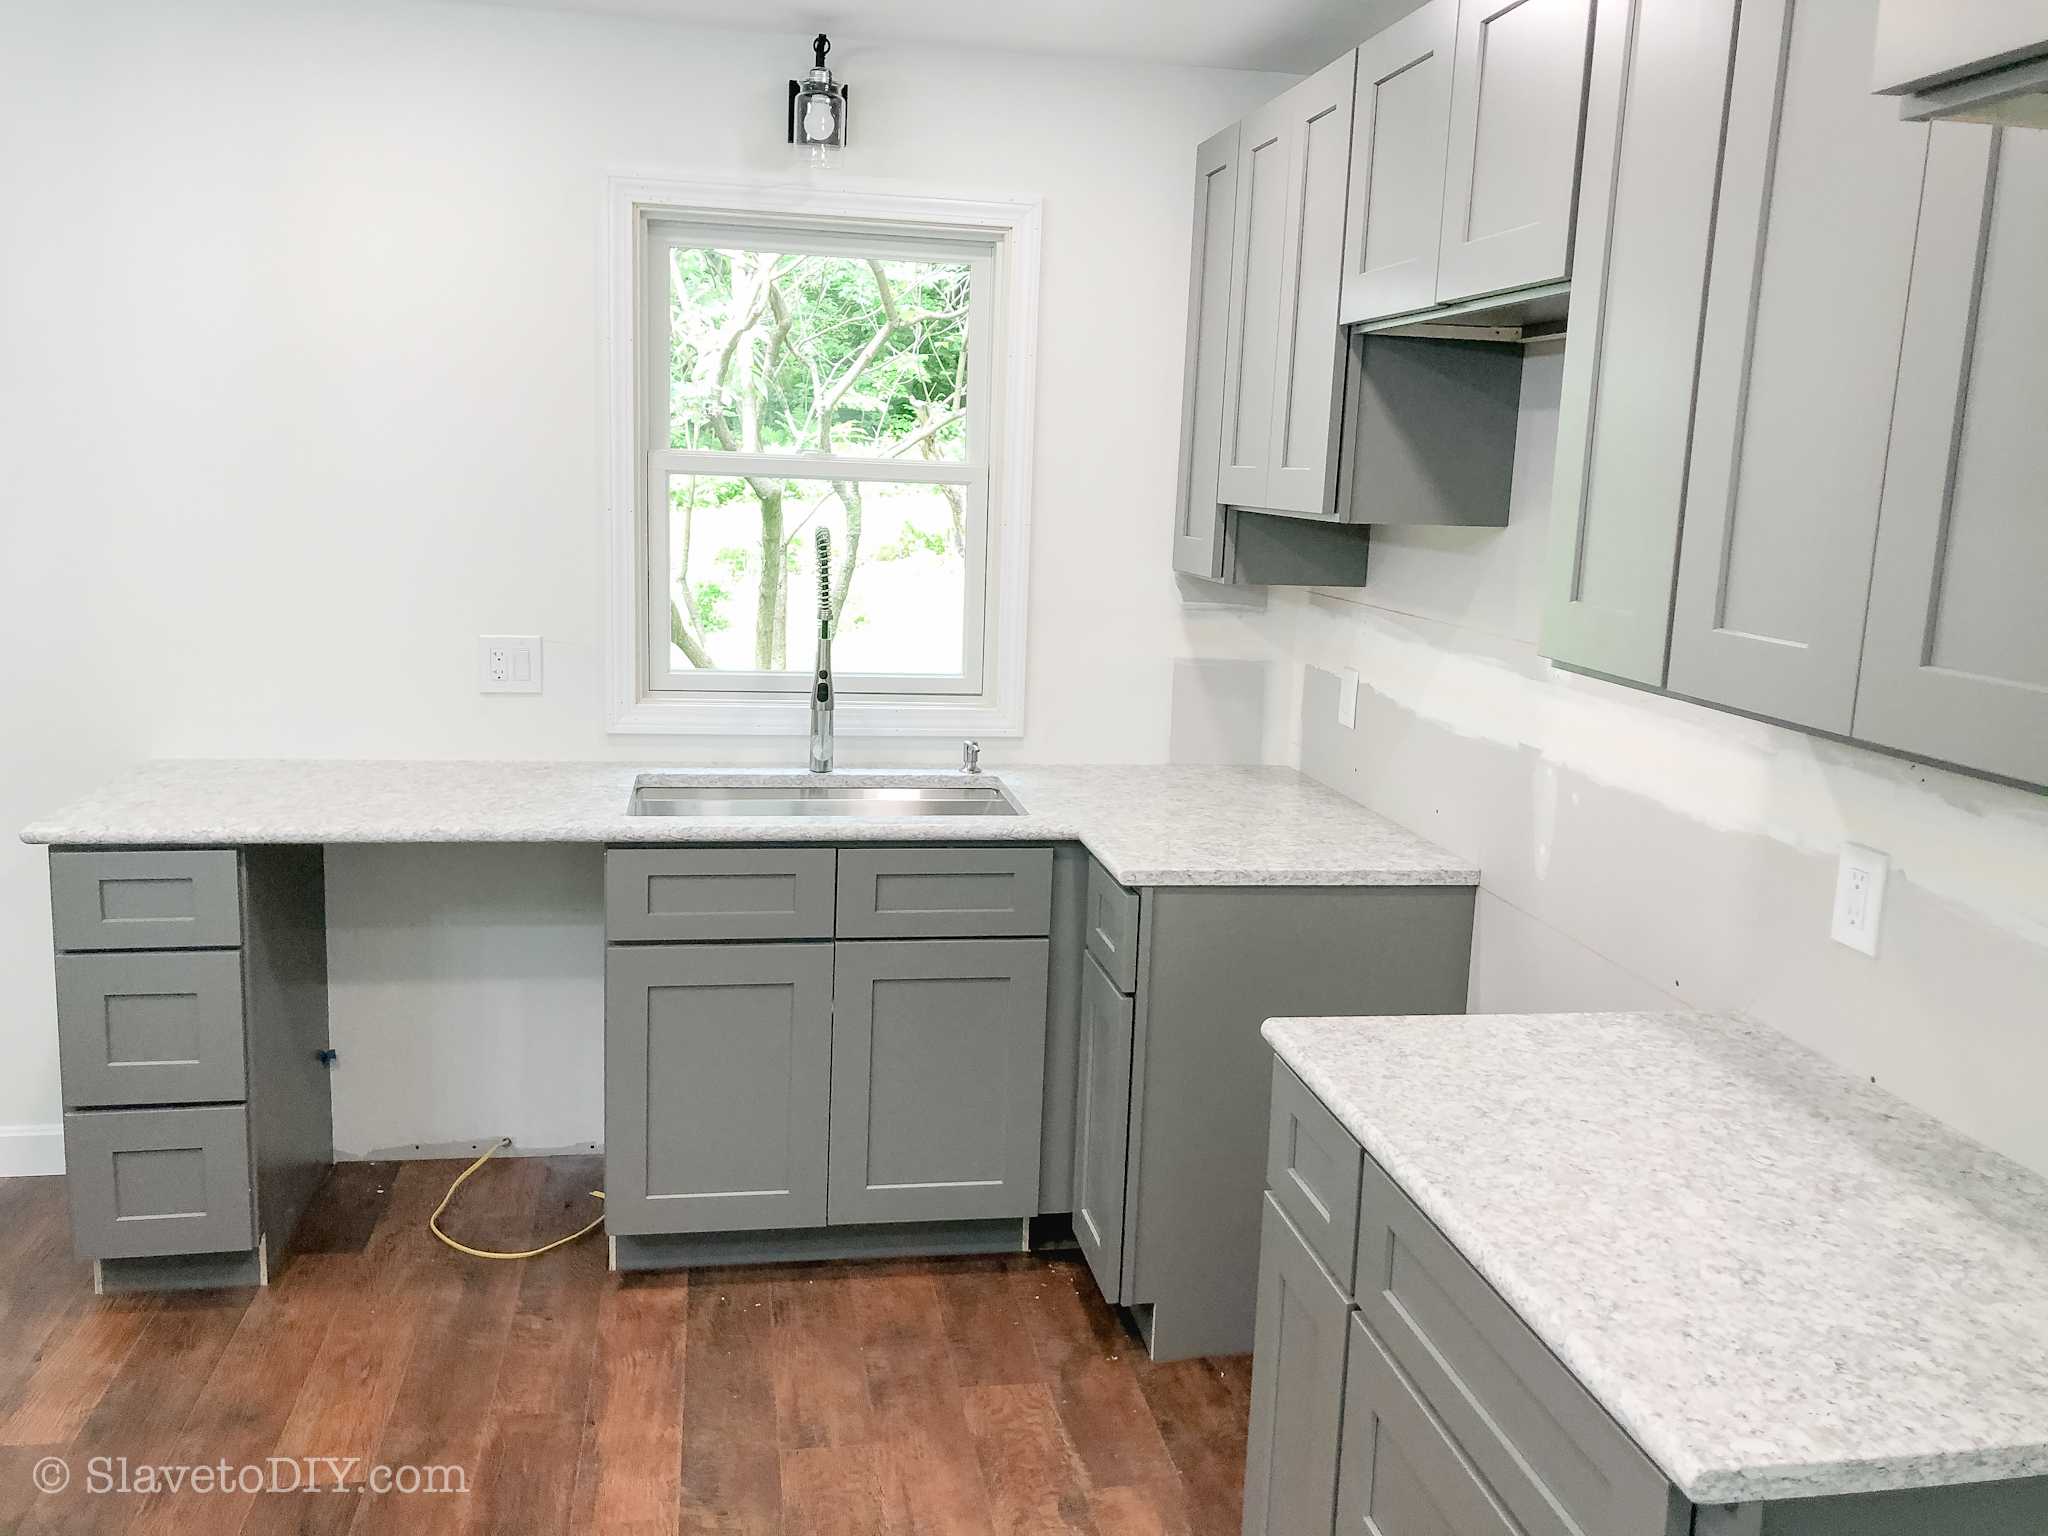
How To Measure For, Design, Order, and Install Your Dream Kitchen From RTA Cabinets: RTA Cabinet Assembly Pictures
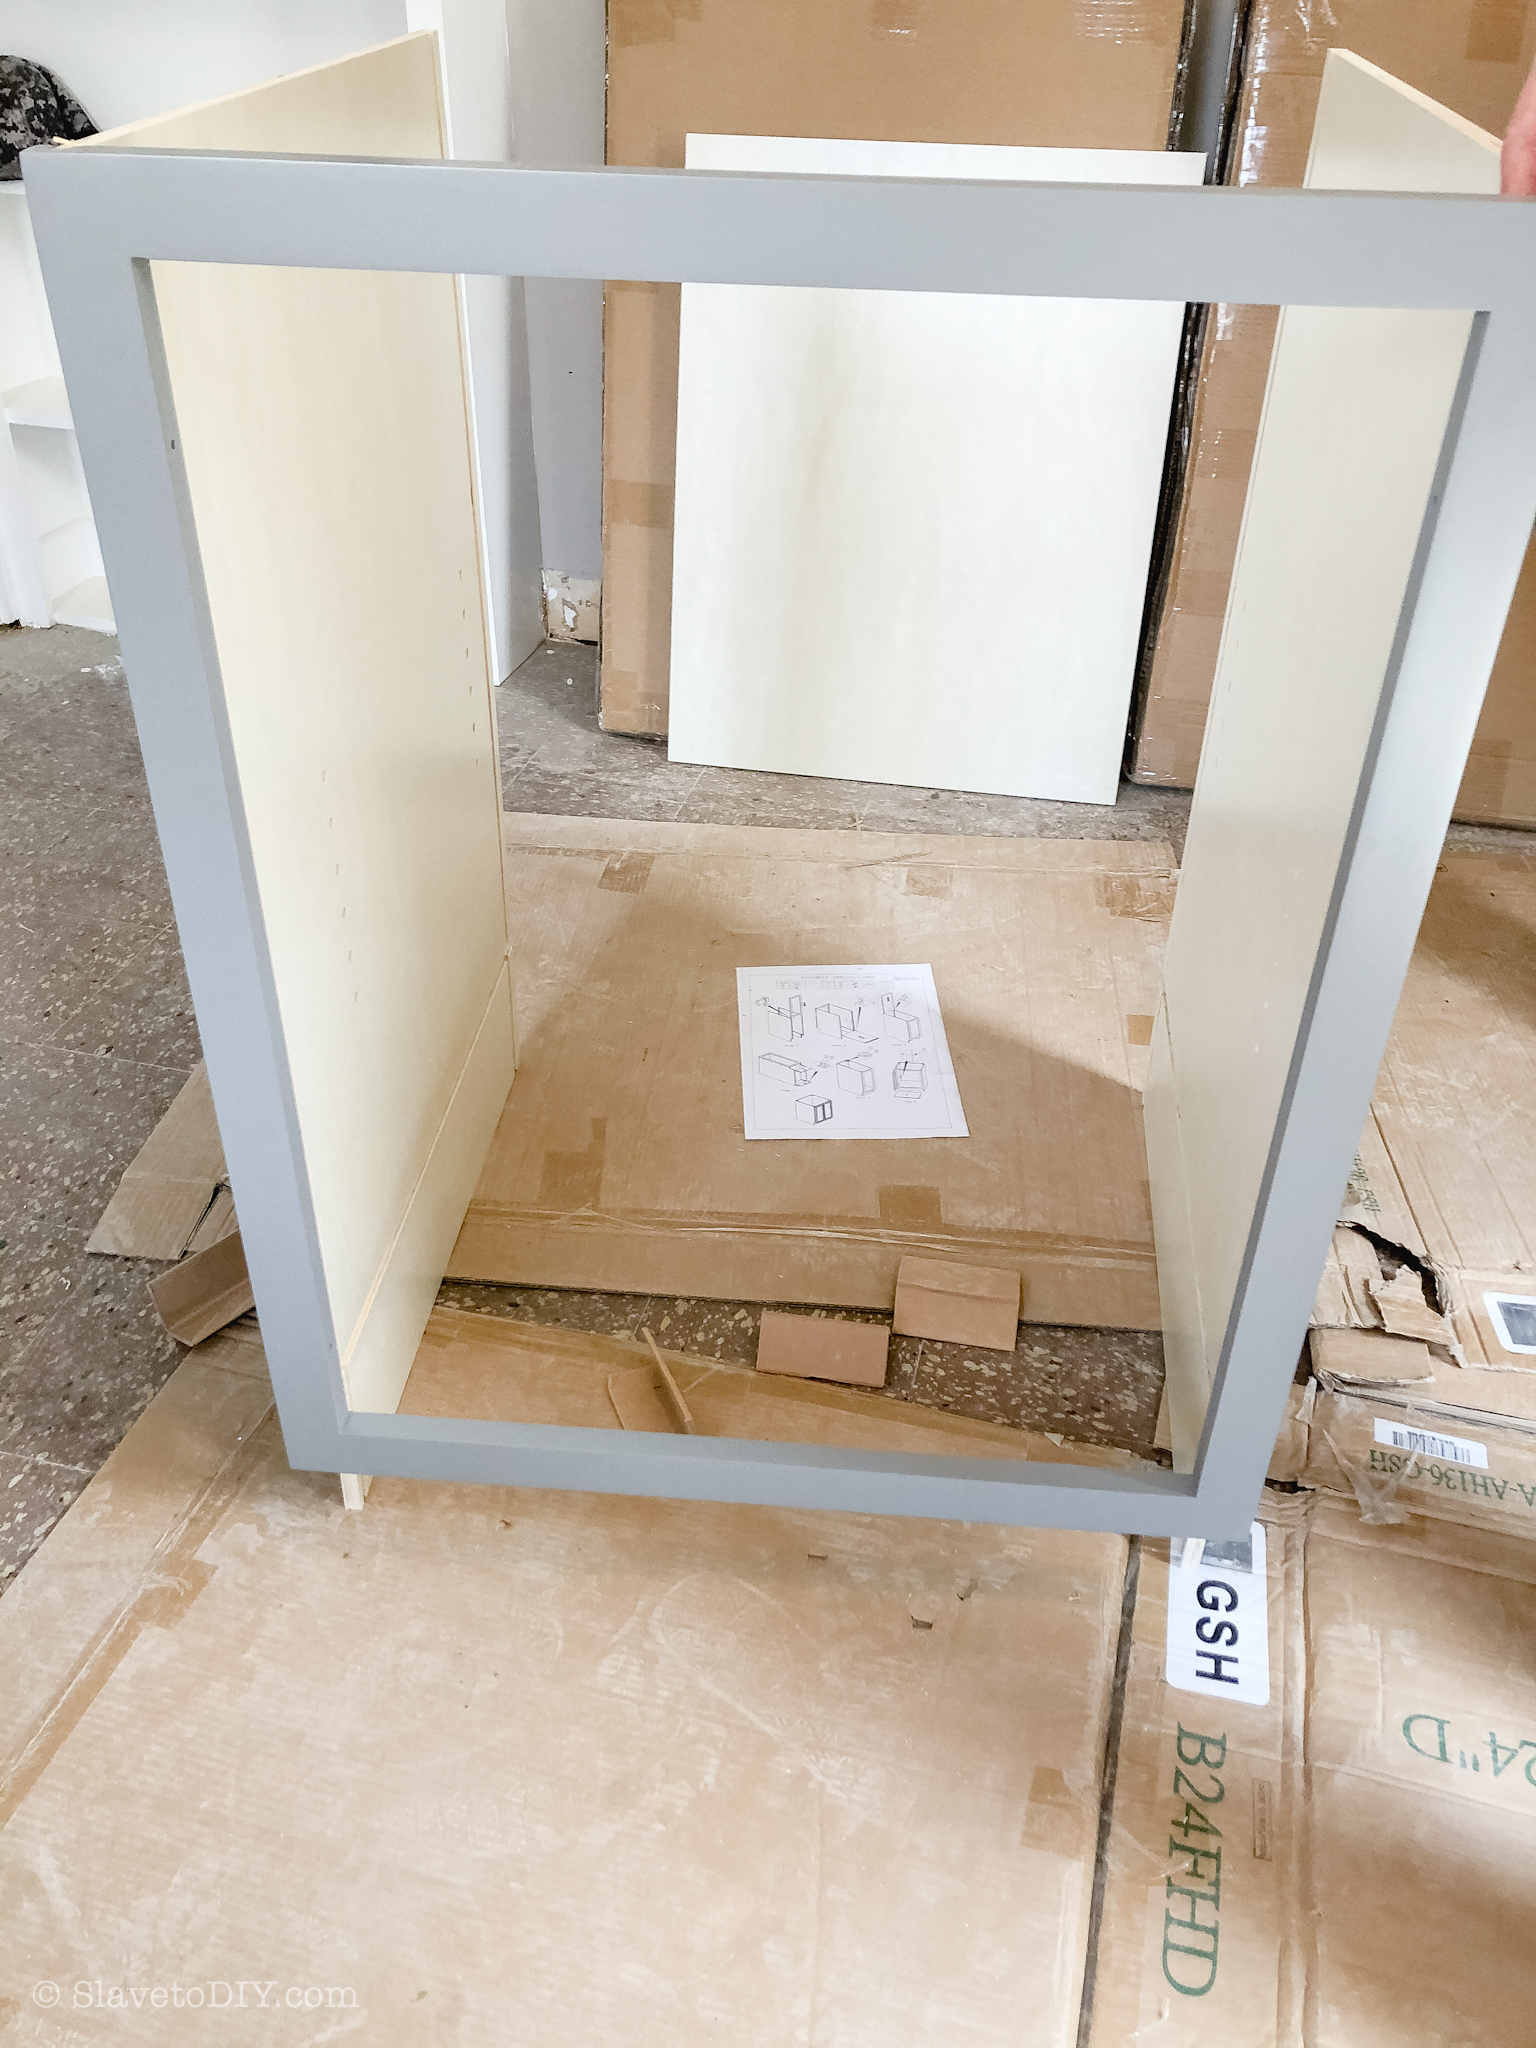
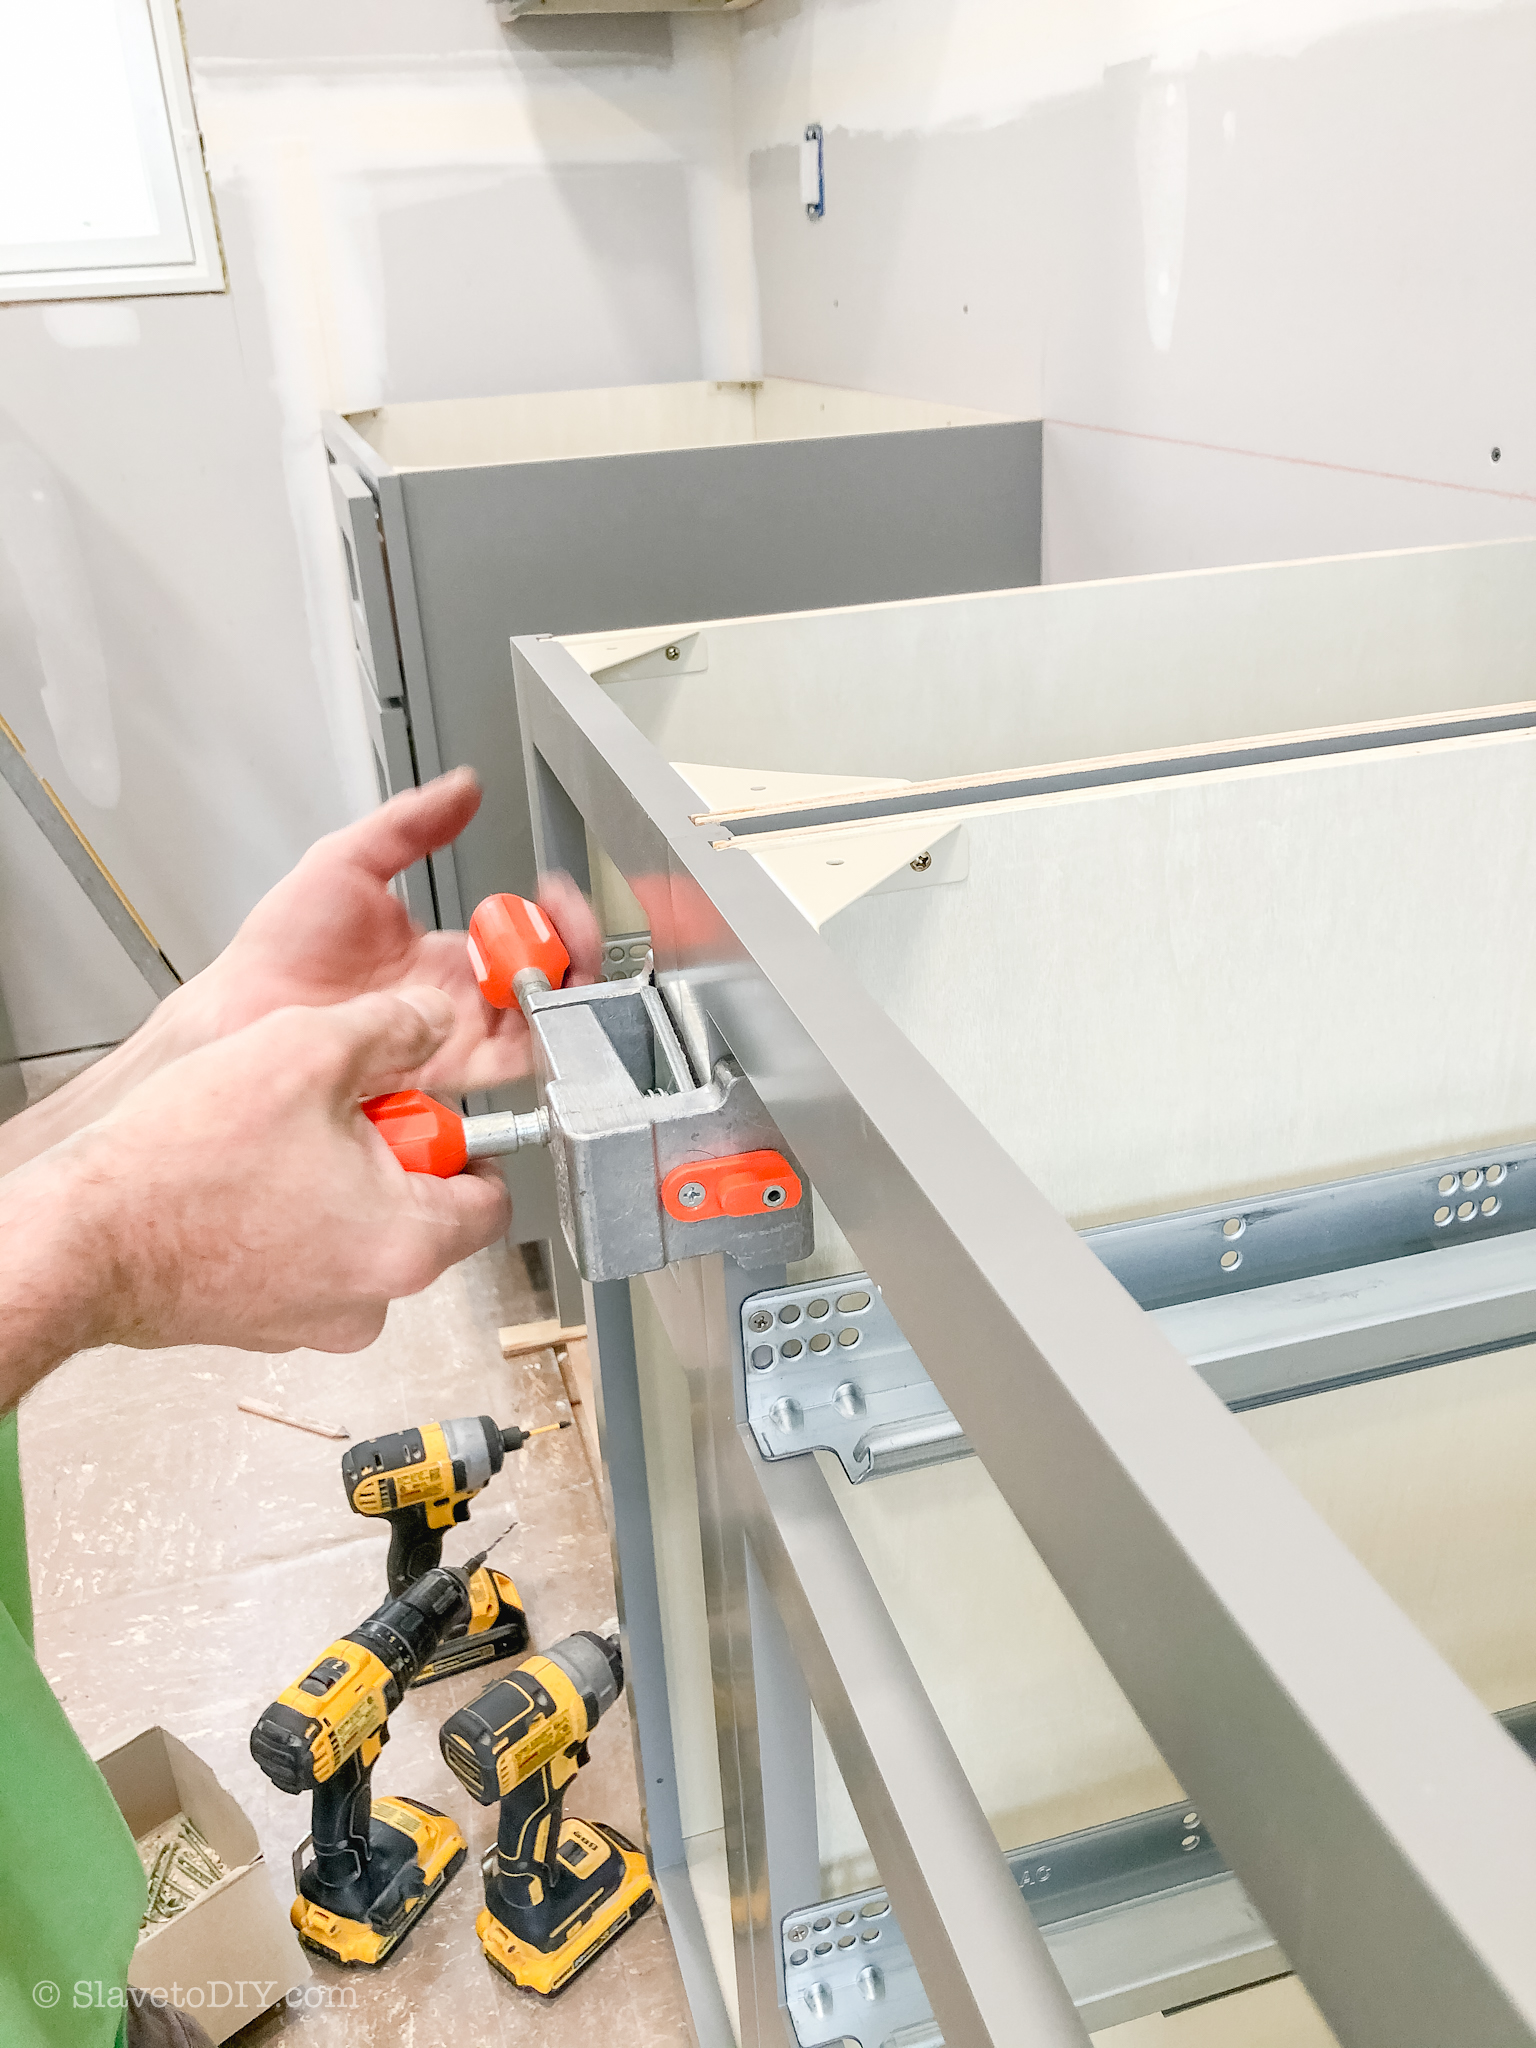
I was a nervous wreck at first… I was holding my breath waiting for my brother to deliver the verdict that the cabinets were junk and were a nightmare to assemble. But, guess what? That didn’t happen. My brother, the wood snob/very talented carpenter was SUPER impressed with the quality craftsmanship and how easily the RTAs went together! I breathed a sigh of relief. Whew!
Not handy? It doesn’t even matter. Check out the following two videos from our build that show the complete assembly of an RTA cabinet box (which takes about 3 minutes total):
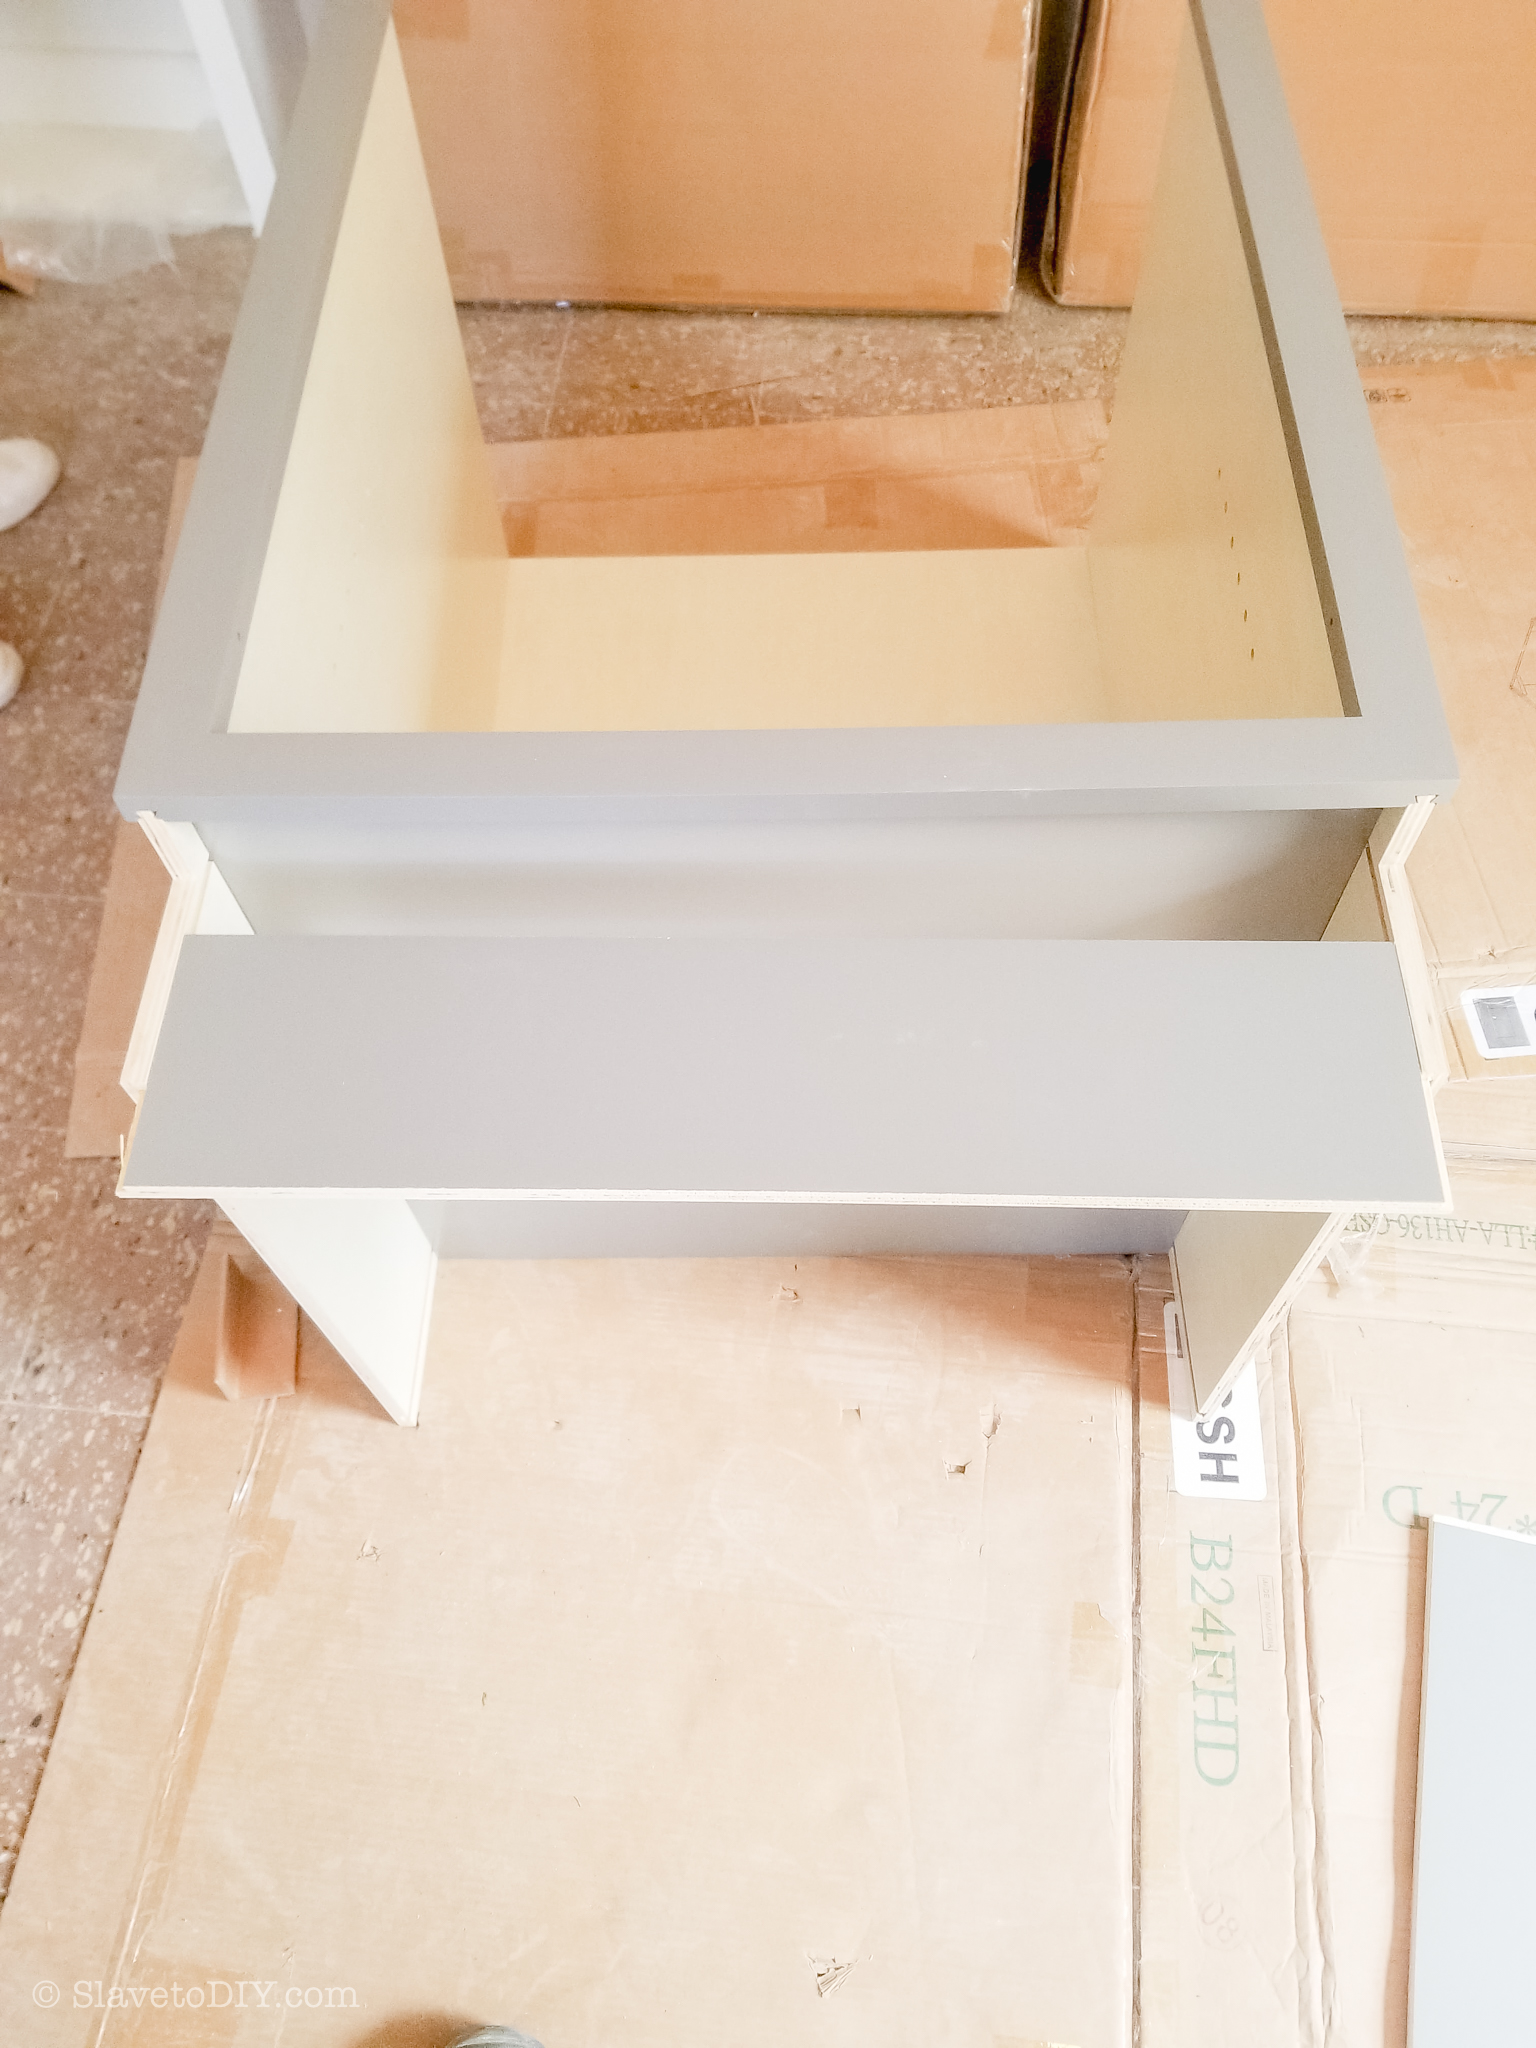
Of course, after the RTA box is assembled, the doors and drawers are attached, which takes a few minutes longer, but is still very simple.
Is it really that simple?: Yes! Here are some more photos of the cabinet assembly:
How To Measure For, Design, Order, and Install Your Dream Kitchen From RTA Cabinets: RTA Cabinet Assembly Pictures
How To Measure For, Design, Order, and Install Your Dream Kitchen From RTA Cabinets: RTA Cabinet Assembly Pictures
How To Measure For, Design, Order, and Install Your Dream Kitchen From RTA Cabinets: RTA Cabinet Assembly Pictures
How To Measure For, Design, Order, and Install Your Dream Kitchen From RTA Cabinets: RTA Cabinet Assembly Pictures
How To Measure For, Design, Order, and Install Your Dream Kitchen From RTA Cabinets: RTA Cabinet Assembly Pictures
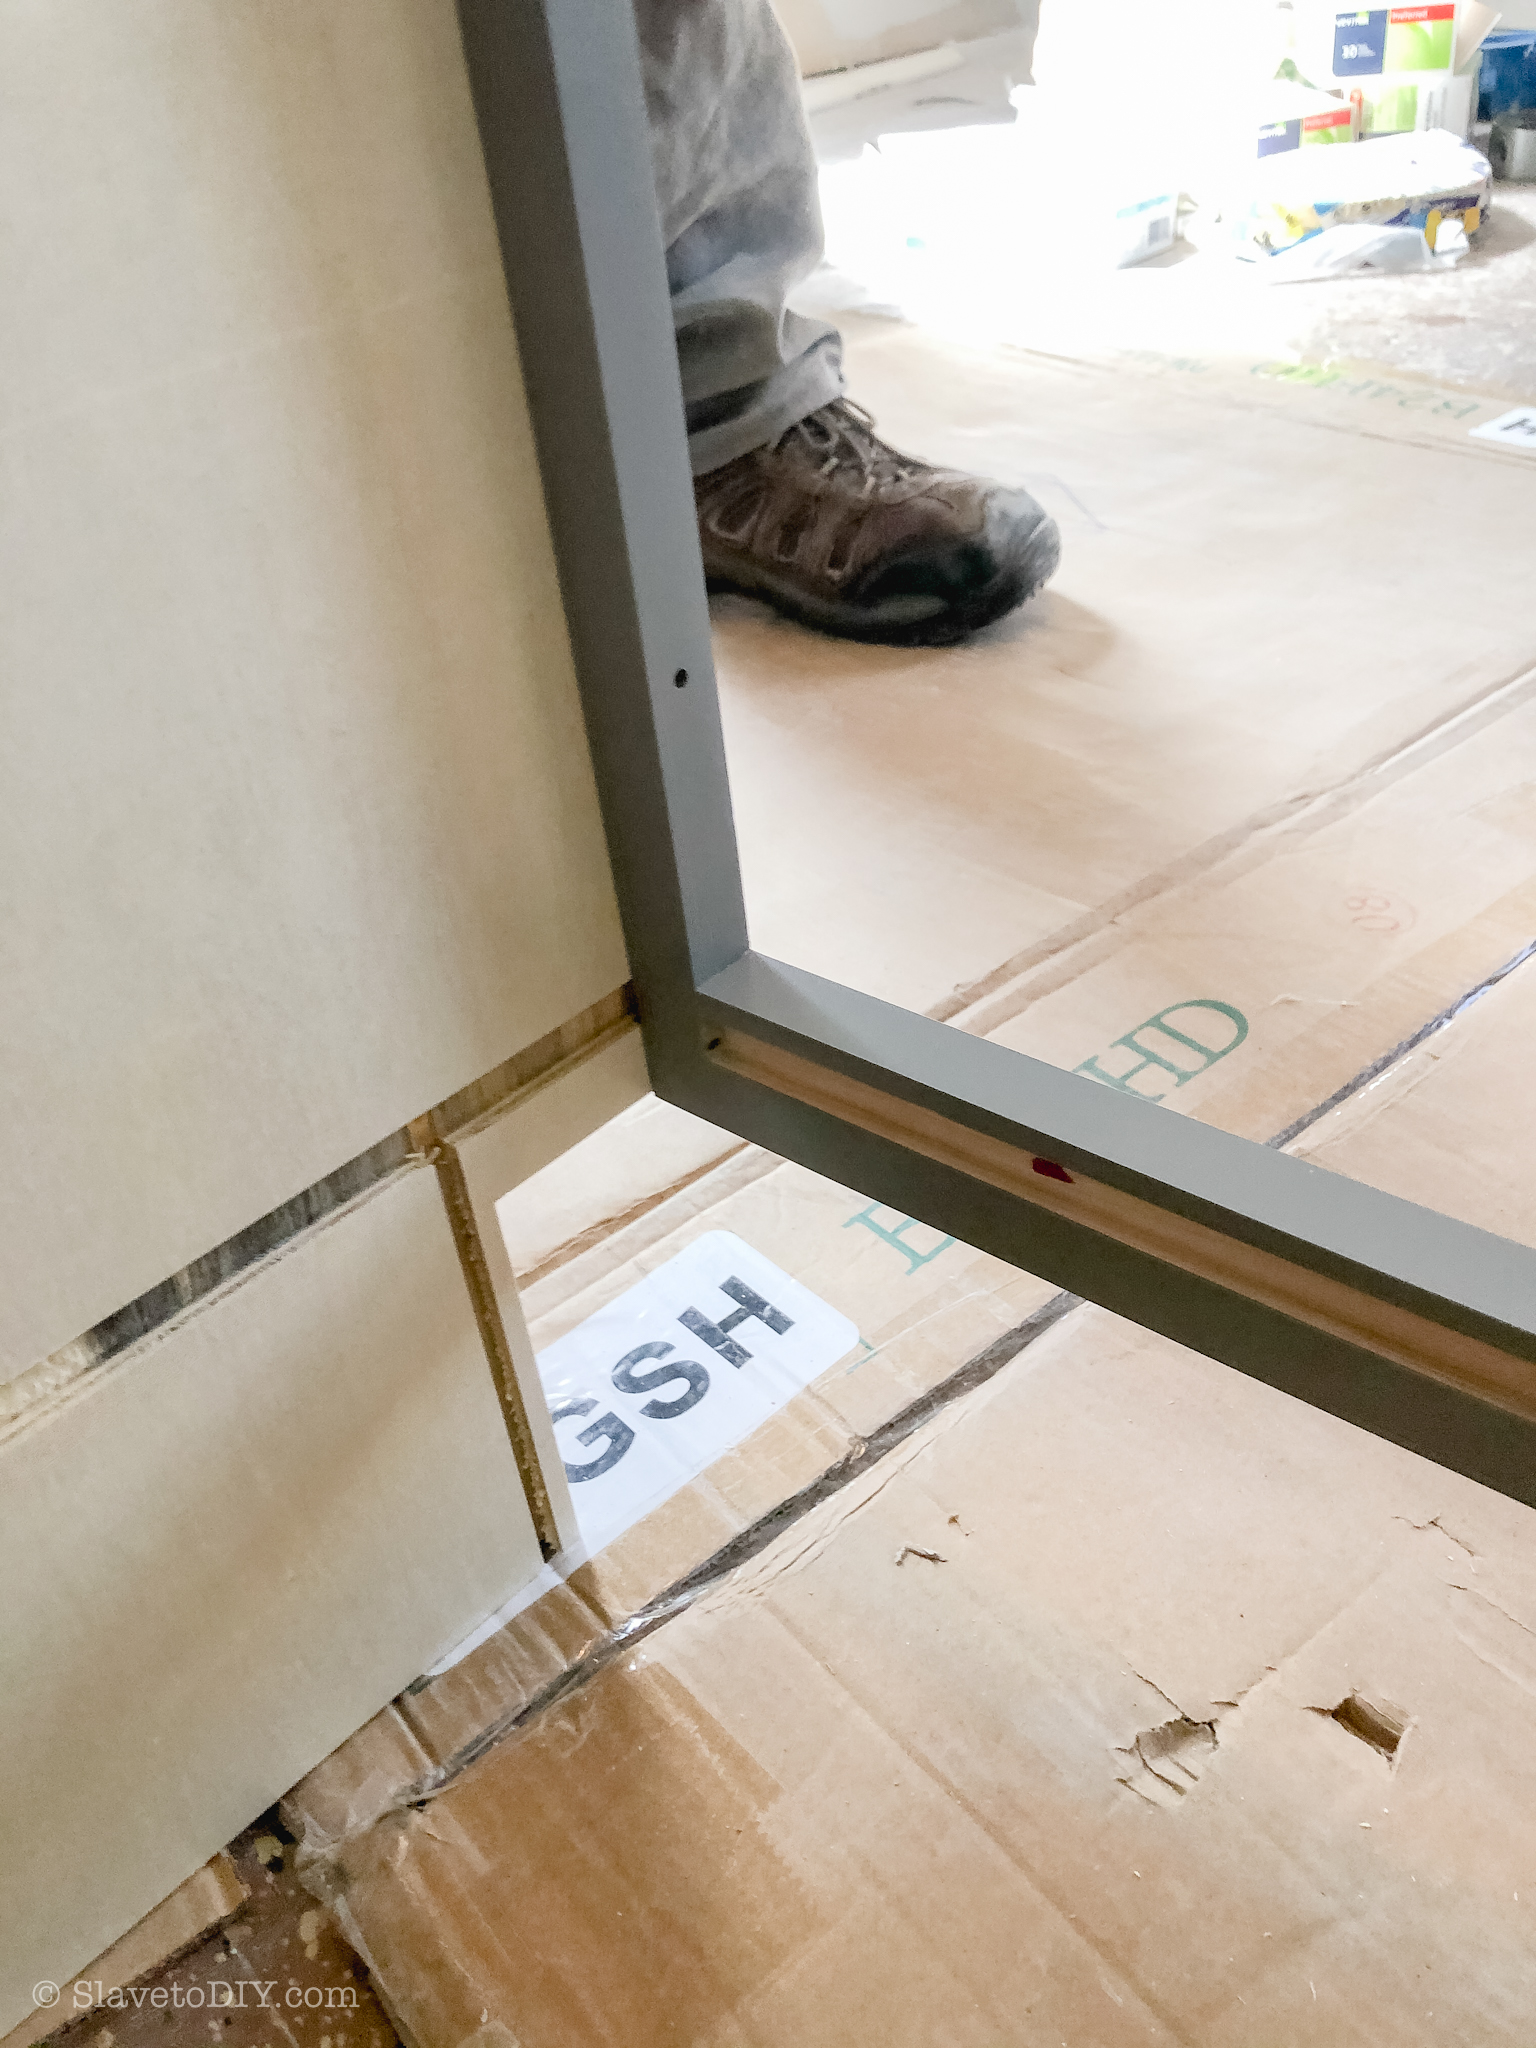
Installation
My brother quickly assembled all of the cabinets and started installing them. He was able to do this without me there, because he had a detailed layout guide from Lily Ann. With exact measurements he was able to do the entire installation.
Remember these?
How To Measure For, Design, Order, and Install Your Dream Kitchen From RTA Cabinets: Lily Ann Cabinets Design Files
How To Measure For, Design, Order, and Install Your Dream Kitchen From RTA Cabinets: Lily Ann Cabinets Design Files
How To Measure For, Design, Order, and Install Your Dream Kitchen From RTA Cabinets: Lily Ann Cabinets Design Files
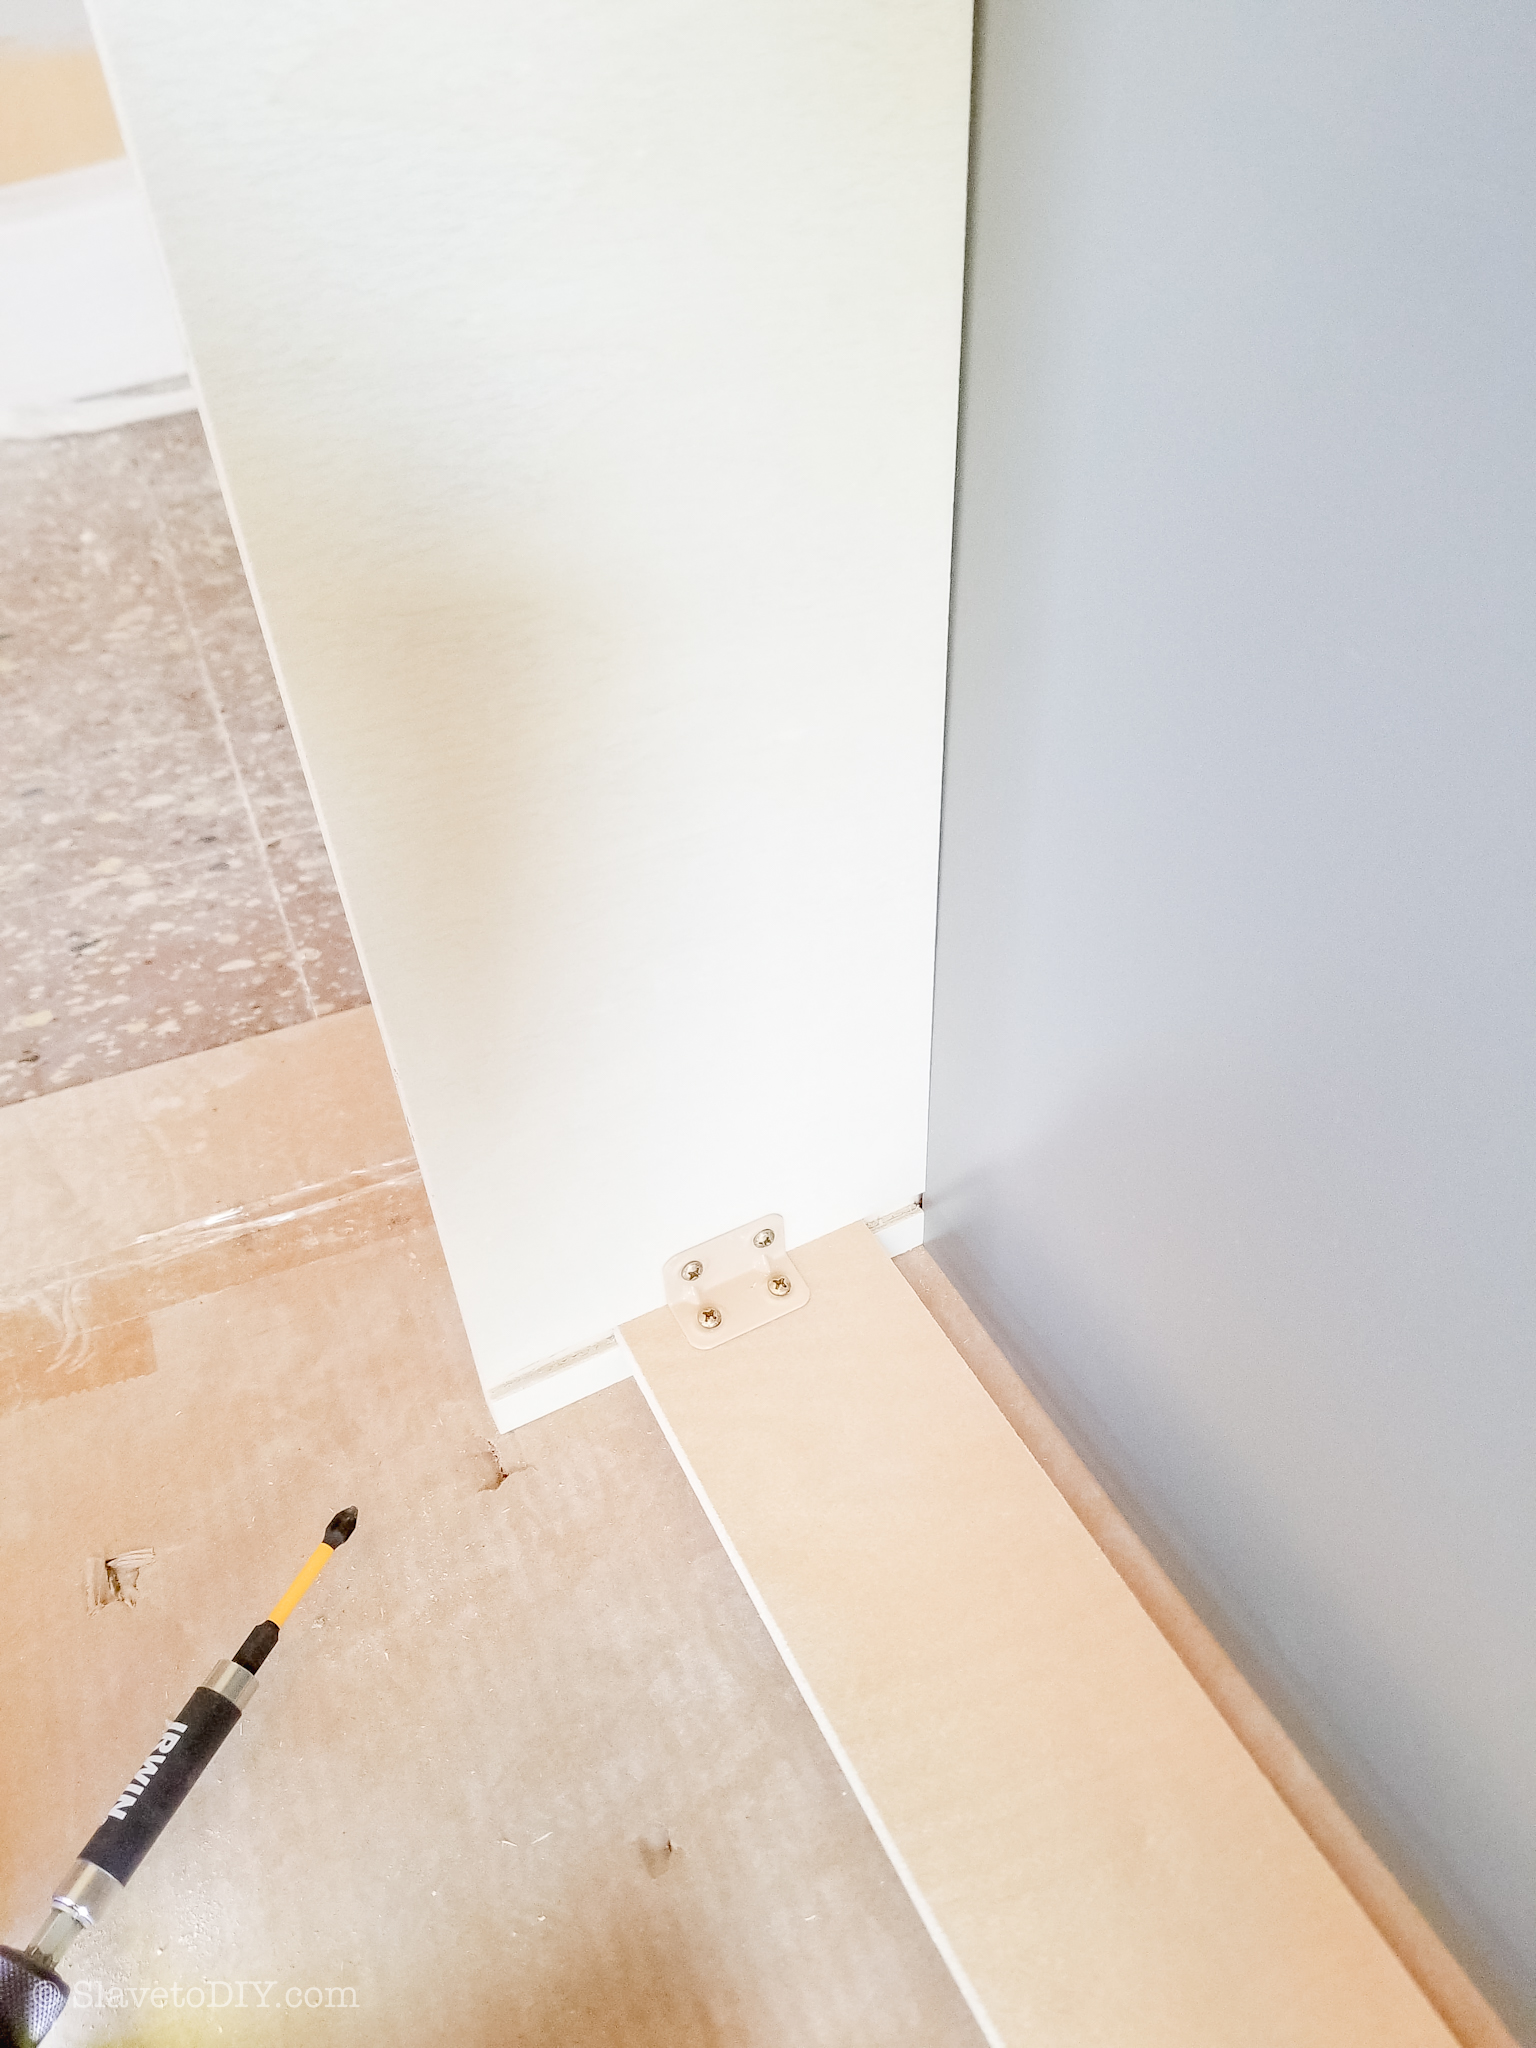
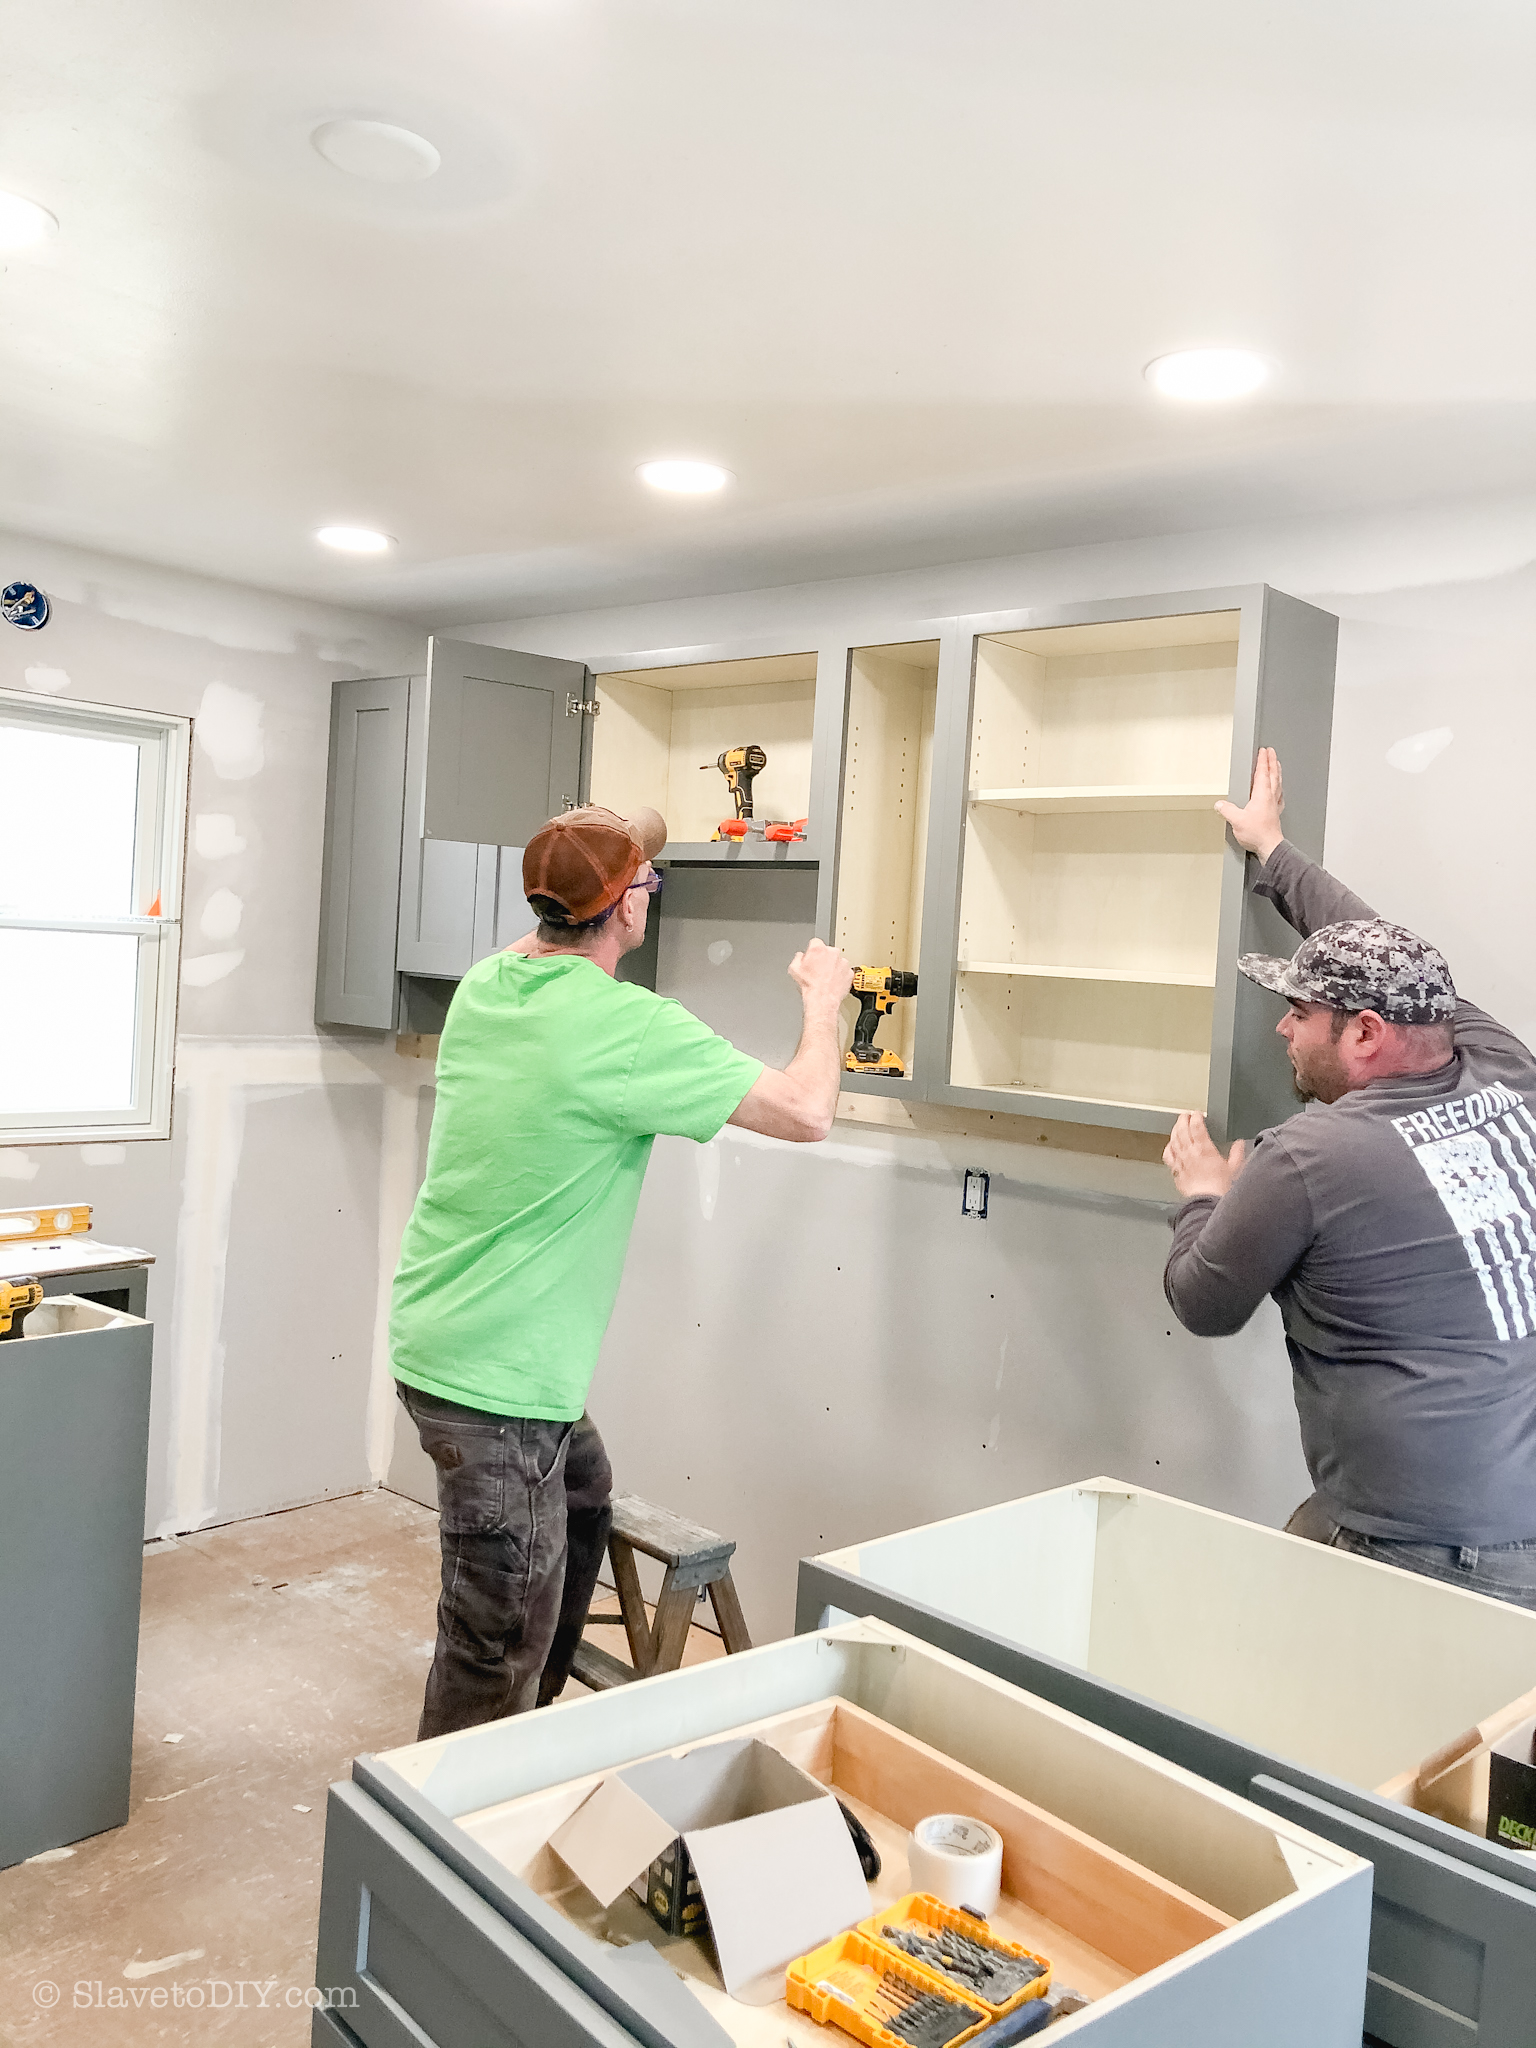
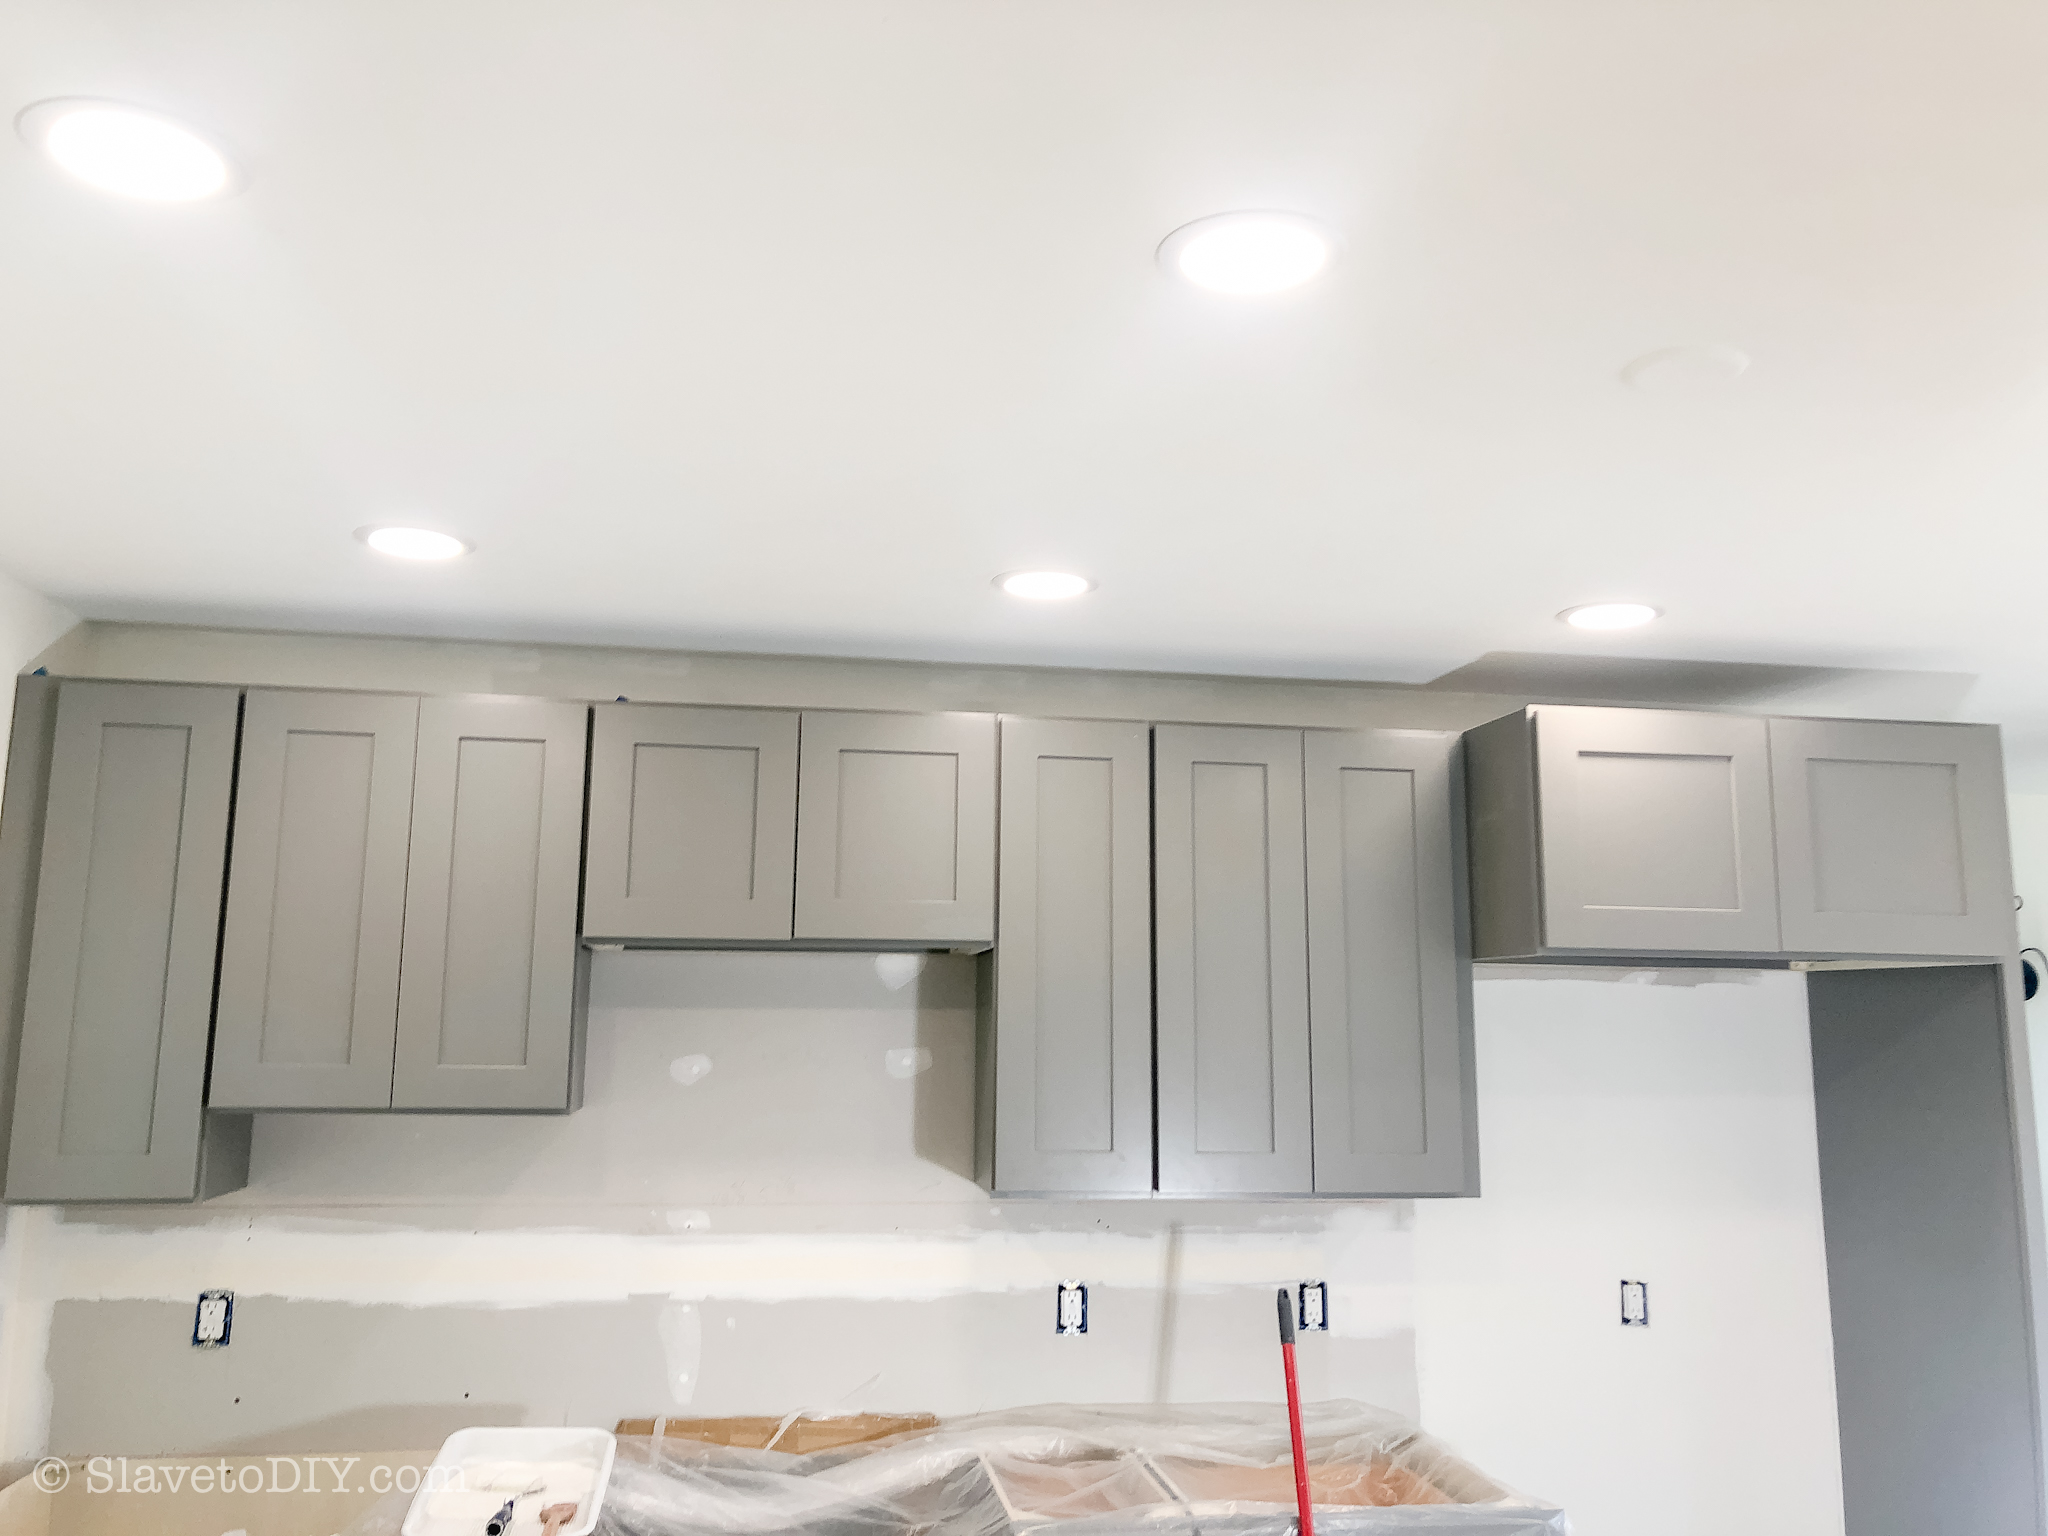
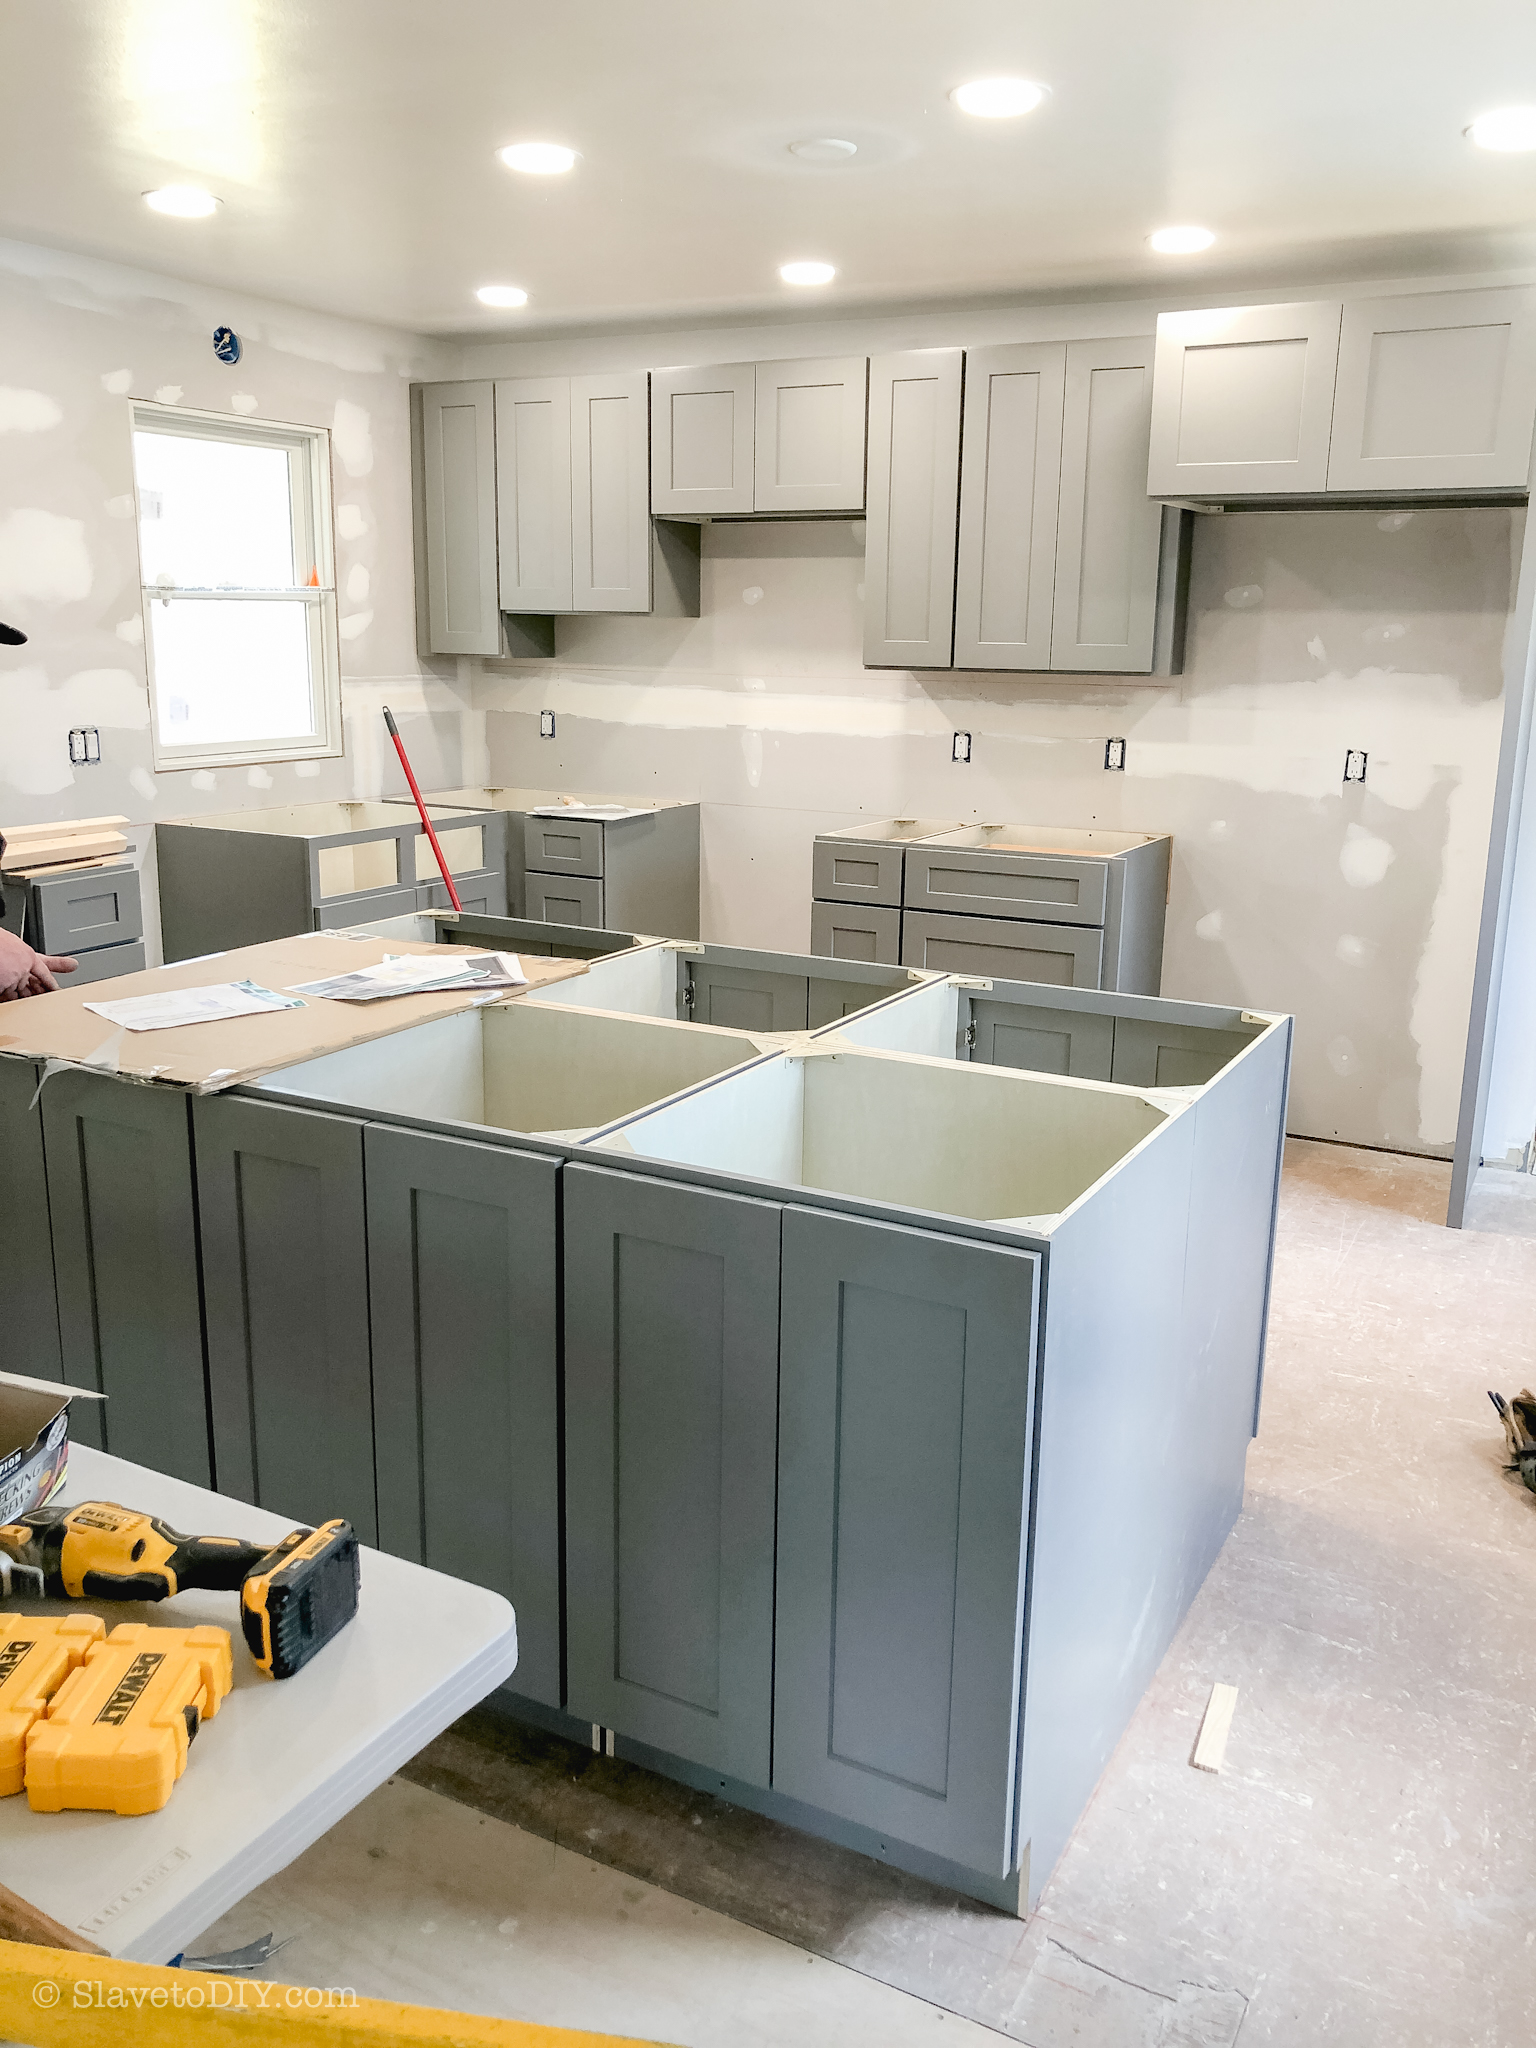
Following the detailed layout the designer provided: they started tying them into the walls and the kitchen was really starting to take shape!
How To Measure For, Design, Order, and Install Your Dream Kitchen From RTA Cabinets: RTA Cabinet Installation
How To Measure For, Design, Order, and Install Your Dream Kitchen From RTA Cabinets: RTA Cabinet Installation
How To Measure For, Design, Order, and Install Your Dream Kitchen From RTA Cabinets: RTA Cabinet Installation
How To Measure For, Design, Order, and Install Your Dream Kitchen From RTA Cabinets: RTA Cabinet Installation
How To Measure For, Design, Order, and Install Your Dream Kitchen From RTA Cabinets: RTA Cabinet Installation
How To Measure For, Design, Order, and Install Your Dream Kitchen From RTA Cabinets: RTA Cabinet Installation
Using the design, he had the electrician put in all new can lights, outlets, and receptacles for the other fixtures.
The Rest Of The Kitchen Installation
My sister immediately got going on painting in the main living spaces, including the kitchen. She very carefully covered the cabinets and went to work.
How To Measure For, Design, Order, and Install Your Dream Kitchen From RTA Cabinets: RTA Cabinet Installation
How To Measure For, Design, Order, and Install Your Dream Kitchen From RTA Cabinets: RTA Cabinet Installation
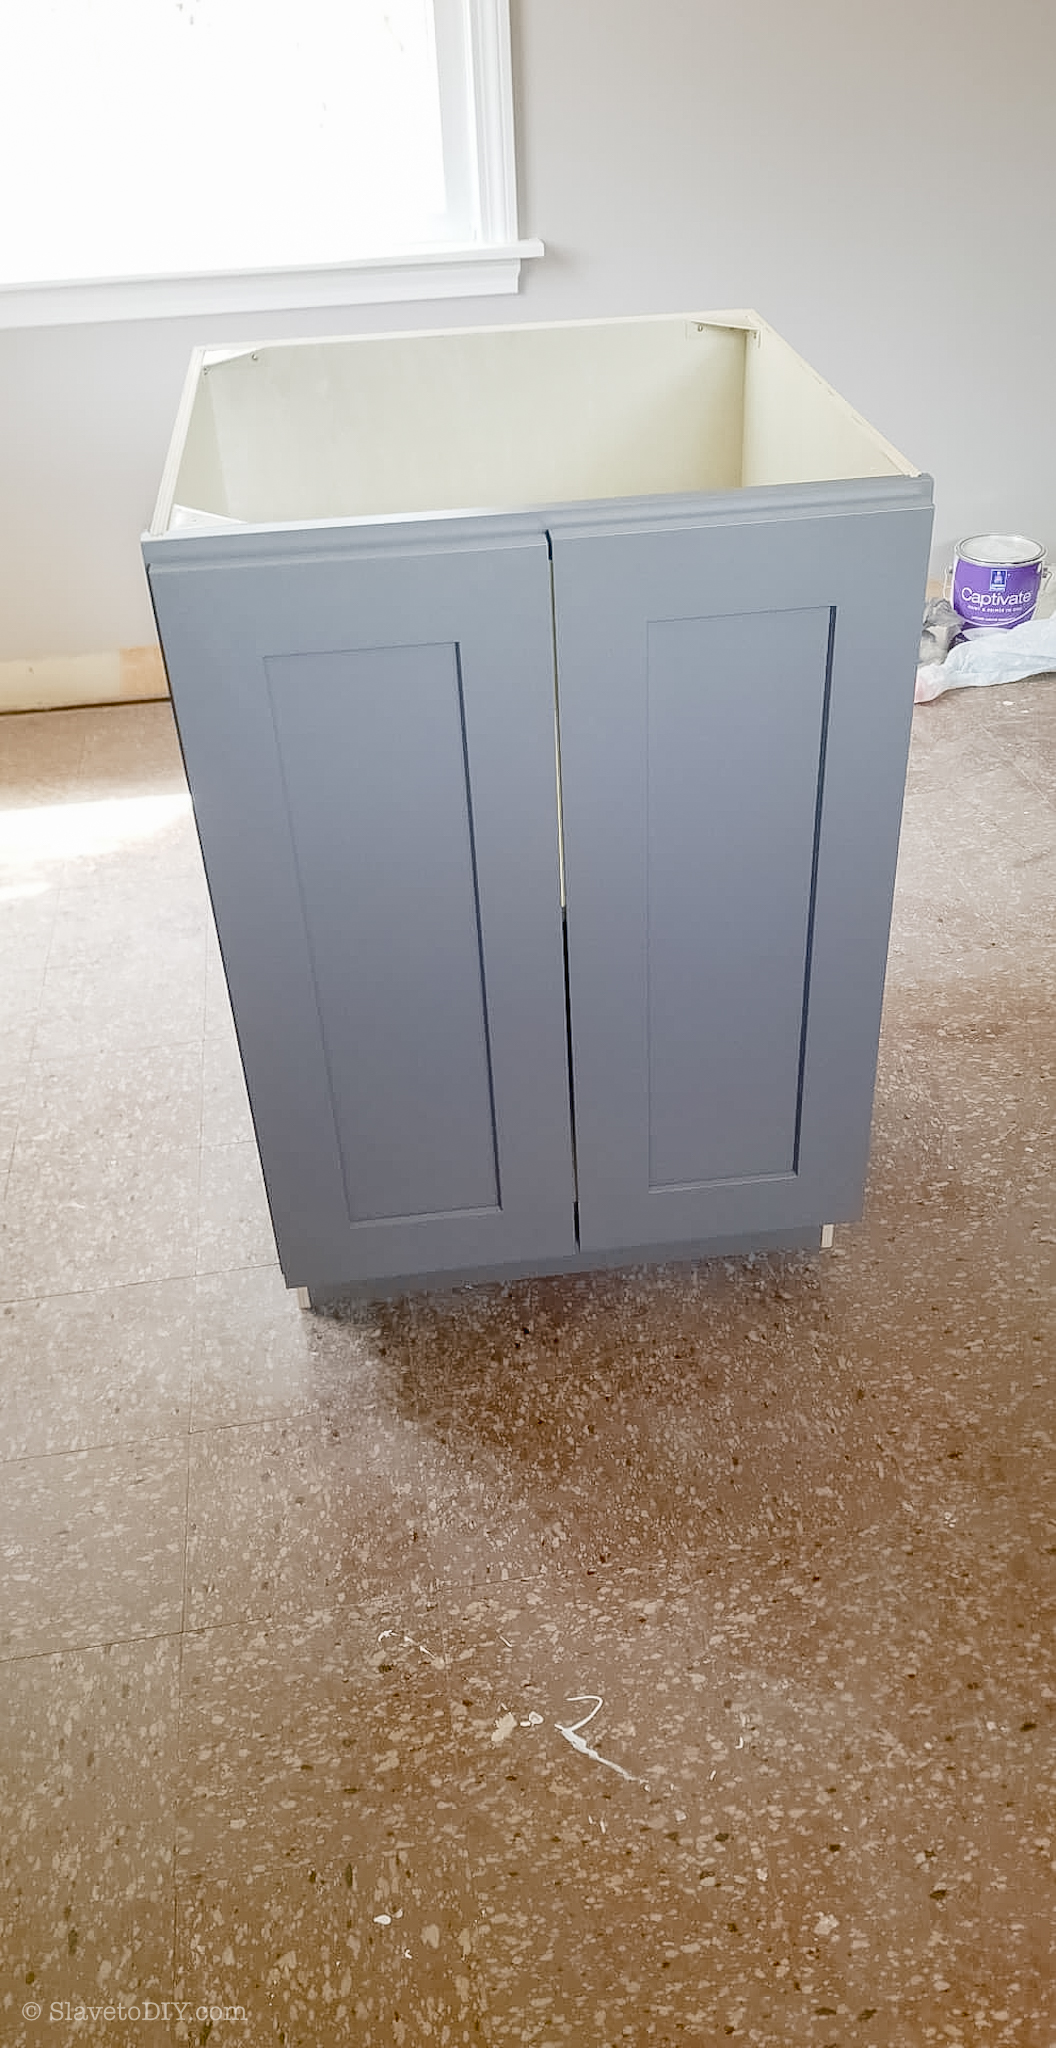
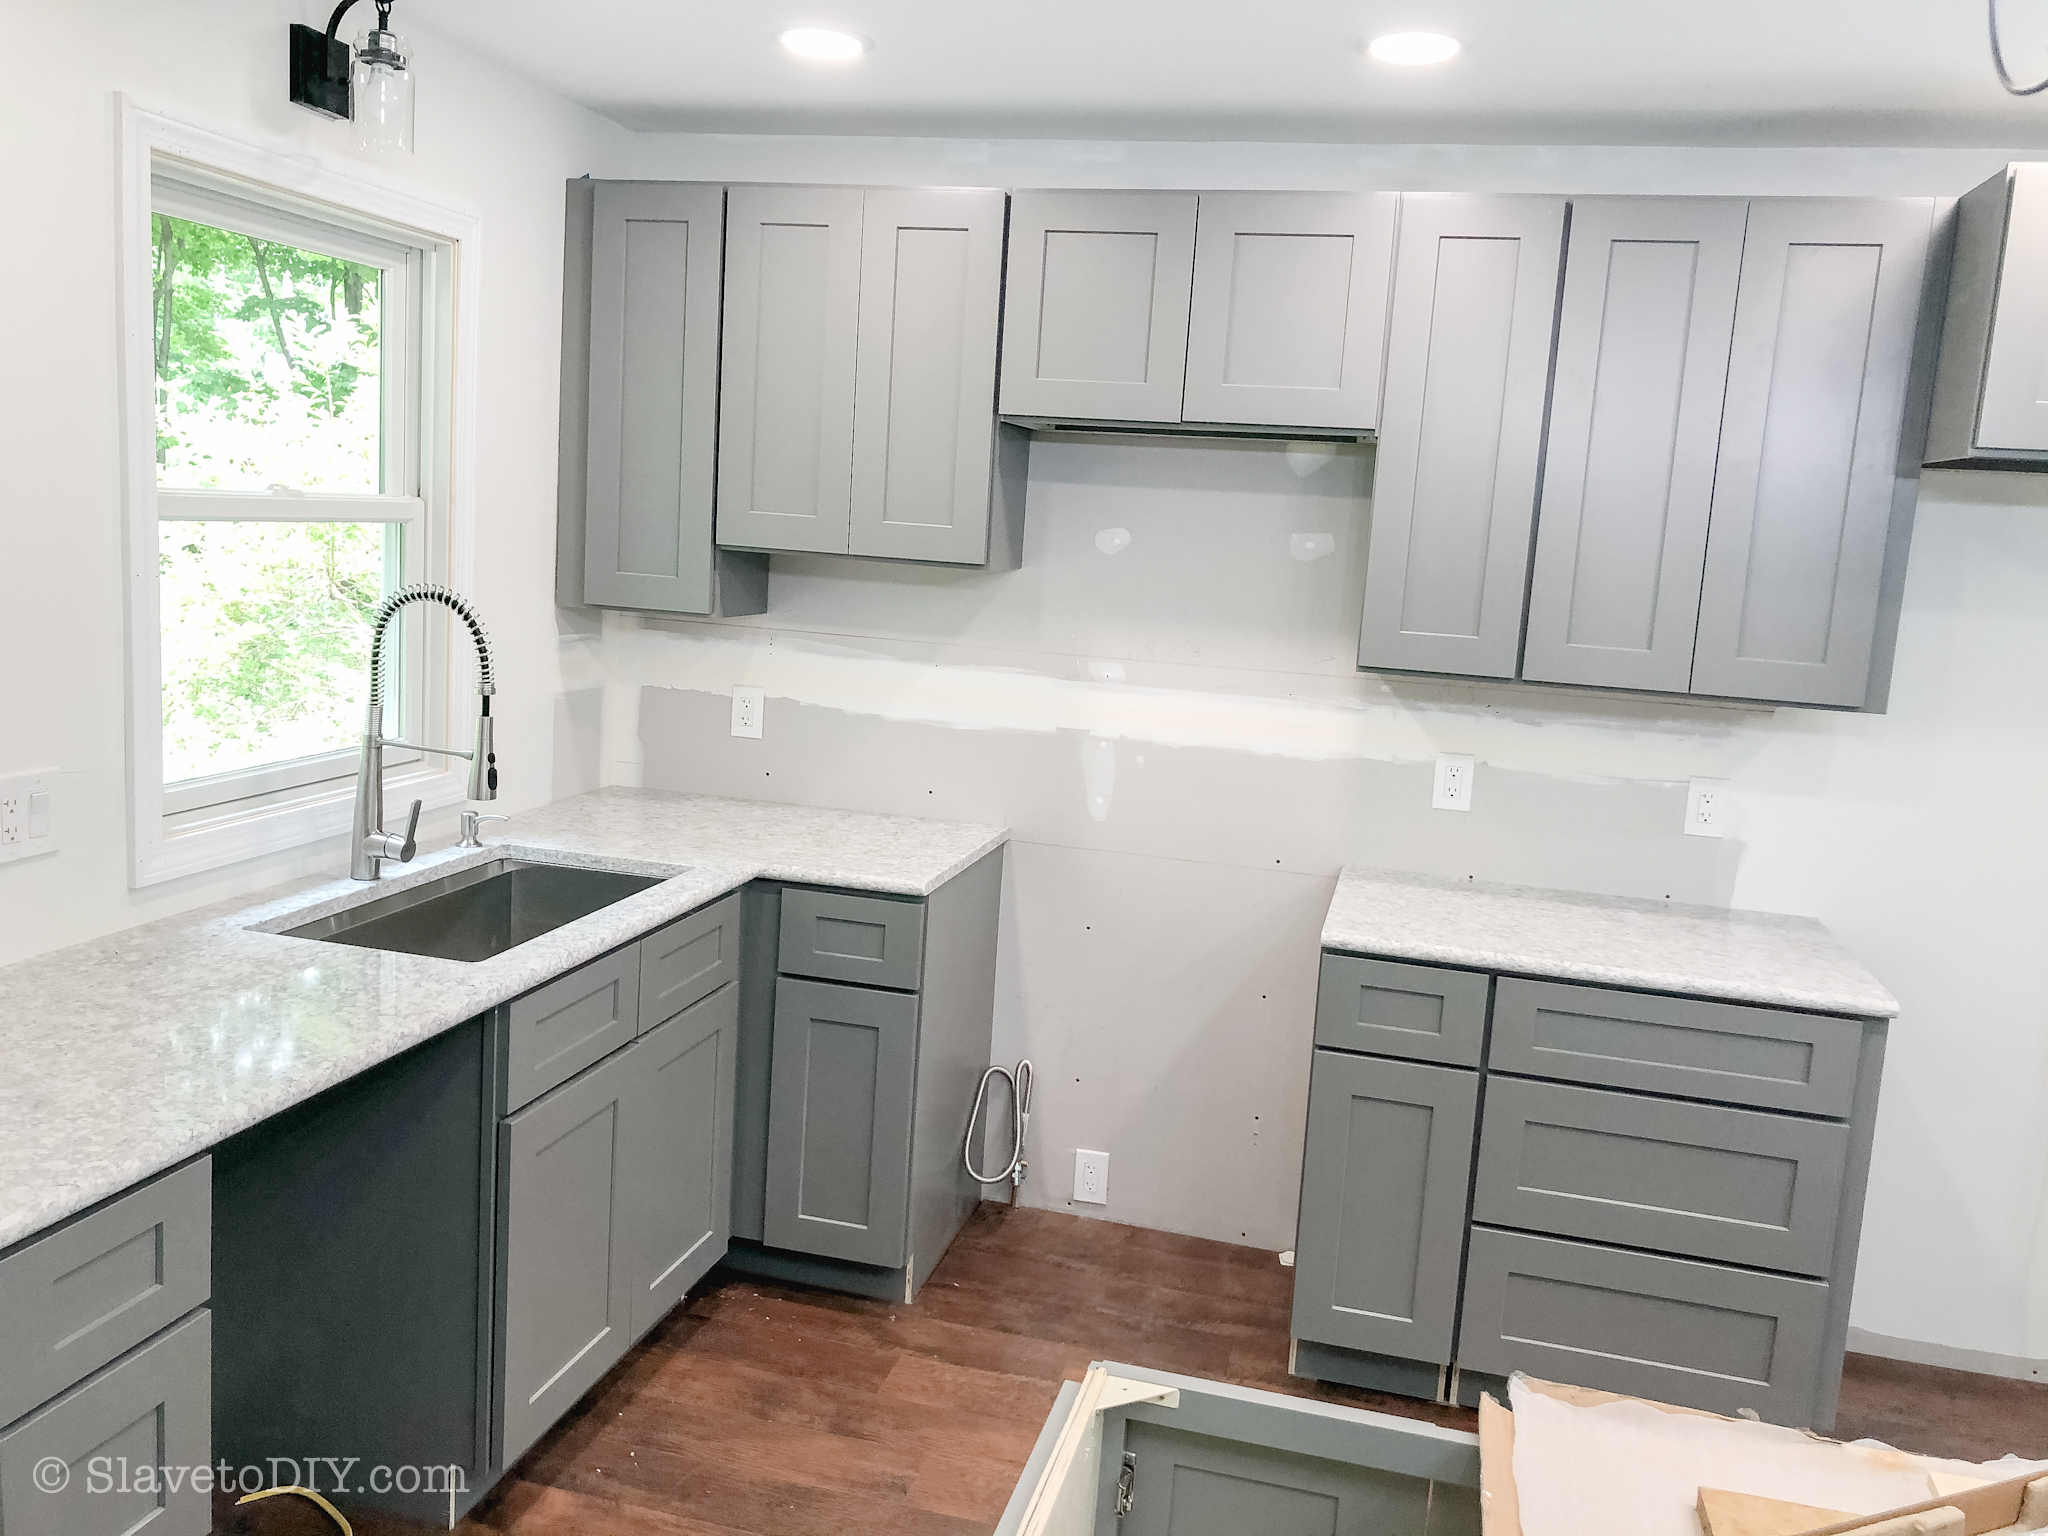
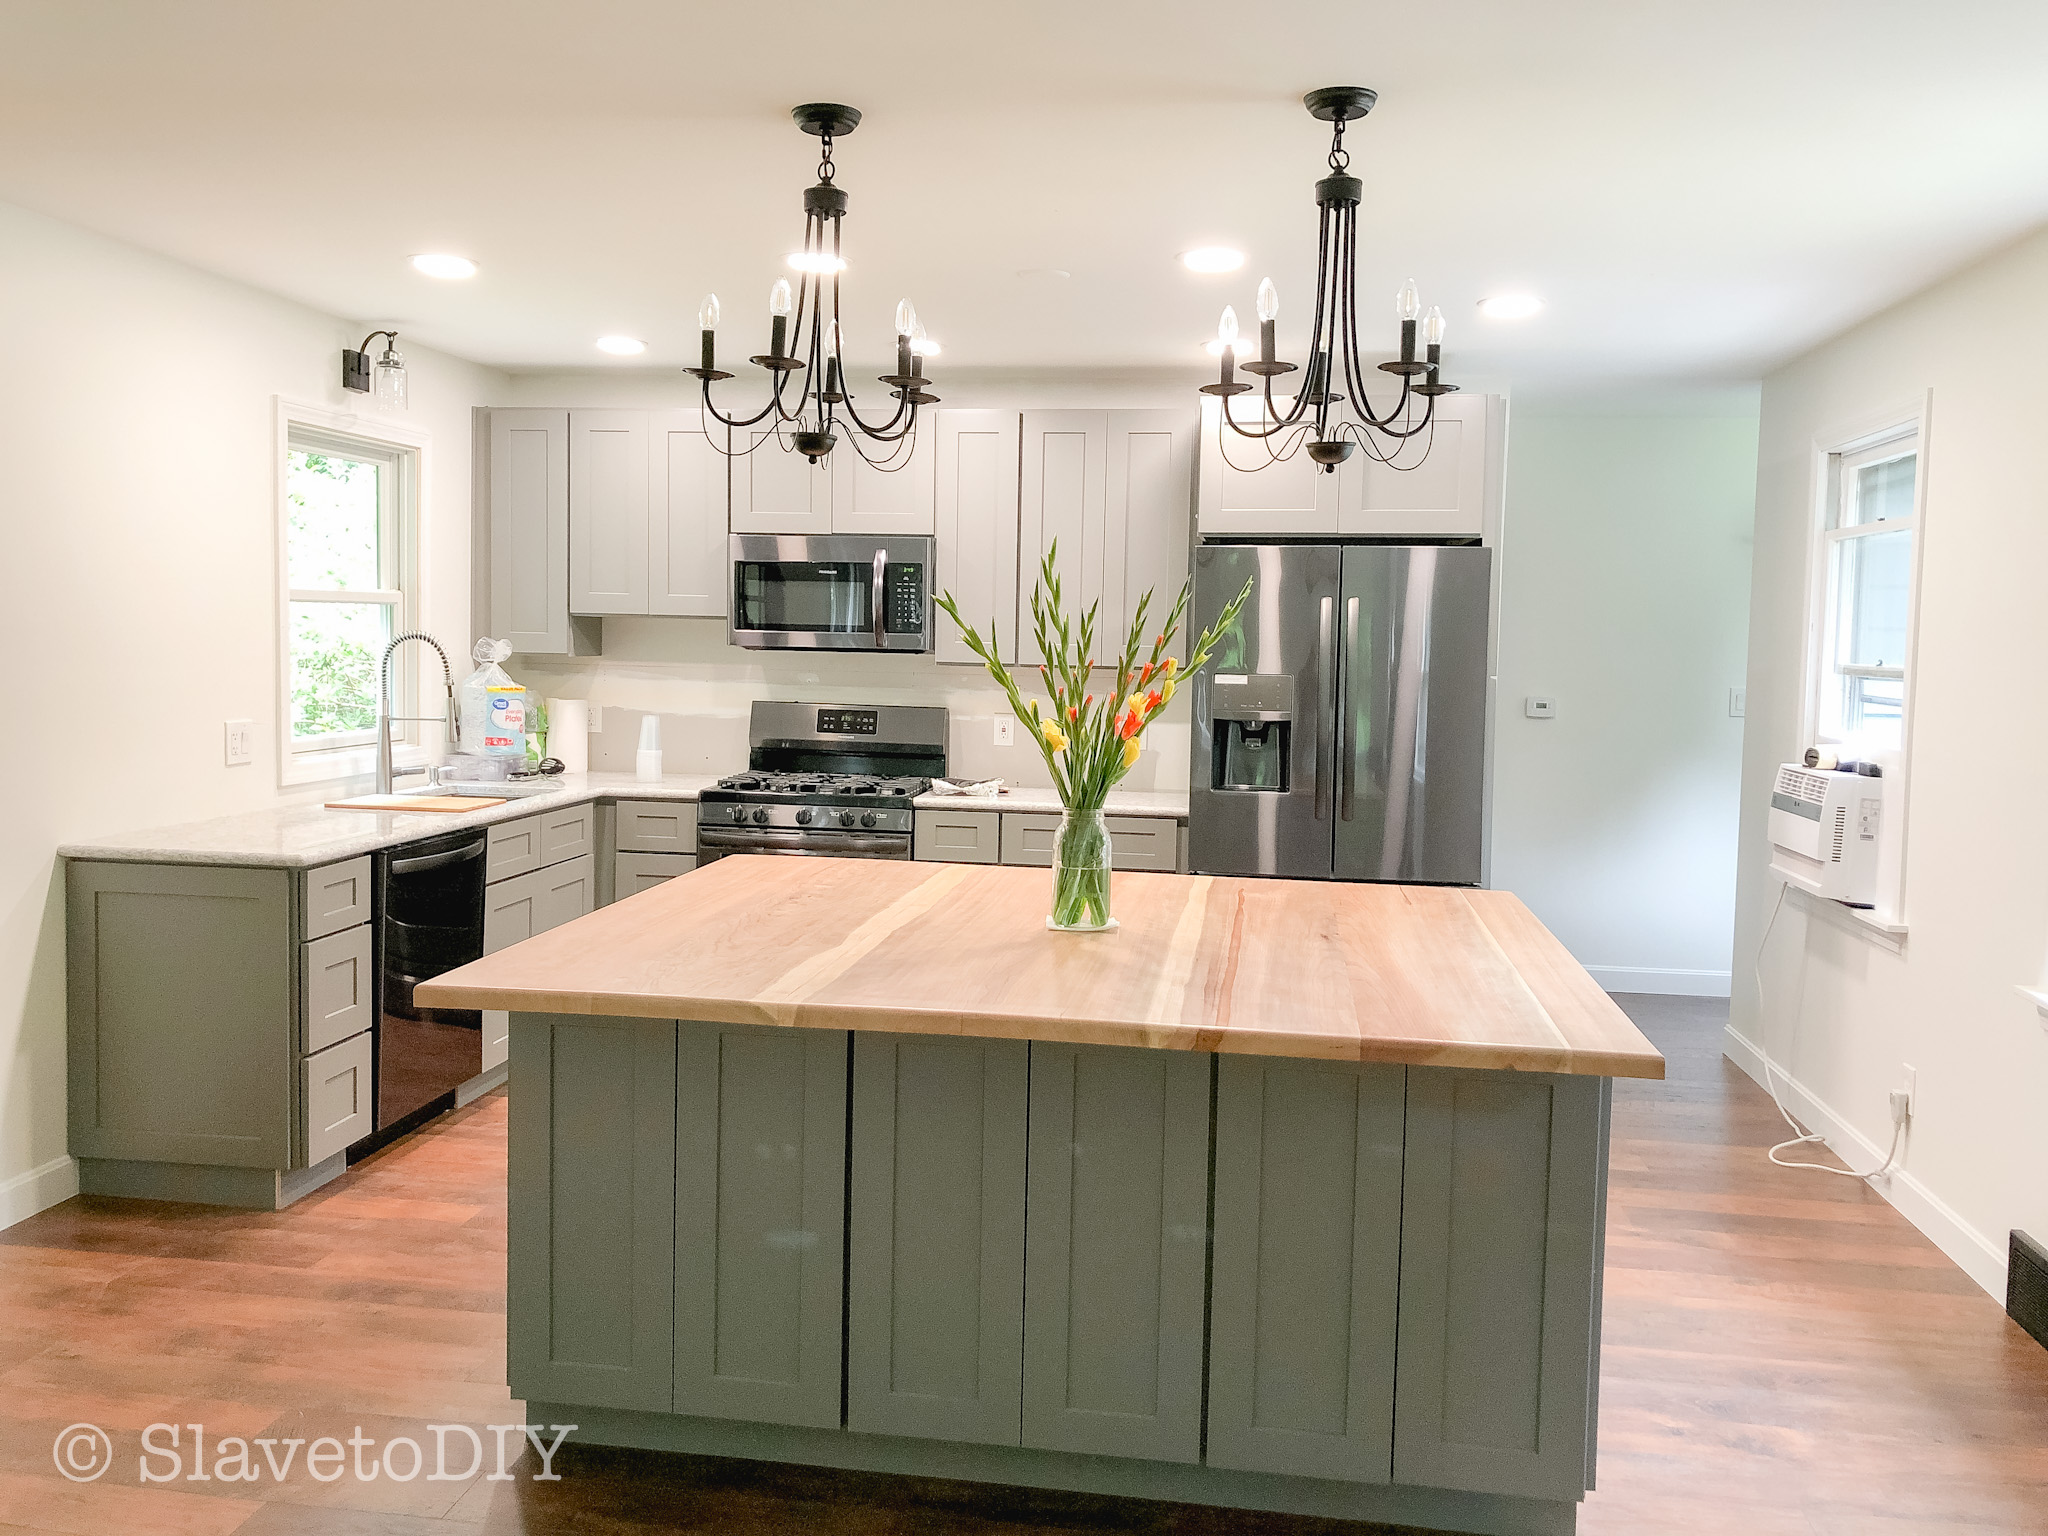
Later, the floors went down and lights went up. My brother also installed the decorative panels on the sides of the cabinets so that the countertop people could measure accurately.
How To Measure For, Design, Order, and Install Your Dream Kitchen From RTA Cabinets: Light fixture installation
How To Measure For, Design, Order, and Install Your Dream Kitchen From RTA Cabinets: RTA Cabinet Installation
Next, the countertops went in (except for the kitchen island, which my brother had wood curing for).
How To Measure For, Design, Order, and Install Your Dream Kitchen From RTA Cabinets: Countertop installation
How To Measure For, Design, Order, and Install Your Dream Kitchen From RTA Cabinets: Countertop Installation
How To Measure For, Design, Order, and Install Your Dream Kitchen From RTA Cabinets: Countertop Installation
They were finally ready to bring the appliances up and it was amazing how it ALREADY looked, even though it wasn’t finished. And we had a little problem coming up… We were supposed to do the “reveal” on my mom’s birthday in July. But, we were still unable to travel north because of COVID.
So, my sister and brother did a mini-reveal to show her the progress, knowing that we would be up soon to finish the space that still needed: molding, an antique for a spice rack, the stove backsplash, the backsplash above the counter, the cabinet hardware, the hanging herb garden, and the open shelving to the left of the sink. But, the before was still pretty awesome and my mom was blown away. Here’s what it looked like on her reveal day with my brother’s custom island top he manufactured from wood on his property and his wood mill:
And who doesn’t love a good reveal video? Warning: it makes me weepy every time.
What do you think? Would you use RTA cabinets for your renovation? Let us know in the comments below!
Ready to get started? My readers can use the code SDIY2018 at checkout to get 5% off your Lily Ann Cabinets order!
Thanks again to the team at Lily Ann Cabinets for making our build possible, to my sister, brother, and brother-in-law in Vermont for all of their hard work, and to my favorite Rainman for doing working vacations with me without a single complaint!
Cheers!
*Legal stuff:
I am honest about my experiences with different products and write because I enjoy it. I do however, have the opportunity to earn money for my writing, also.
Slavetodiy.com is a participant in the Amazon Services LLC Associates Program, an affiliate advertising program designed to provide a means for sites to earn advertising fees by advertising and linking to amazon.com. Amazon offers a small commission on products sold through their affiliate links. Each of your purchases via our Amazon affiliation links supports our cause at no additional cost to you.
If a blogger links to an Amazon product (with a special code for affiliates embedded in the link), and a reader places an item in their “shopping cart” through that link within 24 hours of clicking the link, the blogger gets a small percentage of the sale. Amazon links are not “pay per click.” If you click on the product link and stay around Amazon and purchase something else, however, I will get a commission on that sale.
Slavetodiy.com is also a VigLink affiliate advertiser which works similarly.
I have officially reached the end of Pinterest. I have saved every kitchen that I love in my kitchens folder. I AM NOW READY TO START RENOVATING MY KITCHEN. (Do you think he heard me?)
As you already know: I am ALWAYS in design mode on my own house and looking for ideas for clients. I’m also sort of a real estate junkie and I make it my business to know the local market and am always scouting for real estate deals! What do those things all have in common? KITCHEN OBSESSION. (Yes, I love that million dollar home but the kitchen… IS… AWFUL).
*This post may contain affiliate links. Please see full disclosure at the end of the post.
Yes, I am obsessed with kitchens. Recently, as I was staging for photographing our project in Vermont, something occurred to me: STAGING IS EVERYTHING.
Whether you’re entertaining or showing your house that’s on the market, staging is the make it or break it of beautiful (or even MEH) kitchens. If you sift through your Kitchen board on Pinterest, what you’ll discover is that the ones you REALLY love are staged really well (which is why you saved it, whether you realize it or not!). They have been tricking you all this time… You saved a beautiful flower or branch arrangement that happens to be in a kitchen. But, you saved it, which is the important take away!
Don’t believe me? I’ll show you!
Via @kellynuttdesign Instagram
This kitchen, though probably stunning in person, would be a washed out BLAH in photos without the greenery and fruit. Notice how the big tin bucket with branches anchors the right side of the photo.
Via @wdesigncollective Instagram
Just like the photo before, this kitchen is stunning. However, it has the potential in photos to appear too monochromatic and kind of cold. The branch arrangement, once again, anchors one side of the photo.
Via @ckandm Instagram
Look carefully… If you removed all of the accessories, would this space be very memorable? It’s not that it’s not an amazing kitchen, it’s breathtaking. But, in photos, it really needs some visual interest to look like a DREAM kitchen… which it certainly does here. They have arrangements on both sides here providing an interesting frame.
Would you save this photo? Of course you would!
And, wait, if you saved it… SO WILL YOUR FUTURE BUYERS! They’ll save it to their Pinterest board and obsess about it until they make you an offer over asking price and want to move in, like, yesterday!
So, how do we do that, Campers? Well, I’m going to tell you. I promise.
Step one: take everything off the countertops. Take everything off the shelves. Then add a few, specific things and shop your own stuff!
It’s really that easy: I’m going to show you how and provide links for everything we used here! Altogether, we spent $350 on staging, not including dishes (shhh, don’t tell!!!) and here is how it turned out:
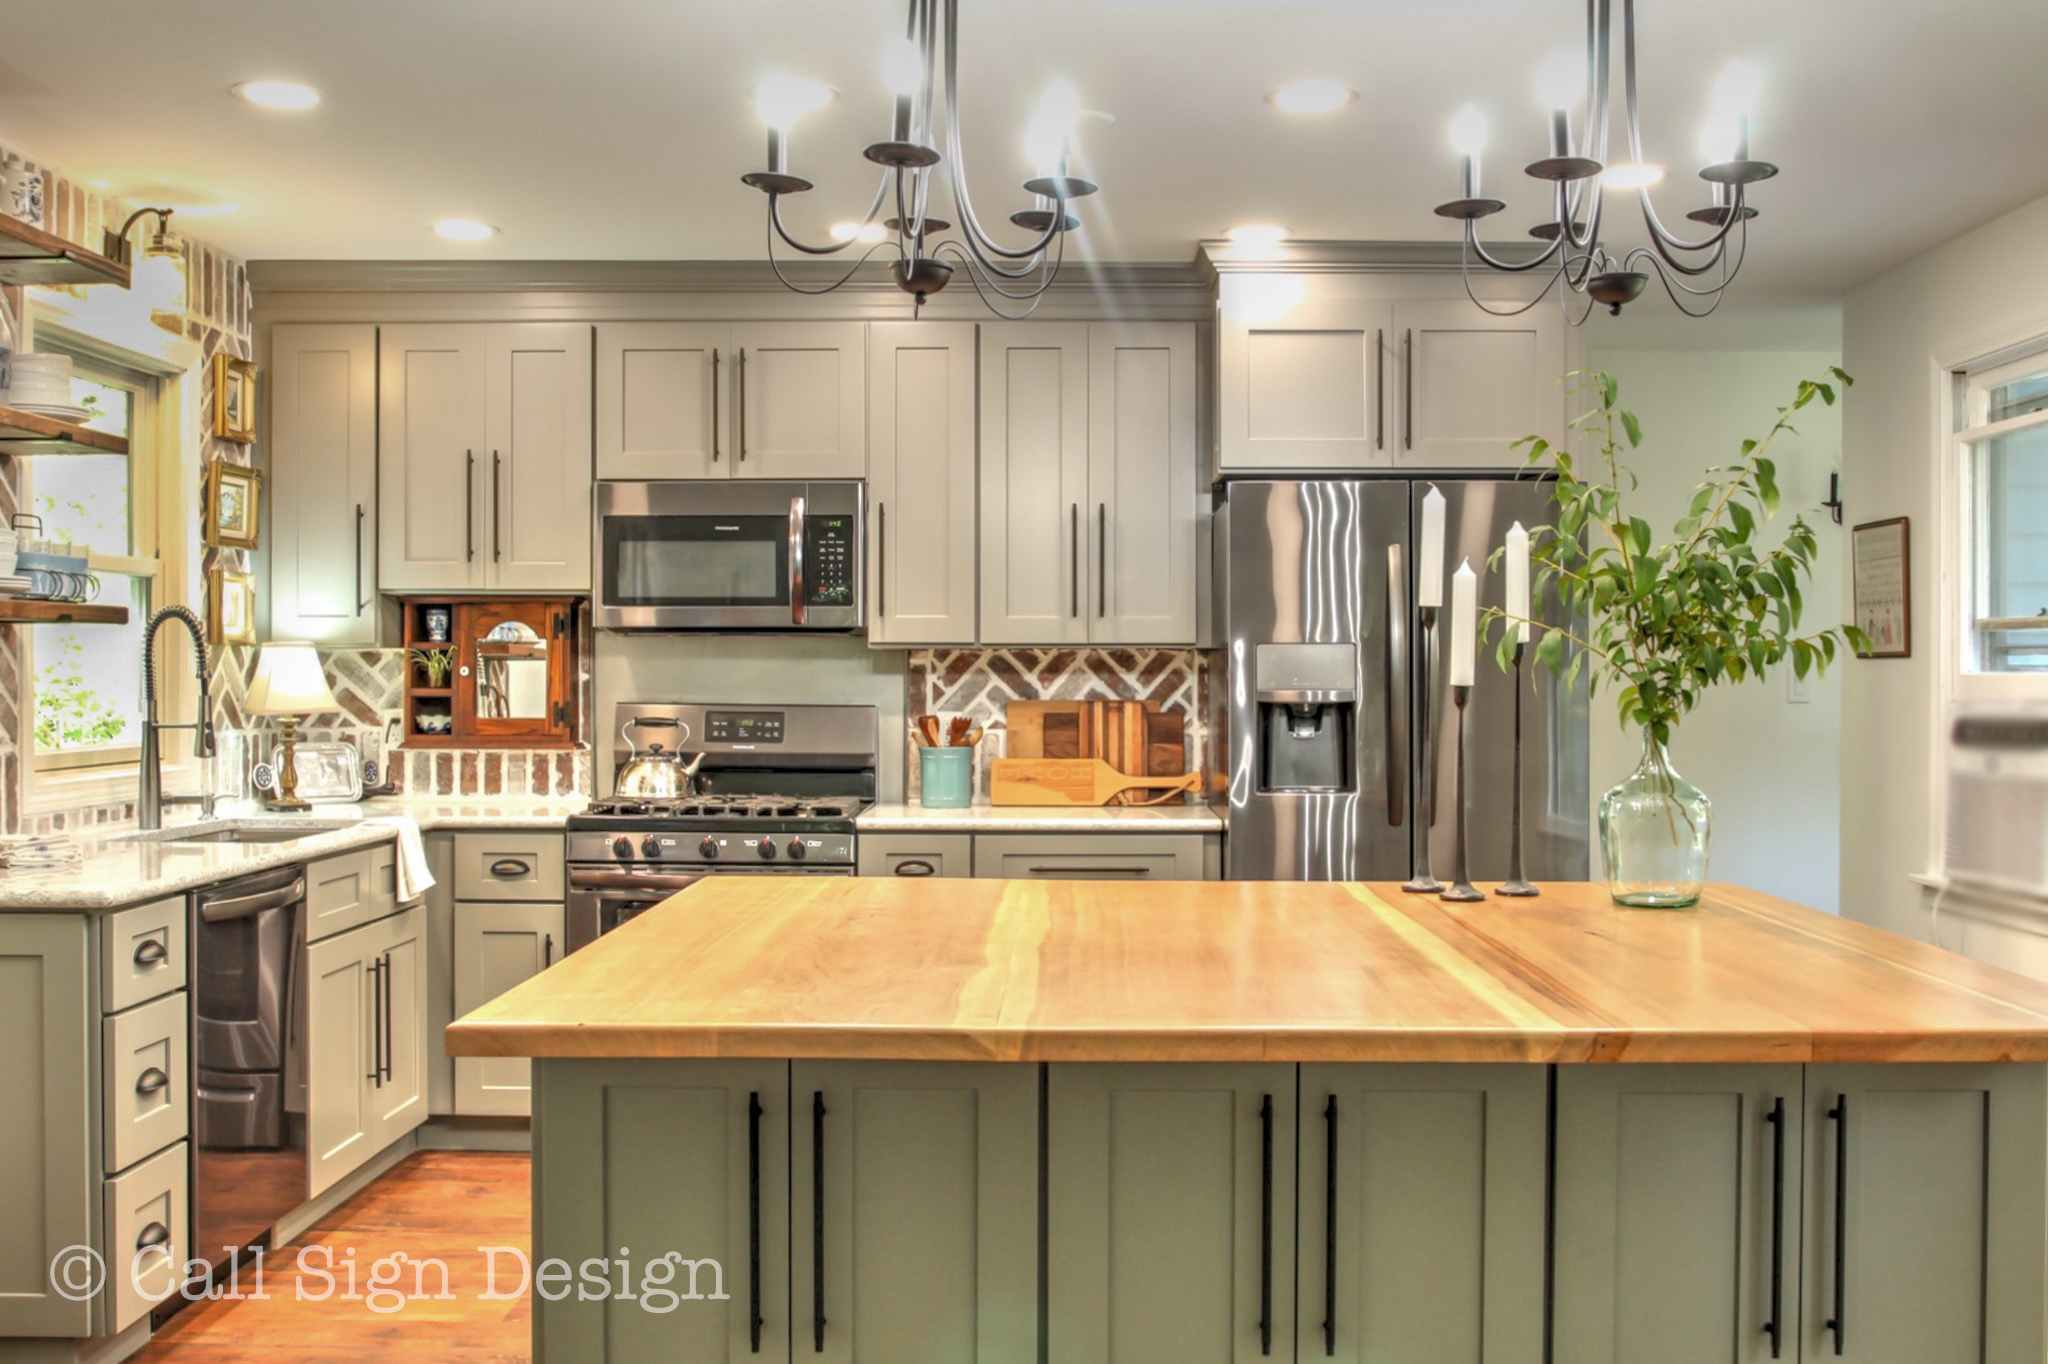
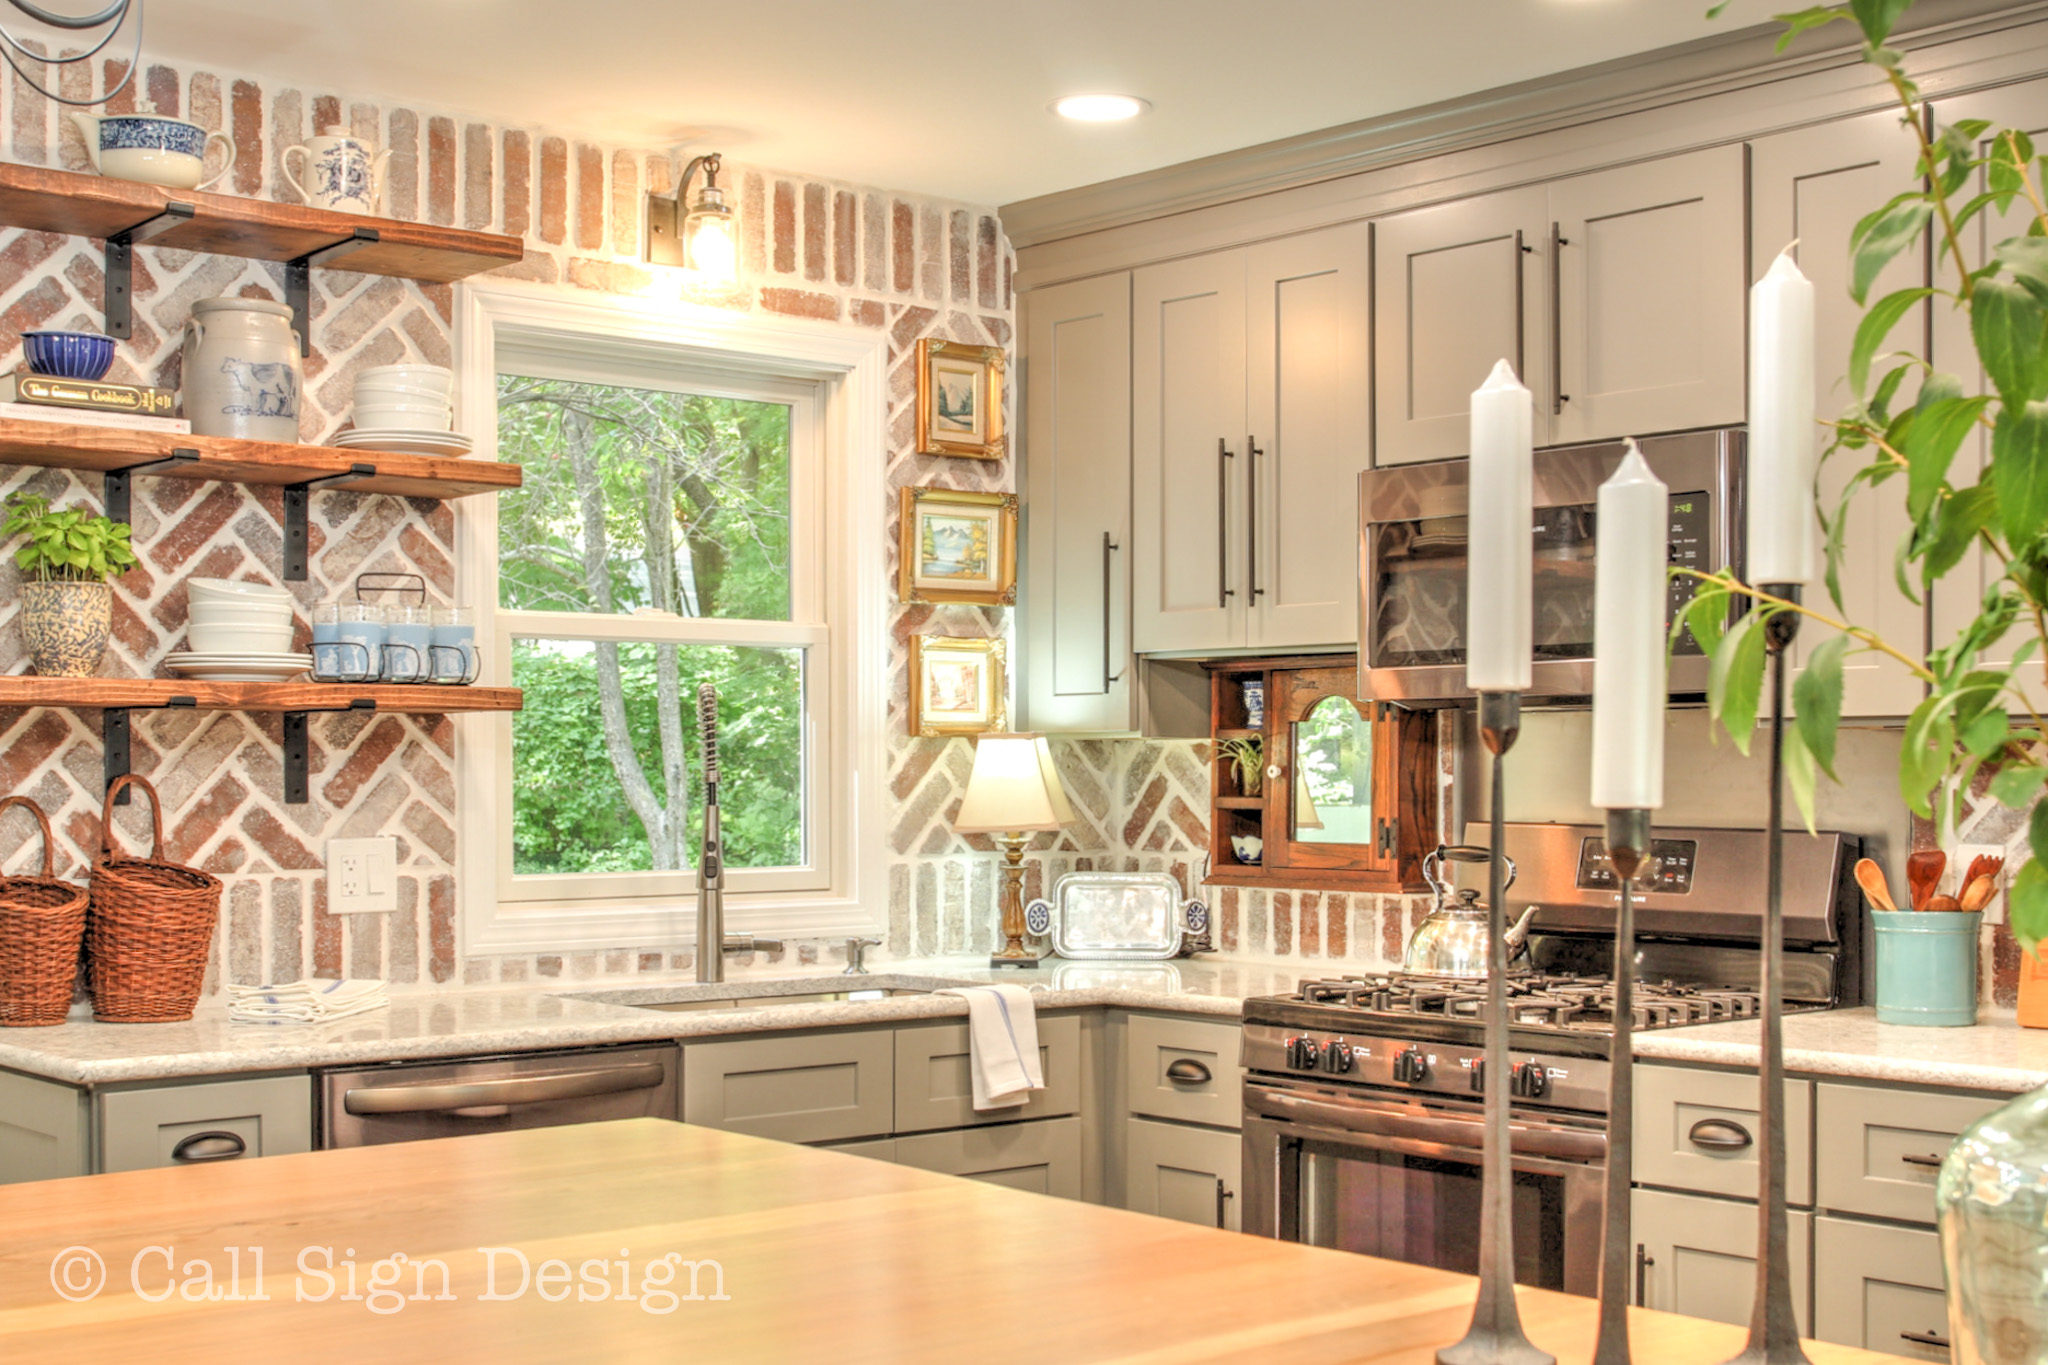
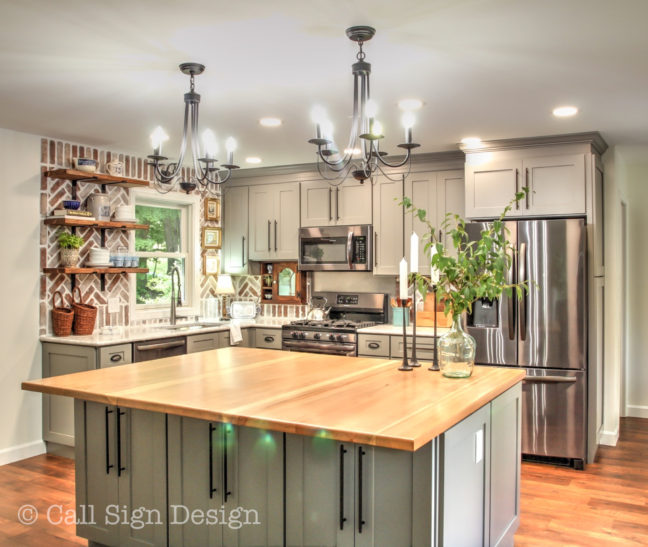
Before and After Pictures of Grandma’s New Vermont Cottage Kitchen: Sponsored by Lily Ann Cabinets and designed by @callsigndesign on Instagram and @slavetodiy on Pinterest.
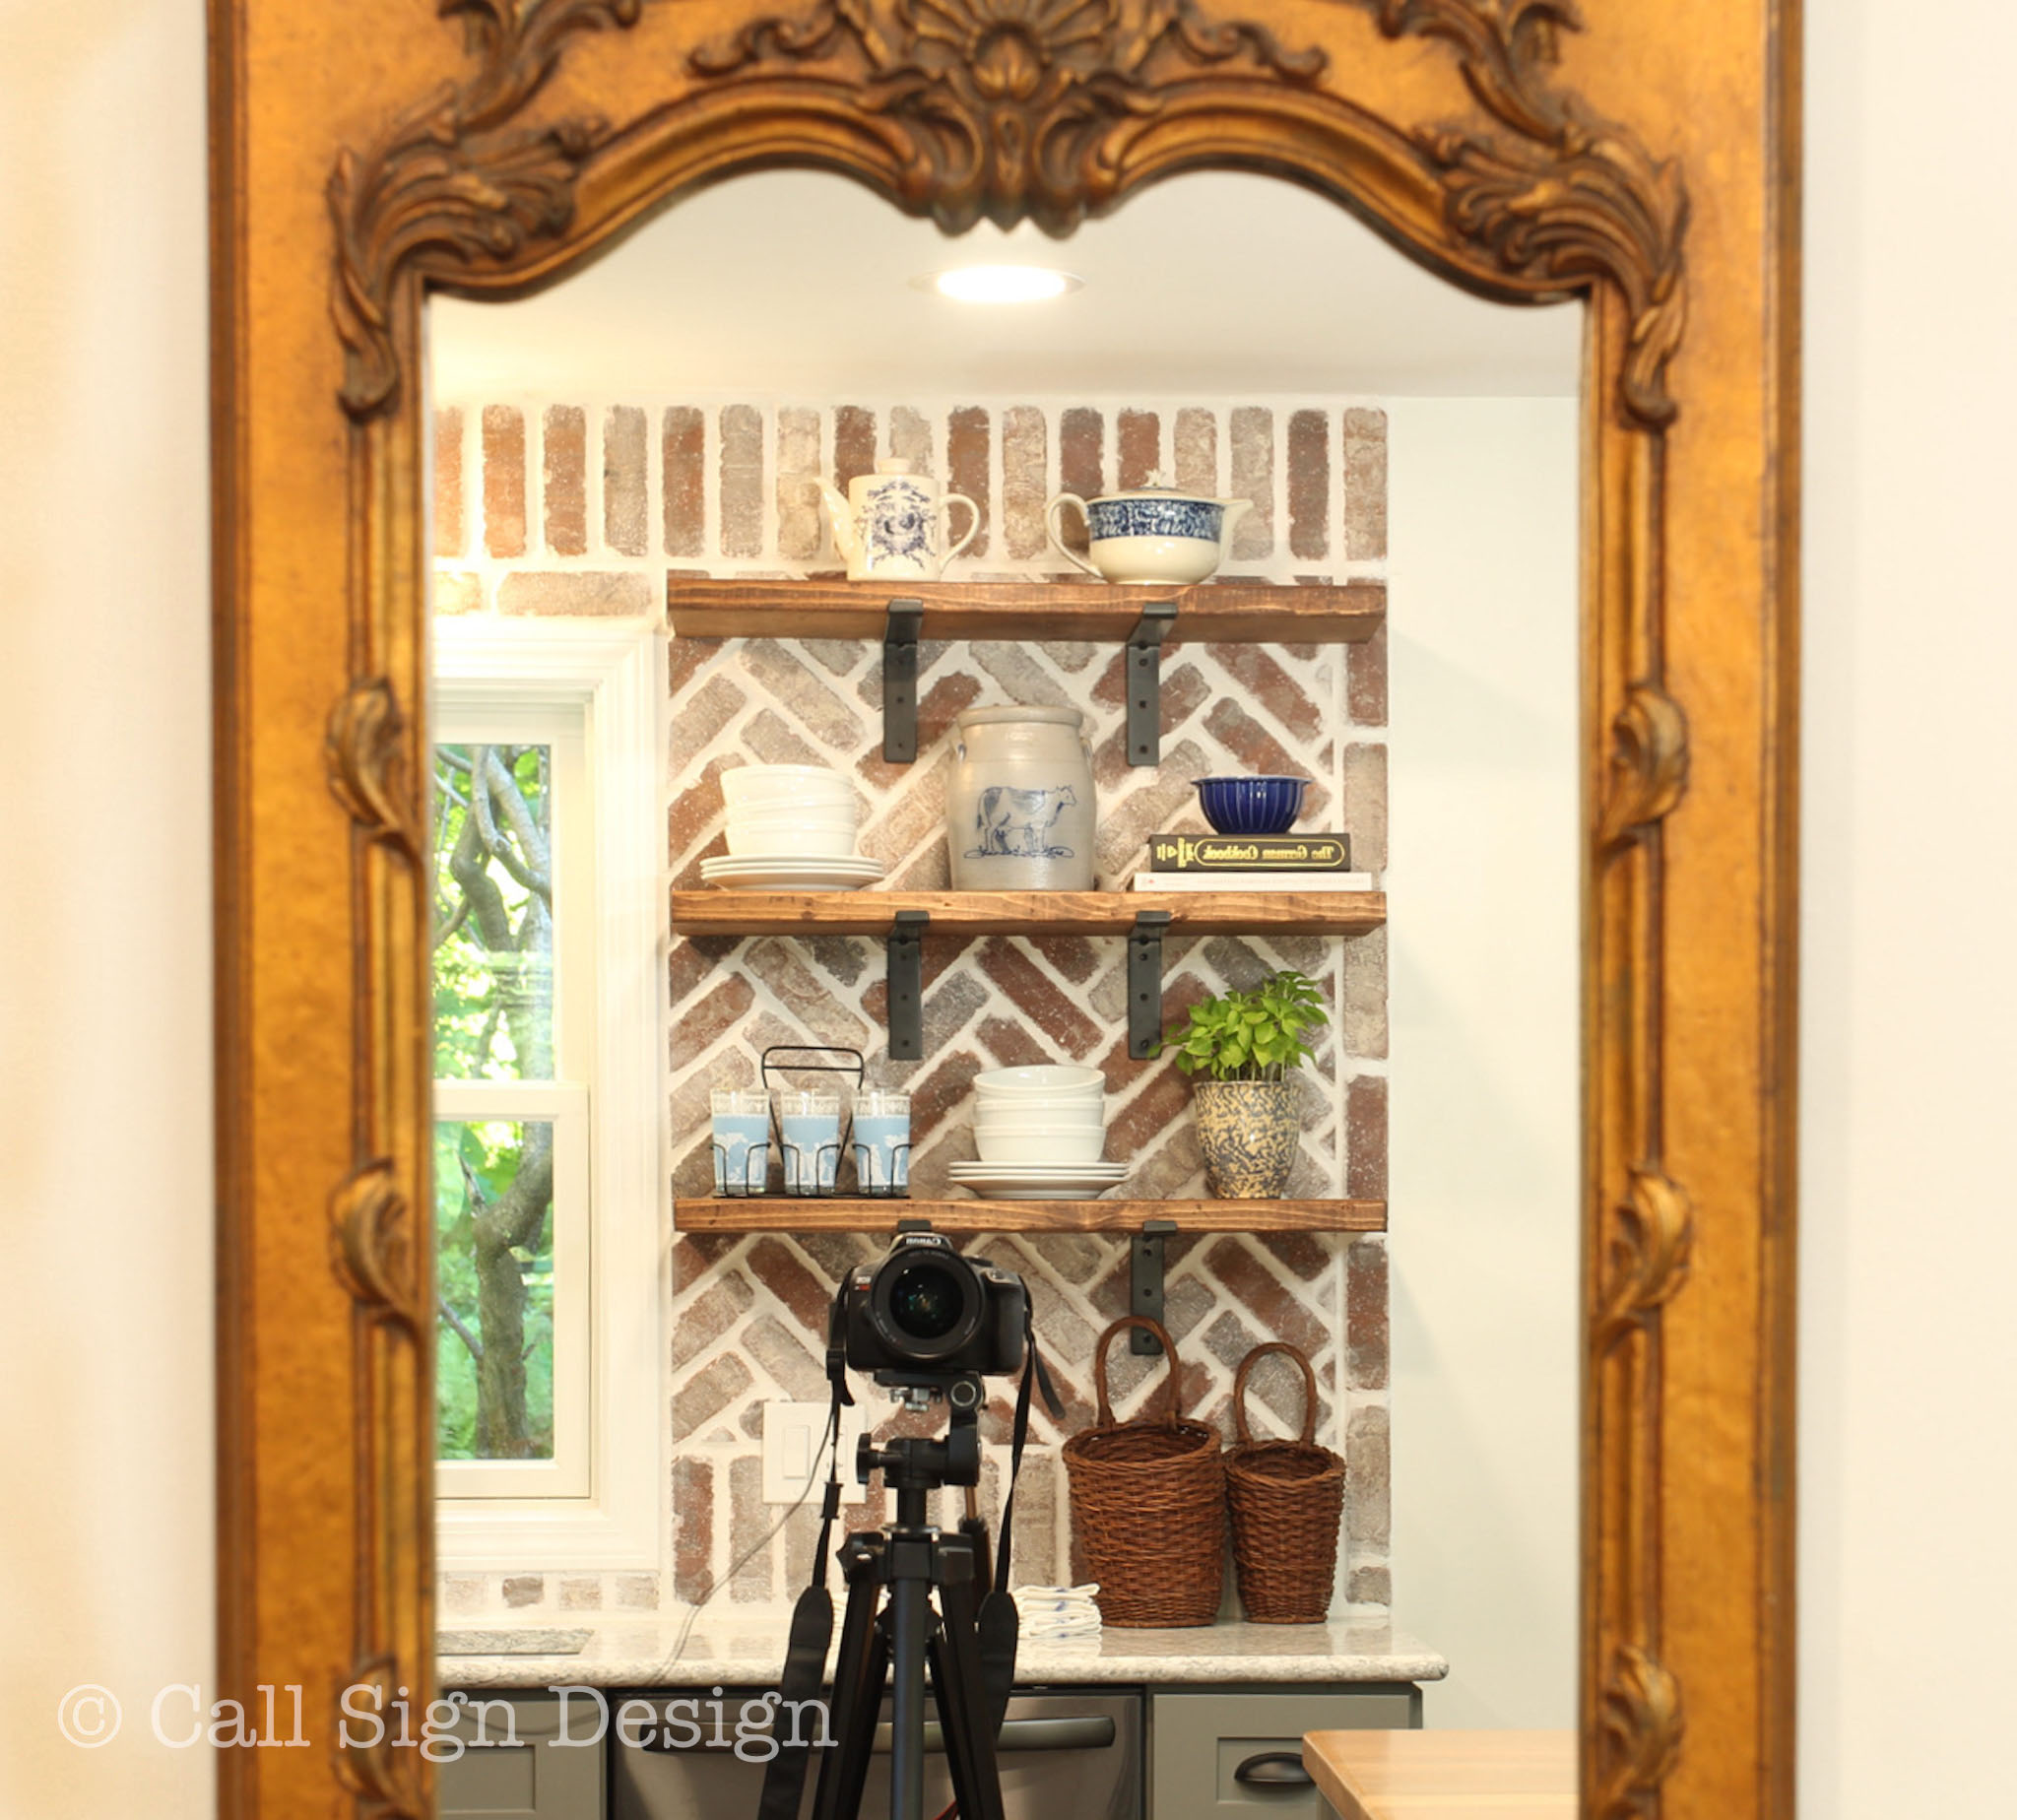
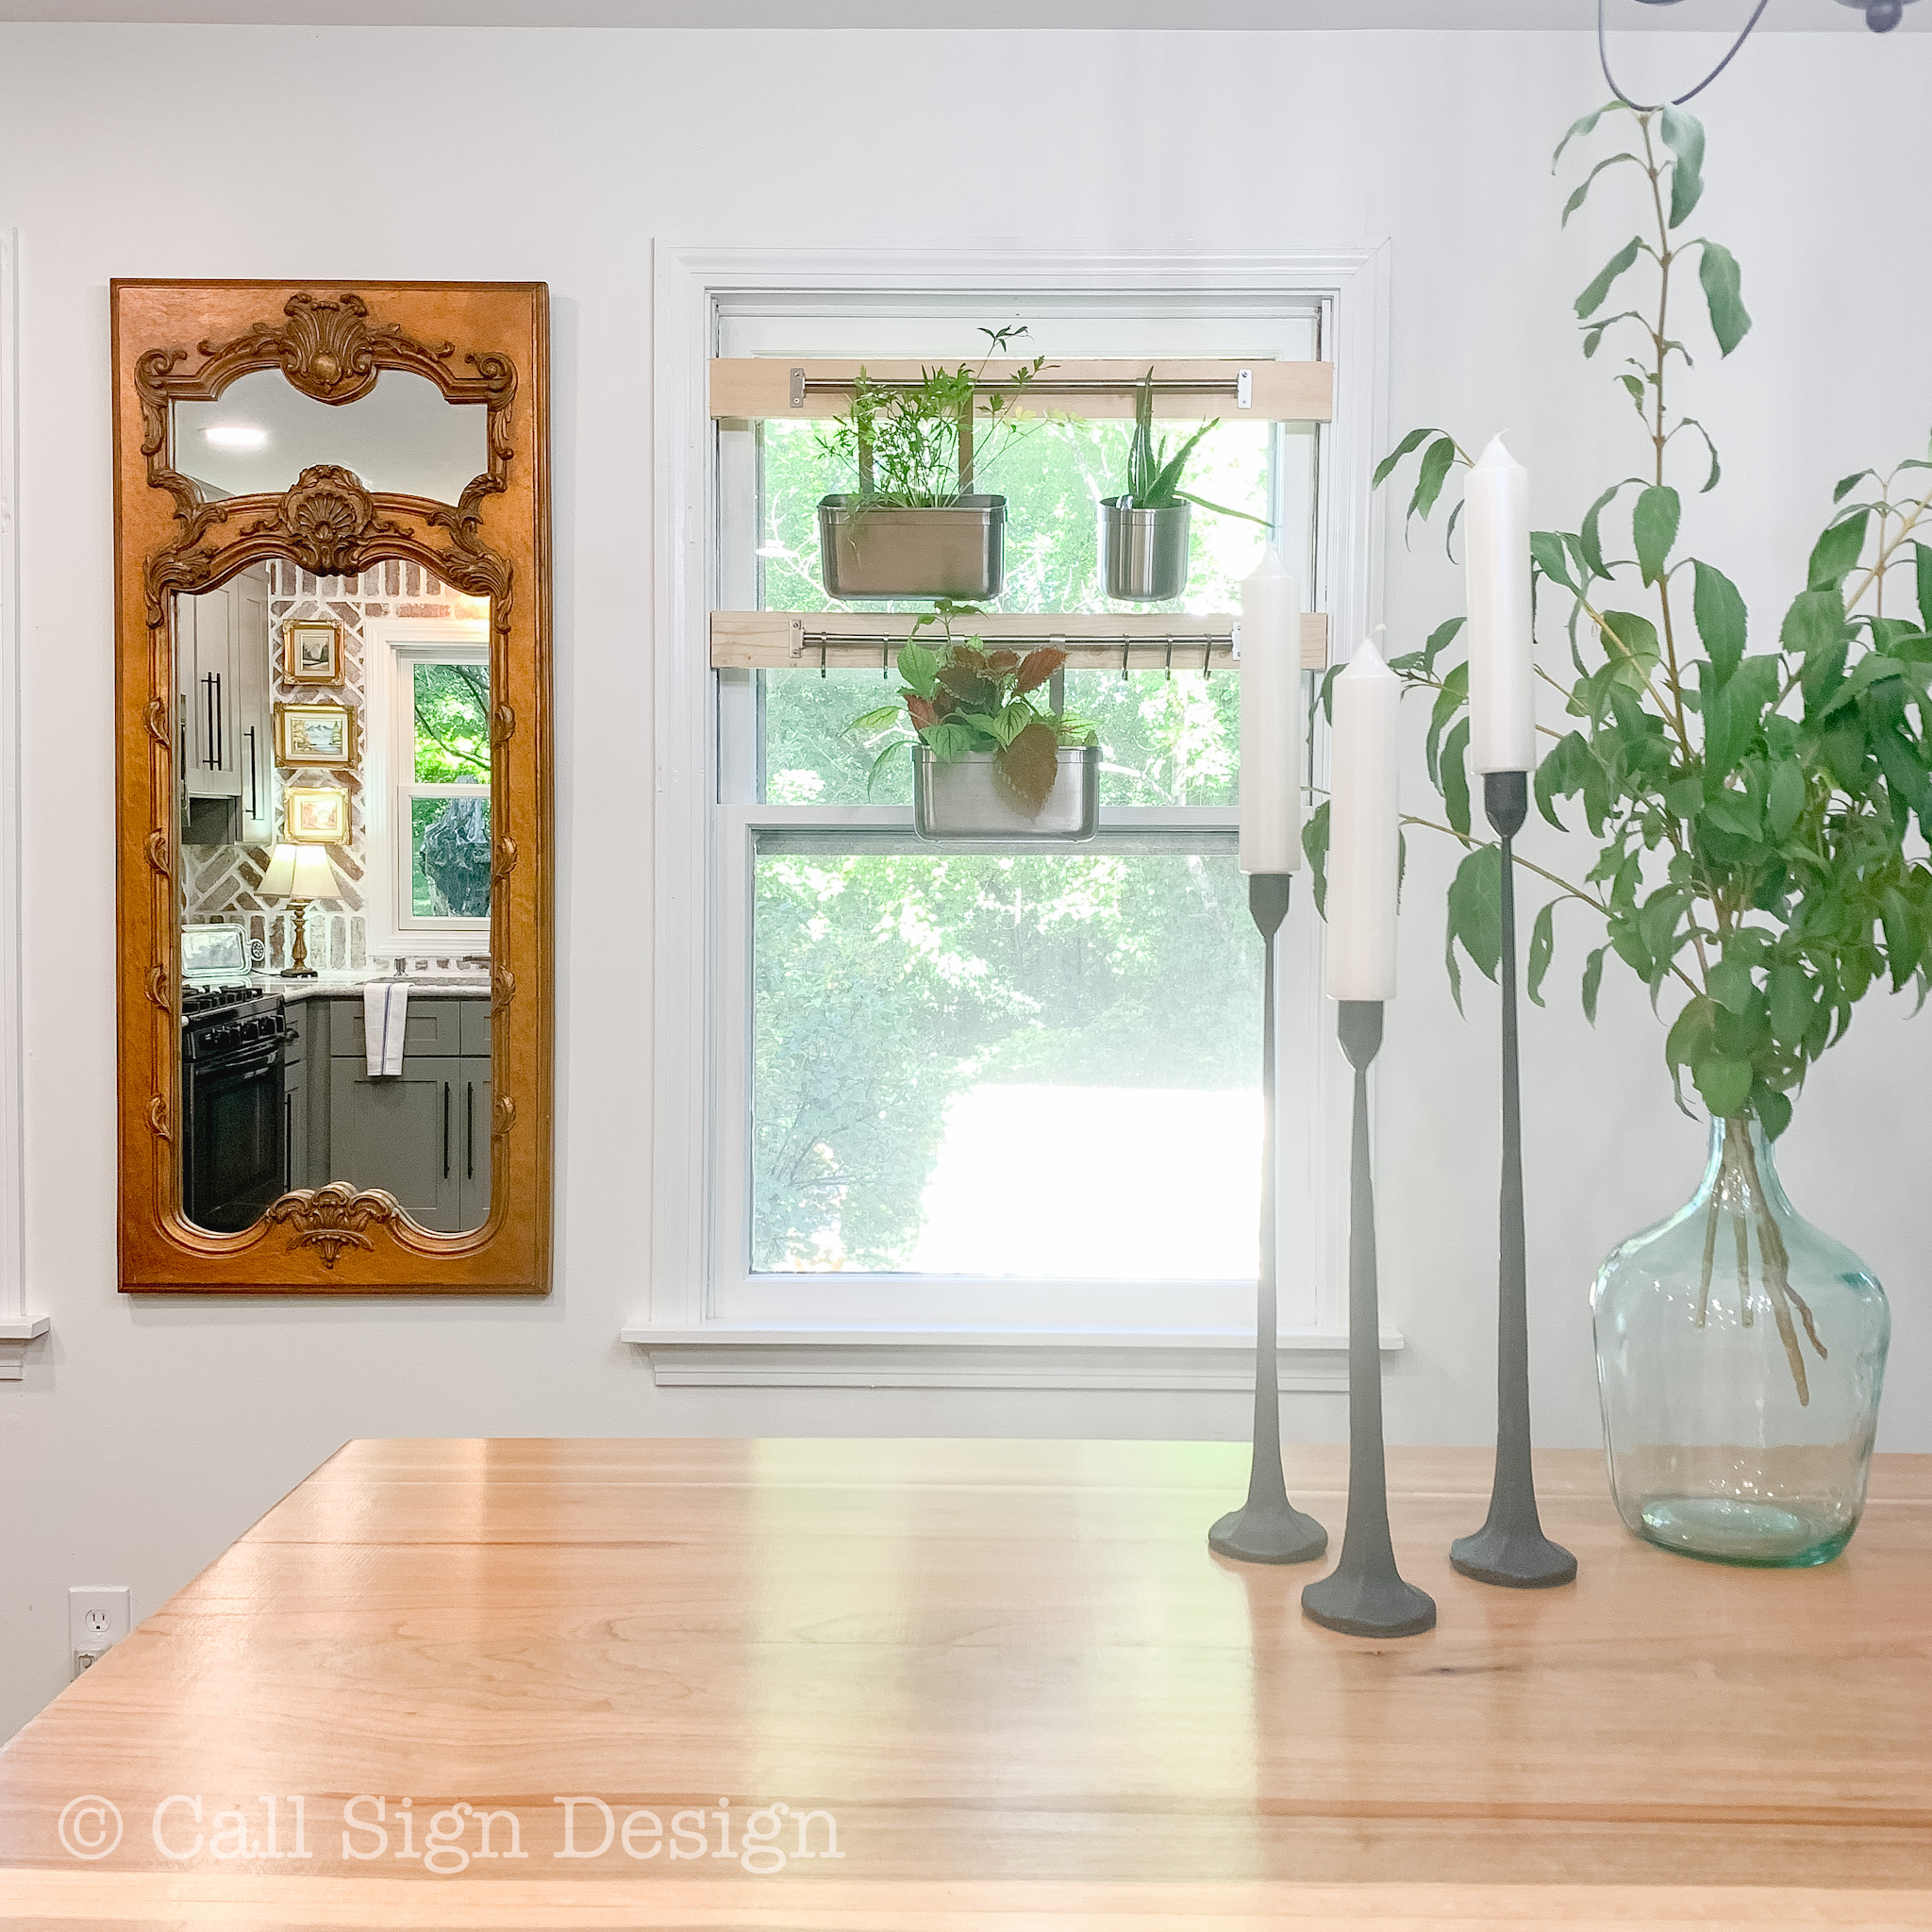
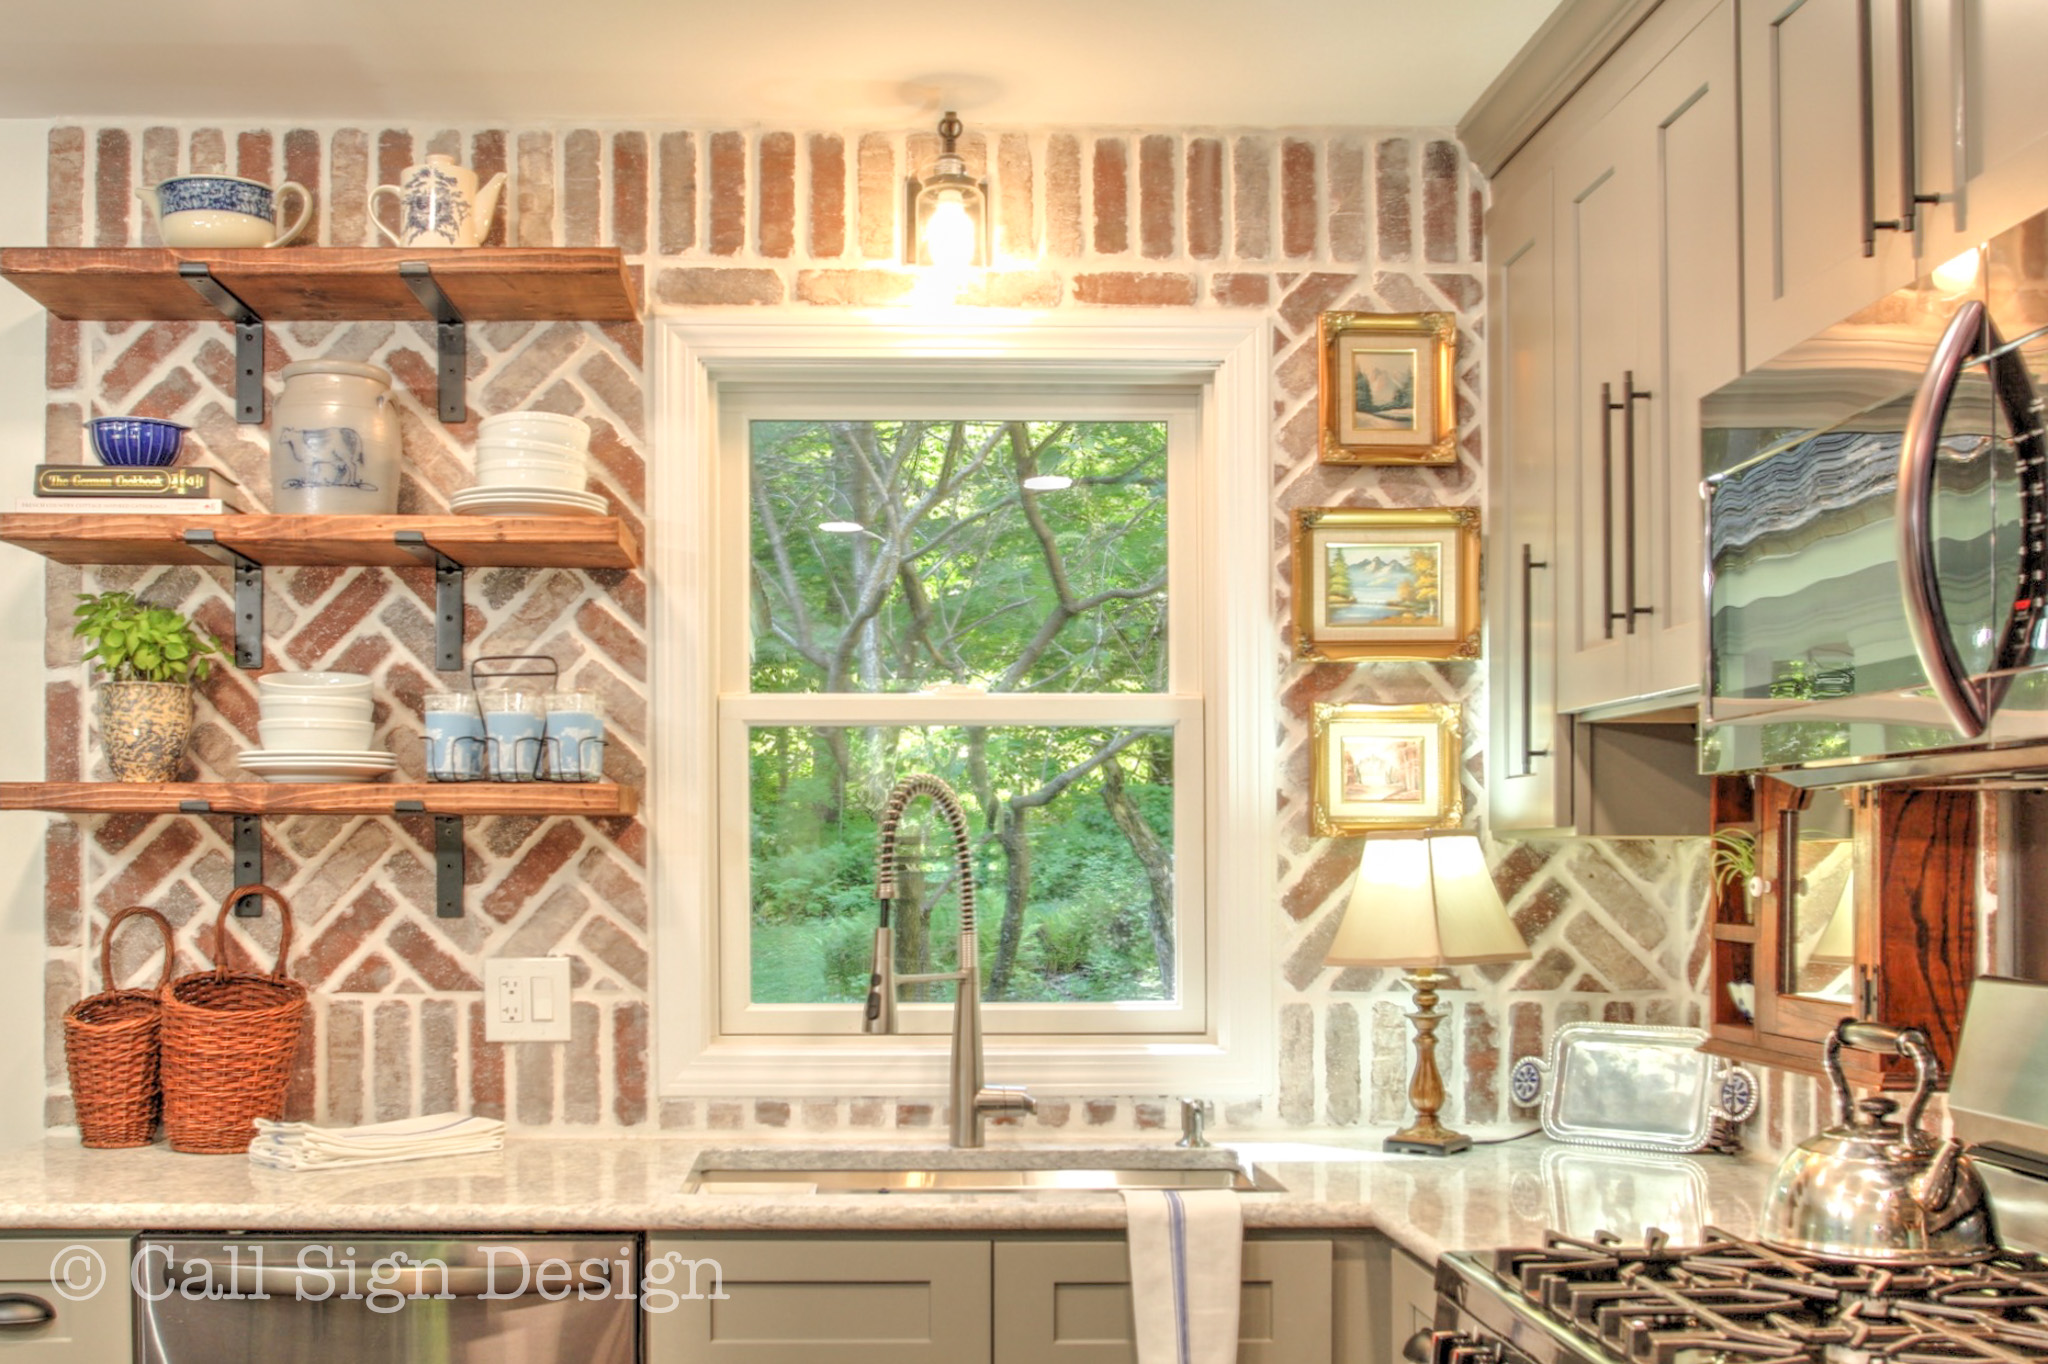
A mirror in a kitchen you say? I say YES. A blank wall in between two windows was begging for a mirror. Mirrors brighten small spaces and reflect light. Win, win. Scale it BIGGER! (Unexpected can be GOOD and in this case, it’s kind of awesome). If you have a tiny kitchen, or a dark kitchen, I’m talking to you.
This mirror we found on Craig’s List for $60. (“If you stalk long enough, you will have success,” I always say!)
Kitchen Herb Kit from IKEA: The Complete Kit For Staging Your Kitchen Like A Pro
Don’t judge me. I have a thing for herbs in the kitchen, and this one wasn’t going without! The rails and bins are from the Kungsfors IKEA Collection. They are both beautiful and functional, and make the kitchen feel that much more cozy. The window is wider than the rails so we used scrap lumber and a Kreg Jig to install them.
Fresh herbs in the kitchen say, “There is some serious professional chef level cooking going down in this kitchen. You must buy this house.”
Don’t want to deal with hanging all those spice racks? Some fresh herbs tied with ribbon on the counter (in front of the chopping block) serves the same purpose for photos.
The Complete Kit For Staging Your Kitchen Like A Pro
HOW CUTE IS THIS???
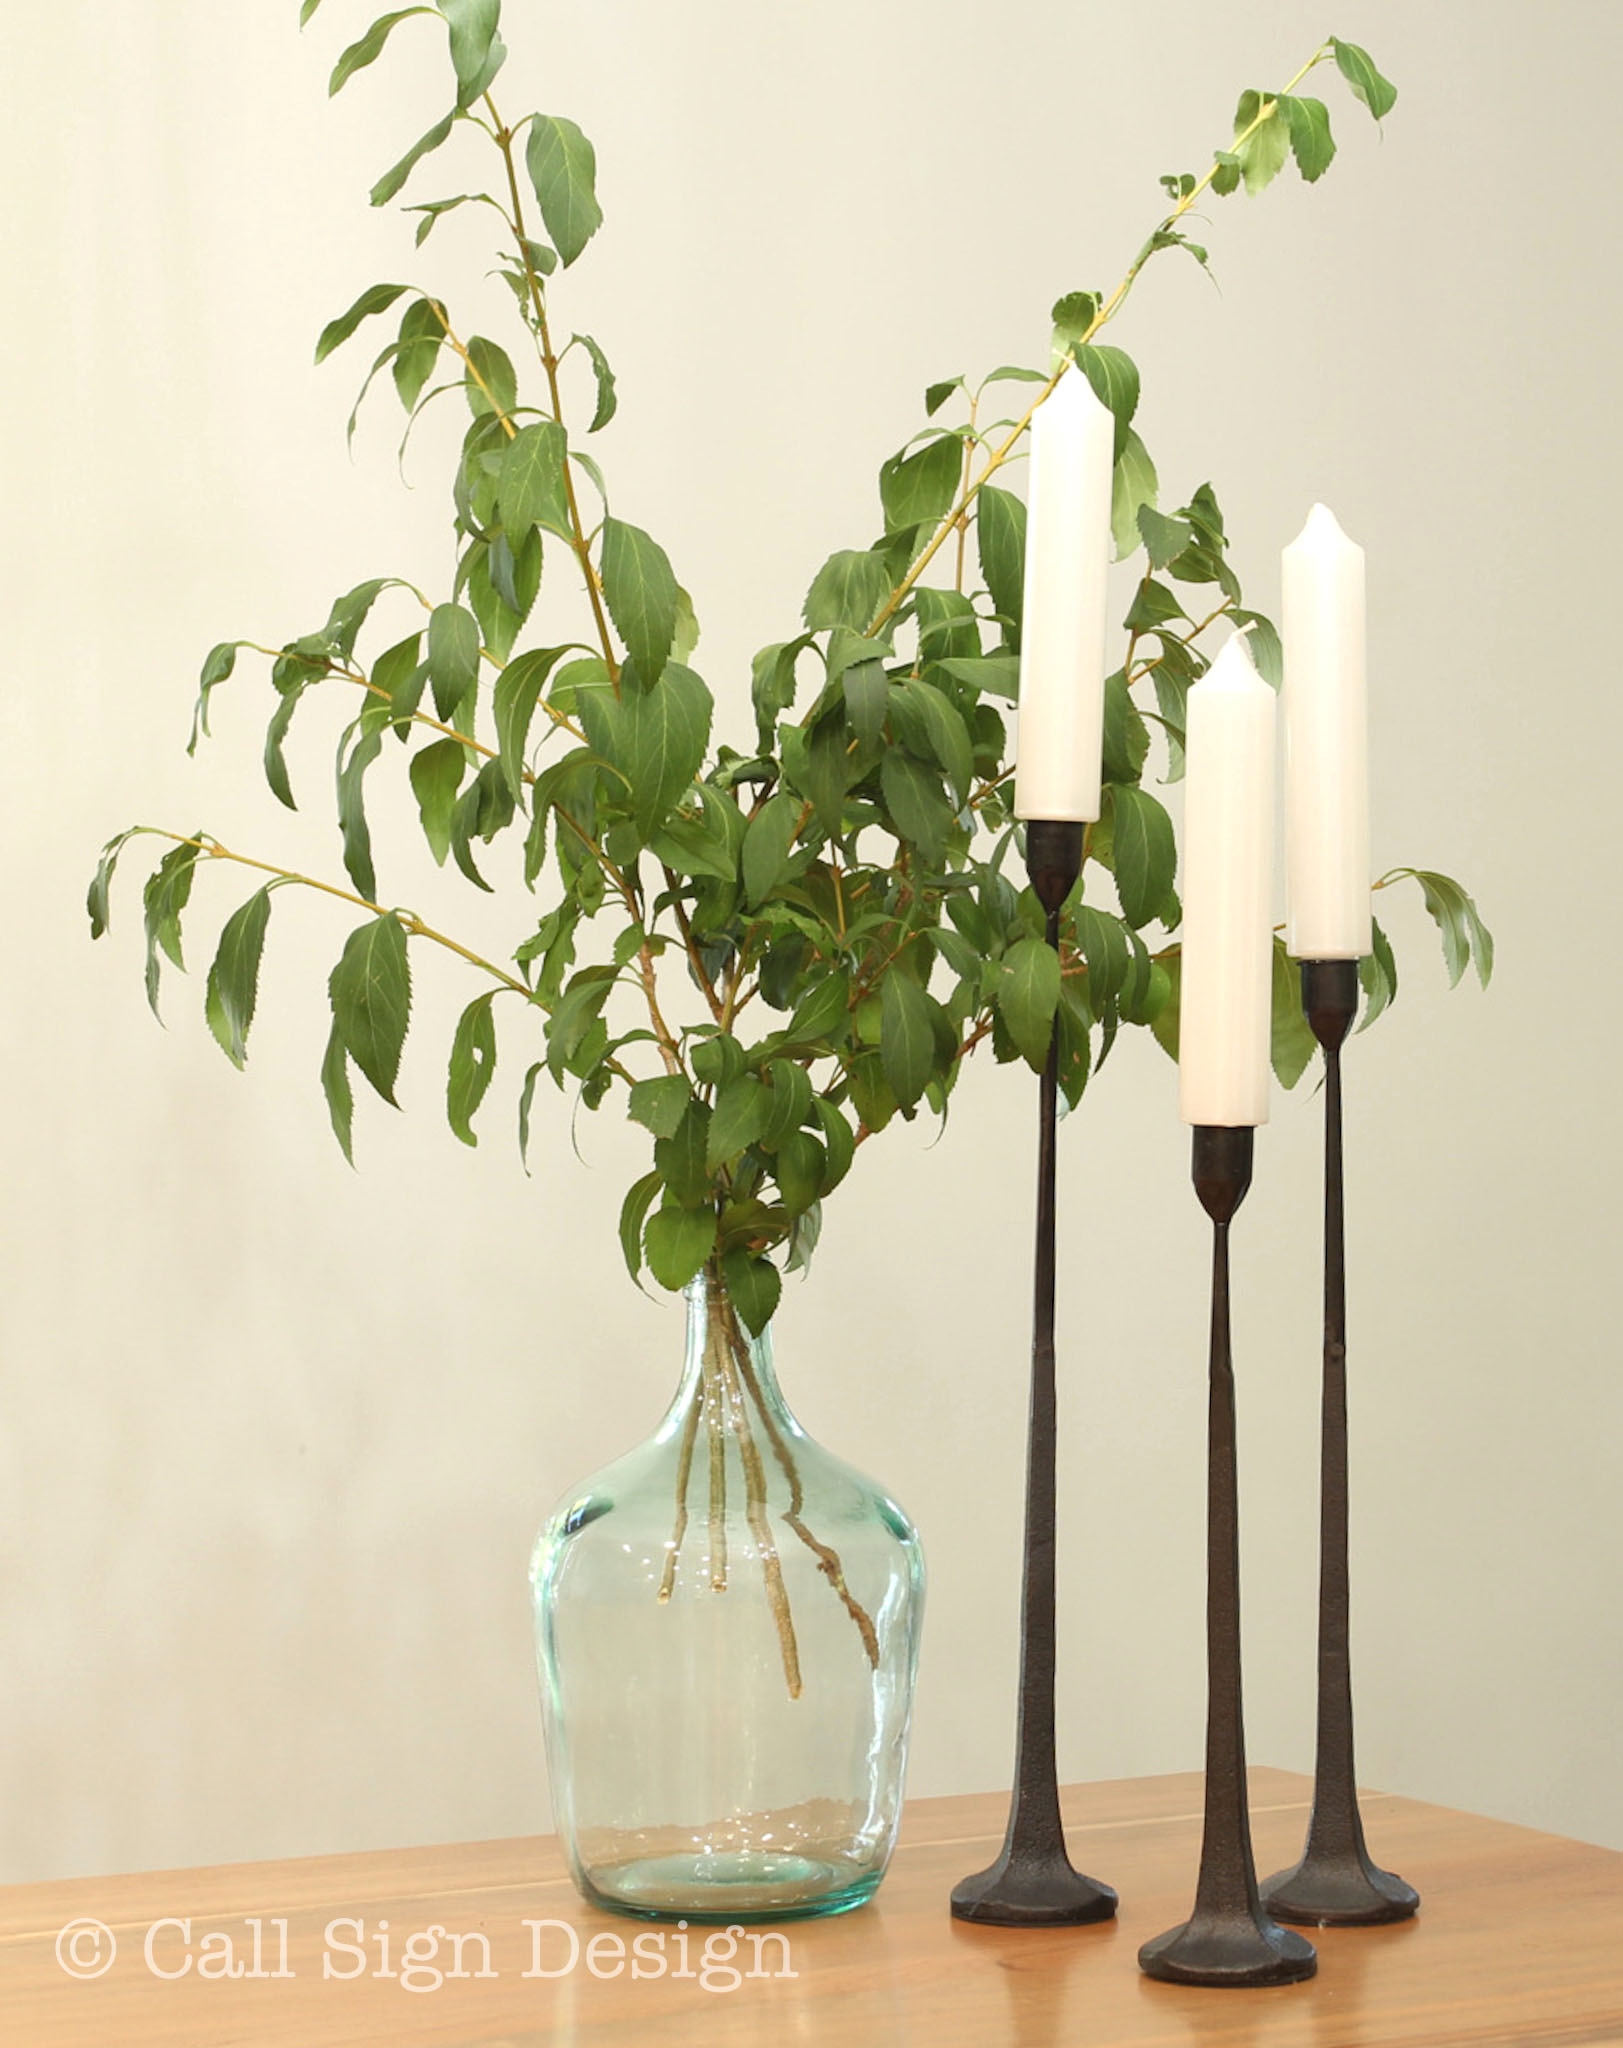
Demijohn: I’ll admit, I’m a little bit of a demijohn snob. What is a demijohn, you ask? I’ll tell you: What is a demijohn and how to use it in your decorating… I like them enough I wrote a whole post about them, because I’m an obsessive nerd. We found this perfect little demijohn at Hobby Lobby for around $20 and it’s perfect for this application!
Candlesticks: Also shown here, these TOTALLY AWESOME real Iron Candlesticks from Hobby Lobby are about $20 each (which I just went on and purchased more of because they’re on sale). Score!
Tree branch: Scalped right out of the woods on the kitchen property. FREE! (Visualize the clients AND Rainman looking at me sideways on staging/photo day walking toward the woods with pruning sheers in hand… “Where are you planning on putting a branch that big, Griswold?” But, I’ll leave it there, and keep it PG).
And that’s all you need for the corner of the island! As the photographer moves around, move your arrangement around so it’s anchoring the outside frame of the picture.
Before and After Pictures of Grandma’s New Vermont Cottage Kitchen: Sponsored by Lily Ann Cabinets and designed by @callsigndesign on Instagram and @slavetodiy on Pinterest.
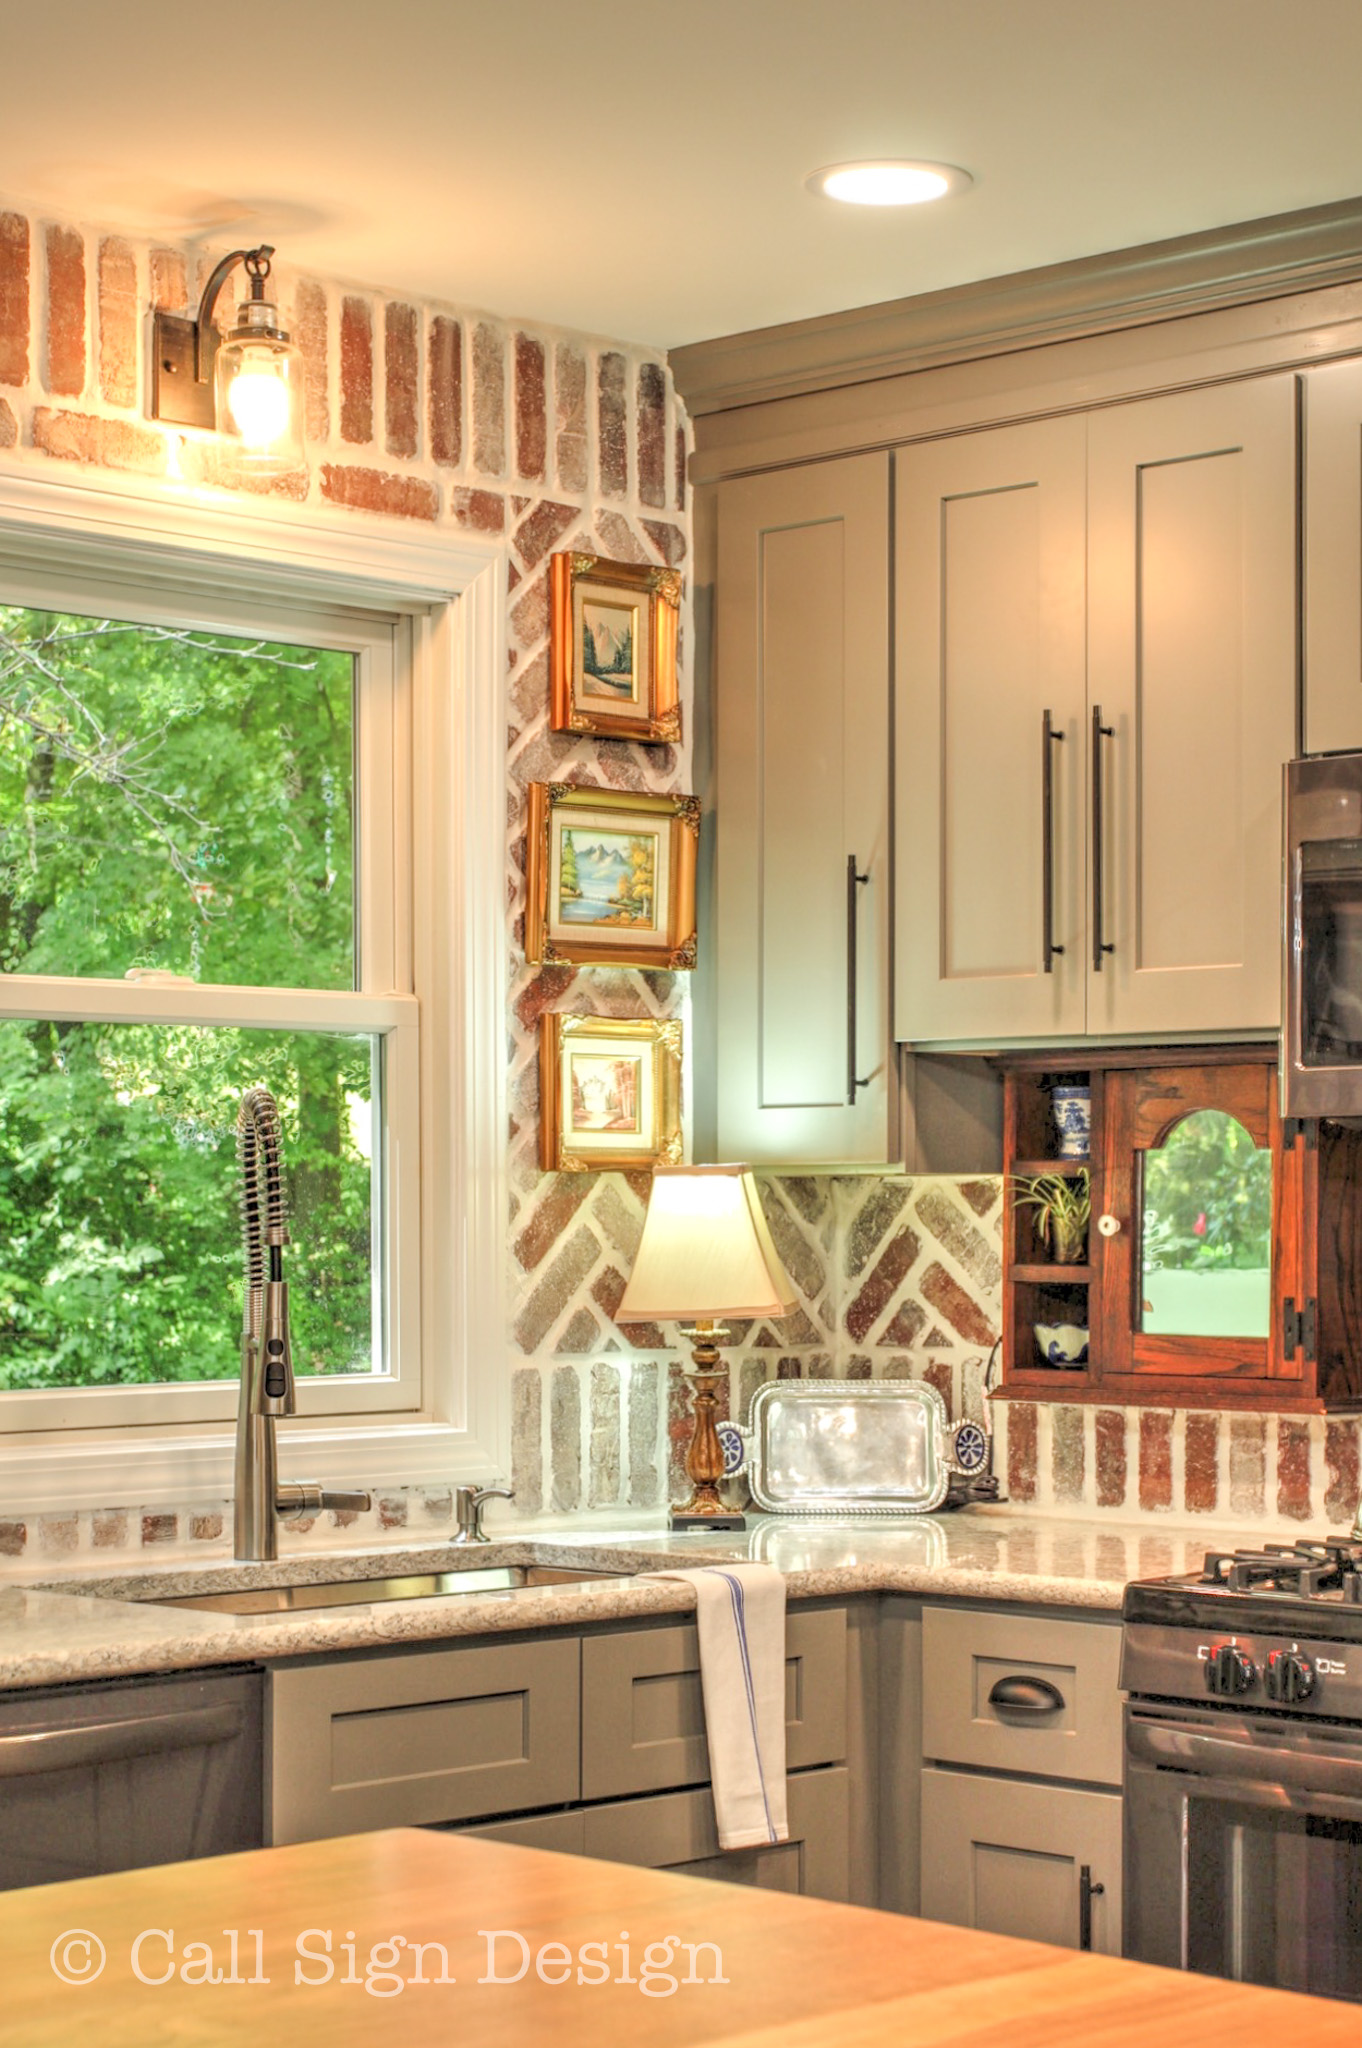
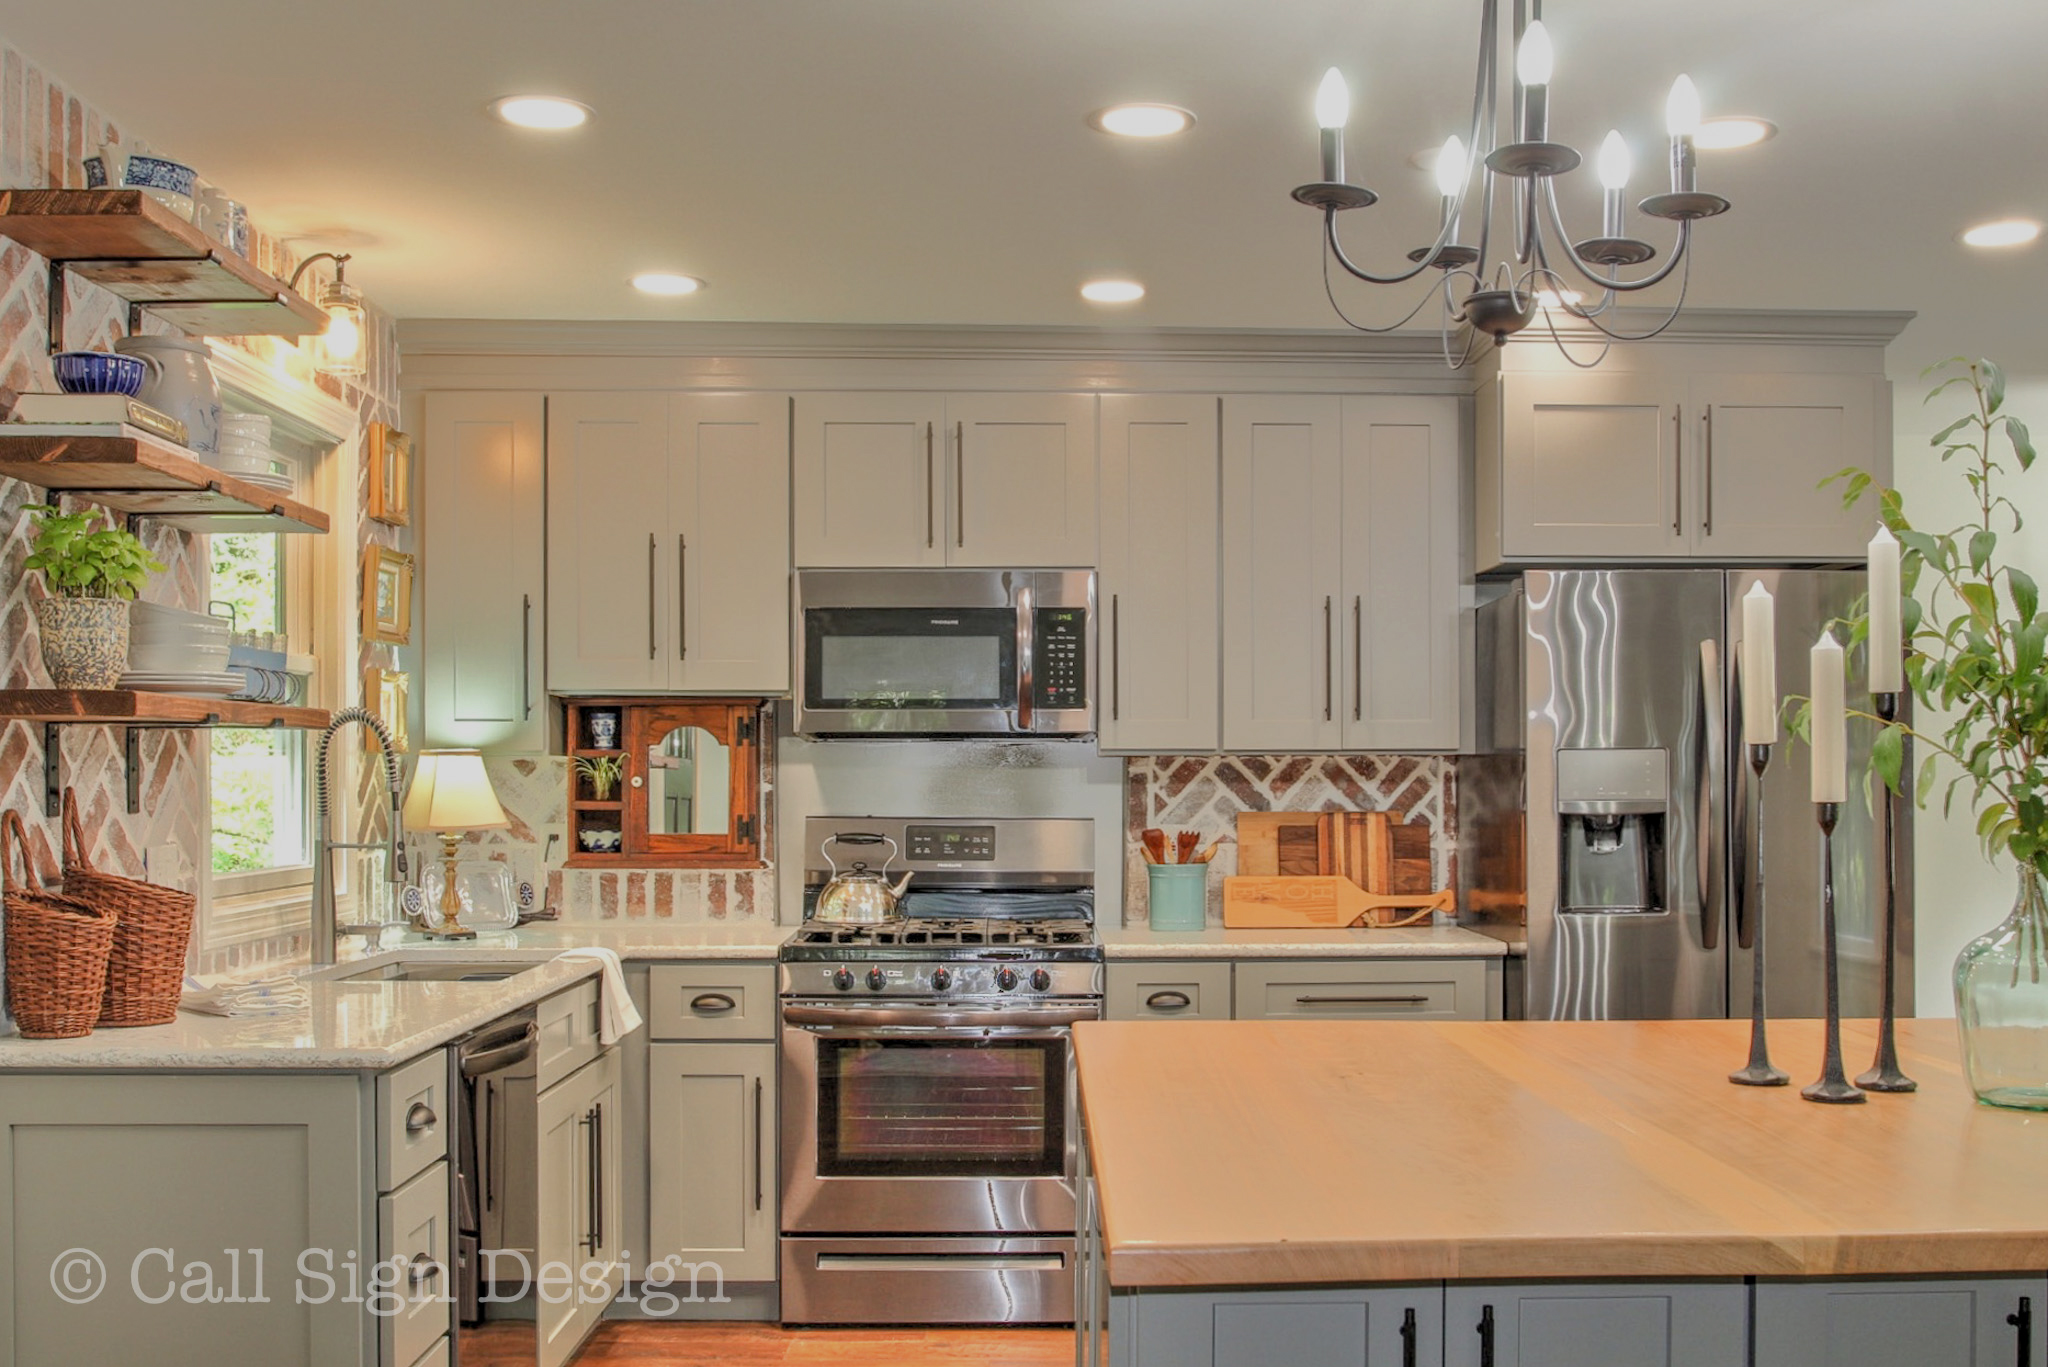
For this next corner I borrowed some items that belonged to the client (shop your own house!)… The little silver tray I used to hide the cord from the lamp. The little vases and tiny plant were also hers, and they look adorable in the spice cabinet!
And that lamp? I looked at about 500 lamps before I found this one with just enough fancy and just enough cottage-style to be convincing. And after I spent hours looking… I finally found it no place other than Amazon: The Perfectly Sized French-Style Countertop Lamp for around $30. (Some of the other sites are REALLY proud of their lamps and I’m just trying to be reasonable here).
The little oil paintings with gilded frames were a bit of a splurge and I found them on Ebay. I’m pretty sure there are some fairly convincing knockoffs at Target if you don’t want to be too extravagant and you’ll ultimately achieve the same look.
Before and After Pictures of Grandma’s New Vermont Cottage Kitchen: Sponsored by Lily Ann Cabinets and designed by @callsigndesign on Instagram and @slavetodiy on Pinterest.
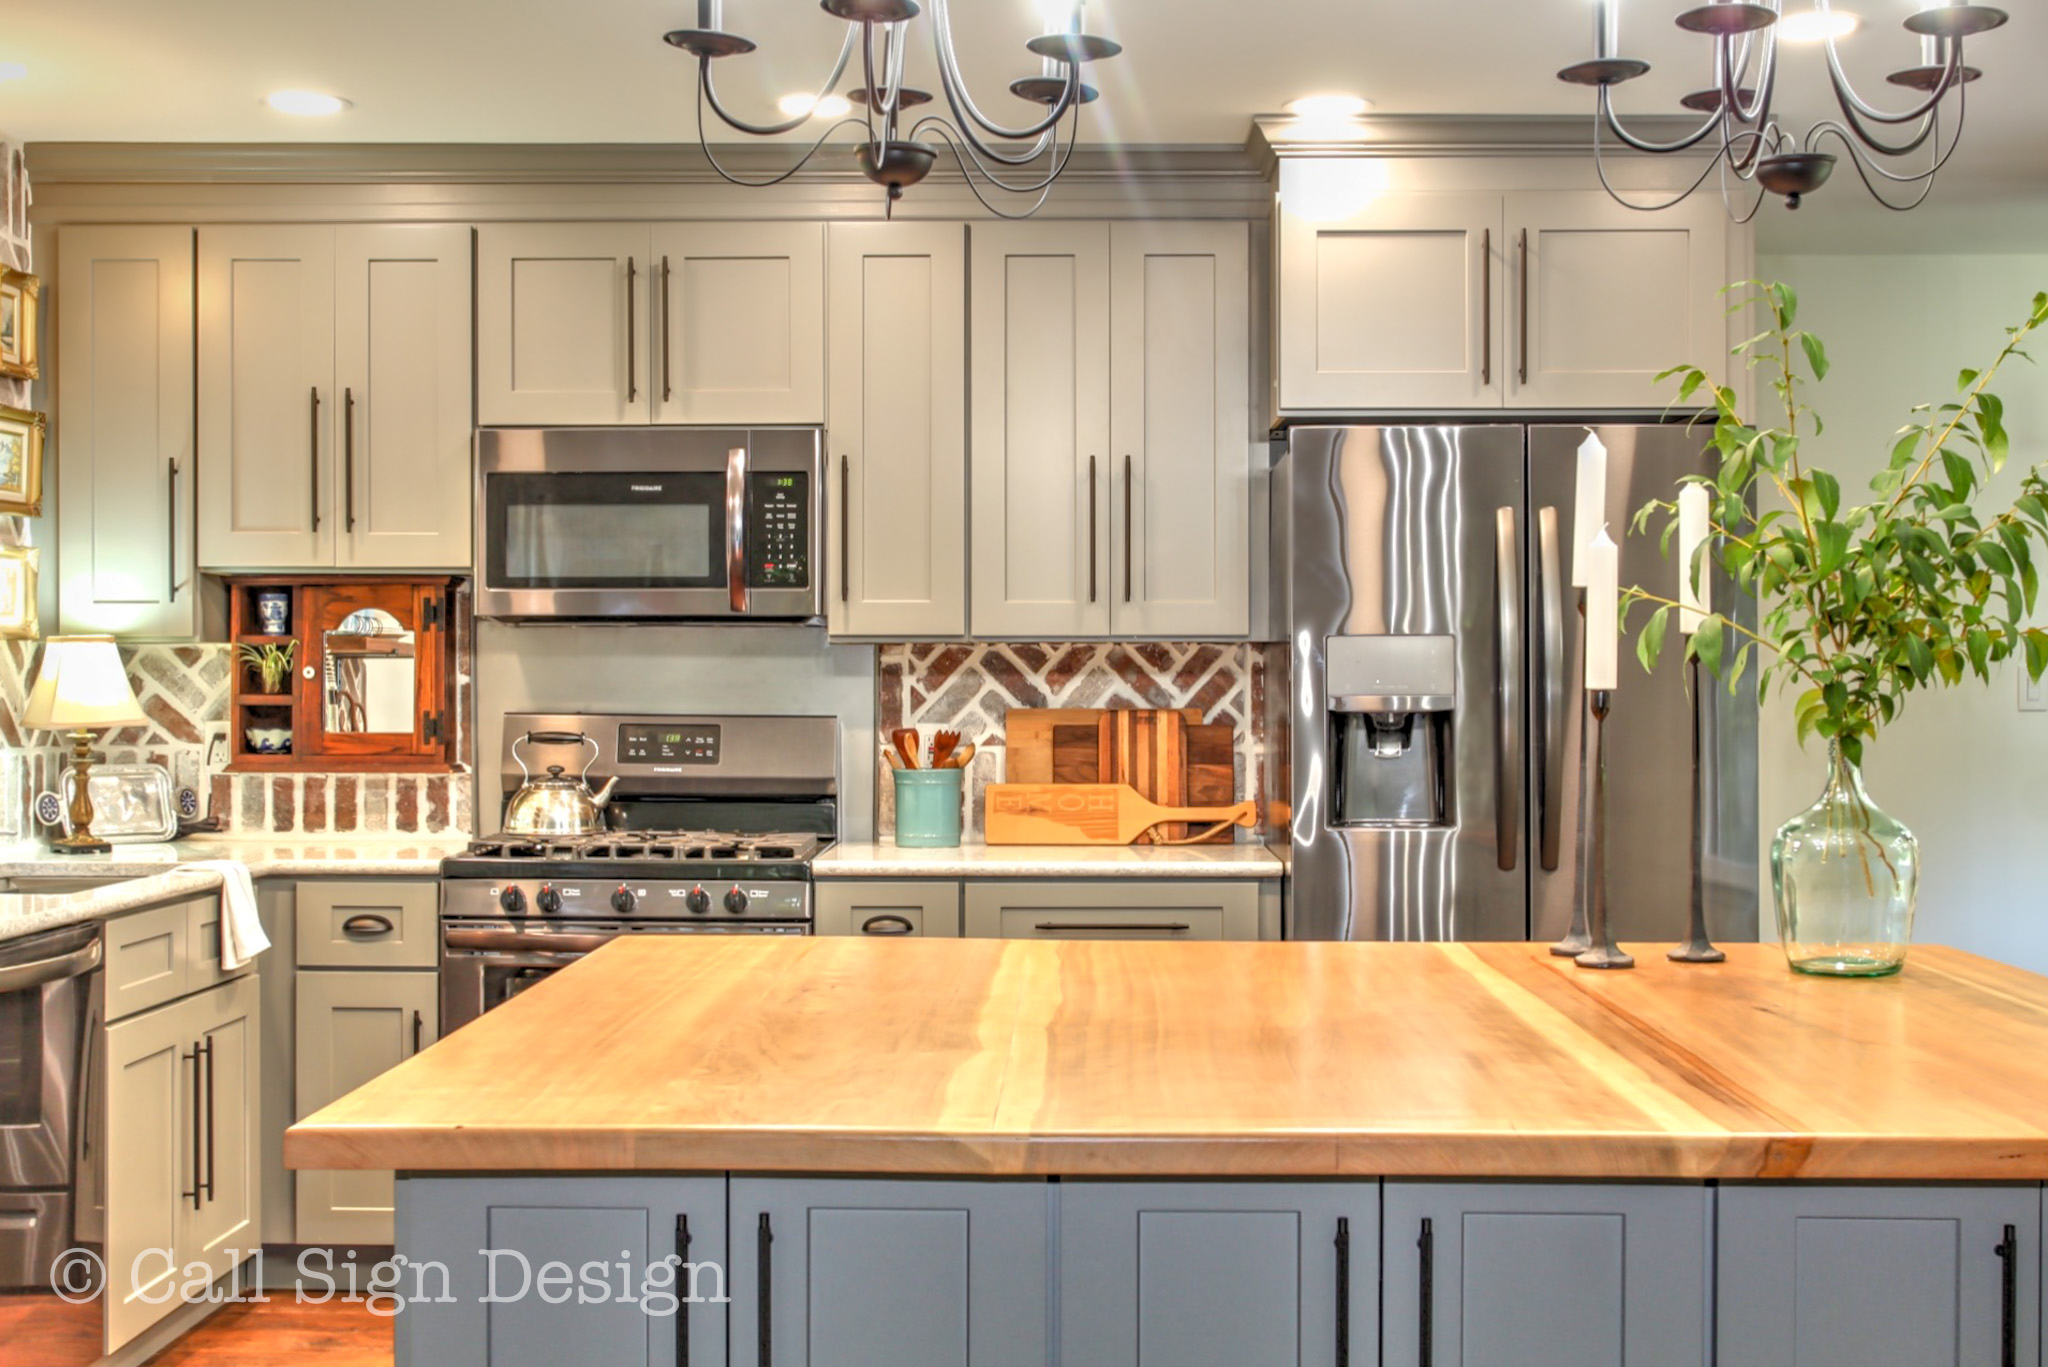
Notice how we moved the demijohn and candles for this shot? We moved them just enough so they’re anchoring an uninteresting side of the room and creating balance.
Before and After Pictures of Grandma’s New Vermont Cottage Kitchen: Sponsored by Lily Ann Cabinets and designed by @callsigndesign on Instagram and @slavetodiy on Pinterest.
Every time we changed the camera angle, we repositioned the candles and spun the branches so they looked nice and full, but also just wild enough to be wonderful and daring.
Before and After Pictures of Grandma’s New Vermont Cottage Kitchen: Sponsored by Lily Ann Cabinets and designed by @callsigndesign on Instagram and @slavetodiy on Pinterest.
Another angle for good measure! (Aren’t those fat candles just the coolest? Also on Hobby Lobby, if you’re looking).
Before and After Pictures of Grandma’s New Vermont Cottage Kitchen: Sponsored by Lily Ann Cabinets and designed by @callsigndesign on Instagram and @slavetodiy on Pinterest.
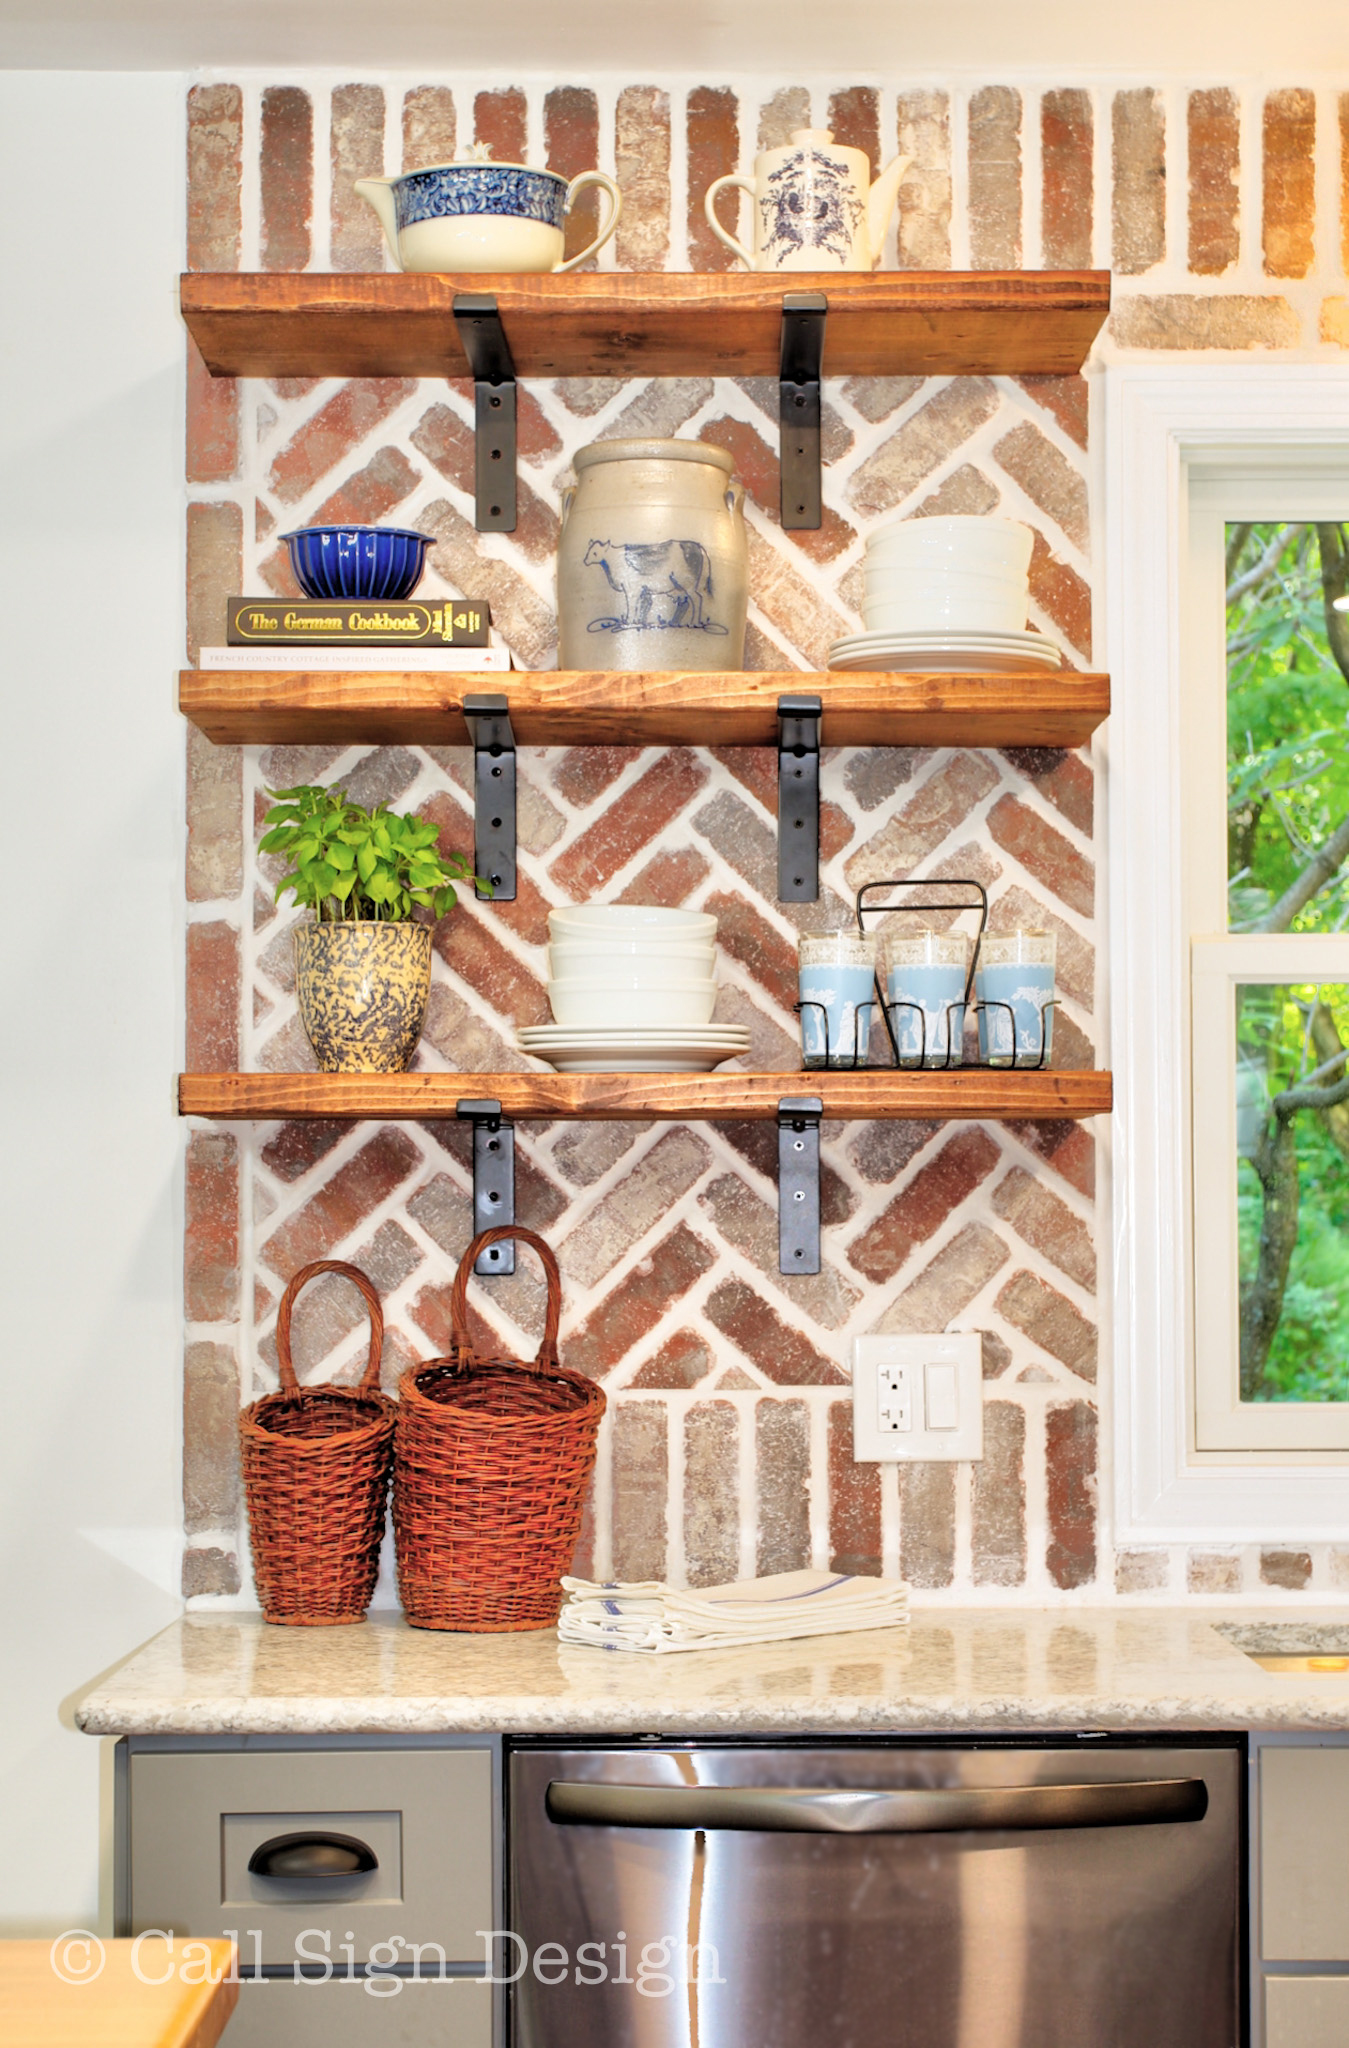
Now, if you haven’t mastered the art of the shelfie, here’s a quick crash course:
Arrange in threes and in triangles. Okay, so we have a couple “twos” but it’s all about balance.
There is a triangle of “tall items” and a triangle of bowls and a triangle at the top of crocks and teapots.
Believe it or not, those shelves used to be the temporary stair treads to the basement. You can find the black metal shelf brackets here if you’re looking to open up some space on your own wall!
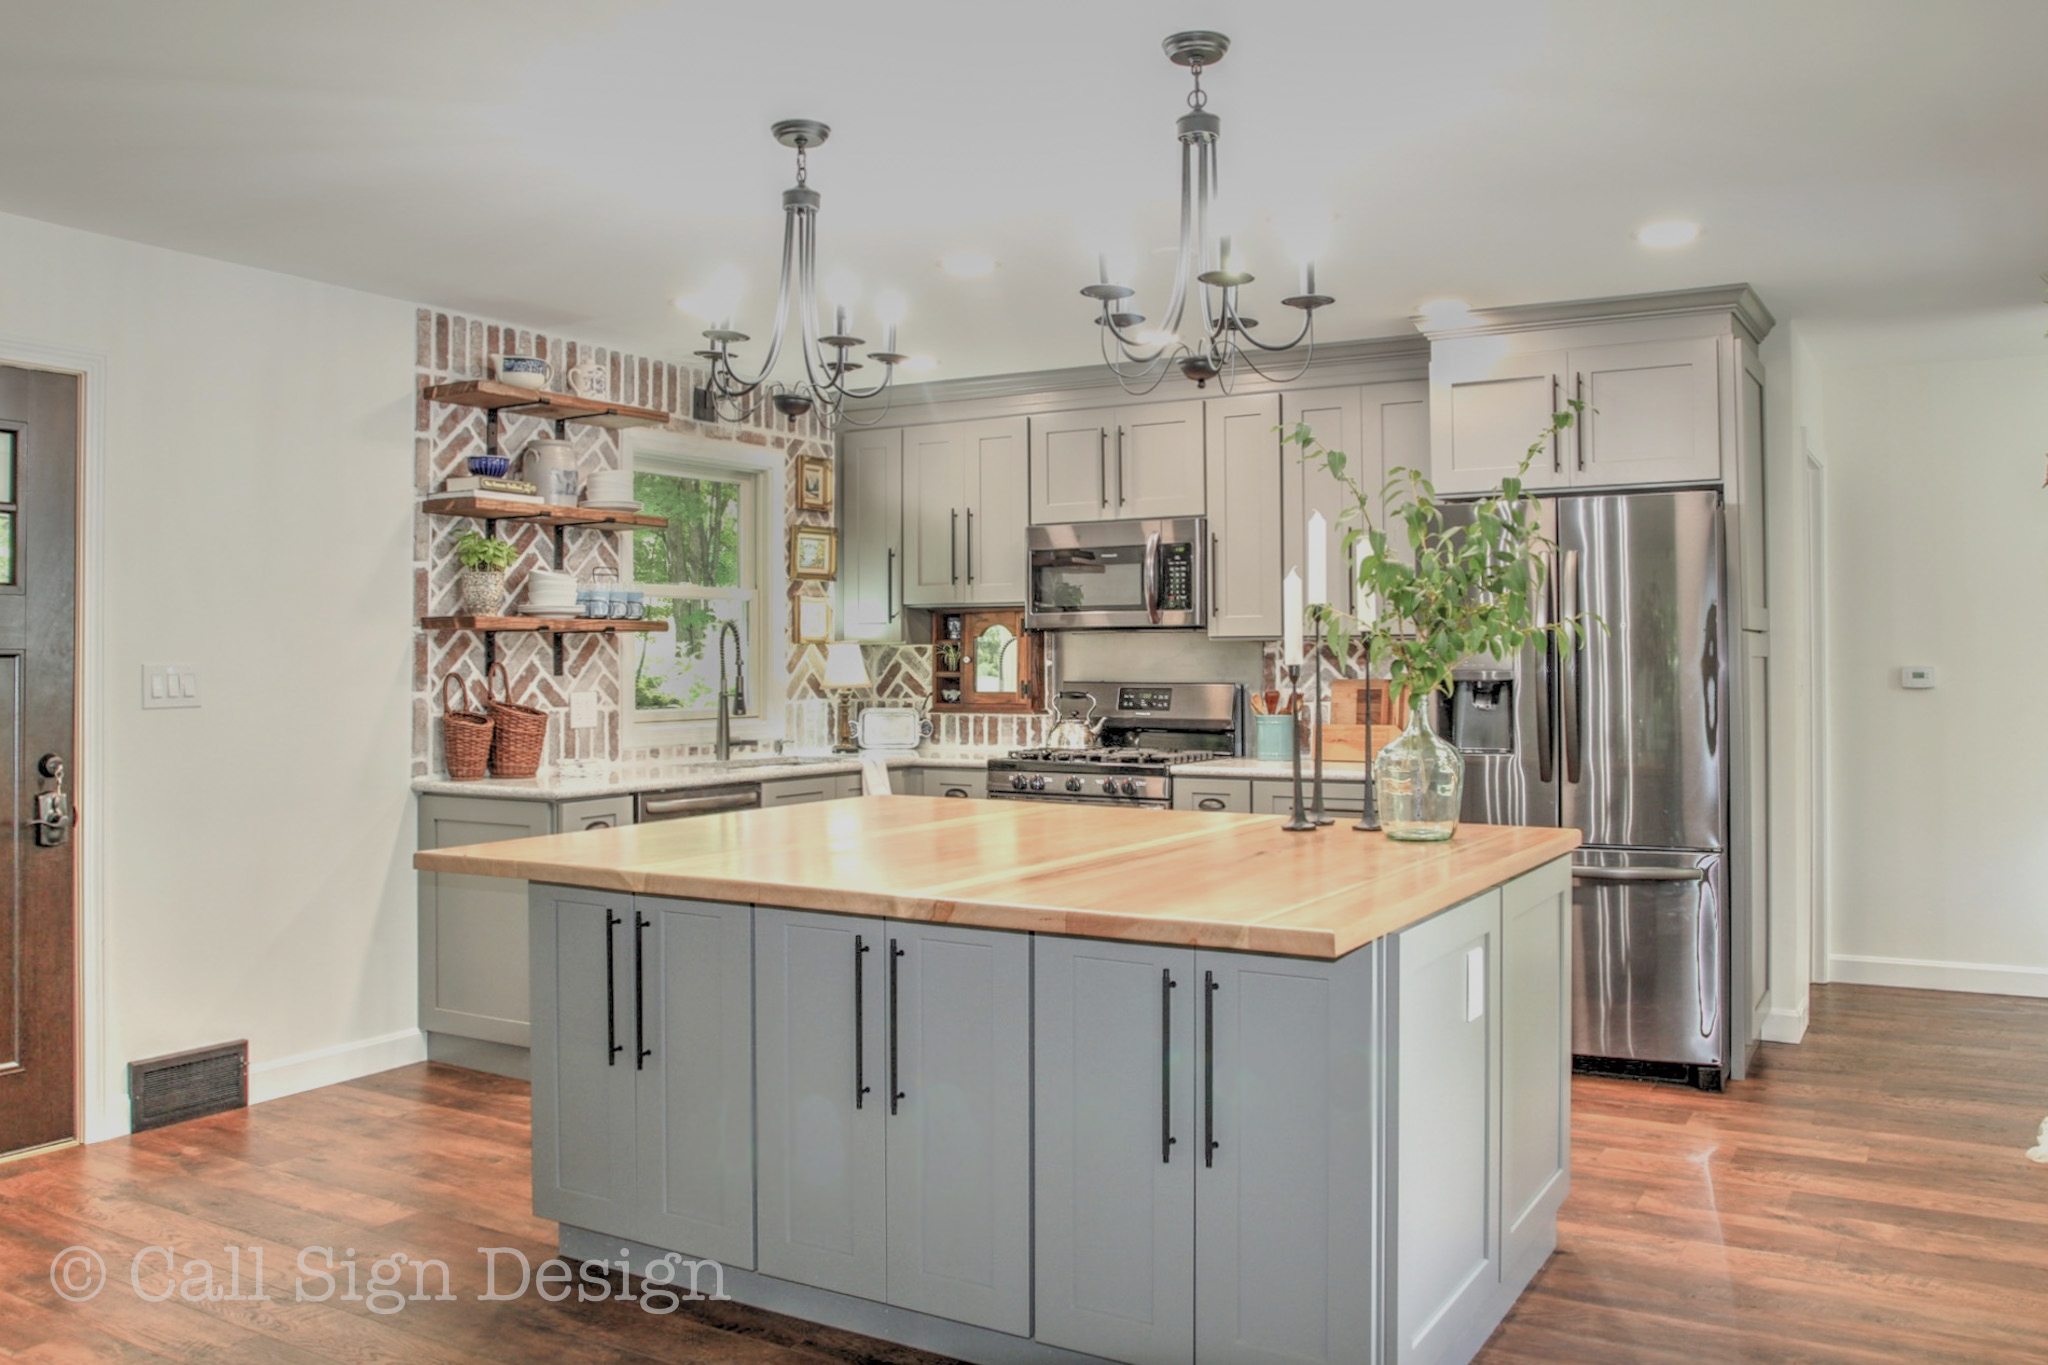
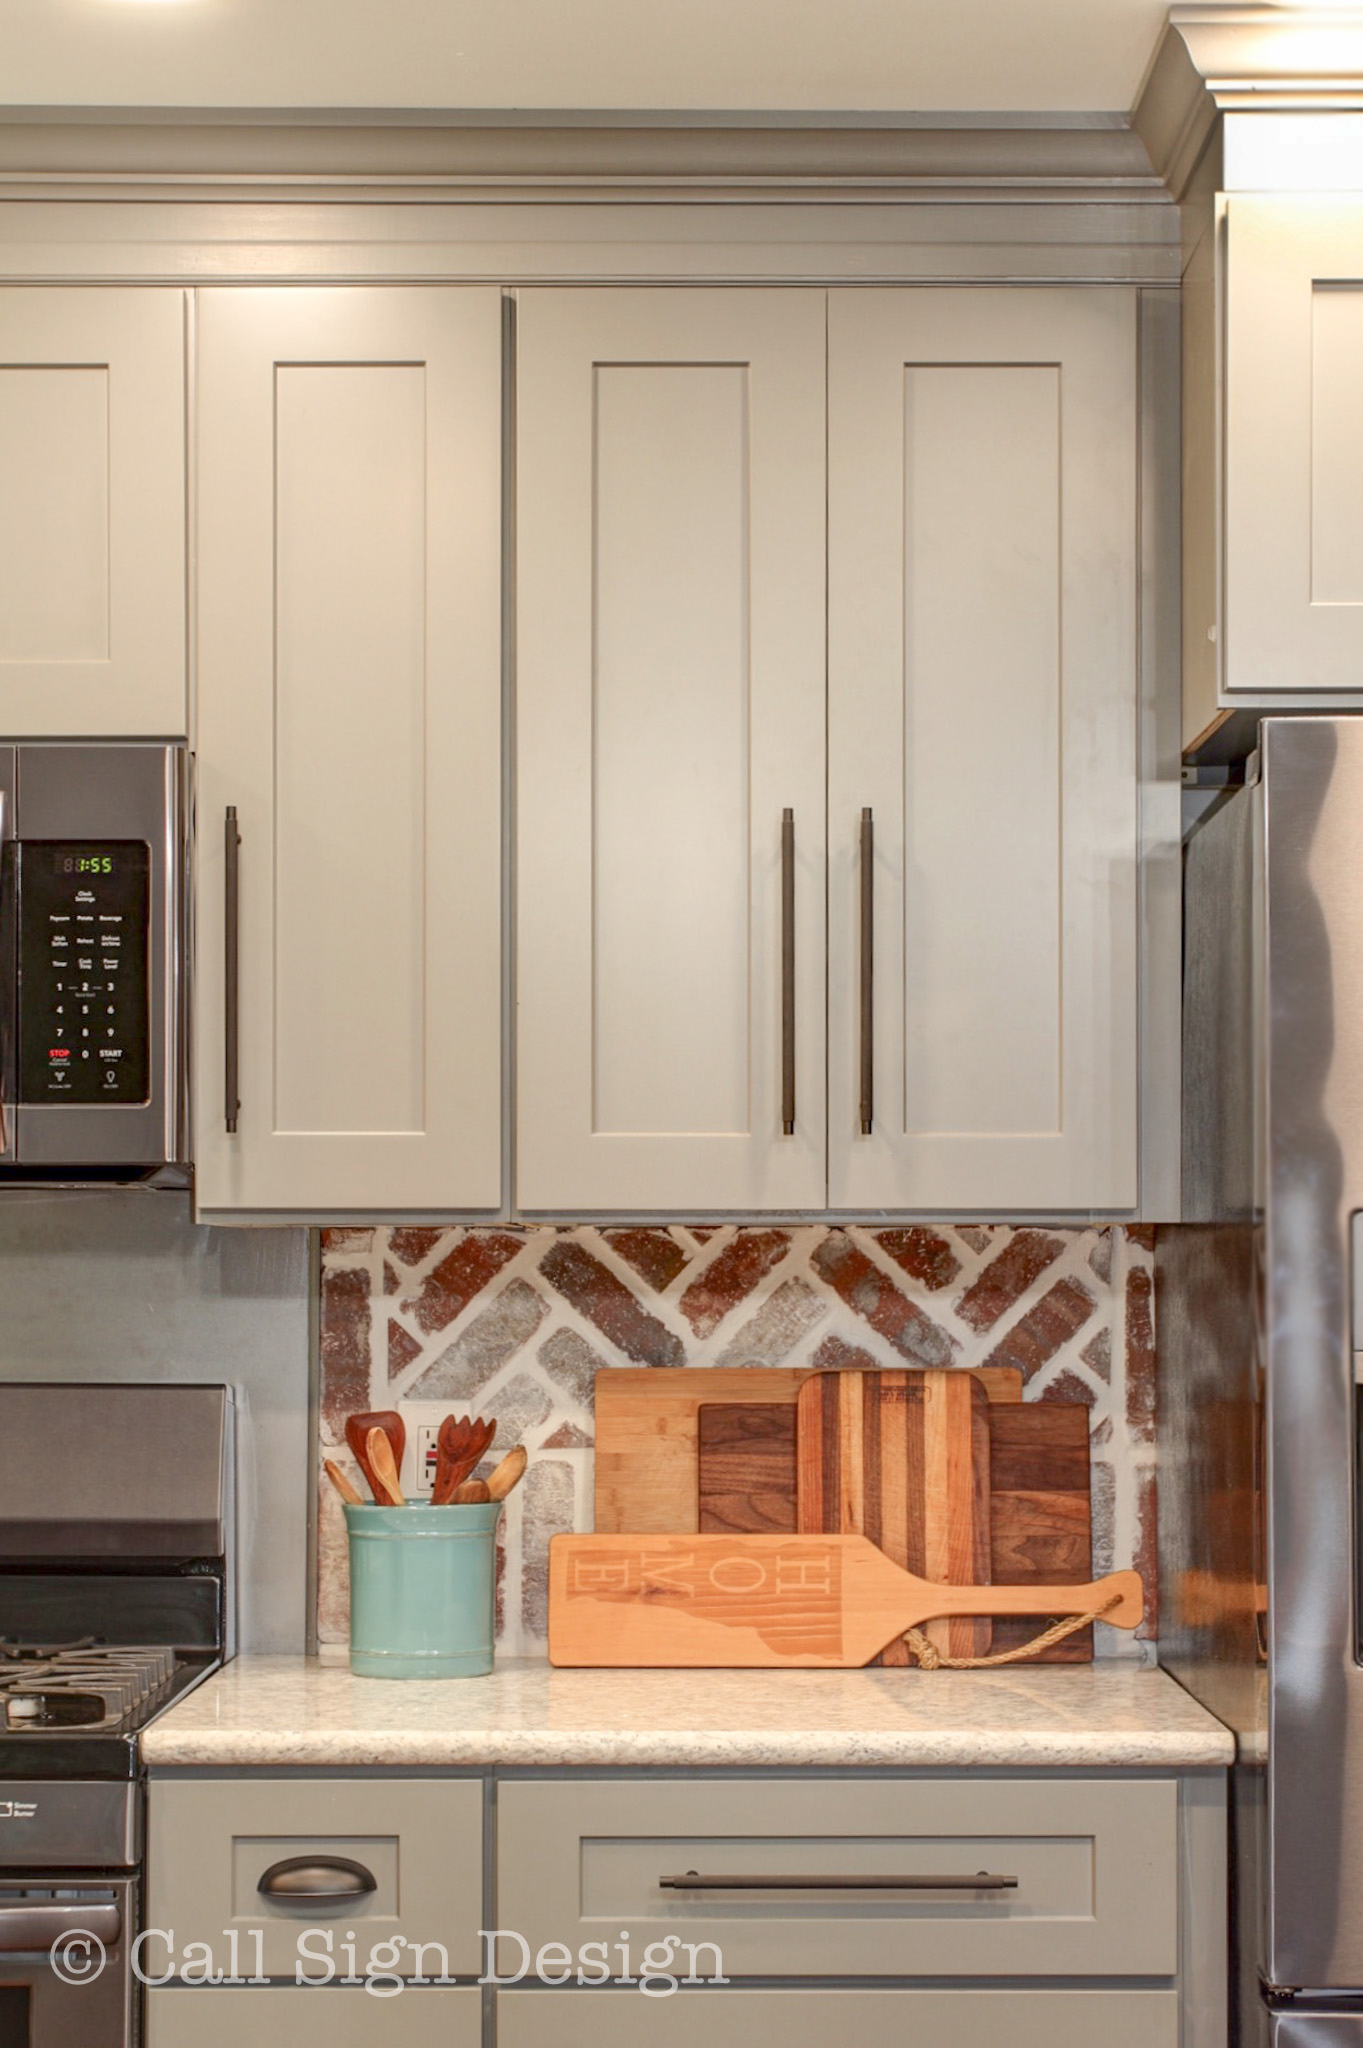
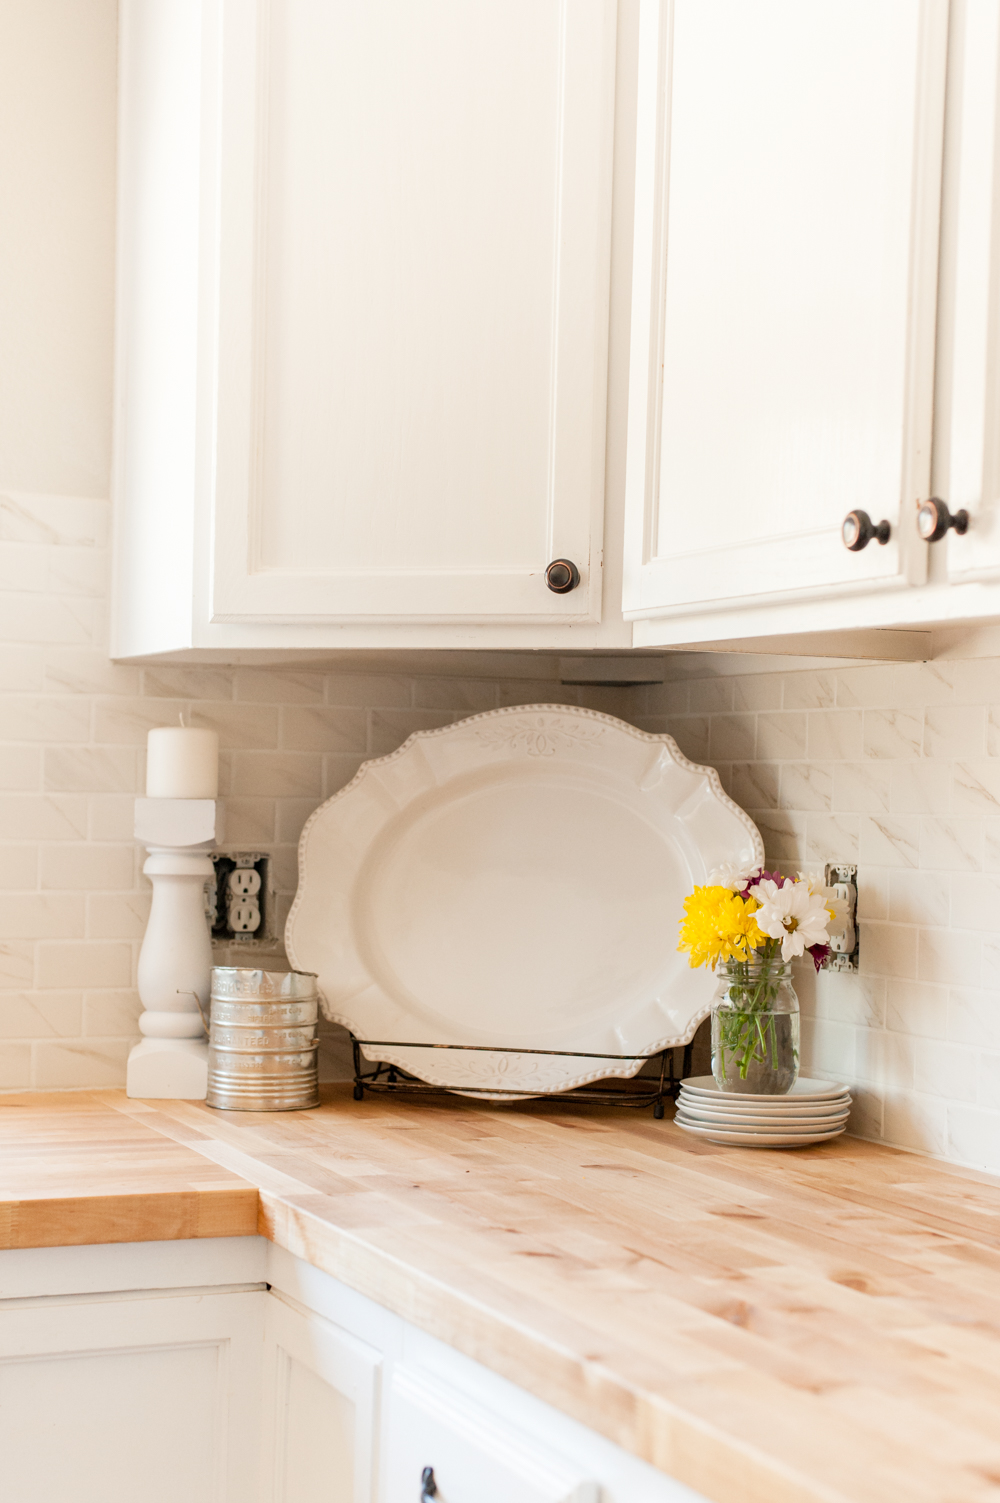
Butcher block, cutting boards, and charcuterie boards, (Oh My)… How To Stage Your Kitchen Like A Pro. Designer: @callsigndesign (Instagram). Photographer: @loganbspring (Instagram). Cabinets @lilyanncabinets_ (Instagram)
The perfect cutting/charcuterie board corner: every one of these the client already had!
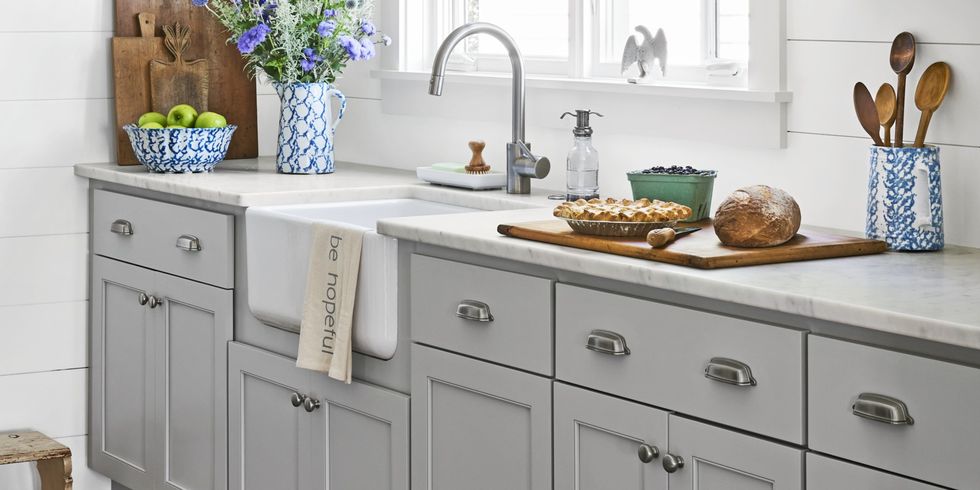
The Cambria Stoneware Kitchen Utensil Holder was from Pottery Barn but I think they may have been discontinued in that color. We displayed her wooden spoon collection in them and I think they look perfect!
Shades of blue created perfect, subtle pops of color in our staging. Wouldn’t you like to do some cooking in this kitchen?
If you’re in the market for quality RTA cabinets go to Lily Ann Cabinets and use offer code SDIY2018 to get 5% off! (The cabinets pictured are Grey Shaker Elite).
I am honest about my experiences with different products and write because I enjoy it. I do however, have the opportunity to earn money for my writing, also.
Slavetodiy.com is a participant in the Amazon Services LLC Associates Program, an affiliate advertising program designed to provide a means for sites to earn advertising fees by advertising and linking to amazon.com. Amazon offers a small commission on products sold through their affiliate links. Each of your purchases via our Amazon affiliation links supports our cause at no additional cost to you.
If a blogger links to an Amazon product (with a special code for affiliates embedded in the link), and a reader places an item in their “shopping cart” through that link within 24 hours of clicking the link, the blogger gets a small percentage of the sale. Amazon links are not “pay per click.” If you click on the product link and stay around Amazon and purchase something else, however, I will get a commission on that sale.
Slavetodiy.com is also a VigLink affiliate advertiser which works similarly.
Who doesn’t love a good before and after reveal??? We teamed up with Lily Ann Cabinets to do this awesome project for my mother’s forever home and I’m super happy with how it turned out. We used their RTA Cabinets, Lily Ann’s Grey Shaker Elite (and you’re going to love them!).
*This post may contain affiliate links. Please see full disclosure at the end of the post.
The kitchen turned out beautifully and the carpenter was super impressed by the quality of the RTA cabinets. That helps a LOT when the carpenter happens to be your brother AND he’s a meticulous and dyed-in-the-wool wood snob.
Quick story:
My family has been playing musical houses for almost my whole life (I’m an army brat). So, when my mom finally decided to pick a house and stay in it, my sister reached out to me to help with the kitchen design (they were really busy renovating the whole rest of the house). The place had great bones, but was really ugly. One little problem: I am in North Carolina and they are in Vermont. To any lesser team this would’ve been a problem (working with family and from a different state… what could go wrong???).
I sent my initial design which was nixed by my incredible carpenter brother who wanted to knock down walls and move stairs (who am I to argue with that?). So, I worked up a moodboard and completely new design and sent it to my sister and brother.
Before and After Pictures of Grandma’s New Vermont Cottage Kitchen: Sponsored by Lily Ann Cabinets and designed by @callsigndesign on Instagram and @slavetodiy on Pinterest.
Then there was the issue of finding a cabinet company that wasn’t going to break the bank. I looked and looked, but everything I liked was super expensive! And since I had added a huge island, the cabinet total had about doubled. Then I stumbled across RTA (ready to assemble) cabinets. I found them on sale (even though they were already significantly cheaper than the other cabinets I had found before the sale), and I sent the company my design. My brother said, “that’s fine, but you guys are putting those cabinets together.”
Almost ALL of this was carried out without me physically at the property because suddenly there was a pandemic. Yup. Perfect timing. I corresponded with a Lily Ann kitchen designer in Michigan that was working from home and had the details and 3d renderings in just a few weeks. A skeleton warehouse crew got our order out and it was delivered about a month and a half after we first contacted them.
Back to the house: imagine my delight when my brother (who had said NO WAY was he assembling RTA cabinets) called me to say he had assembled and installed them and the quality was amazing. Oh, and they went together super fast. I was in shock. I will save the rest of that story for another post. This is a simple before and after, remember?
If you love this look, you can find these cabinets from Lily Ann Cabinets. My readers can get a 5% discount by using the offer code: SDIY2018 at checkout!
Grandma got to see her almost finished kitchen on her birthday in July and I think you’ll appreciate the video (it still makes me cry every time):
All that was left (after the first reveal) for install when we arrived in Vermont (two months later and on re-scheduled trip number three) was hardware, the backsplash, the shelves, and crown molding. Still, five full days of install while trying to persuade my six year old to do her virtual school independently was a bit challenging. And, to be perfectly honest, my brother had told me the quality was good, but the cabinets were even better in person. The finish was beautiful and I quickly realized there was nothing “discount” about these cabinets other than the price.
The after photos were all taken by @loganbspring on Instagram, so give him a follow! I think you’ll love his work as much as we do!
Drumroll please!!!!
This is looking through the front door at the door that went down to the basement:
Before and After Pictures of Grandma’s New Vermont Cottage Kitchen: Sponsored by Lily Ann Cabinets and designed by @callsigndesign on Instagram and @slavetodiy on Pinterest.
Here is the front door now:
Before and After Pictures of Grandma’s New Vermont Cottage Kitchen: Sponsored by Lily Ann Cabinets and designed by @callsigndesign on Instagram and @slavetodiy on Pinterest.
This is looking from the corner of the kitchen back at the front door:
Before and After Pictures of Grandma’s New Vermont Cottage Kitchen: Sponsored by Lily Ann Cabinets and designed by @callsigndesign on Instagram and @slavetodiy on Pinterest.
We couldn’t REALLY get this “before” shot because of the wall, but you can see where the new front door is now (the wall started roughly where the island begins):
Before and After Pictures of Grandma’s New Vermont Cottage Kitchen: Sponsored by Lily Ann Cabinets and designed by @callsigndesign on Instagram and @slavetodiy on Pinterest.
This is standing by the front door, looking at the kitchen.
Before and After Pictures of Grandma’s New Vermont Cottage Kitchen: Sponsored by Lily Ann Cabinets and designed by @callsigndesign on Instagram and @slavetodiy on Pinterest.
And here is the after:
Before and After Pictures of Grandma’s New Vermont Cottage Kitchen: Sponsored by Lily Ann Cabinets and designed by @callsigndesign on Instagram and @slavetodiy on Pinterest.
This is a shot of the space after the walls came down, but before the staircase was moved:
Before and After Pictures of Grandma’s New Vermont Cottage Kitchen: Sponsored by Lily Ann Cabinets and designed by @callsigndesign on Instagram and @slavetodiy on Pinterest.
And after:
Before and After Pictures of Grandma’s New Vermont Cottage Kitchen: Sponsored by Lily Ann Cabinets and designed by @callsigndesign on Instagram and @slavetodiy on Pinterest.
And just for fun, here are some more detailed shots of the kitchen we took during staging:
Reclaimed shelves with iron brackets, fully staged. Before and After Pictures of Grandma’s New Vermont Cottage Kitchen: Sponsored by Lily Ann Cabinets and designed by @callsigndesign on Instagram and @slavetodiy on Pinterest.
Before and After Pictures of Grandma’s New Vermont Cottage Kitchen: Sponsored by Lily Ann Cabinets and designed by @callsigndesign on Instagram and @slavetodiy on Pinterest.
Grandma’s cutting board/charcuterie board collection next to her wooden spoon collection. Before and After Pictures of Grandma’s New Vermont Cottage Kitchen: Sponsored by Lily Ann Cabinets and designed by @callsigndesign on Instagram and @slavetodiy on Pinterest.
Before and After Pictures of Grandma’s New Vermont Cottage Kitchen: Sponsored by Lily Ann Cabinets and designed by @callsigndesign on Instagram and @slavetodiy on Pinterest.
Before and After Pictures of Grandma’s New Vermont Cottage Kitchen: Sponsored by Lily Ann Cabinets and designed by @callsigndesign on Instagram and @slavetodiy on Pinterest.
Kitchen staged with gold pictures and a french country style lamp. Before and After Pictures of Grandma’s New Vermont Cottage Kitchen: Sponsored by Lily Ann Cabinets and designed by @callsigndesign on Instagram and @slavetodiy on Pinterest.
Before and After Pictures of Grandma’s New Vermont Cottage Kitchen: Sponsored by Lily Ann Cabinets and designed by @callsigndesign on Instagram and @slavetodiy on Pinterest.
Reclaimed shelves against a herringbone backsplash. Before and After Pictures of Grandma’s New Vermont Cottage Kitchen: Sponsored by Lily Ann Cabinets and designed by @callsigndesign on Instagram and @slavetodiy on Pinterest.
This was quite the journey, but it was all worth it to see how happy my mom was at the end. What do you think of our design and renovation? What is your favorite part? Please let us know in the comments below!
Once again: If you love this look, and want to pay less for awesome cabinets, you can find these cabinets from Lily Ann Cabinets. My readers can get a 5% discount by using the offer code: SDIY2018 at checkout!
Special thanks to my brother and sister for all of the hard work and making it so easy for us to look good!
Thanks for joining us on our adventures! Cheers!
*Legal stuff:
I am honest about my experiences with different products and write because I enjoy it. I do however, have the opportunity to earn money for my writing, also.
Slavetodiy.com is a paid affiliate for Lily Ann Cabinets and received discounted products to provide this review. As always, our opinions are honest and we promote only quality products that we use ourselves.
Slavetodiy.com is a participant in the Amazon Services LLC Associates Program, an affiliate advertising program designed to provide a means for sites to earn advertising fees by advertising and linking to amazon.com. Amazon offers a small commission on products sold through their affiliate links. Each of your purchases via our Amazon affiliation links supports our cause at no additional cost to you.
If a blogger links to an Amazon product (with a special code for affiliates embedded in the link), and a reader places an item in their “shopping cart” through that link within 24 hours of clicking the link, the blogger gets a small percentage of the sale. Amazon links are not “pay per click.” If you click on the product link and stay around Amazon and purchase something else, however, I will get a commission on that sale.
Slavetodiy.com is also a VigLink affiliate advertiser which works similarly.
Are you planning a kitchen renovation? One of the fears many people have when they’re planning a big renovation is the concern that the kitchen will feel dated soon after they complete the renovation. It can be very daunting to lay out the money for an extensive renovation and then consider that you might be doing it again in just a few years.
*This post may contain affiliate links. Please see full disclosure at the end of the post.
To help you in your planning and design process: Here are the top things that date your kitchen:
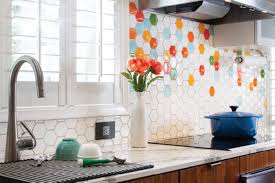
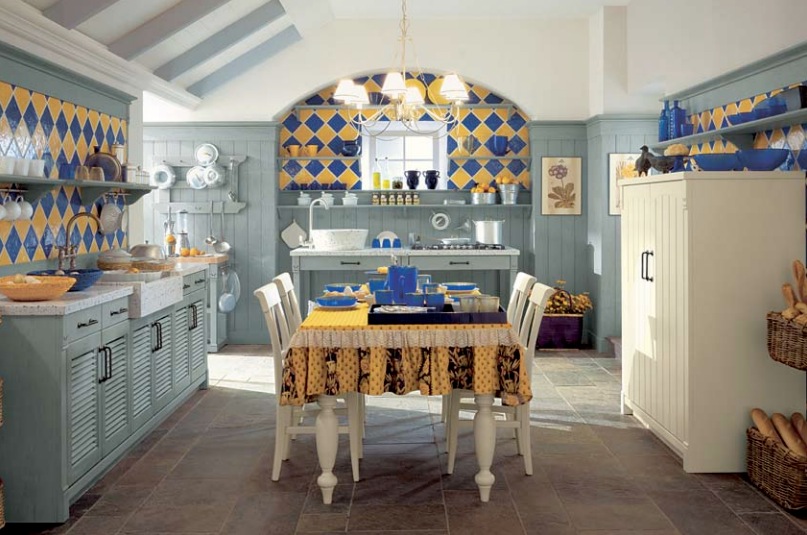
A Trendy/Patterned Backsplash: Don’t follow backsplash trends (trust me here… this is THE FASTEST way to date your kitchen). Both material and pattern date the backsplash. Unless you’re flipping a house, skip the trendy stuff. Plain white subway tile is a safe choice, as is brick. Ignore me at your peril: if you do something trendy, you’ll be updating this every couple of years.
Kitchen Crush: Things That Will Make Your Kitchen Feel Dated in 5 Years Or Less, Backsplash from Hawaiihomemag.com
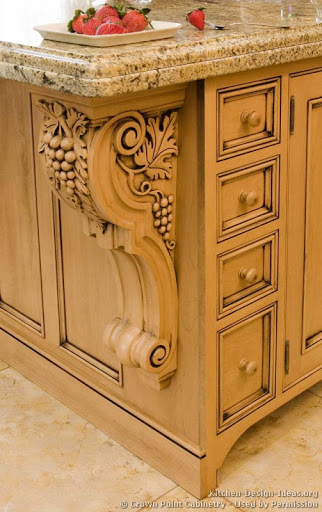
2. Arches and Busy Woodwork. If your thick, wood doors have an awful 80s/90s era arch on them, there is simply no fixing that. If there’s an arch/bridge over the kitchen sink, just take the whole thing down. As for the cabinets themselves: If you stick with basic rectangular doors you can always update those, but you can’t undo an arch. Also, if you MUST have fancy woodwork on your cabinets, adding appliques that can be removed later is your best bet (anyone who has those grape inlaid cabinets is giving me a silent high five right now).
Kitchen Crush: Things That Will Make Your Kitchen Feel Dated in 5 Years Or Less grapes from Kitchen-Design-Ideas.org
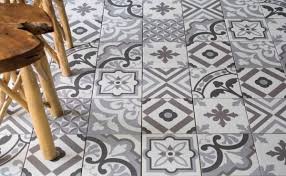
3. Trendy/Patterned Floors: You’ve seen it: The vinyl planks, the wood-look-alike tiles, etc. None of them stay in style very long. Instead, think of classic materials: travertine, limestone, brick, wideplank wood floors, terra cotta tiles. Any of these are classic choices that last! Try them in herringbone or antique formations (travertine) that will make them look as if they’ve always been there and are forever chic. As a rule of thumb, I avoid anything that has the word “faux” in front of it (remember the original Corian? It cracks and melts under abuse). If you go with authentic materials and shapes, you’ll be happier in the long run.
Kitchen Crush: Things That Will Make Your Kitchen Feel Dated in 5 Years Or Less, Patterned Floors from Tileoutlets
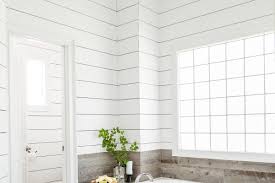
4. Shiplap. Skip it. (Trust me here, there are going to be oodles of ladies cursing Joanna Gaines in a few years when they have to undo all that faux shiplap they put up). Don’t get me wrong, even though we have VERY different design styles, Joanna Gaines is a design superstar, and if she’s anywhere close to as cool as she appears on her media, I’m a big fan of her as a person. I’m a little bummed that she singlehandedly ruined shiplap. Shiplap was a classic element in coastal homes (especially on the East Coast), with a white wash or watery white wash… it was beautiful. Now it is faux farmhouse and COMPLETELY overdone. It is dying a slow death from over-popularity. It’s going to be the 2010s equivalent of seventies porn panelling in a few years. Just trust me!
Kitchen Crush: Things That Will Make Your Kitchen Feel Dated in 5 Years Or Less from “This Old House”
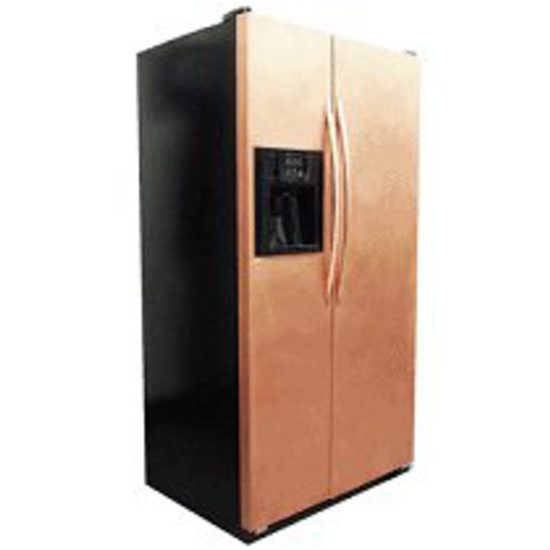
5. Trendy Appliance Finishes: This can be tricky, because we all remember when white appliances were the ONLY thing, then black came along, then stainless, dark stainless, copper, etc. If you can’t decide on a finish, choose a commercial-kitchen-looking option (stainless, stainless, stainless). Stainless was introduced to the residential arena a LONG time ago and the most expensive brands are still sporting the look. Why? It’s what commercial kitchens use, and when we’re designing kitchens, everyone’s a wannabe chef/foodie. We want what the pros use. (The exception: If you have a retro or mid-century house, the sky’s the limit… you can do colorful or plain, and it all works).
Kitchen Crush: Things That Will Make Your Kitchen Feel Dated in 5 Years Or Less, Copper finish from Kitchensource.com
6. MDF Painted Cabinets. Do you remember when painted cabinets weren’t a thing? Solid wood cabinetry was very popular once (it was sort of the only game in town) and is still around. It’s very versatile… if you don’t like it you can paint it. Want it to be stained again? Strip the paint and stain it again. I know they’re cheaper, but, if you opt for MDF painted cabinets those can’t be stripped and stained. You’re going to have to replace the cabinets, or at least the doors if you tire of painted cabinets.
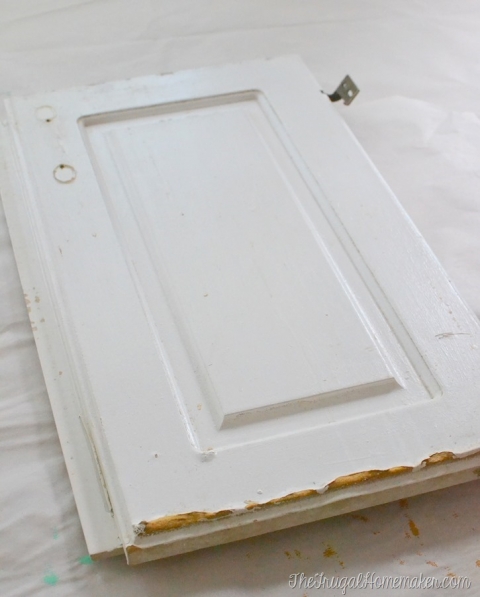
Kitchen Crush: Things That Will Make Your Kitchen Feel Dated in 5 Years Or Less, MDF Doors from Thefrugalhomemaker.com
7. Any cabinet style that is not inset or full overlay. For all of you that painted your 80s or 90s cabinets, the appraiser can tell that you did a very “mini” flip on your kitchen. How? The cabinet style. If you can see the frame around the outside of the cabinet doors, the cabinets are old. Full overlay is the cheaper of the two timeless choices and you can get away with it… probably forever. For a pricier option: Inset cabinets were found in historic homes and have stayed in style for cottages and period homes for the duration. This is my choice for something that may NEVER be dated. Less expensive that completely replacing your cabinetry? Try a cabinet door company. With careful measurements they can help you build a full overlay look that will look like you’ve done a complete gut on your kitchen.
Kitchen Crush: Things That Will Make Your Kitchen Feel Dated in 5 Years Or Less, Traditional overlay from secondsandsurplus.com
8. The Wall and Cabinet Colors. Seriously. Just paint it! Is your kitchen still stuck in a deep red faux Tuscany phase? It’s time. Go on Pinterest and search for kitchen paint colors. There are some really talented ladies that will tell you which wall colors best complement your cabinetry (if you’re planning on painting your cabinets, skip the paint brush and check out our article on How To Use An Inexpensive Paint Sprayer For Painting Cabinets or Furniture).
Kitchen Crush: Things That Will Make Your Kitchen Feel Dated in 5 Years Or Less, Red walls in the kitchen from pinterest.com
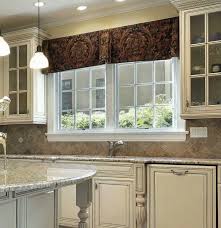
9. Your window treatments. If you’re looking at them right now and pondering, chances are they need to come down. Heavy, dark window treatments, broken blinds, vertical blinds, and valances (unless you live in a multi-million dollar home, take it down) need to come down. You can thank me later. Every one of your windows is better off naked than with outdated window dressings.
Kitchen Crush: Things That Will Make Your Kitchen Feel Dated in 5 Years Or Less, Dark Valance from Prioritywindowvalances.com
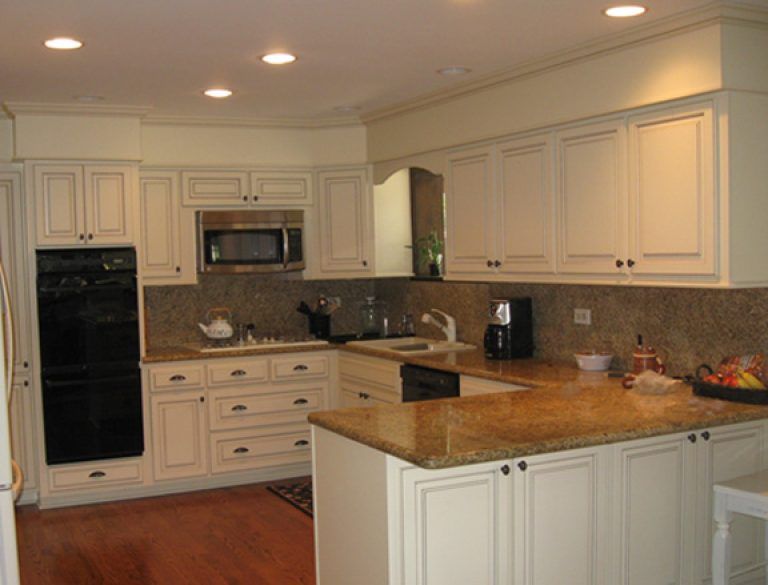
10. That weird soffit over the cabinets that serves no purpose whatsoever. First, please check to make sure that it’s not housing plumbing, venting, or electrical. Then, rip it out! For some great ideas of what to do in that newly opened up space, check out our post on The Best Ways To Transform An Outdated Kitchen On A Tiny Budget.
Kitchen Crush: Things That Will Make Your Kitchen Feel Dated in 5 Years Or Less, Soffit over cabinets from Pinterest.com
That doesn’t mean that your new kitchen has to be boring, it’s just that if you keep the bones of your kitchen neutral-ish and classic, you’ll avoid design mistakes that will end up costing you money again.
Trendy things you can purchase for your new kitchen (that are easier and inexpensive to swap out later):
Kitchen faucets and fixtures
Hardware
Pendants/lighting
But, as for the rest of it… keep it classic, keep it in historic home color families, and you’ll never have to do a full renovation again.
What are some kitchen elements that date your kitchen?
Cheers and check out more of our great content over on the blog!
*Legal stuff:
I am honest about my experiences with different products and write because I enjoy it. I do however, have the opportunity to earn money for my writing, also.
Slavetodiy.com is a participant in the Amazon Services LLC Associates Program, an affiliate advertising program designed to provide a means for sites to earn advertising fees by advertising and linking to amazon.com. Amazon offers a small commission on products sold through their affiliate links. Each of your purchases via our Amazon affiliation links supports our cause at no additional cost to you.
If a blogger links to an Amazon product (with a special code for affiliates embedded in the link), and a reader places an item in their “shopping cart” through that link within 24 hours of clicking the link, the blogger gets a small percentage of the sale. Amazon links are not “pay per click.” If you click on the product link and stay around Amazon and purchase something else, however, I will get a commission on that sale.
Slavetodiy.com is also a VigLink affiliate advertiser which works similarly.
What I remember most about my first condo was how much I hated the kitchen. Actually, hate might not be a strong enough word. It was dark and depressing, with a weird window and aged-orange vertical shades, all illuminated by a florescent fixture with brown burn marks on the plexiglass cover. The condo itself had space and was the right price, but the kitchen was awful. It was tragic. However, my total budget for transforming the space was right around ZERO dollars. Even the grocery budget was tight, at the time, so much that I sometimes worried about being able to buy diapers for my one year old. So, how the kitchen looked wasn’t a priority, regardless of how depressing it was to cook in it.
*This post may contain affiliate links. Please see full disclosure at the end of the post.
I’m betting many of you can relate. Stuck with dated, 80s arched doors or a too-dark 70s finish, or even worse, the orangish-tannish builder grade oak cabinets of the late 80s and 90s… the scalloped arches over the kitchen sink, the brown and orange vinyl flooring. All of this made MUCH worse by the endless taunting from Pinterest and Instagram: the gorgeous, highly edited kitchen photos of IG starlets showing off the latest dishes and gadgets they’re creating and using in their maddeningly perfect kitchens.
I understand. I’ve BEEN THERE. But, I’m going to tell you a secret: You CAN transform a kitchen you hate on a tiny budget. I’ve done it, multiple times.
Now, I’m not going to tell you that I’m still in that place, because I’m not. That was twenty years ago and I’ve been Blessed financially since then, so I’m working on planning my FOREVER kitchen in a MUCH larger home and loving every second (keep the FAITH, you’ll get there!). However, I want to share my secrets with you… I want to share how you can make your kitchen a place you like to cook, even take pictures of, especially if you’ve got a little bit of cash for supplies and energy to do the heavy lifting, I’ll tell you how to make BIG impact transformations for just a little bit of money.
So, here’s the big impact list:add molding, cabinet color, hardware, counter kits, counter stools & kitchen furniture, light fixtures, repurposed furniture island, and, yes, backsplashes.
Add Molding:
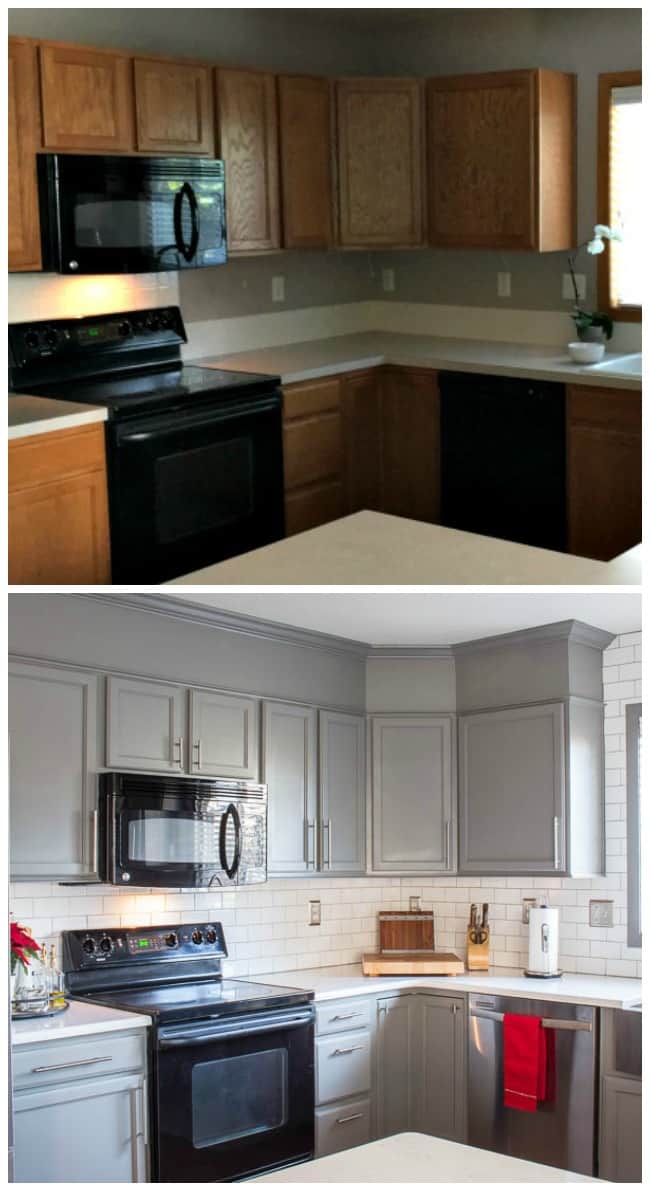
You may not realize when you look at those horrid 70s, 80s, and 90s kitchens what in particular makes them so hideous, but I can tell you for sure that one main thing is the soffits! Some of them are for no reason at all other than to close the space in above the cabinets, and others house vents, etc. However, this is fixable! You can add molding over soffits or close in spaces above cabinets to completely update cabinets and bring them into this century! There are some really neat molding stackups I’ve seen done and it can totally change the look of a kitchen for not very much money!
Check out this incredible makeover from Remodelandolacasa.com. A combination of paint and some smaller build projects, including adding molding to the ceiling, created a dramatic transformation in this great kitchen before and after:
Isn’t that amazing the difference? Adding molding completely changed the look and feel of the cabinets. To see this whole transformation, go to https://www.remodelandolacasa.com/2012/01/kitchen-remodeling.html
Cabinet Color:
Cabinet Painting is ALL the rage these days, and with good reason. A new color can totally transform the space. On the positive side, if you have a 70s or 80s kitchen, chances are the cabinets are solid wood and will hold up really well to sanding and painting.
Pro tip: beware of the tutorials that tell you to slop on some paint with a brush. It’s going to turn out like poo and you’ll regret it. There’s a cheaper way to do this that has GREAT results. There’s a cute little basic paint spray gun that you can get for about $35 bucks that will take your cabinet paint job from “Yikes, she painted her cabinets” to “wow, how did you afford new cabinets?”
I recommend the paint from Benjamin Moore that makes it look and feel like a hard factory finish. If you’re one of those farmhouse gals that’s dreaming of a white kitchen, Benjamin Moore’s White Dove in CO-INSL-X Cabinet Coat is the BEST option. This is an enamel and will dry to a hard finish. It’s AWESOME. But, that paint is NOT cheap. If you can’t afford it, run down to the local hardware store and the paint guy should be able to tell you which paint to buy.
One of my favorite transformations is from Laura at inspirationformoms.porch.com. She did a heavenly flip on her kitchen:
How’s that for a fantastic before and after on kitchen cabinet paint (and did you notice the molding at the top of the cabinets???). To see this whole transformation go to https://inspirationformoms.porch.com/kitchen-before-and-after-reveal/
Hardware:
New hardware, and swapping out dated hardware, can completely transform a kitchen all by itself. It’s like remembering accessories when you get dressed up: the perfect necklace and jewelry to accent and improve your cute outfit. Think it’s expensive? Think again.
One of the coolest things that has happened because of Amazon in the last few years is that competition has SIGNIFICANTLY reduced the cost of cabinet hardware. The 3″ Stainless Steel Bar Kitchen Cabinet Pulls I purchased for a renovation in 2011/2012 at $25 each you can buy on Amazon today for a quantity of 25 for the same price (try to visualize the steam coming out of my ears). Yes, THEY’RE LITERALLY A DOLLAR APIECE. This is a project you can afford, and you don’t need any specialty tools to install them. If you purchase hardware with the same hole spacing as the old ones, you won’t even need to drill.
Country Living Magazine has a great blog post on easy DIY and inexpensive hardware updates. It’s amazing to me what a difference hardware makes, and how it can COMPLETELY change the style of a kitchen.
From Country Living Magazine https://www.countryliving.com/home-design/decorating-ideas/g27572367/kitchen-cabinet-hardware-ideas/
Countertop Update Kits and Butcher Block:
I know you want solid surface countertops. I get it. I love them, too. But, guess what, you can’t afford them right now. So, you’ve got two GREAT options:
Tiny budget: Vinyl contact paper. There are very convincing vinyl self-adhesive countertop paper kits that can make your laminate countertops look like Carrera Marble. They have great reviews and cost about $29 bucks. But, be careful with these: they won’t stand up to abuse or hot pans.
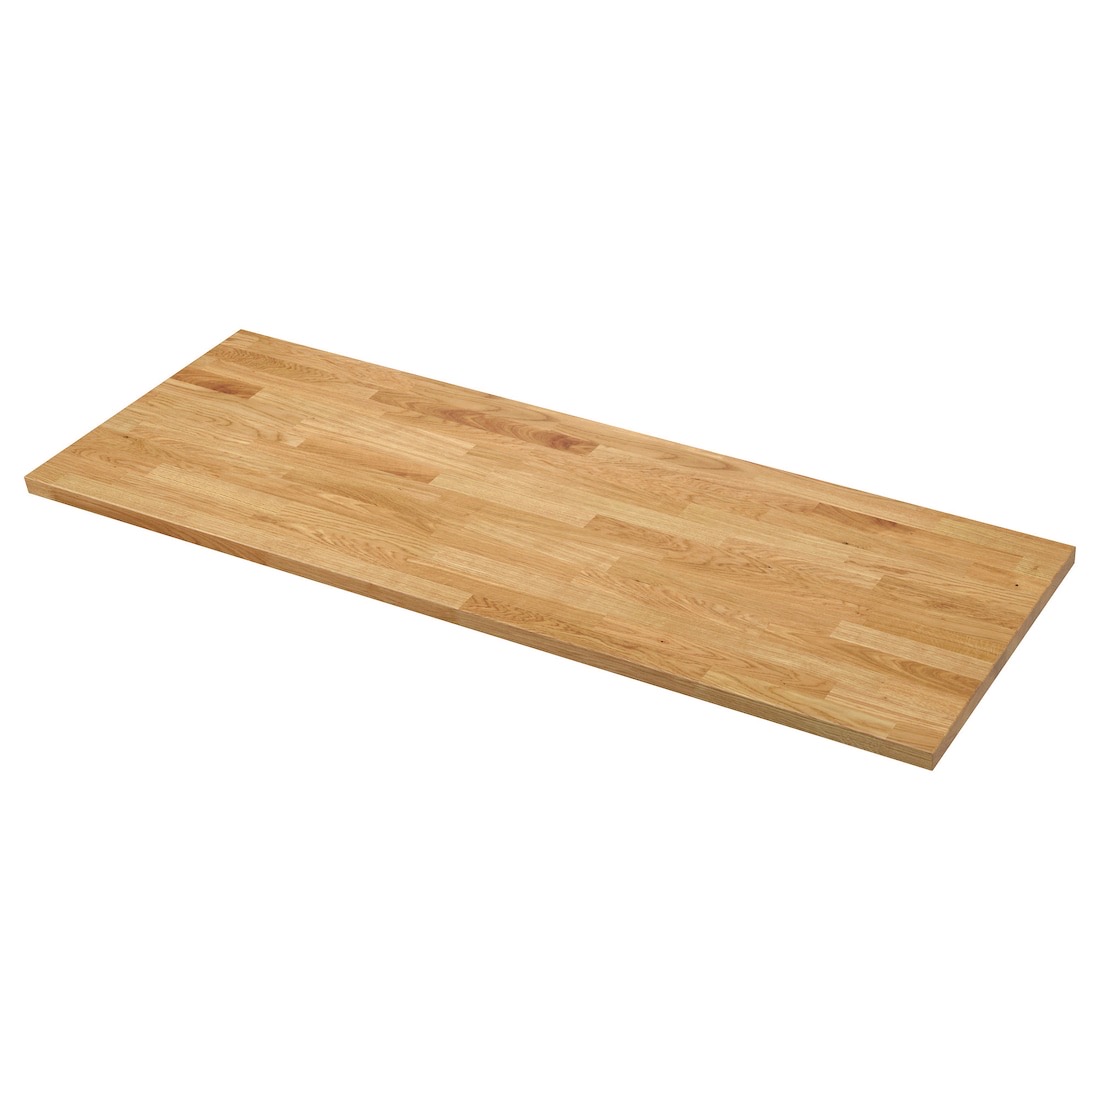
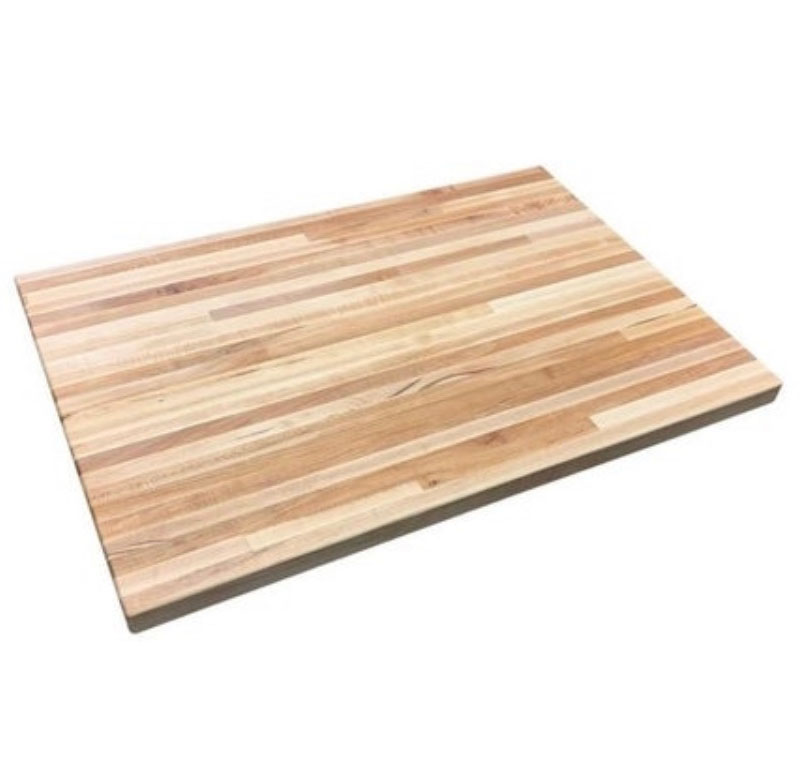
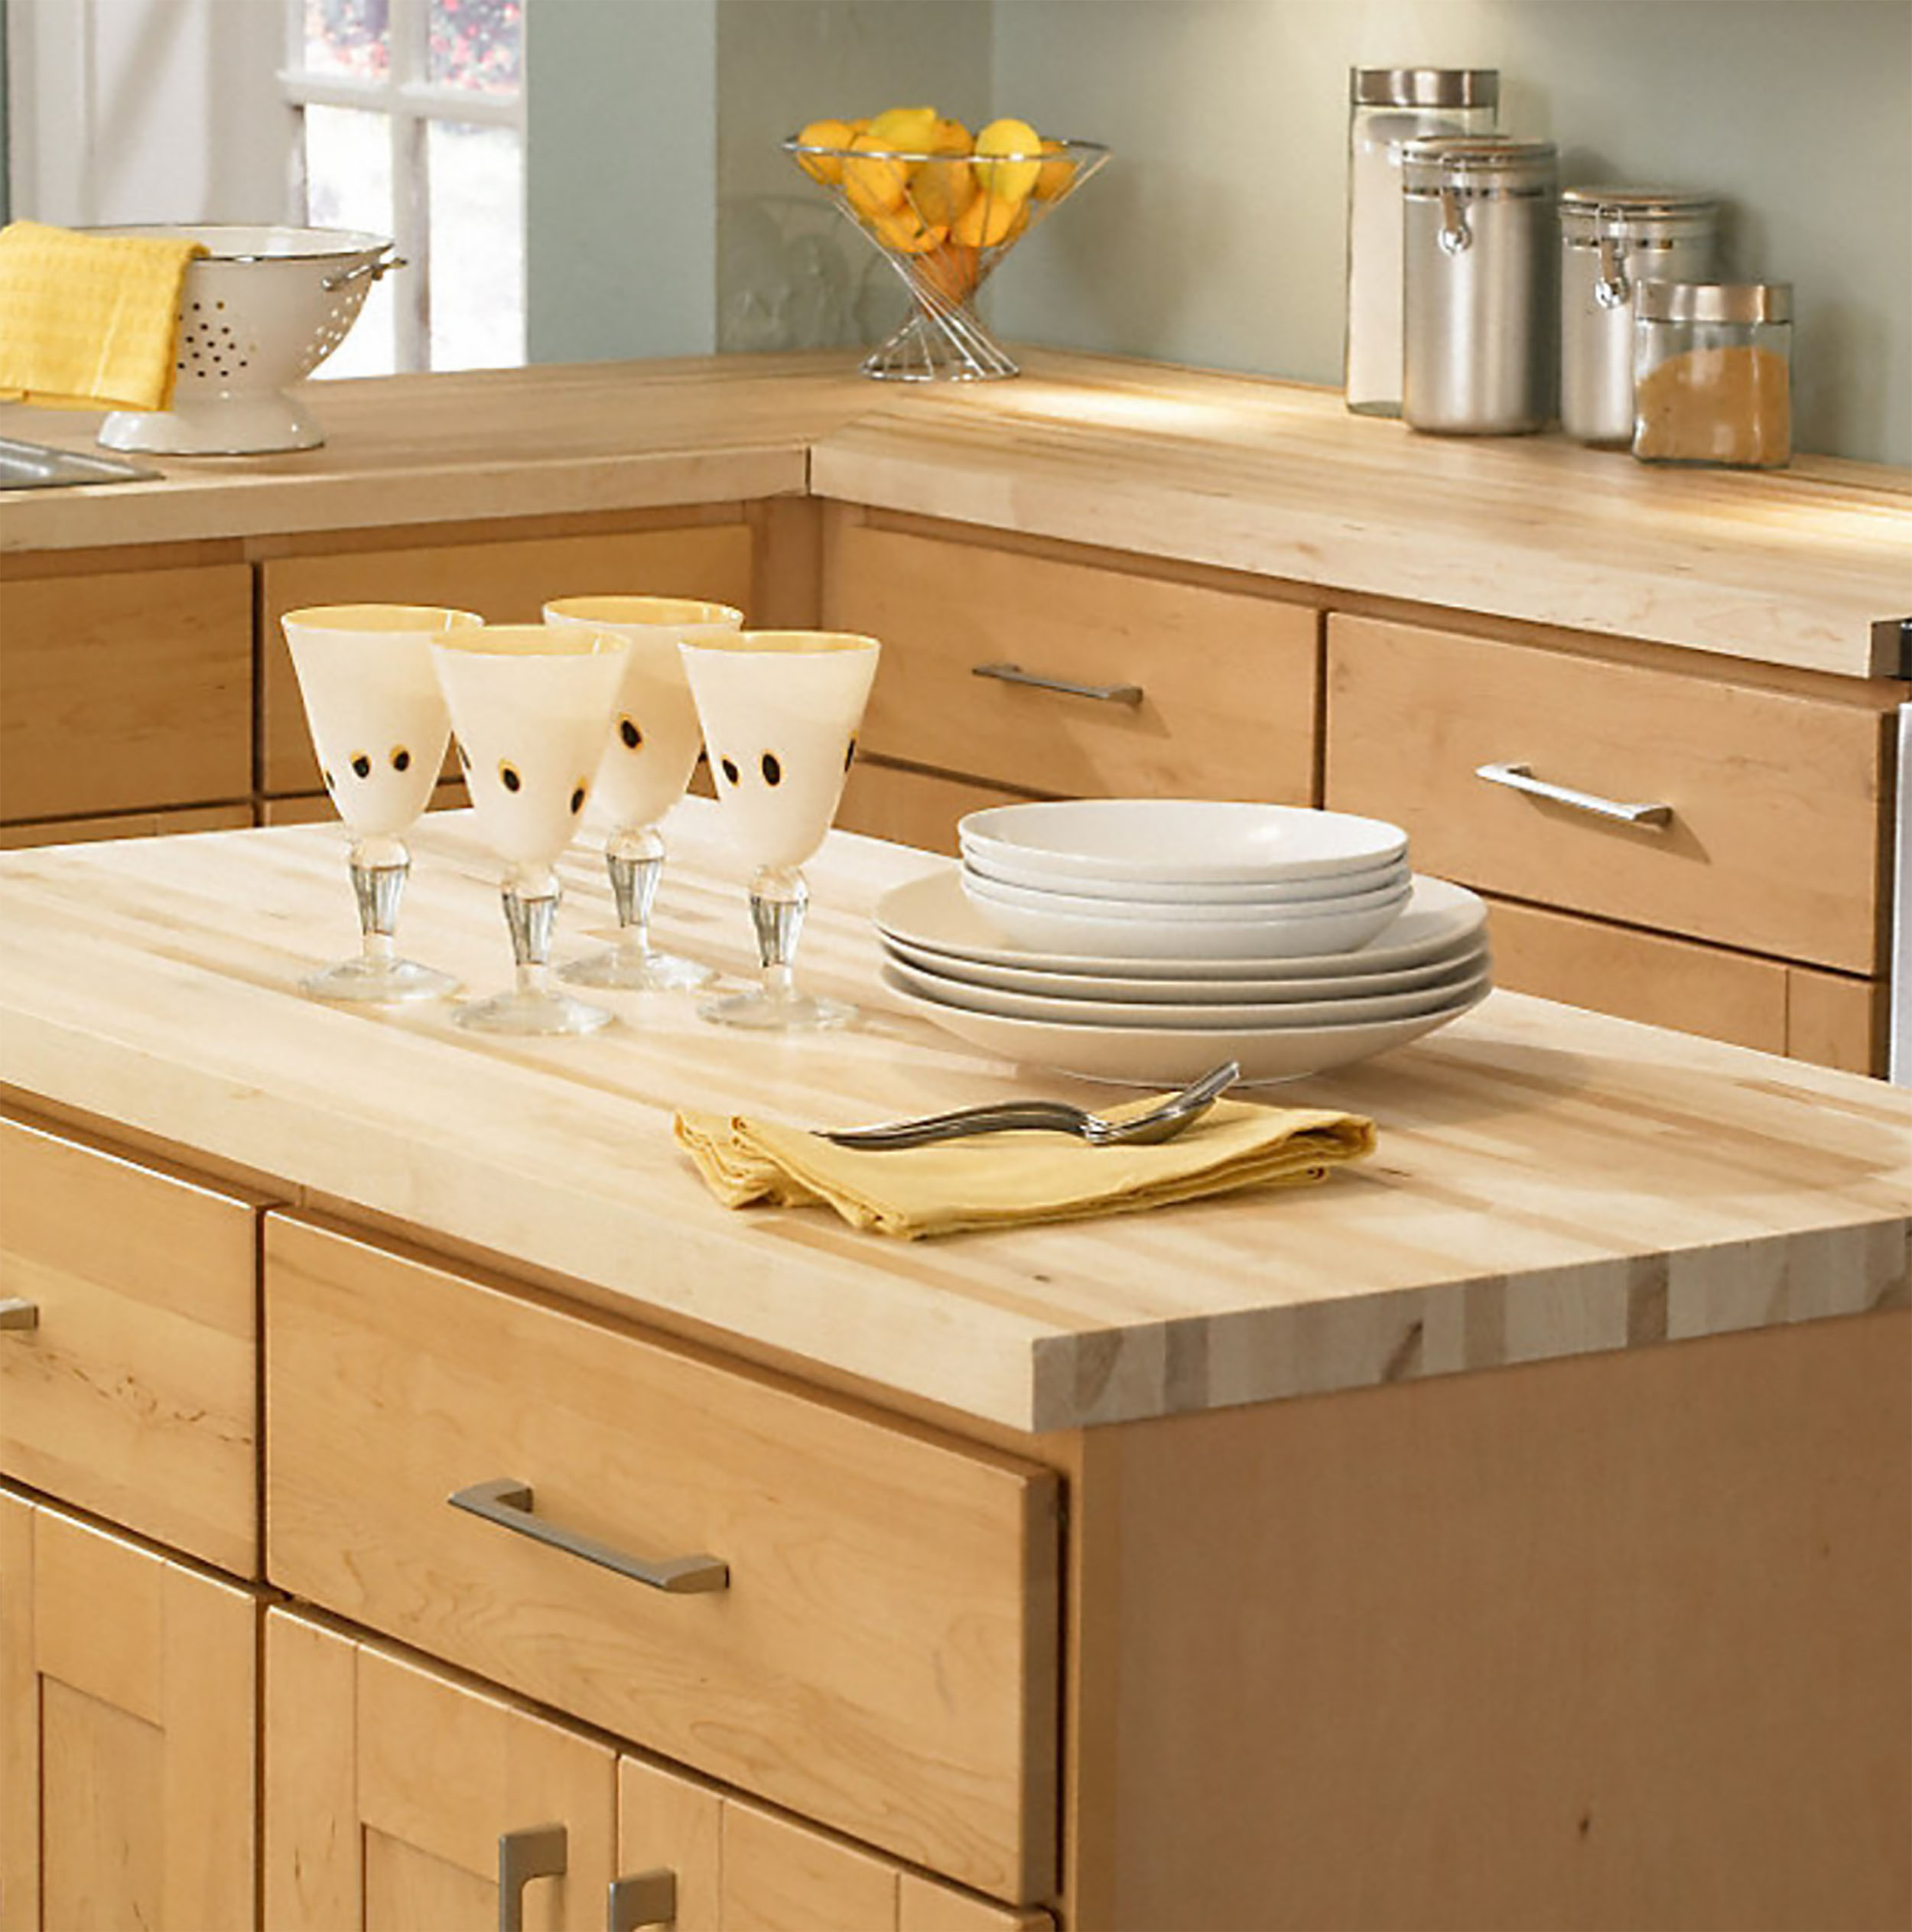
Small budget: Butcher block! It’s super popular right now and I have a great post on Where To Find The Best Deals On Butcher Block Countertops if you decide that’s the right option for you! To give you a ballpark idea, when I wrote the article, you could purchase 50 inches of butcher block countertop from the Home Depot for $105 plus tax. You’ll need some special oil to treat it and some screws to install it. How awesome is that?
Pro tip: You can find left over granite slabs on Craigslist and letgo for around $50 if you scour the internet and be patient. It’s not an easy project, but if you have any experienced craftsmen in the family, they can help you, so be on the lookout!
One of my favorite countertop updates is from my friend Krystle at Spruceandabide.com. She and her husband did a kitchen flip and I just love how it turned out (and definitely give them a follow on Pinterest and IG, they are the cutest couple ever):
Krystle from Spruceandabide.com did a gorgeous butcher block countertop update. You can read all about it at https://spruceandbide.com/our-rustic-kitchen-makeover-a-mini-tour/
Counter Stools:
Maybe your parents and friends donated some furniture to you when you moved in, and you know what? They were so generous because they didn’t want it anymore. Because it’s ugly. How are your barstools? Kitchen furniture can make your space look dated really fast. You can buy some VERY reasonable new bar stools both on Amazon and, my personal favorite place to find deals, Overstock.
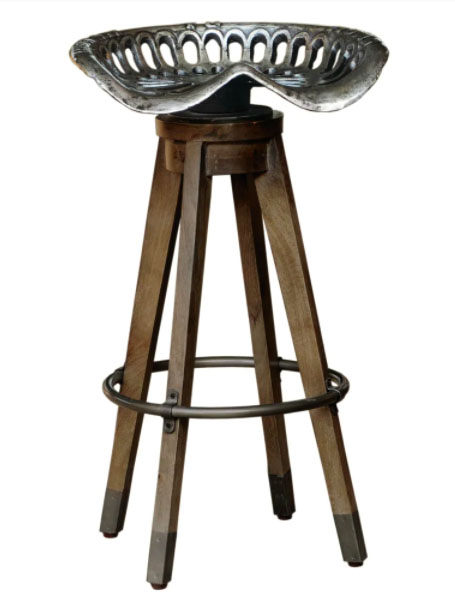
One of my favorite types of stools are tractor seat stools, they’ve been a thing in my native Vermont for several decades but have picked up steam more recently (thanks, Joanna). If you watch for antique tractor seats on Craigslist, you can add them to the top of a basic wooden stool, for about $25 each (plus the cost of the tractor seats and a little spray paint)!
Tractor Seat Stool From Overstock https://bit.ly/2X53QN8
Light Fixtures:
I’m not suggesting that you can get REALLY NICE light fixtures at this point in your life. But, what if they looked just like really nice light fixtures but were a lot cheaper (come to think of it, why are there more expensive fixtures when you can buy cheaper ones)? Once again, thanks to global competition, you can get some really nice looking light fixtures for a lot less than you’d imagine!
But, which ones should you swap out? Well, the giant florescent light fixture I would leave alone. I know it’s a bummer, but changing those out is not a straightforward process and I don’t want you to get mad at me for suggesting it (the replacement fixture isn’t that much, but it leaves an area of the ceiling needing repair and it’s a big mess). If you REALLY hate it, go get a new piece of plexiglass (they have seeded glass and rain pattern plexi panels cheap) for it and paint the wood on the outside to match your cabinets.
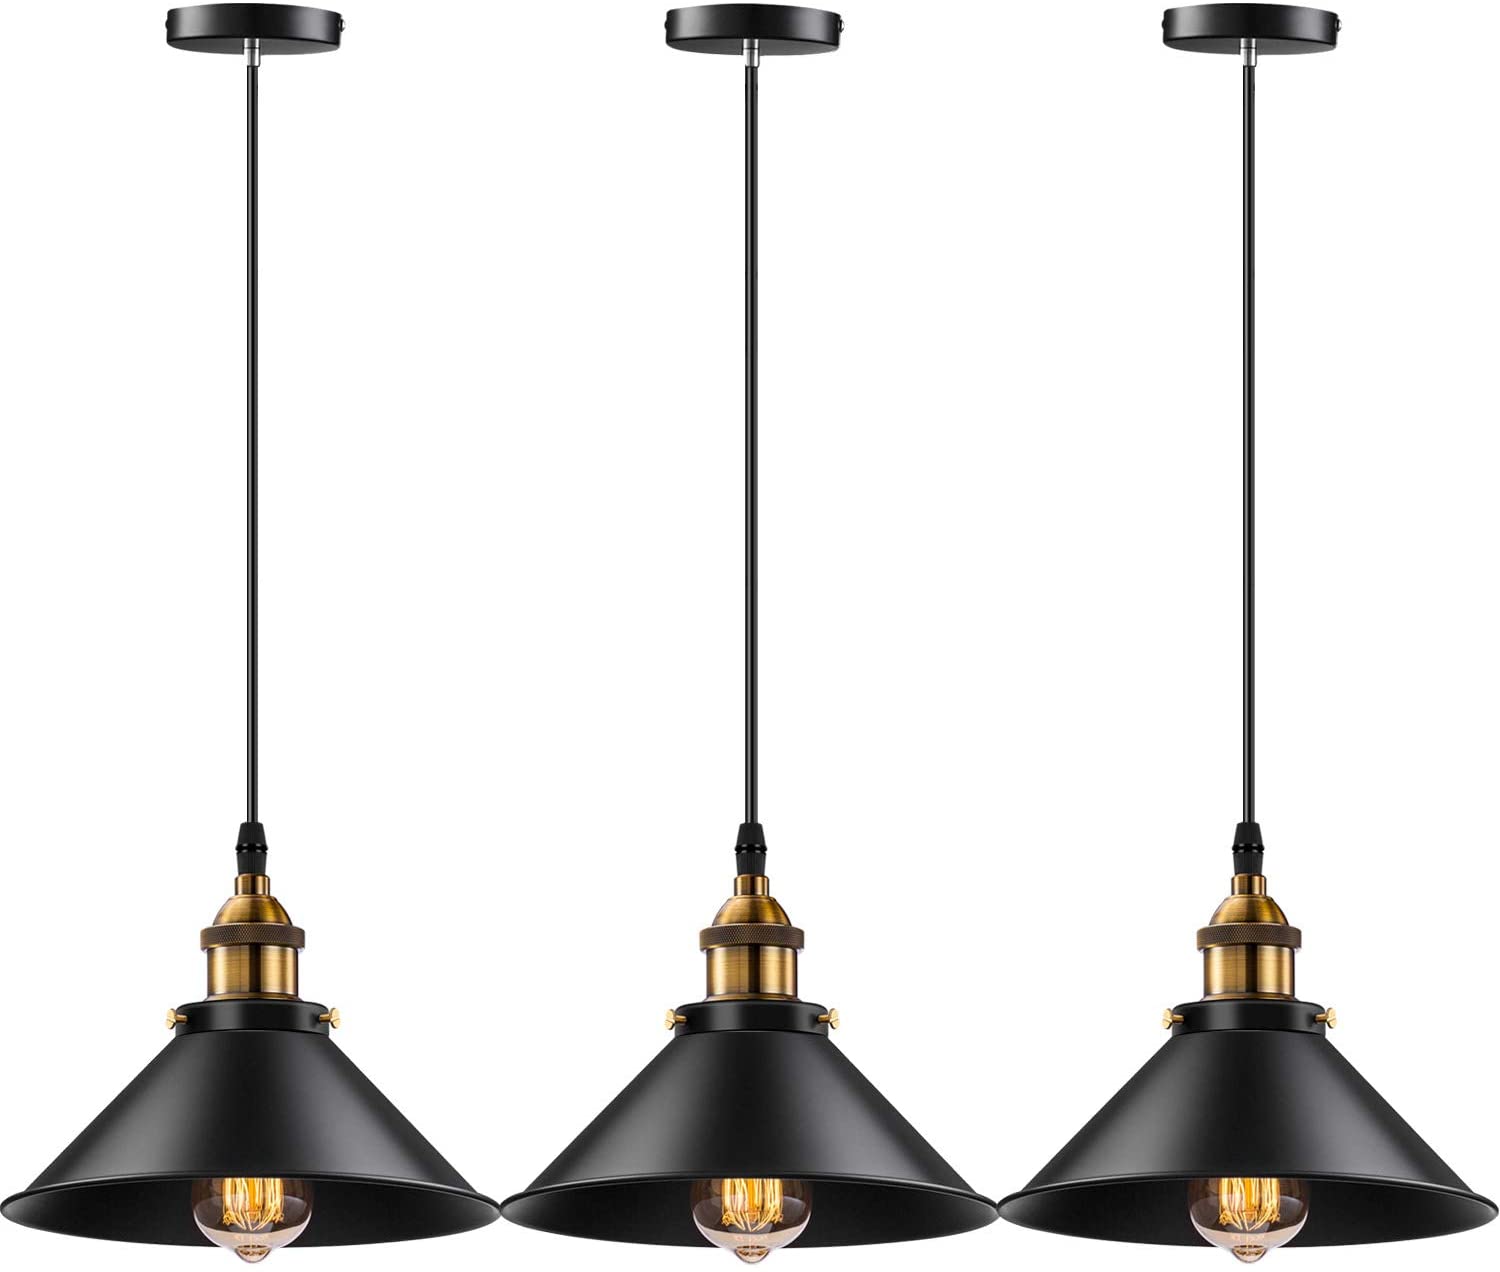
However, some light fixtures are very straightforward to swap out: if you have an outdated dome light over your kitchen sink, that’s a great opportunity to swap it for a pretty pendant for about $25 bucks. You can get a Three Pack of Industrial Edison Bulb Pendants to replace island lighting for $35 bucks! These might not be Pottery Barn fixtures, but I’m betting that your friends can’t tell the difference and YOU are going to love them.
Edison Bulb Pendants (Pack of 3)Find on Amazon at https://bit.ly/2X53QN8
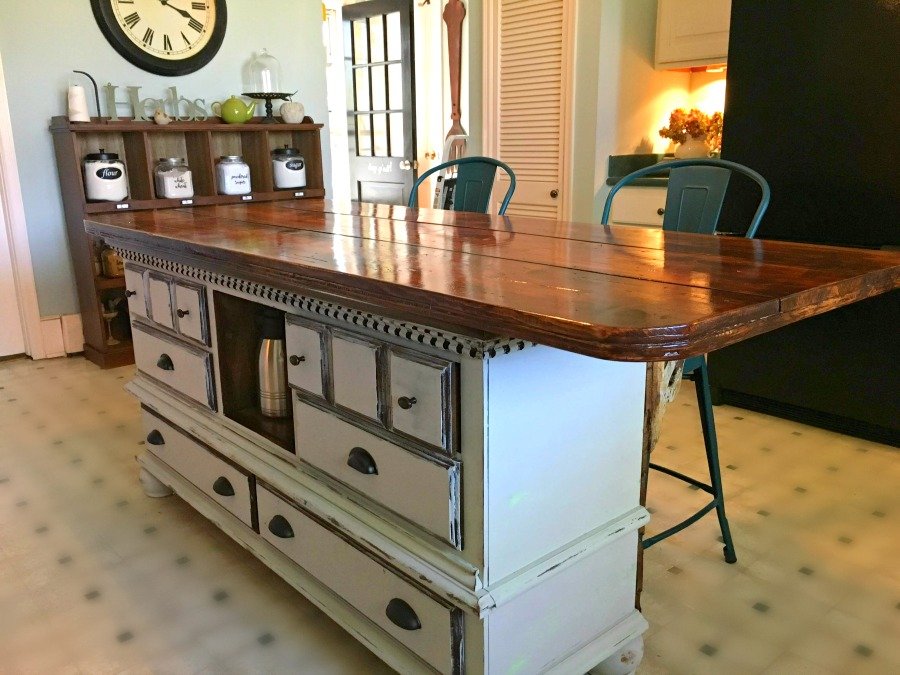
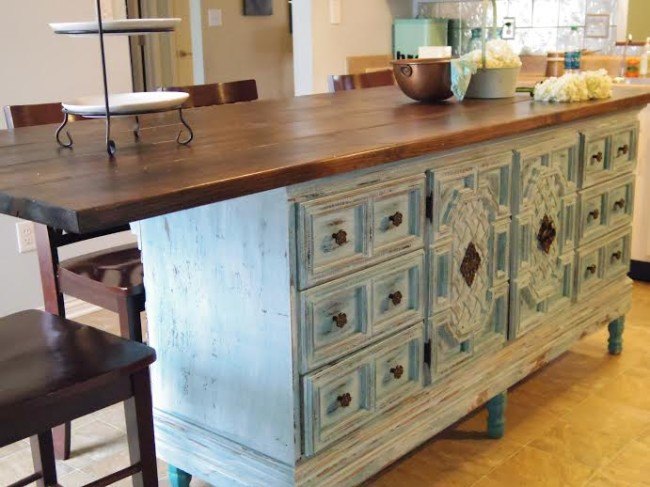
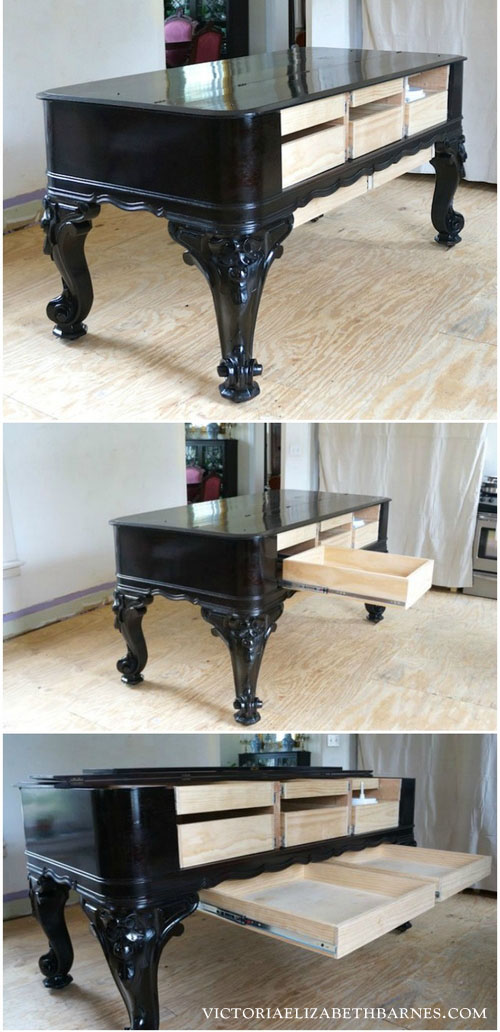
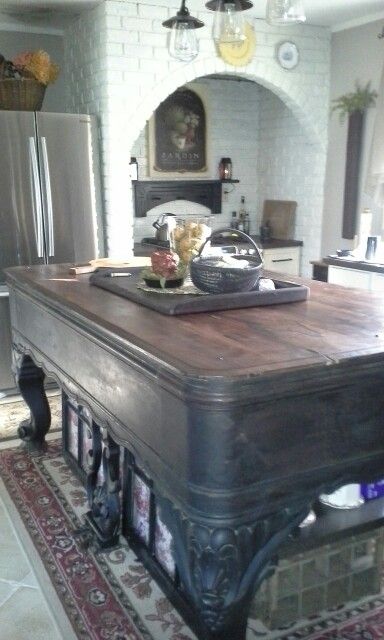
Repurposed Furniture Island:
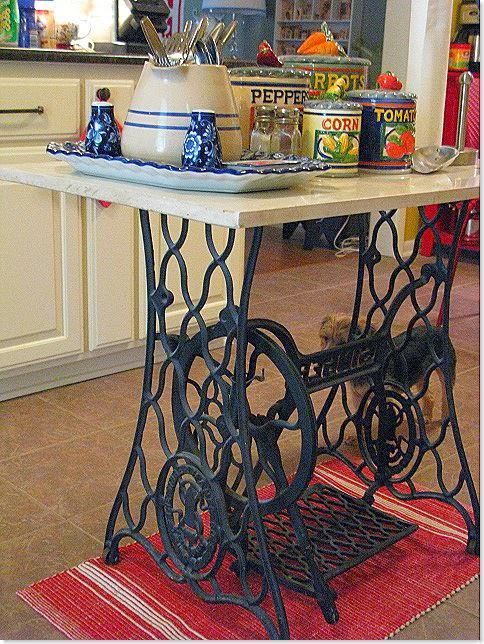
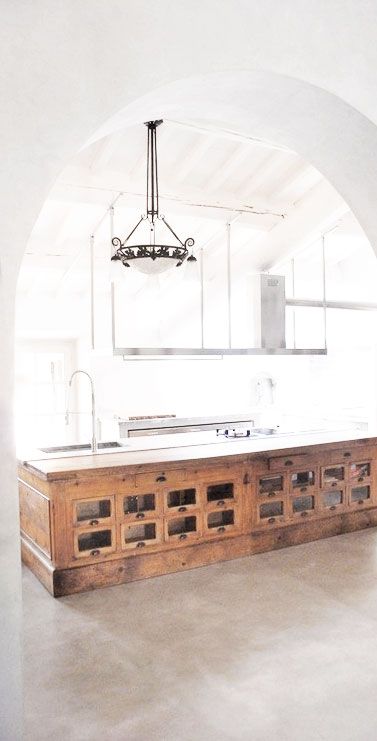
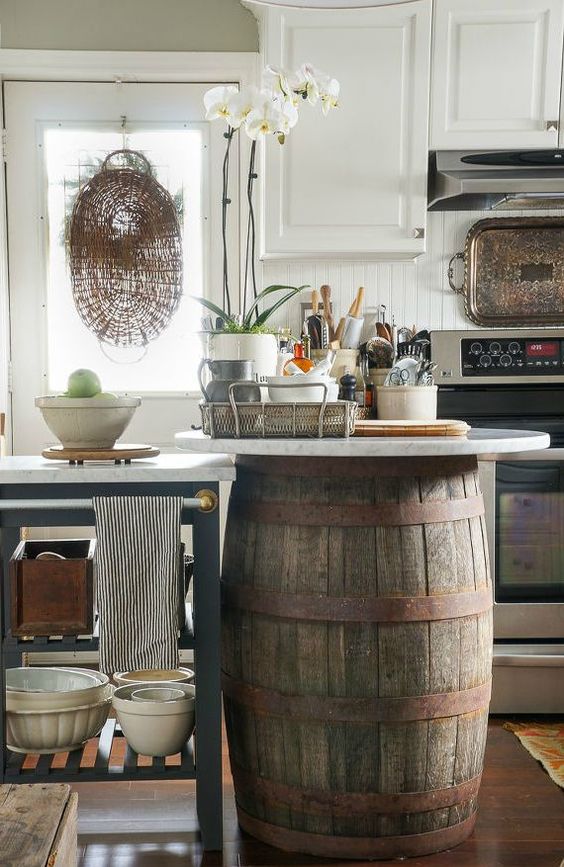
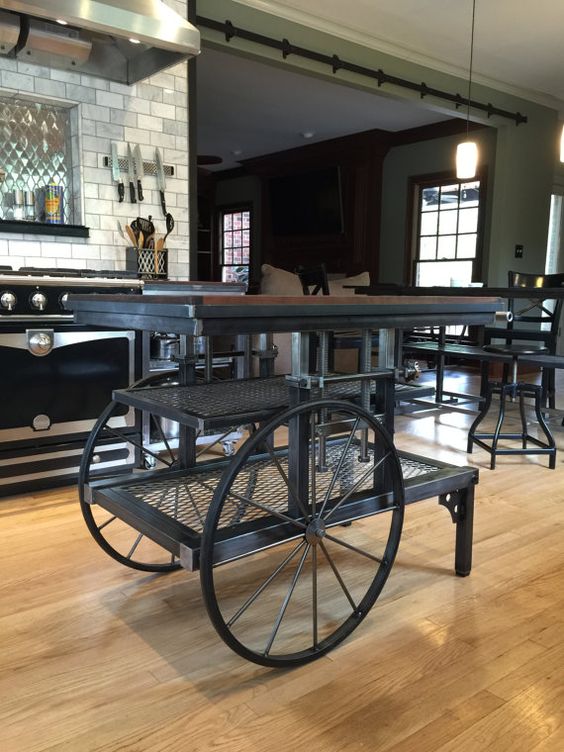
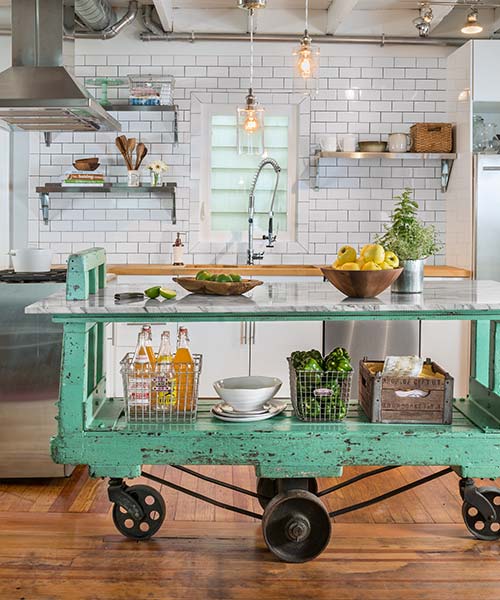
One of my favorite kitchen updates is seeing furniture transformed into functional kitchen islands (for a LOT cheaper than a custom build or using store bought cabinets)! If you want to see lots of ideas on this, check out our design inspiration post on Kitchen Islands Out of Repurposed Furniture and Materials! Craigslist finds are my favorite source for these, or dressers you couldn’t find a purpose for, etc. The point is, the island adds counter and storage space for next to nothing in cost if you’re creative!
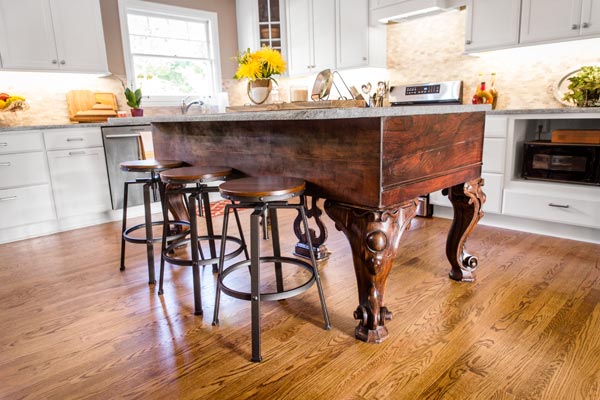
My favorite idea is fancy antique pianos that are no longer working… how cool is this?
Mashup Monday: Kitchen Islands Out of Repurposed Furniture and Materials: From This Old House “Salvage Projects You’ve Got To See”
Backsplashes:
What’s popular right now? At the Home Depot you can get 3X6 Bright White Subway Tile for 15 cents each (and they generally ship free to your house)! That means that for the entire run, let’s say you have 10 linear feet of counters (and an 18 inch tall backsplash), the tile would cost you $19 plus tax. Now, once you add in the mortar, grout, and basic tools, the total will probably be closer to $100 bucks. But, what a HUGE impact! One of my favorite subway tile transformations is from my friend Krystle @spruceandbide on Instagram. Isn’t it cool???
Kitchen backsplash update from Krystle @spruceandabide on Instagram. Check out the whole kitchen update athttps://spruceandbide.com/our-rustic-kitchen-makeover-a-mini-tour/
The point is, just because you’re broke doesn’t mean you have to live and cook in your depressingly outdated kitchen. There are absolutely ways to update your kitchen without spending a bunch of money!
How have you updated your spaces on a small budget? I’d love to hear about it!
Thanks for stopping by and check out more design inspiration and DIY on our blog. Cheers!
*Legal stuff:
I am honest about my experiences with different products and write because I enjoy it. I do however, have the opportunity to earn money for my writing, also.
Slavetodiy.com is a participant in the Amazon Services LLC Associates Program, an affiliate advertising program designed to provide a means for sites to earn advertising fees by advertising and linking to amazon.com. Amazon offers a small commission on products sold through their affiliate links. Each of your purchases via our Amazon affiliation links supports our cause at no additional cost to you.
If a blogger links to an Amazon product (with a special code for affiliates embedded in the link), and a reader places an item in their “shopping cart” through that link within 24 hours of clicking the link, the blogger gets a small percentage of the sale. Amazon links are not “pay per click.” If you click on the product link and stay around Amazon and purchase something else, however, I will get a commission on that sale.
Slavetodiy.com is also a Sovrn affiliate advertiser which works similarly.
I’ve been super focused on kitchens lately because I am perpetually in designing-my- forever-kitchen mode and I just finished designing my mom’s new kitchen. One of my favorite inexpensive, quick updates in kitchens is adding either a permanent or rolling island to the existing kitchen layout. My favorite way to do this? Thrifted finds that you can pick up super cheap on Craigslist!
*This post may contain affiliate links. Please see full disclosure at the end of the post.
You may not realize it, but some of the most loved images on Pinterest for kitchen islands are repurposed, and relatively inexpensive, thrifted finds. I just did a massive kitchen island out of cabinets for my mother (I’m not co-located so I was unable to do a repurposed island) and even with my blogging discount the cabinets were $1500, and that doesn’t include the top.
Some repurposed islands are great if you’re strictly looking for additional counter/prep space and don’t need more storage, others provide both. This antique sewing machine base is a really cool idea for one with no storage. They’re sturdy and you can find these pretty cheap if you wait for a good deal (stalking Craig’s list is a hobby of mine).
Mashup Monday: Kitchen Islands Out of Repurposed Furniture and Materials: Source Unknown
Although I have no idea where it came from, I’ve seen this image about a million times of Pinterest and it’s one of my favorites. It has limited storage plus lots of counter space.
Mashup Monday: Kitchen Islands Out of Repurposed Furniture and Materials: Source Unknown
I know a lot of people that don’t love antique dressers that they are handed down from relatives… but they are absolutely LOVELY and functional repurposed as islands! Storage and counter space, win win! And, oh by the way, pretty cost effective, right?
Mashup Monday: Kitchen Islands Out of Repurposed Furniture and Materials: From diyshowoff.com “Eclectic Vintage Modern Farmhouse Kitchen”
I ADORE these architects cabinets! They are perfect for a wide variety of kitchen storage items and I have saved searches for these in my local area. I wish I knew where to find them!
Mashup Monday: Kitchen Islands Out of Repurposed Furniture and Materials: From Nordicdesign.ca “Unique Home Iceland Mid Century Modern Flair”
This is another image I’ve seen a million times but have yet to find a source for. It is the PERFECT island, produce storage bins and I’m pretty sure it is a reclaimed General Store Counter. I’ve seen these for sale online upward of $10k but I’m sure there are some hiding in barns in different places. Keep your eyes open and you might accidentally stumble across one!
Mashup Monday: Kitchen Islands Out of Repurposed Furniture and Materials: Source Unknown
This wine barrel island is super cute if you’re looking for a small countertop space. You could cut out a door and put a shelf in if you wanted to include storage (or if you’re really handy put in some wine storage cubes)!
Mashup Monday: Kitchen Islands Out of Repurposed Furniture and Materials: Source Unknown
If you’re looking for something a little edgier, this industrial cart is about as cool as it gets and offers lots of styling opportunities.
Mashup Monday: Kitchen Islands Out of Repurposed Furniture and Materials: Source Unknown
Here’s another cart that came out very cool!
Mashup Monday: Kitchen Islands Out of Repurposed Furniture and Materials: From This Old House “Salvage Projects You’ve Got To See”
Here are two more great examples of dresser conversions: Inexpensive, lots of storage, and the opportunity for ample counter space!
Mashup Monday: Kitchen Islands Out of Repurposed Furniture and Materials: From gullycreekcottage.com “How I Got My Very Own Island And You Can Too”
Mashup Monday: Kitchen Islands Out of Repurposed Furniture and Materials: Hometalk.com
This next one is my MOST FAVORITE ISLAND EVER and has me on a perpetual search for antique pianos (under a million dollars). This is on victoriaelizabethbarnes.com: She is my FAVORITE BLOGGER EVER and I recommend checking her out. She shares my passion for all things old and fancy and making her husband repurpose impossible projects: see the incredible piano re-work below!
Mashup Monday: Kitchen Islands Out of Repurposed Furniture and Materials: From Elizabethvictoriabarnes.com “Antique Piano Into Kitchen Island
Below are two additional piano/island conversions that are also awesome (where in the world are they finding these pianos???).
Mashup Monday: Kitchen Islands Out of Repurposed Furniture and Materials: Source Unknown
Mashup Monday: Kitchen Islands Out of Repurposed Furniture and Materials: From This Old House “Salvage Projects You’ve Got To See”
Have you done any cool repurposed island projects? We’d love to hear about them in the comments below!
Thanks for hanging out with us and check out more of our design inspiration and projects over on the blog.
Cheers!
*Legal stuff:
I am honest about my experiences with different products and write because I enjoy it. I do however, have the opportunity to earn money for my writing, also.
Slavetodiy.com is a participant in the Amazon Services LLC Associates Program, an affiliate advertising program designed to provide a means for sites to earn advertising fees by advertising and linking to amazon.com. Amazon offers a small commission on products sold through their affiliate links. Each of your purchases via our Amazon affiliation links supports our cause at no additional cost to you.
If a blogger links to an Amazon product (with a special code for affiliates embedded in the link), and a reader places an item in their “shopping cart” through that link within 24 hours of clicking the link, the blogger gets a small percentage of the sale. Amazon links are not “pay per click.” If you click on the product link and stay around Amazon and purchase something else, however, I will get a commission on that sale.
Slavetodiy.com is also a VigLink affiliate advertiser which works similarly.
Welcome to the first installment of our kitchen inspiration and design series: Kitchen Crush! I am working on an impossibly difficult and involved task: simplifying kitchen design. I soon realized that although I could probably get the design guide down into a bite-sized checklist that people could use without a designer, I really wanted to provide an explanation for a lot of the recommendations and ideas I offer as kitchen options so there are visual aids for each section.
*This post may contain affiliate links. Please see full disclosure at the end of the post.
Watch for our free printable kitchen design guide/checklist, coming soon!
One of the concerns I hear from every client is being afraid that an investment in a shiny new kitchen will result in a dated kitchen in less than ten years (ten years used to be the guideline for remodeling dated kitchens). That is a legitimate concern! I usually point out that it happens a lot faster than that now, because of platforms like Pinterest and easy visual access to what the pros are currently doing. It’s easy to feel sad when you sink a fortune into a beautiful kitchen and then start seeing that the pros are doing something new, something cooler, and you’re already regretting your design choices just a matter of months into the process.
We have a simple solution for that: don’t chase trends. Period. (Watch for our design post on trend chasing, coming soon!)
Pro tip: if you MUST chase trends (we know, you can’t help it that Pinterest keeps showing you that new cool tile shape for backsplashes), follow trends in areas that are cheaper and easier to replace than the bones of your kitchen, including: cabinet color, hardware, counter stools, light fixtures, and, yes, backsplashes. I promise that if you like your existing layout, cabinet style, flooring, etc, with the mini changes I just listed, you can have a whole brand new kitchen for a relatively miniscule investment if you’re itching for a trend change later.
However, back to my point. I advise against trend following. What does that mean? That means use authentic materials, they never go out of style. Rethink what the cabinet companies are telling you that you need to have a beautiful kitchen, and design a kitchen you’ll love forever.
One of the items I talk to my clients at length about is the concept of how they really live, how they really cook, and how they interact from the kitchen on a day to day basis. Do they entertain a lot? Do their kids do homework at the kitchen island while they cook dinner? Do they have multiple family members cooking together on a regular basis?
One of the biggest laments I have regarding the modern kitchen is that the family kitchen table went away, and the table was moved either to a corner or to a completely different room. So, mom cooks in a space far away from everyone and doesn’t get to join in the fun.
So, to start: rethink your space.
What if you had a long space that was an eat in kitchen, plus kitchen, plus dining room? Get out some graph paper and draw the footprint of your kitchen AND dining spaces. What would it look like if the family table was in the middle of the kitchen and the surrounding space held kitchen furniture and cabinetry that holds the things you need for that area?
Think outside of the box, and I don’t just mean the cabinet box.
The kitchen table is just ONE timeless component of your kitchen design, but check out these inspiration images that feature the dining table as the central hub of the kitchen, and tell me what you think!
Kitchen Crush: Old World Dine In Kitchens: From lameredelamule.canalblog.com
Kitchen Crush: Old World Dine In Kitchens: From the_essense_of_frenchness.blogspot.com
Kitchen Crush: Old World Dine In Kitchens, From: My Stylish French Girlfriend
Kitchen Crush: Old World Dine In Kitchens. Source Unknown
Kitchen Crush: Old World Dine In Kitchens. From Shutterbugsage.com
Kitchen Crush: Old World Dine In Kitchens: From Minacciolo Kitchens: Minacciolo Country Kitchens with Italian Style
Kitchen Crush: Old World Dine In Kitchens: From Mary Evelyn Interiors (Black French Range)
Kitchen Crush: Old World Dine In Kitchens: From Kathy Kuo Blog (French Industrial Country Kitchen)
What do you think? Could you see your family living with an informal, in-kitchen table? Are you casual or formal when dining? We’d love to hear about it in the comments!
Thanks for hanging out with us in DIY land and check out more great DIY and design inspiration over on our blog.
*Legal stuff:
I am honest about my experiences with different products and write because I enjoy it. I do however, have the opportunity to earn money for my writing, also.
Slavetodiy.com is a participant in the Amazon Services LLC Associates Program, an affiliate advertising program designed to provide a means for sites to earn advertising fees by advertising and linking to amazon.com. Amazon offers a small commission on products sold through their affiliate links. Each of your purchases via our Amazon affiliation links supports our cause at no additional cost to you.
If a blogger links to an Amazon product (with a special code for affiliates embedded in the link), and a reader places an item in their “shopping cart” through that link within 24 hours of clicking the link, the blogger gets a small percentage of the sale. Amazon links are not “pay per click.” If you click on the product link and stay around Amazon and purchase something else, however, I will get a commission on that sale.
Slavetodiy.com is also a VigLink affiliate advertiser which works similarly.
We are in the middle of a super exciting project! My sister purchased a fixer upper for our mother’s forever home and I get to design her kitchen! The thing is, my mom watches way too much HGTV and is a perpetual renovator (I come by it honestly), so I know she will be bummed if it doesn’t look like a designer kitchen. So, no pressure, right?
*This post may contain affiliate links. Please see full disclosure at the end of the post.
One of the reasons I’m designing it is that I’ve done kitchens before and have done a lot of research on it (read: obsessively planning our current kitchen reno)… plus, I’m generally good at bargain hunting and finding cost efficient ways to do things.
Any kind of high end countertops are a MAJOR expense in the kitchen planning process and I need to find ways to make it cost less. So, the first thing I’m looking at is alternatives to solid surface. Guess what I super, duper love? Butcher block.
Here’s a quick look at some of my favorite blogger kitchens and their awesome butcher block:
Remodelista.com, From: Remodeling 101- All About Butcher Block Countertops
Sincerelymariedesigns.com: Our Butcher Block Counter Top Review – One Year Later
Beckiowens.com, Best of Pinterest : Becki Owens
Domesticimperfection.com
The first place to ALWAYS look is for places that carry off-the-shelf sizes. Producers offer standard sizes to consumers much more cheaply than semi custom or custom sizes. The best way to save yourself money is to find inexpensive products and sizes that will work and plan the design around that. I found a few places that have reasonable offerings. I looked for four foot lengths for purposes of comparison, but several stores only had longer lengths.
*Please note that prices are current in February 2020 and are subject to change.
Obviously, what size the sections are that you are working with are important. I will let you know what we decide and definitely show you the finished product!
Have you used butcher block from any of these stores? Have you found them in precut sizes elsewhere? We’d love to hear about it in the comments!
Thanks for hanging out with us in DIY land and check out more great DIY and design inspiration over on our blog.
Cheers!
*Legal stuff:
I am honest about my experiences with different products and write because I enjoy it. I do however, have the opportunity to earn money for my writing, also.
Slavetodiy.com is a participant in the Amazon Services LLC Associates Program, an affiliate advertising program designed to provide a means for sites to earn advertising fees by advertising and linking to amazon.com. Amazon offers a small commission on products sold through their affiliate links. Each of your purchases via our Amazon affiliation links supports our cause at no additional cost to you.
If a blogger links to an Amazon product (with a special code for affiliates embedded in the link), and a reader places an item in their “shopping cart” through that link within 24 hours of clicking the link, the blogger gets a small percentage of the sale. Amazon links are not “pay per click.” If you click on the product link and stay around Amazon and purchase something else, however, I will get a commission on that sale.
Slavetodiy.com is also a VigLink affiliate advertiser which works similarly.