How To Create A Historic Looking Bathroom In A New Home

One of the biggest challenges living in a new, or newer, home is making the house feel like it’s been there forever: lived in, loved, cozy, warm. I know. I’ve been there. I am also CURRENTLY there… We’ve been trying to accomplish this task room by room here. It’s slow going (because Rainman has to go to work… which is super frustrating and also QUITE INCONVENIENT WHEN WE NEED TO BE RENOVATING OUR HOUSE) but we did finally get to our downstairs bathroom remodel.

The neighbor had the audacity to remark to my husband that he thought our downstairs bathroom was fine and that time would be better spent fishing. I haven’t egged his house yet, but I’m considering it. Do people still TP houses or is that frowned upon? Asking for a friend.

And the bathroom?

It. Is. Awesome.

*This post may contain affiliate links. Please see full disclosure at the end of the post.

As usual, the budget did not allow for me to hire a bathroom contractor (bathroom remodeling near me is SUPER EXPENSIVE- but, isn’t everything?). Apparently, every tradesman in my area has a ton of work and they can charge whatever they want to show up and work on your house (and that’s a BIG IF you can get them to show up).

Of course, it’s not like Rainman would hire out something he is “perfectly capable of doing himself” even if they can do it in under a decade, unlike us.

But… I feel like we got this amazing project done well under the average cost to remodel a bathroom because we did it ourselves (other than the plumber, who I begged Rainman to hire and ended up saving us probably about a week in work time) and I LOVE that we saved the money.

As most of you know: kitchen and bathroom renovations are the most expensive rooms in the house to remodel, but we managed to do this pretty reasonably, because I’ve been working on this for A WHILE. I’ve been sourcing pieces, researching,… cough cough… and buying stuff for this bathroom for about two years (and the guest room that was temporarily storing all of the construction stuff has finally breathed a sigh of relief and been emptied out again).

Long story short: how did we do?

This. Is. My. Favorite. Room. We’ve. Ever. Done.

Seriously. I am absolutely, 100% in LOVE… and have captured EXACTLY my design style. It doesn’t have a name.

It’s just me.

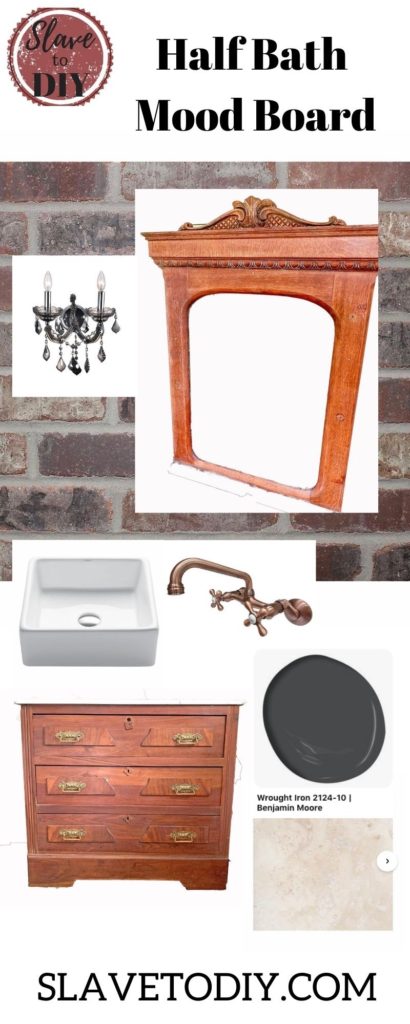
Without further ADIEU, here is the mood board we started with:


How To Create A Historic Bathroom In A New Home


And the bathroom I was trying to take from boring and forgettable, to awesome…

I’m actually really lucky, because at no point did my darling Rainman suggest any silly things like, “this room is perfectly okay as is.” Or any other such nonsense. I believe he has truly embraced his fate in being married to someone who can’t just- for the LOVE OF GOD- leave well enough alone. I honestly don’t know why he puts up with me.

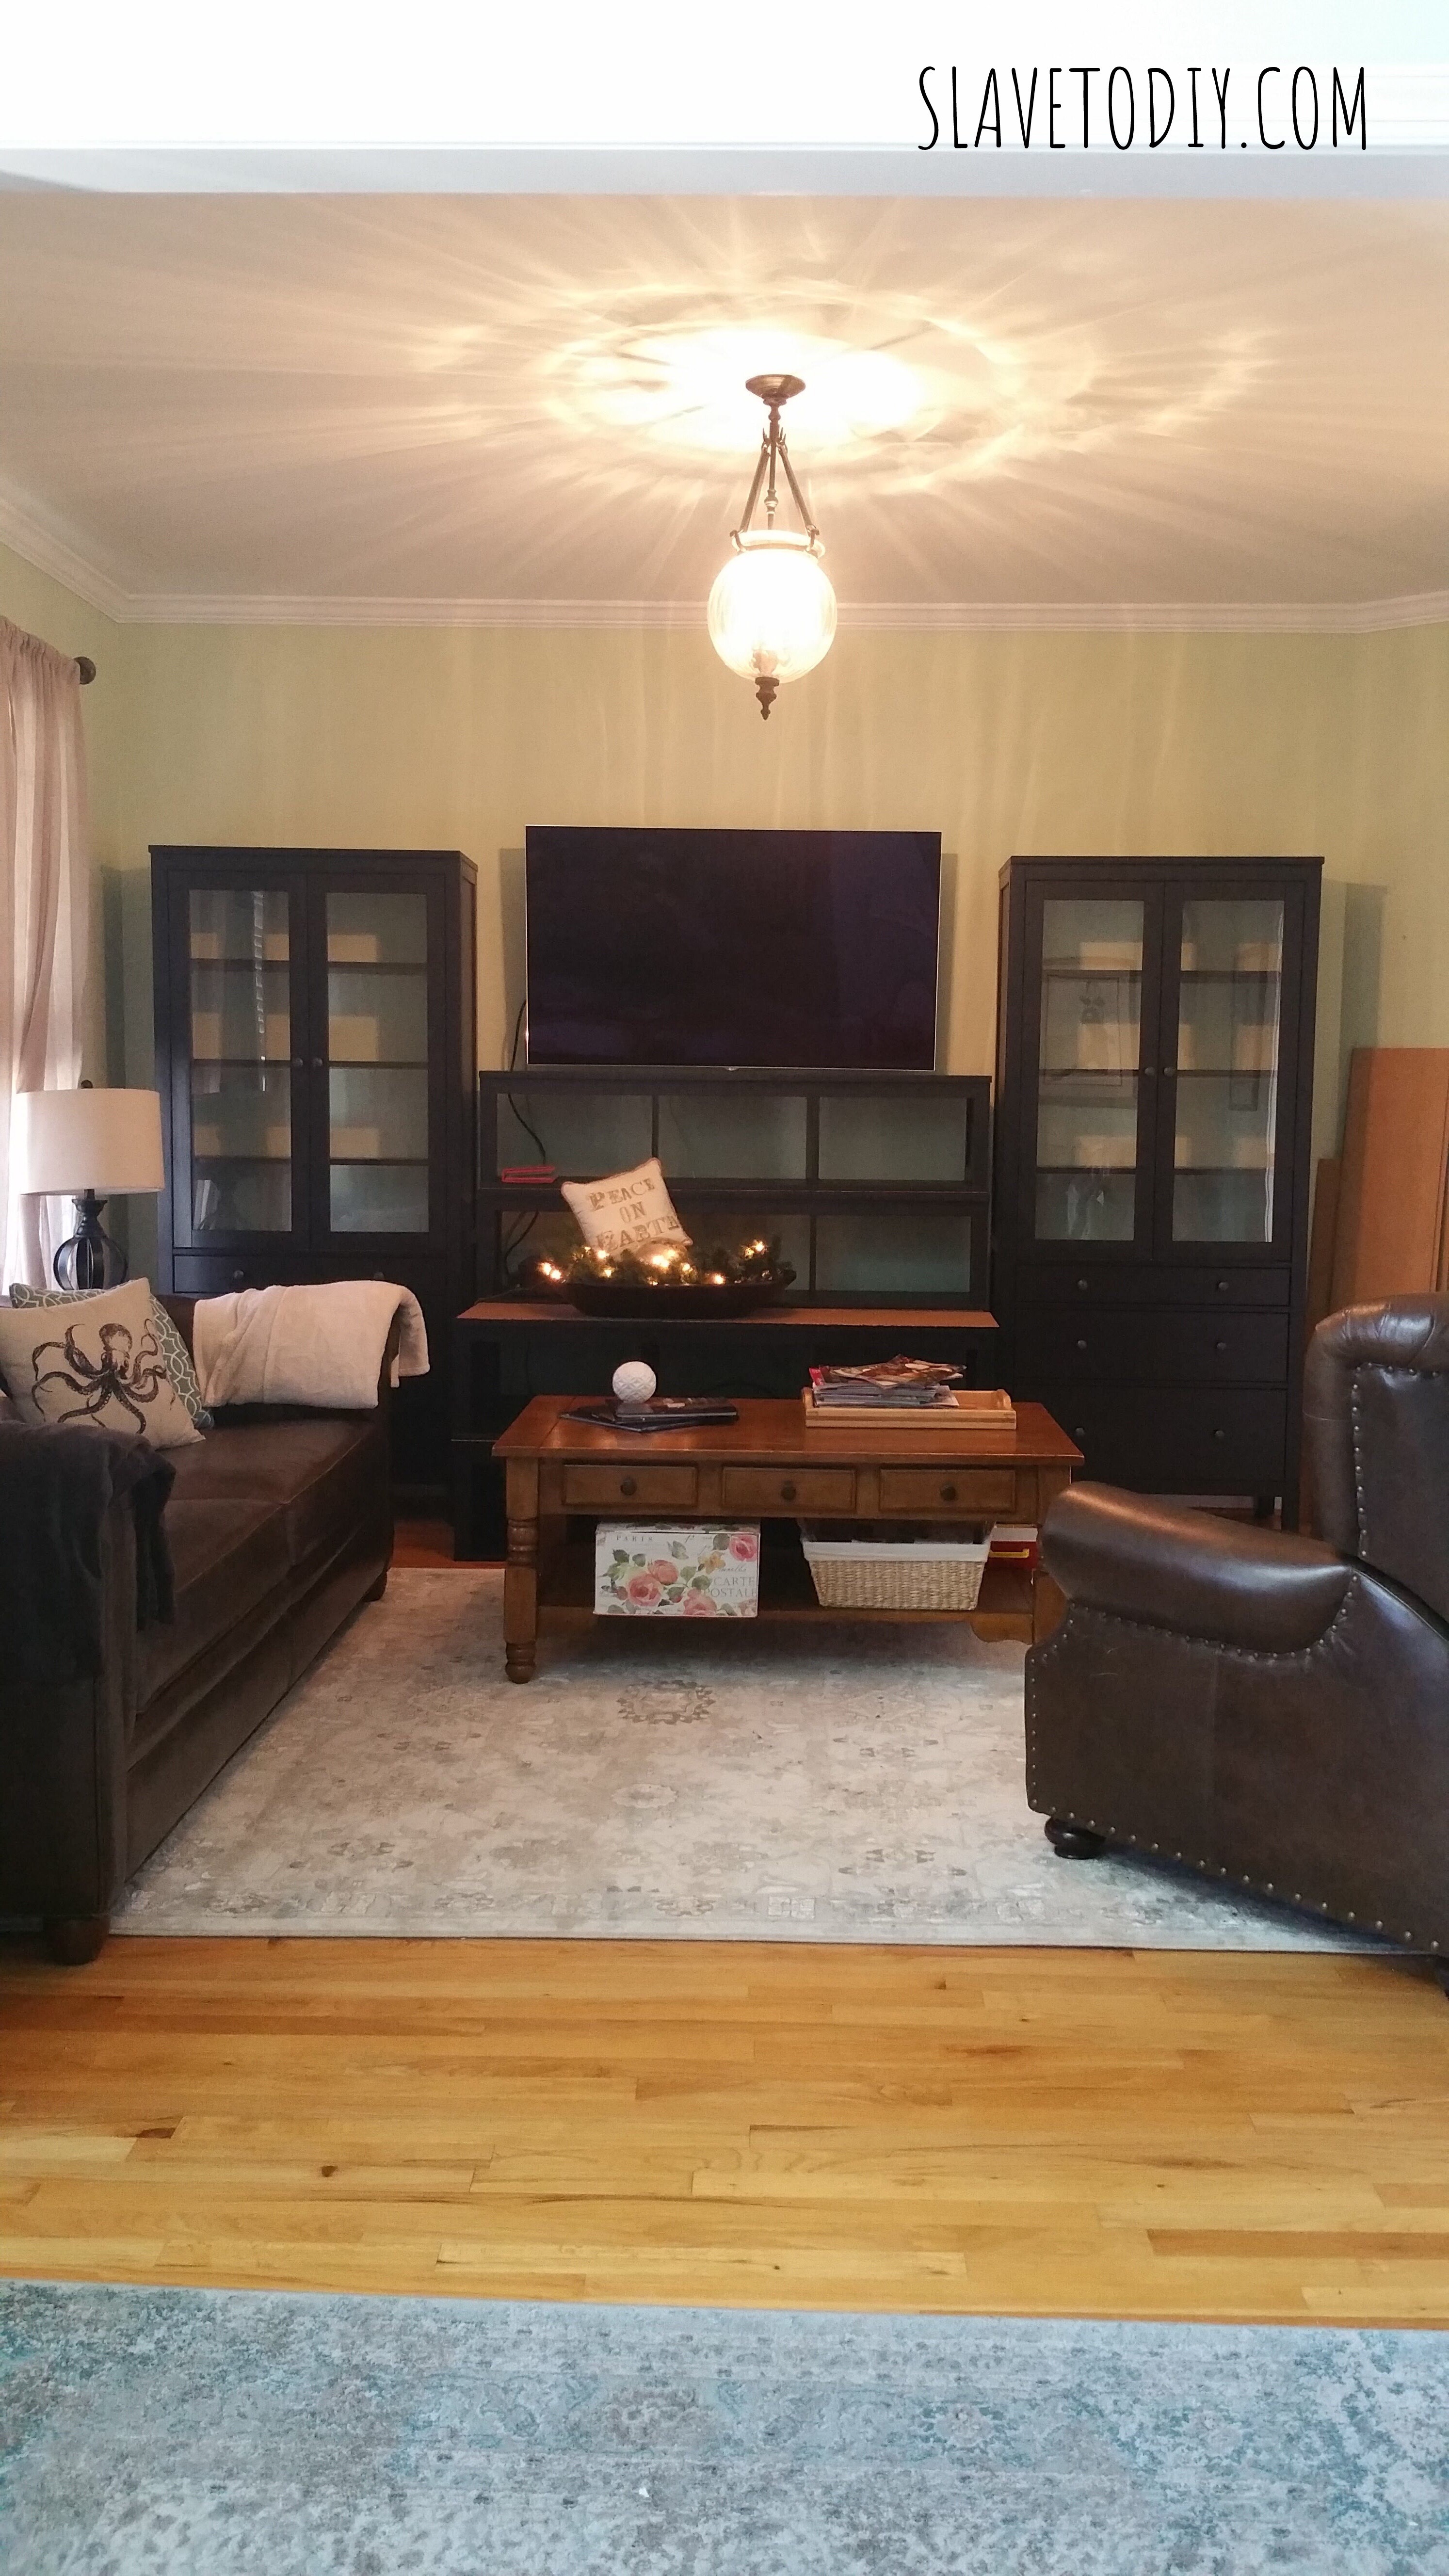
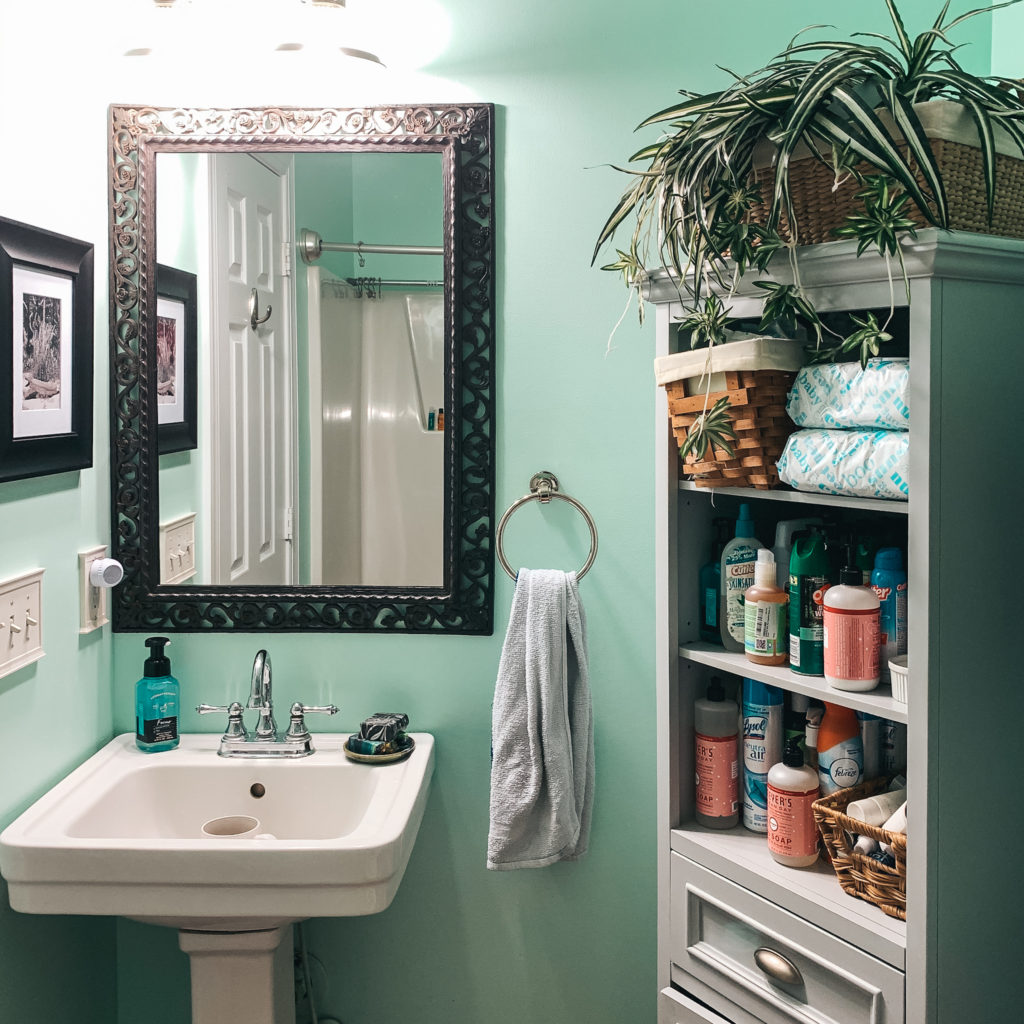
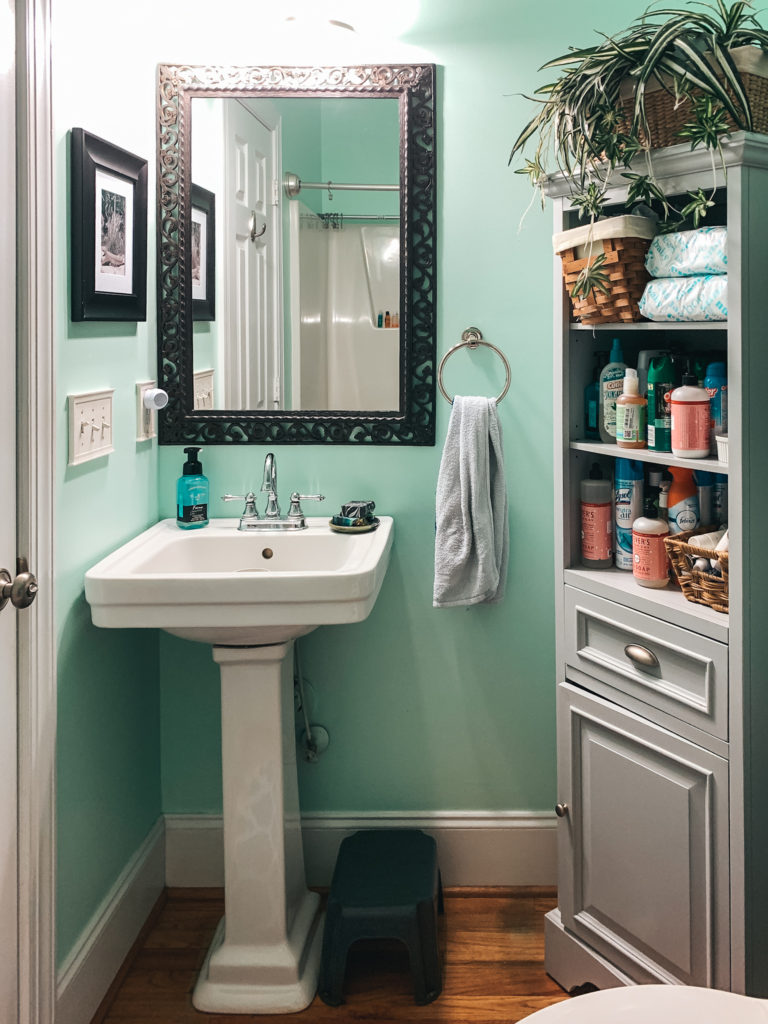
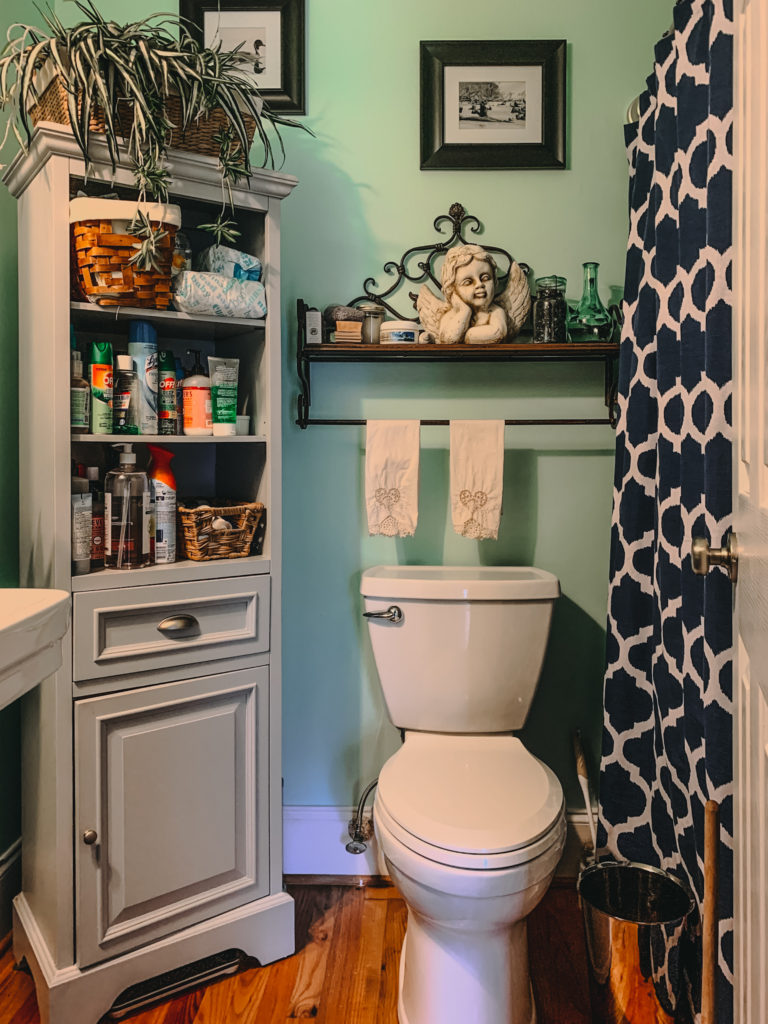
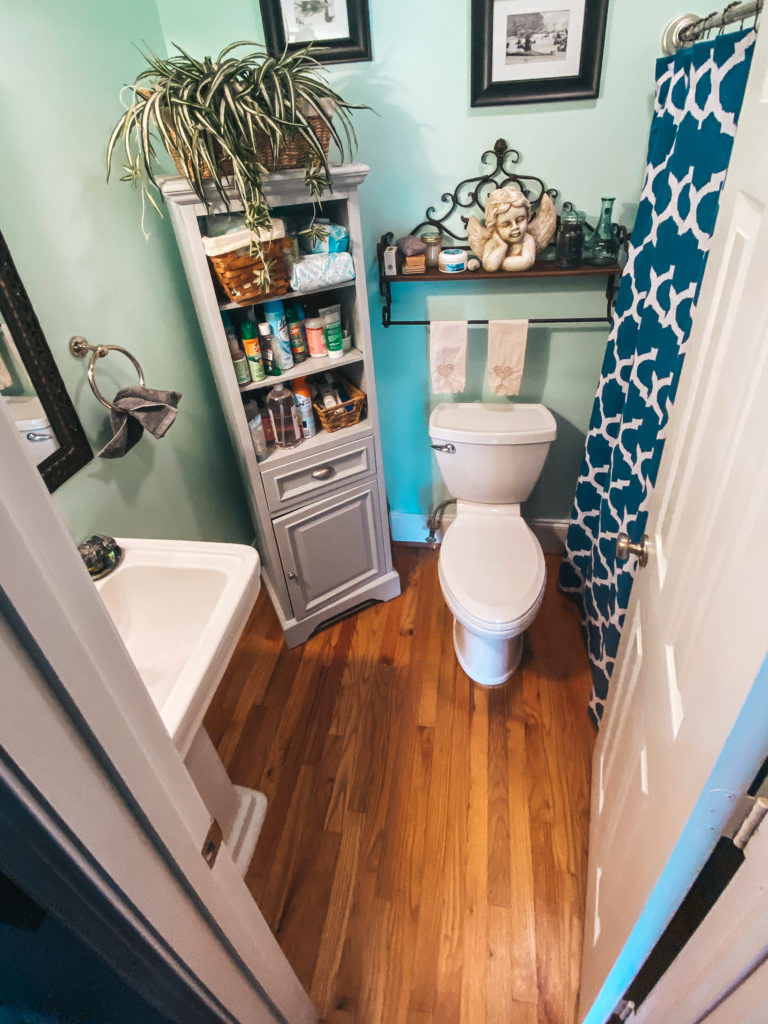
BEFORE (also see “Zzzzzzzzz” in the dictionary):

How To Create A Historic Bathroom In A New Home


AFTER (and the clouds parted…):

How To Create A Historic Bathroom In A New Home


BEFORE:

How To Create A Historic Bathroom In A New Home


AFTER:

How To Create A Historic Bathroom In A New Home


BEFORE:

How To Create A Historic Bathroom In A New Home


AFTER:

How To Create A Historic Bathroom In A New Home


BEFORE:

How To Create A Historic Bathroom In A New Home


AFTER:

How To Create A Historic Bathroom In A New Home


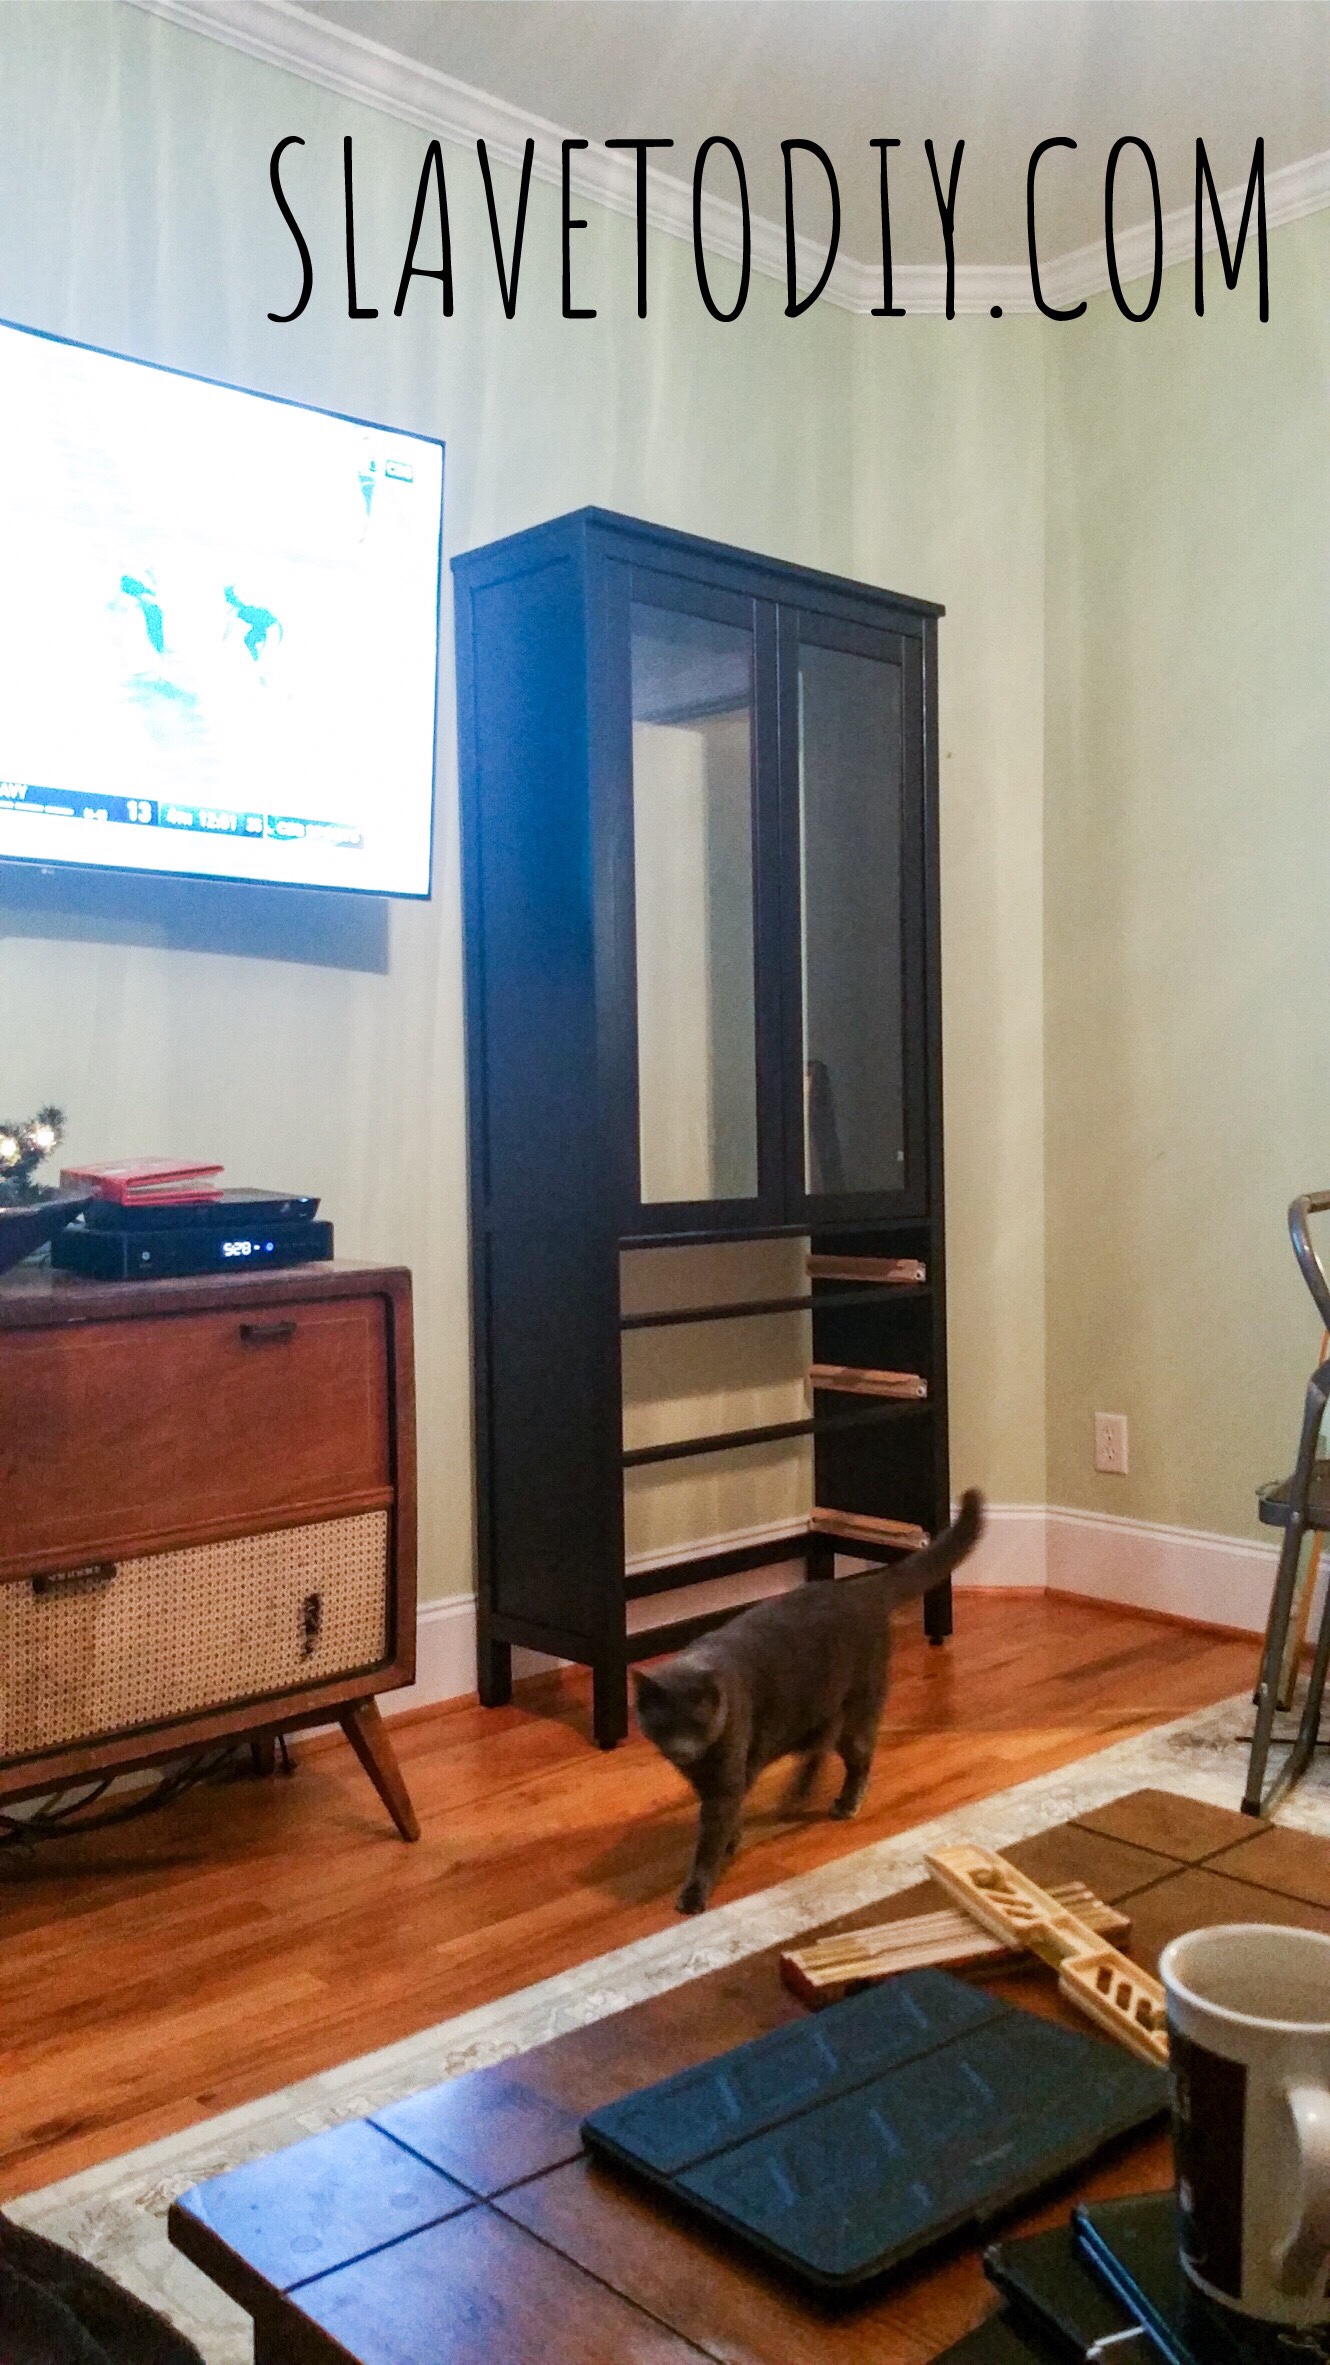
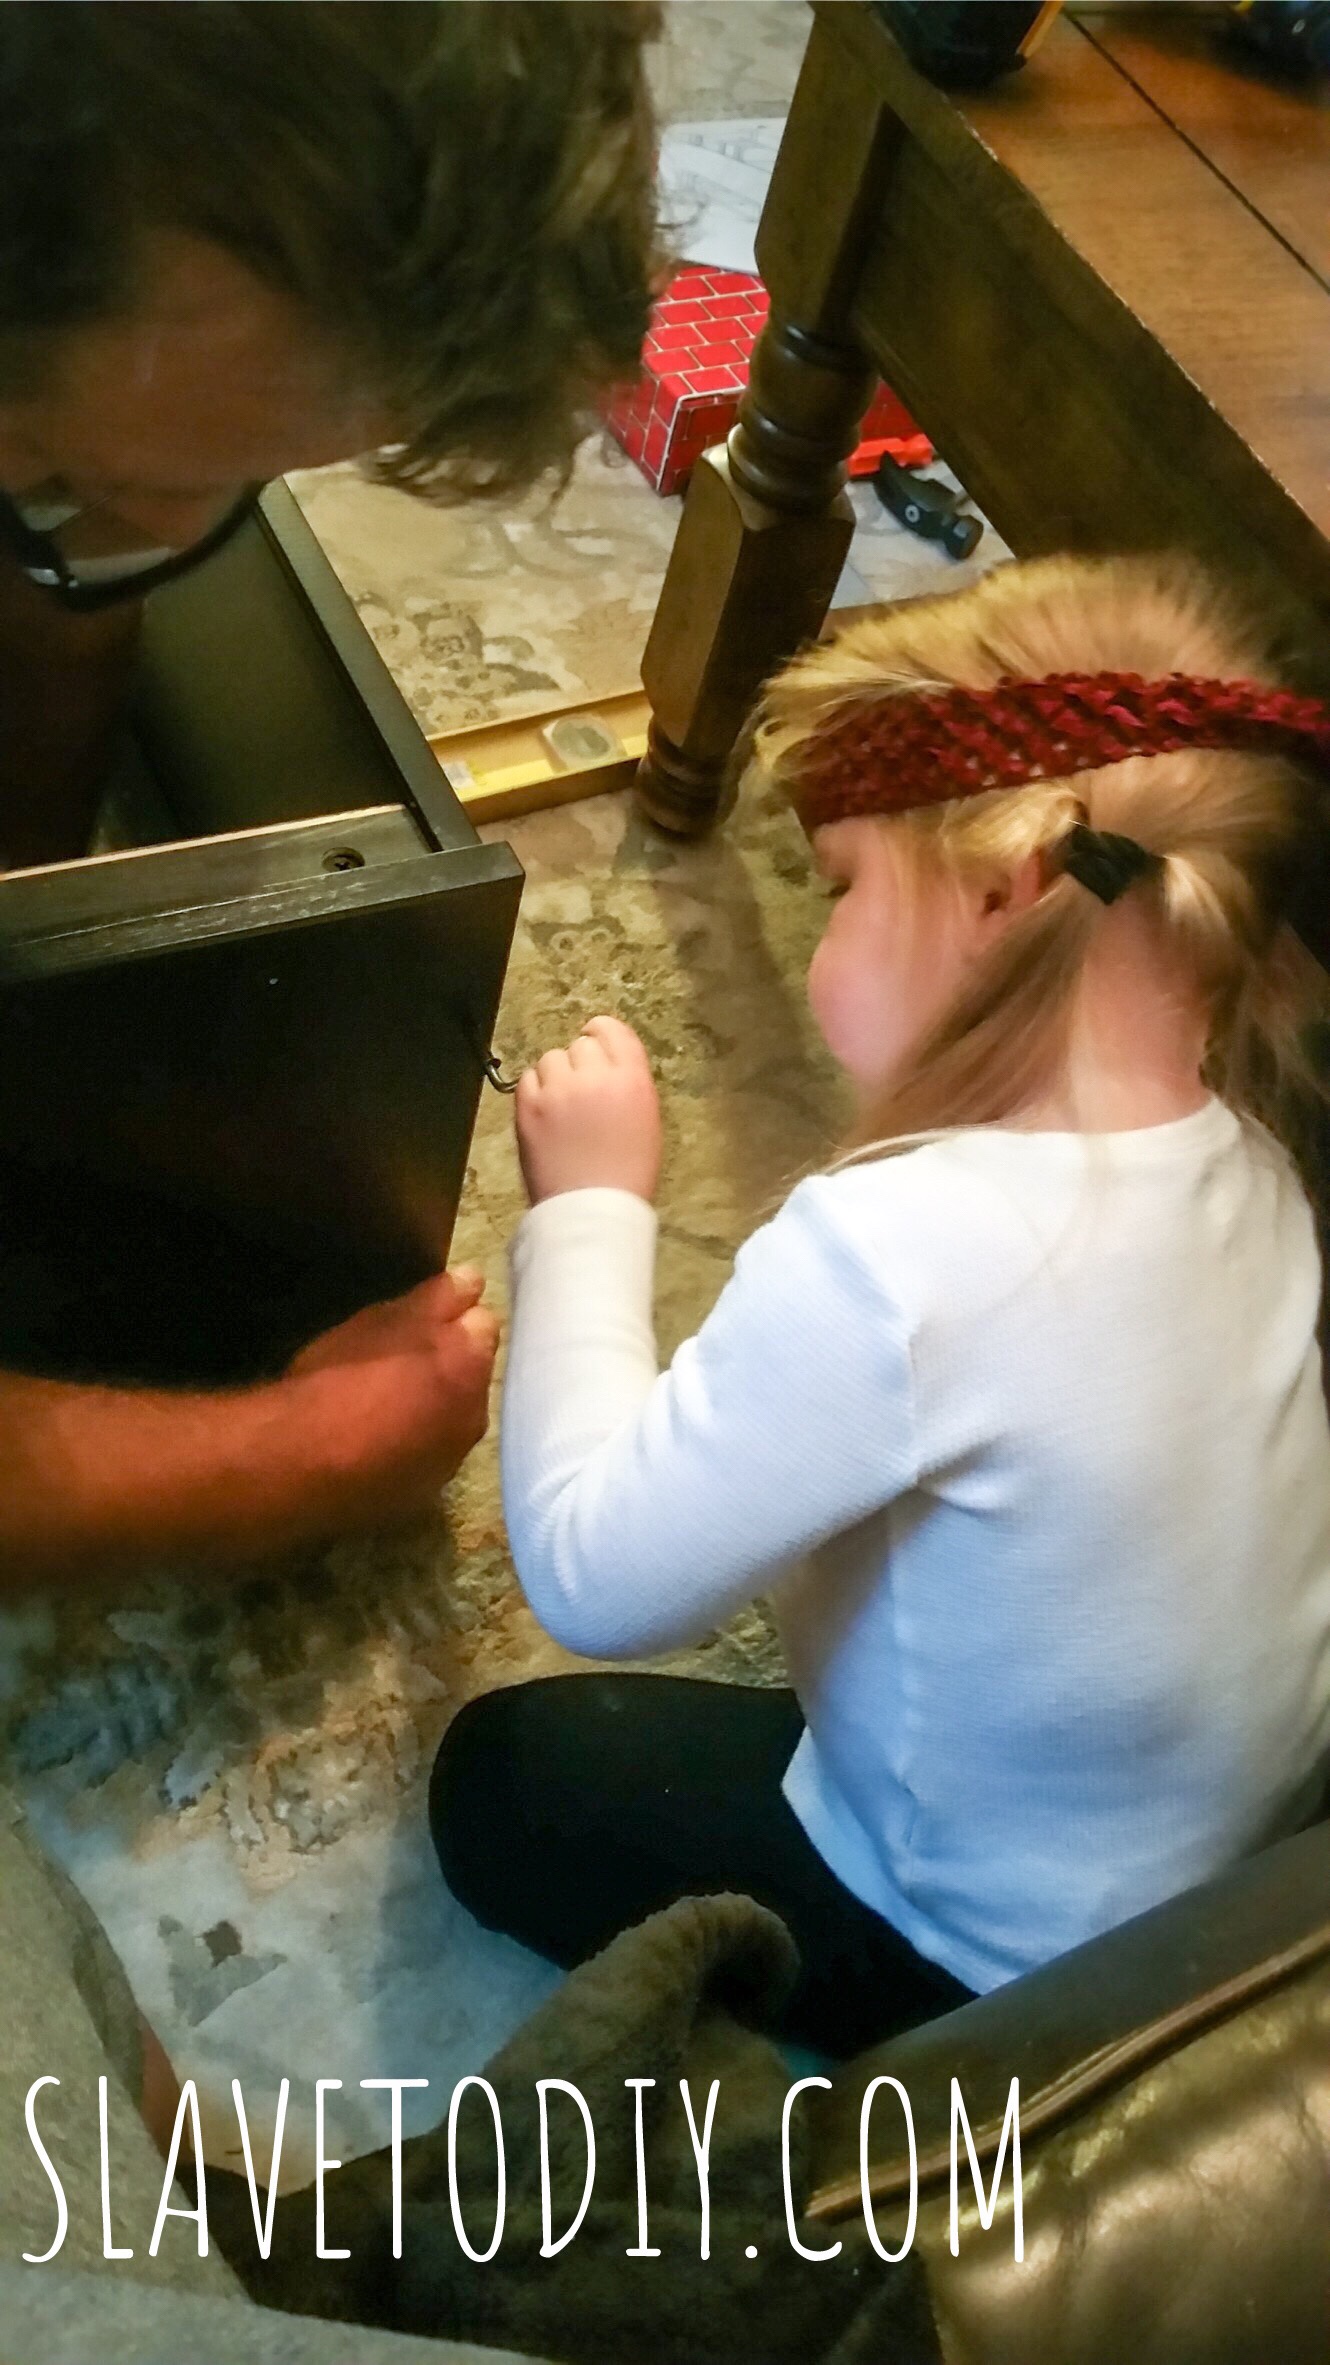
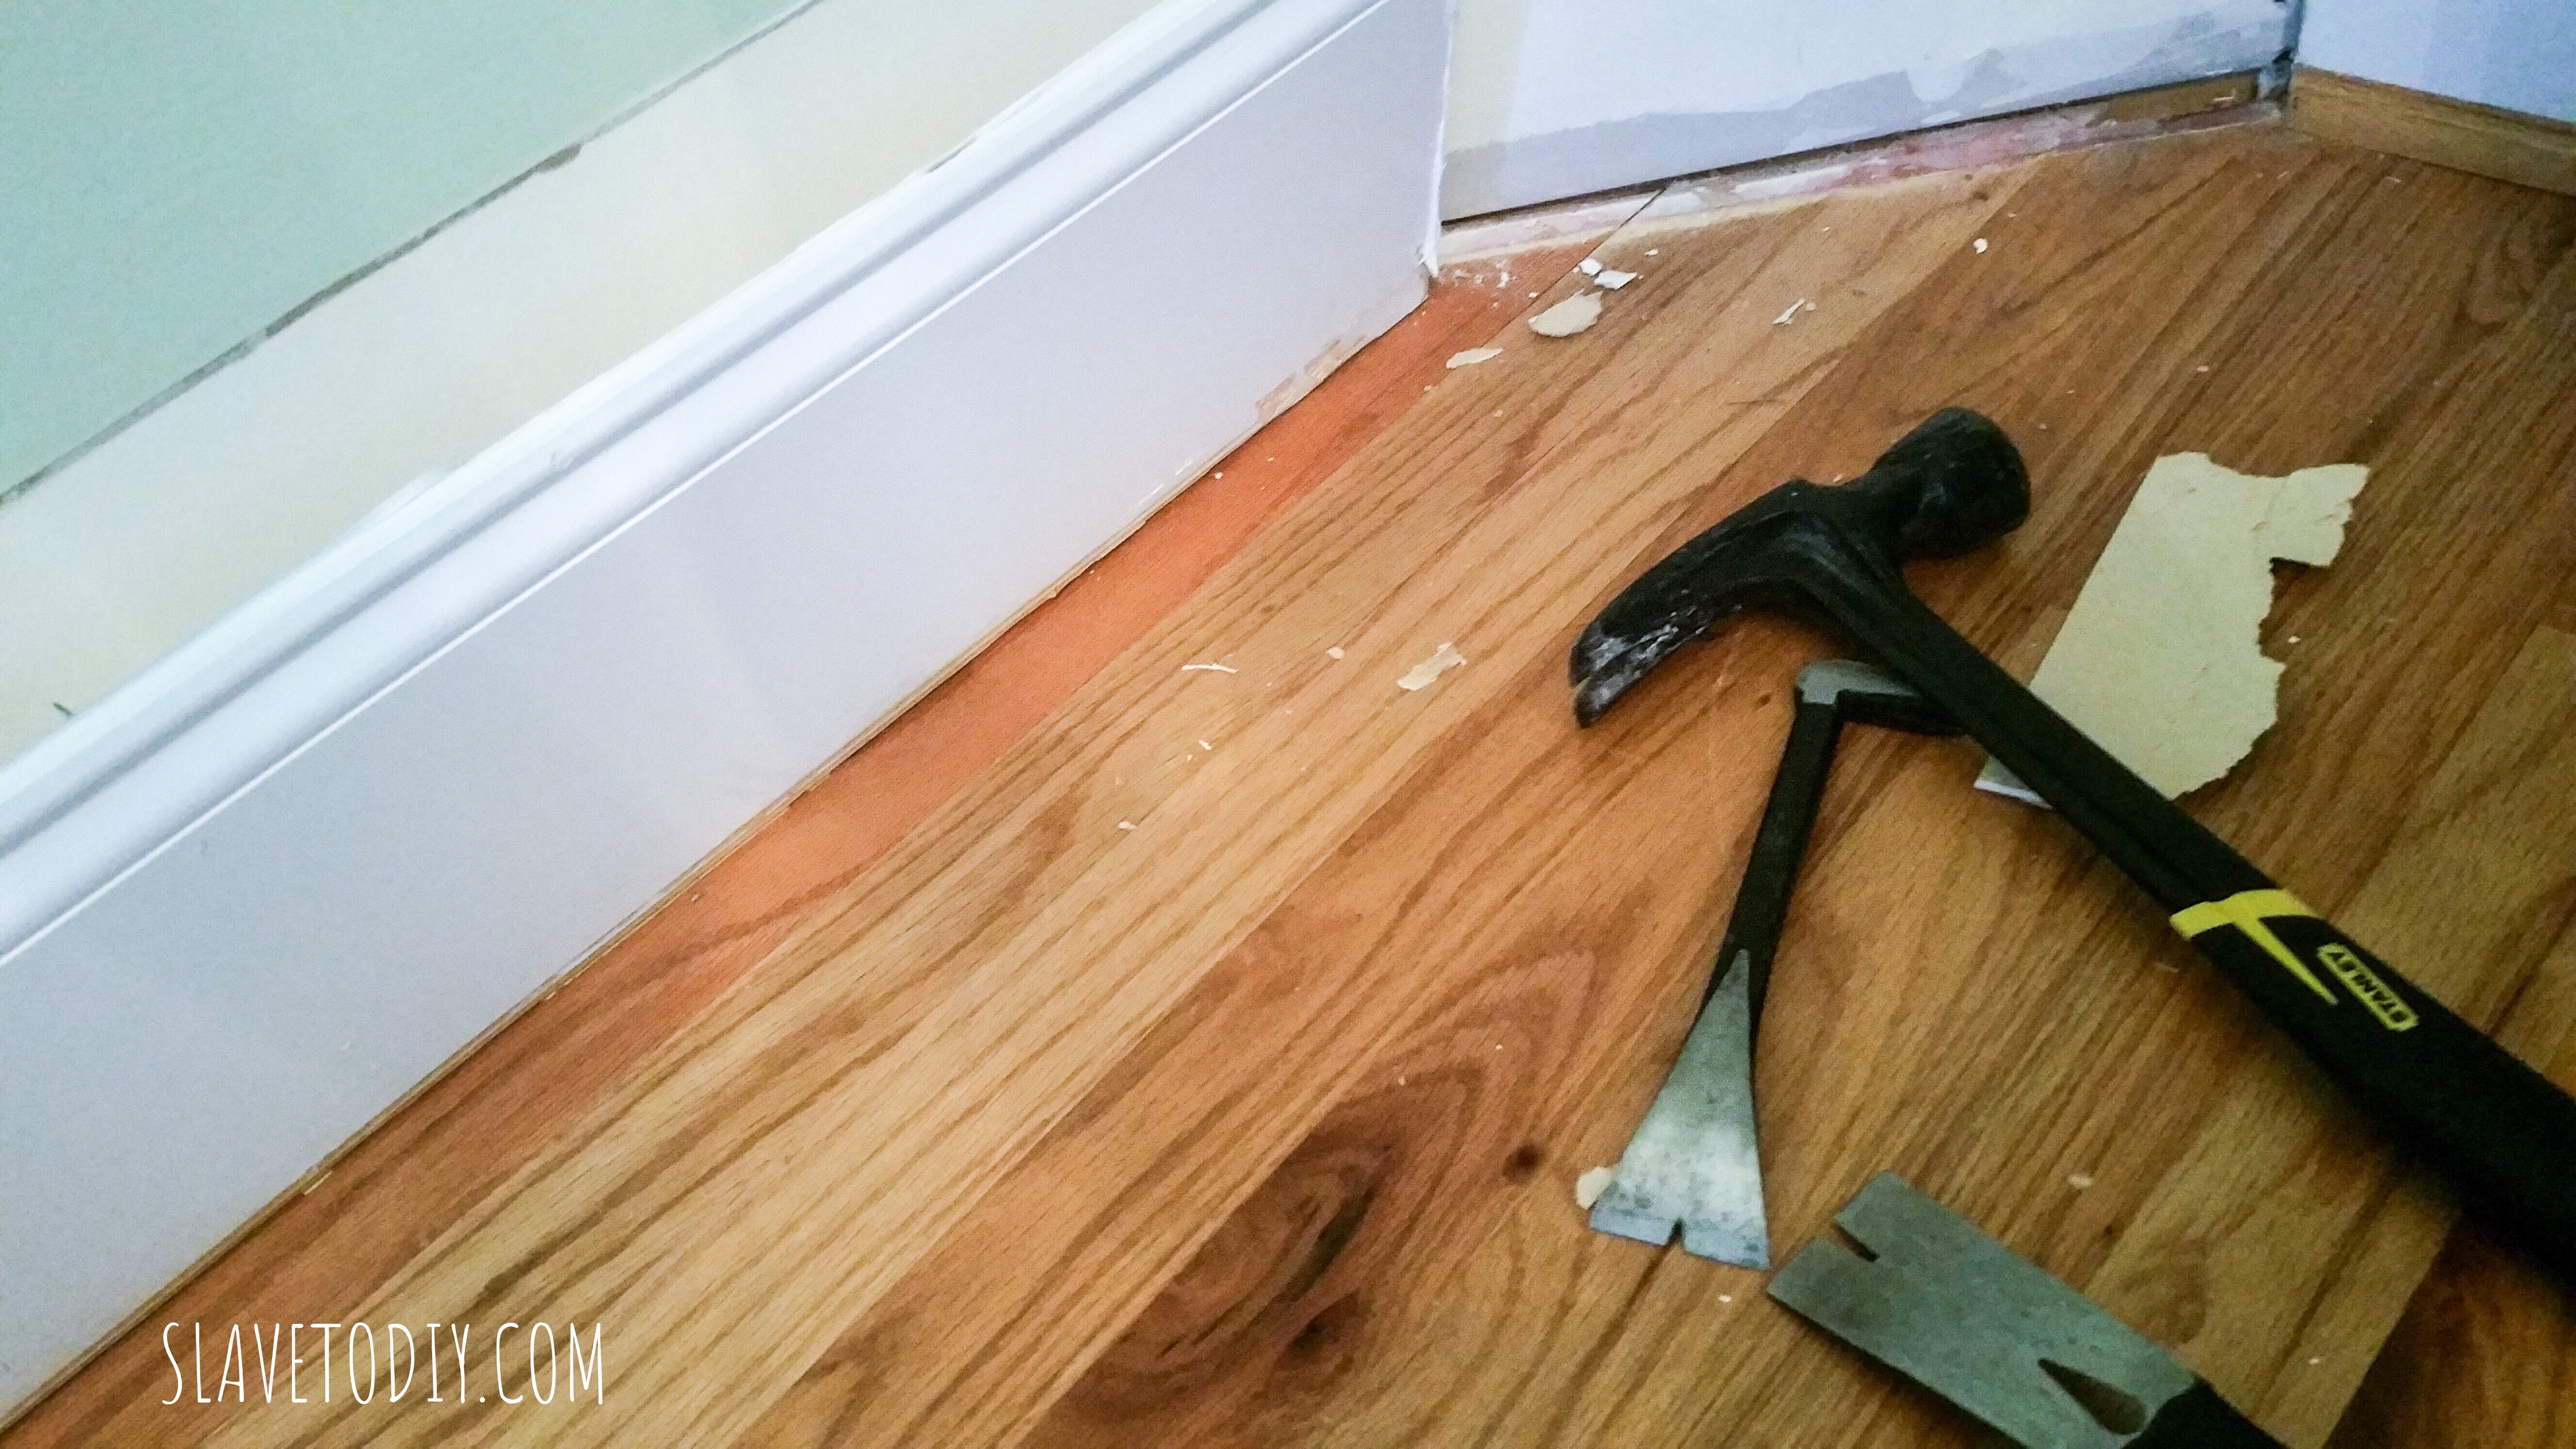
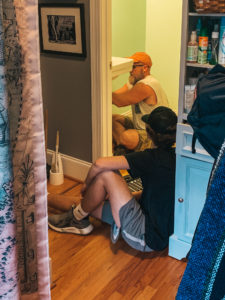
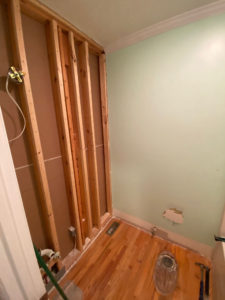
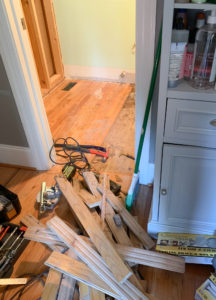
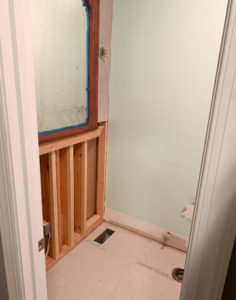
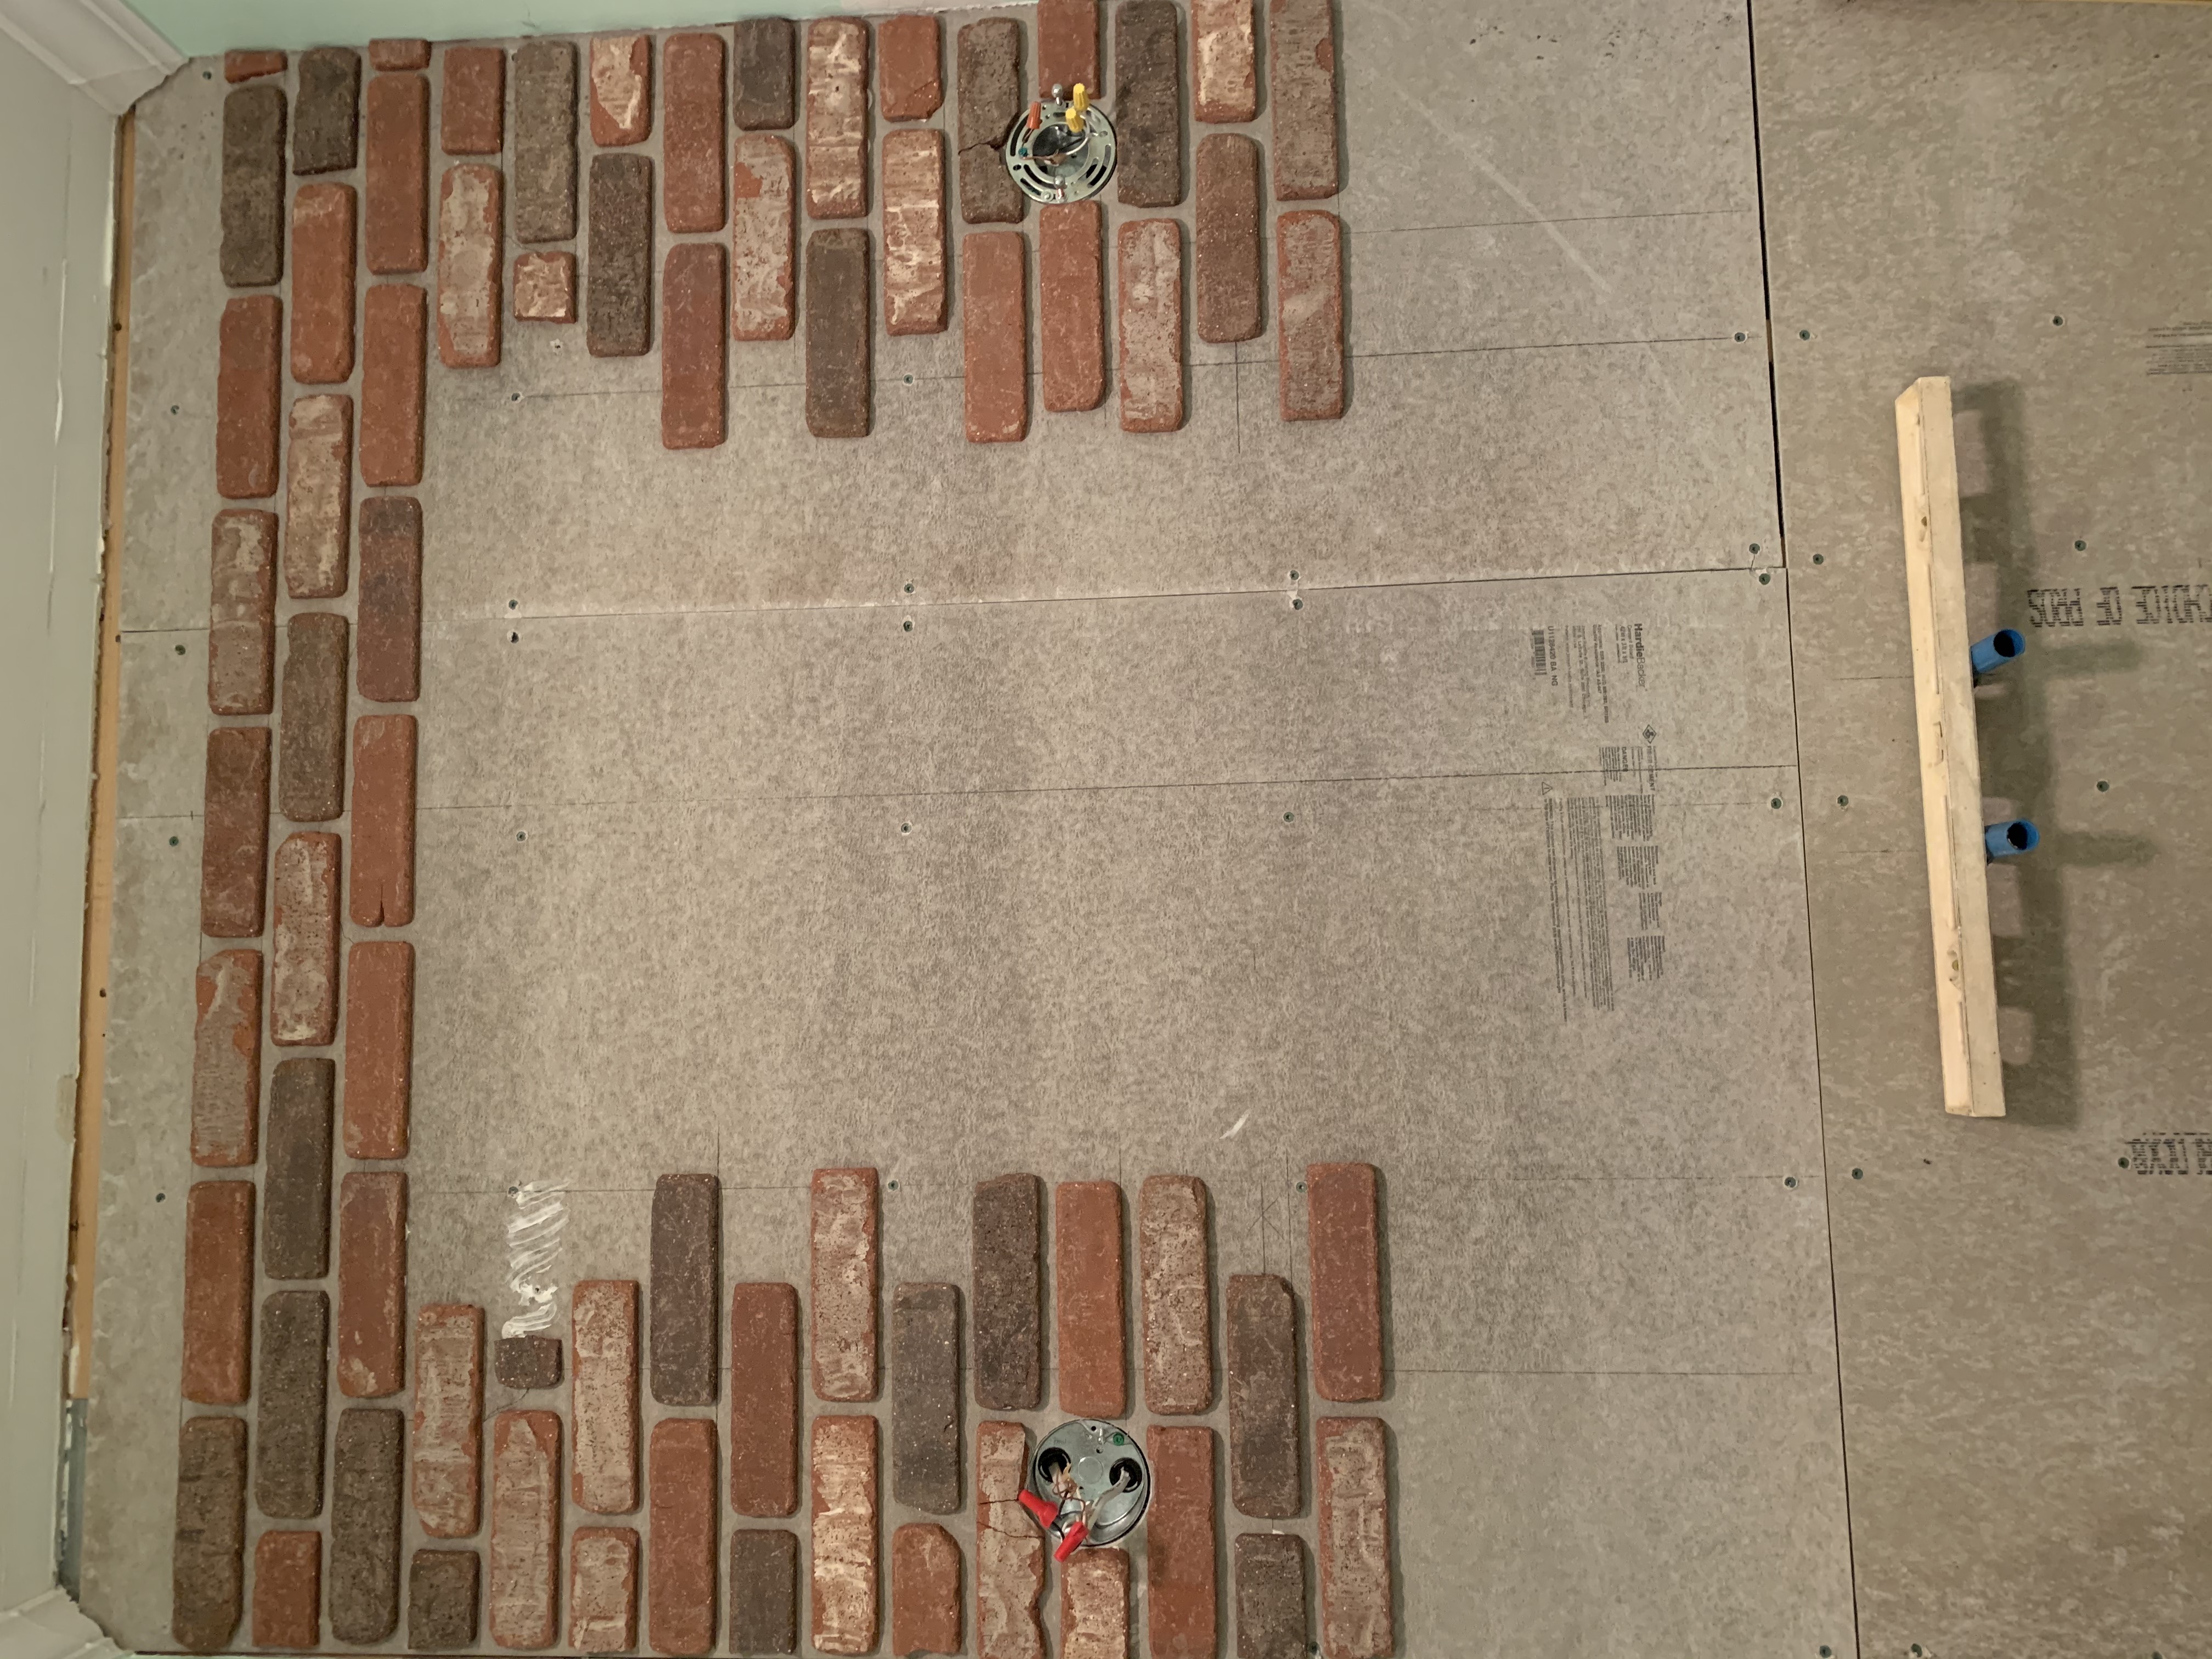
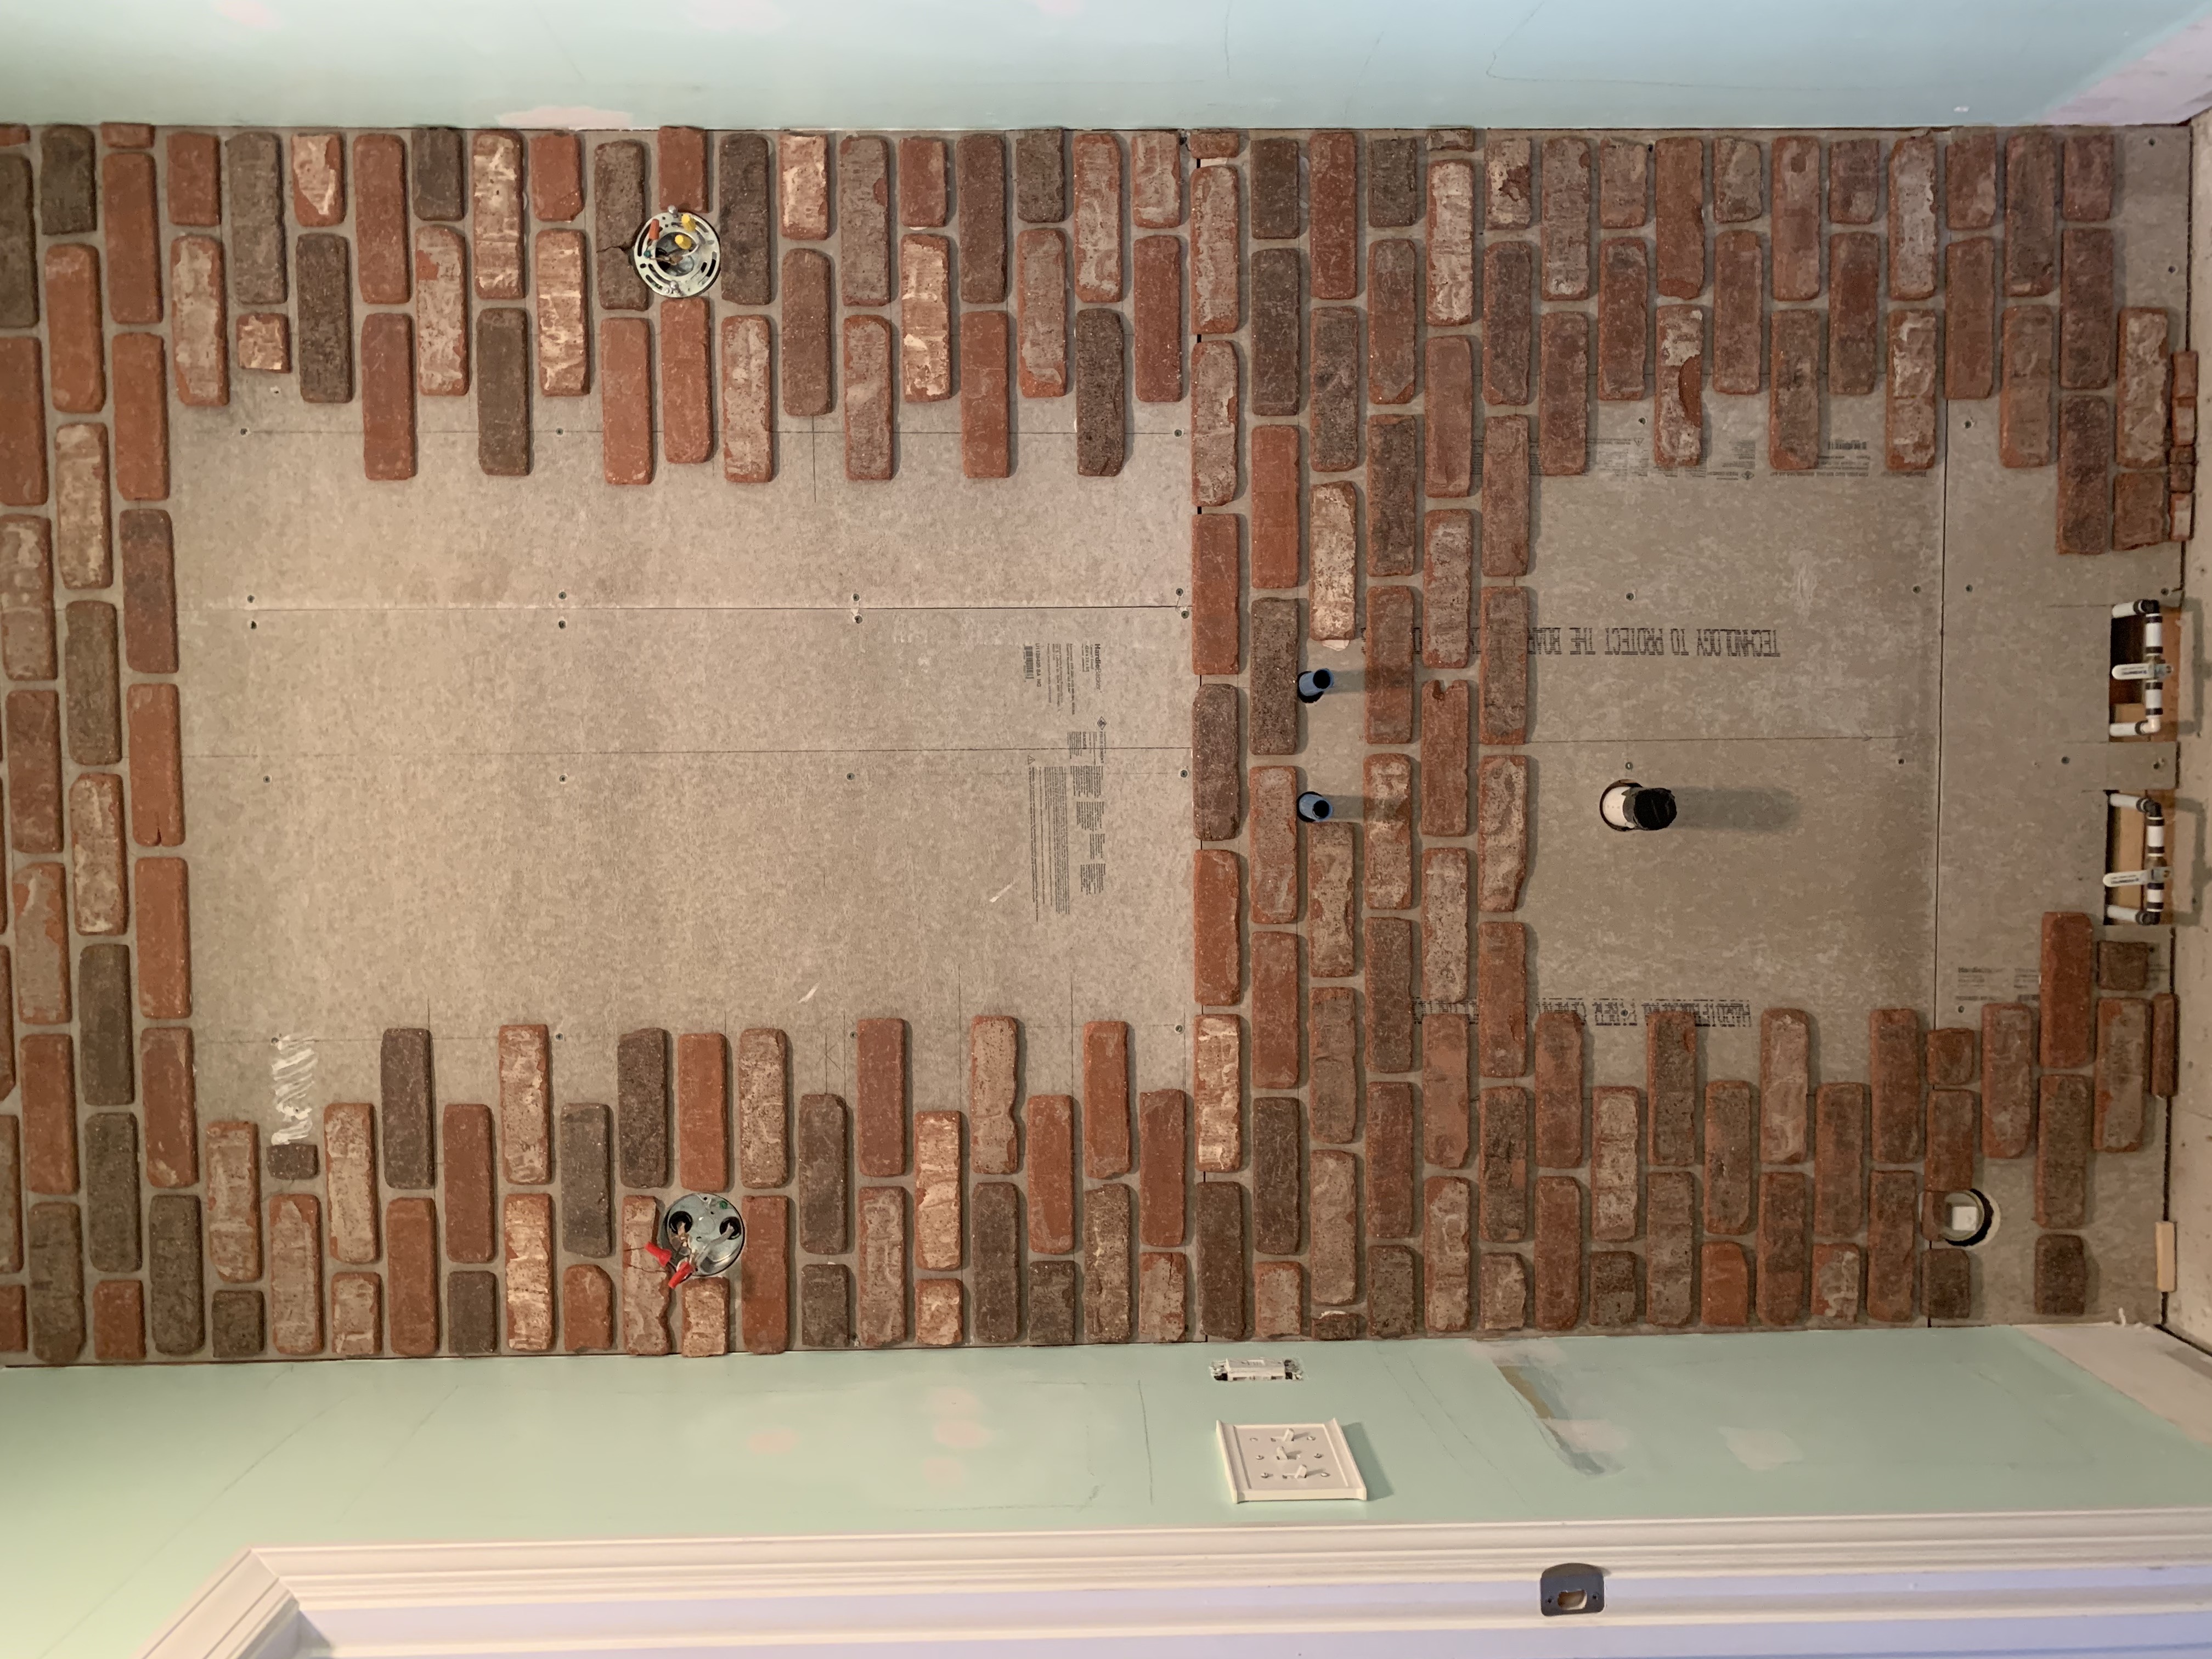
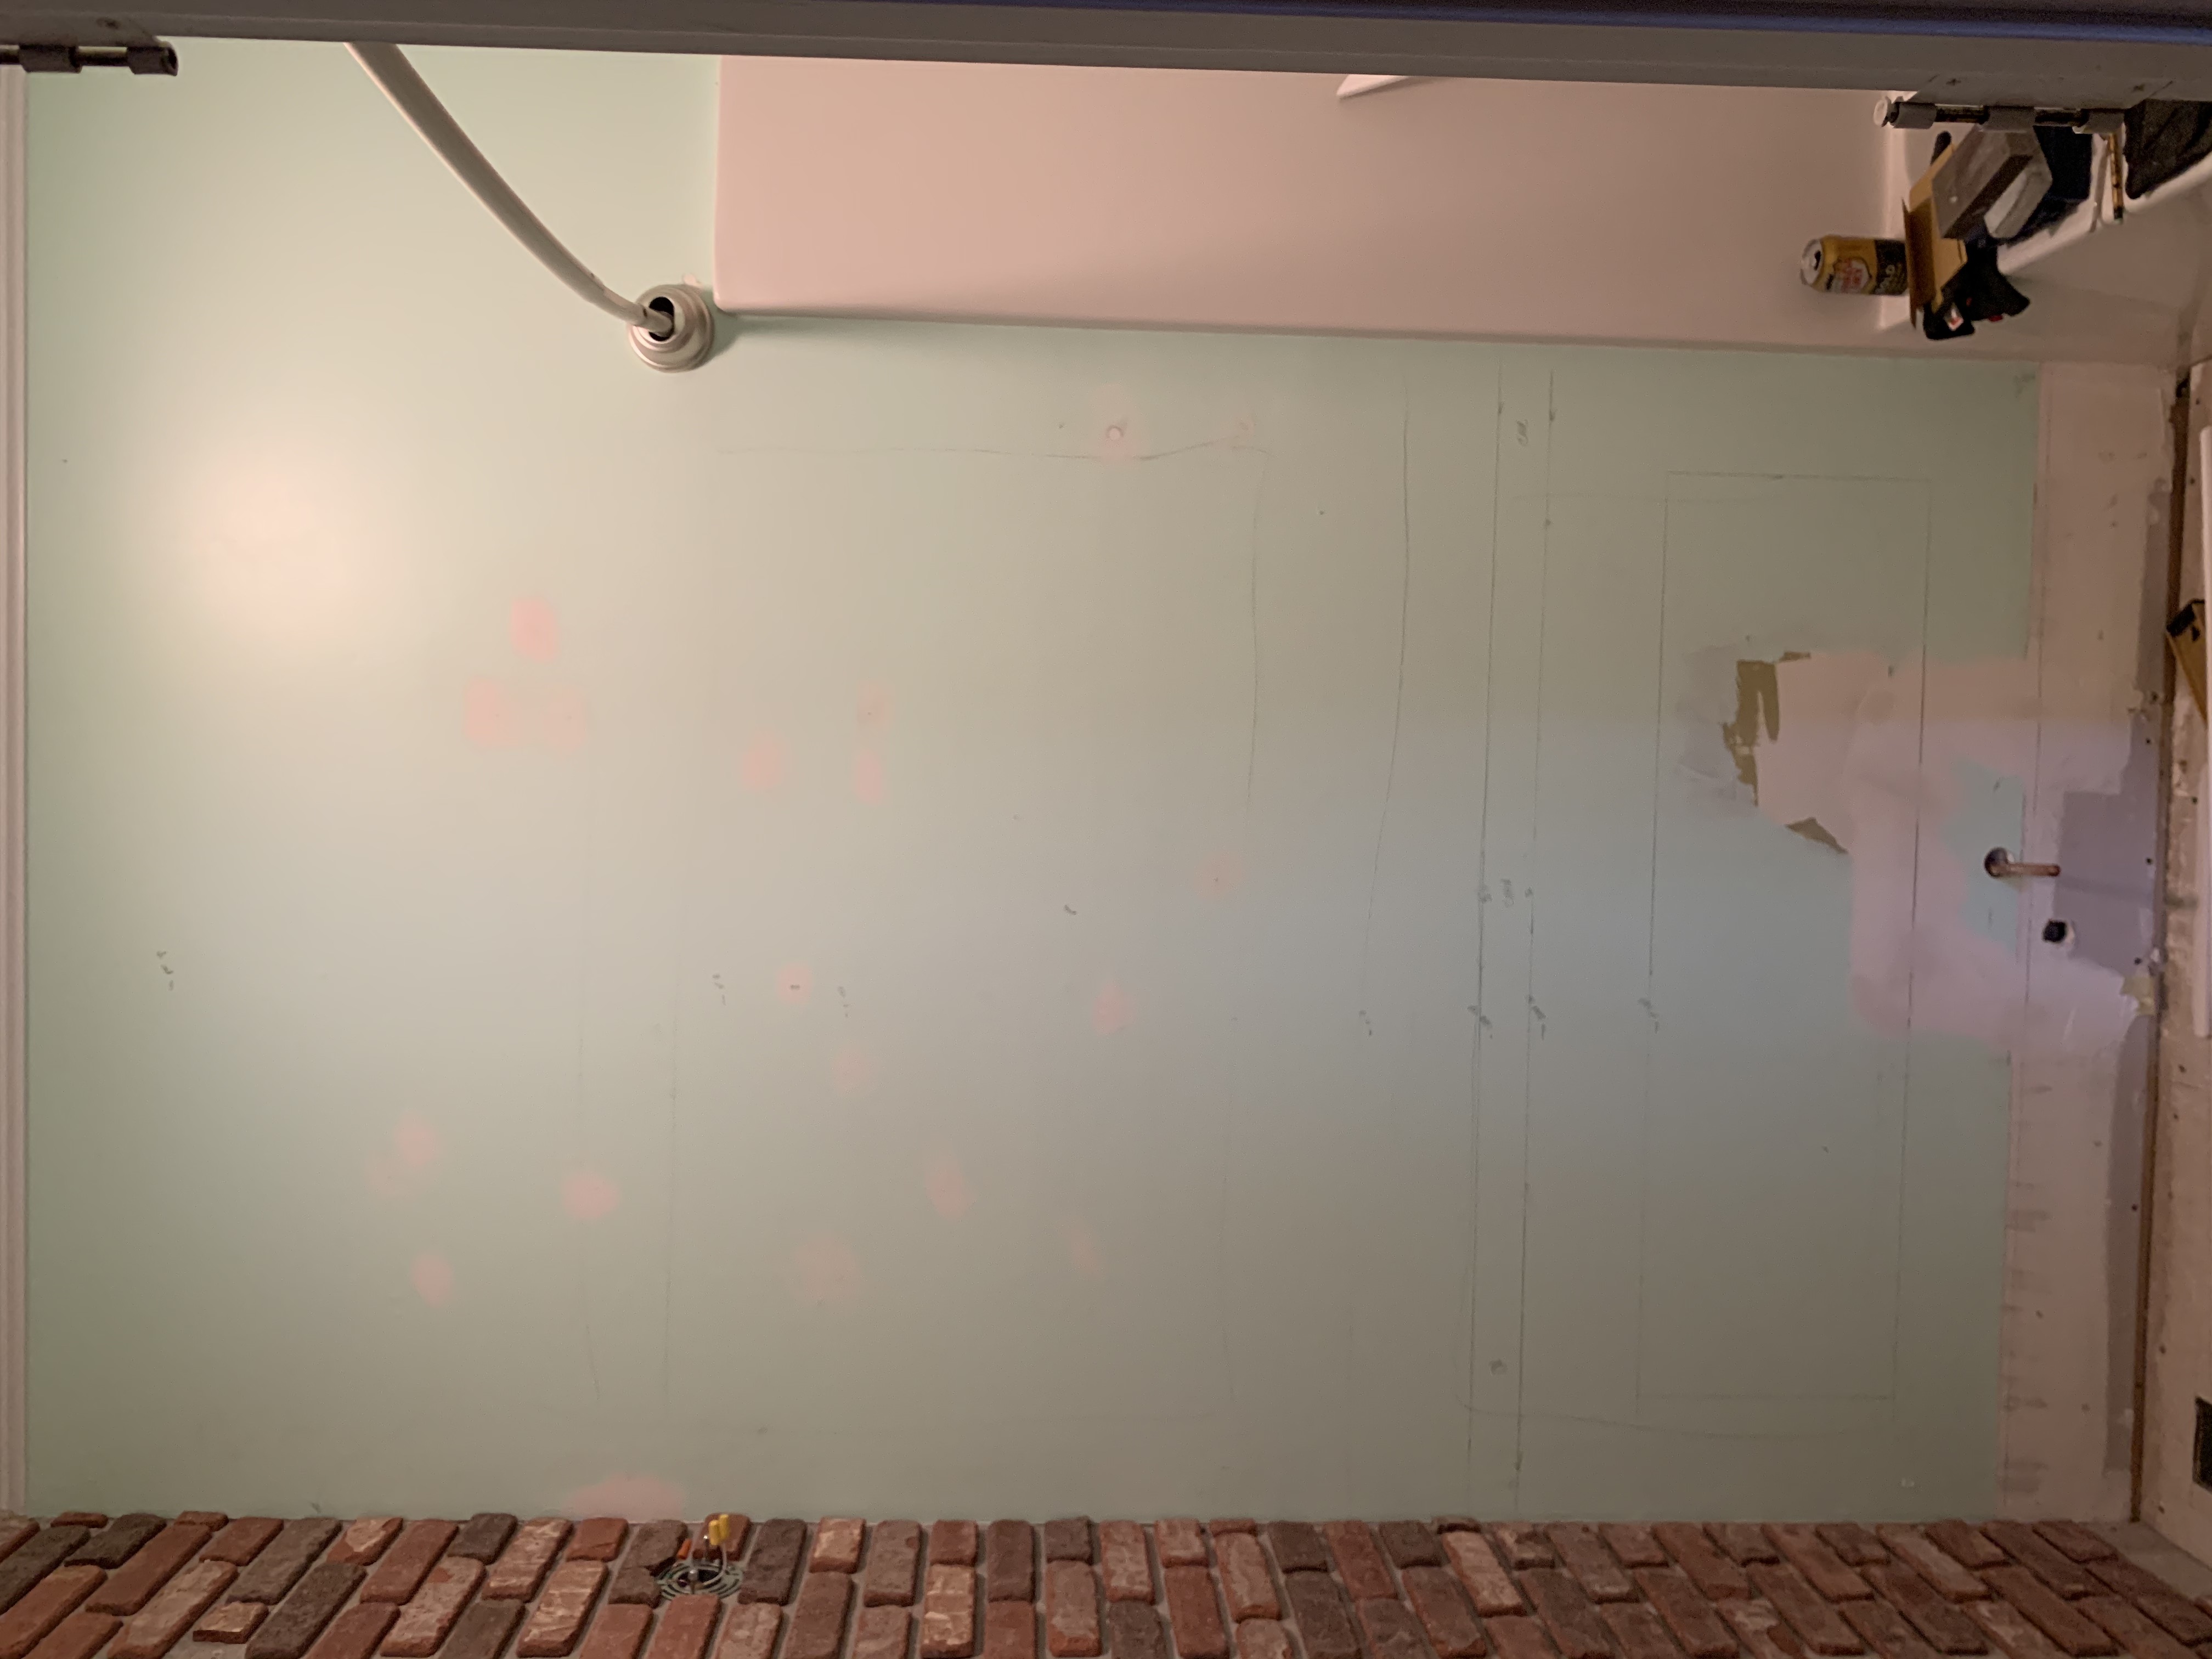
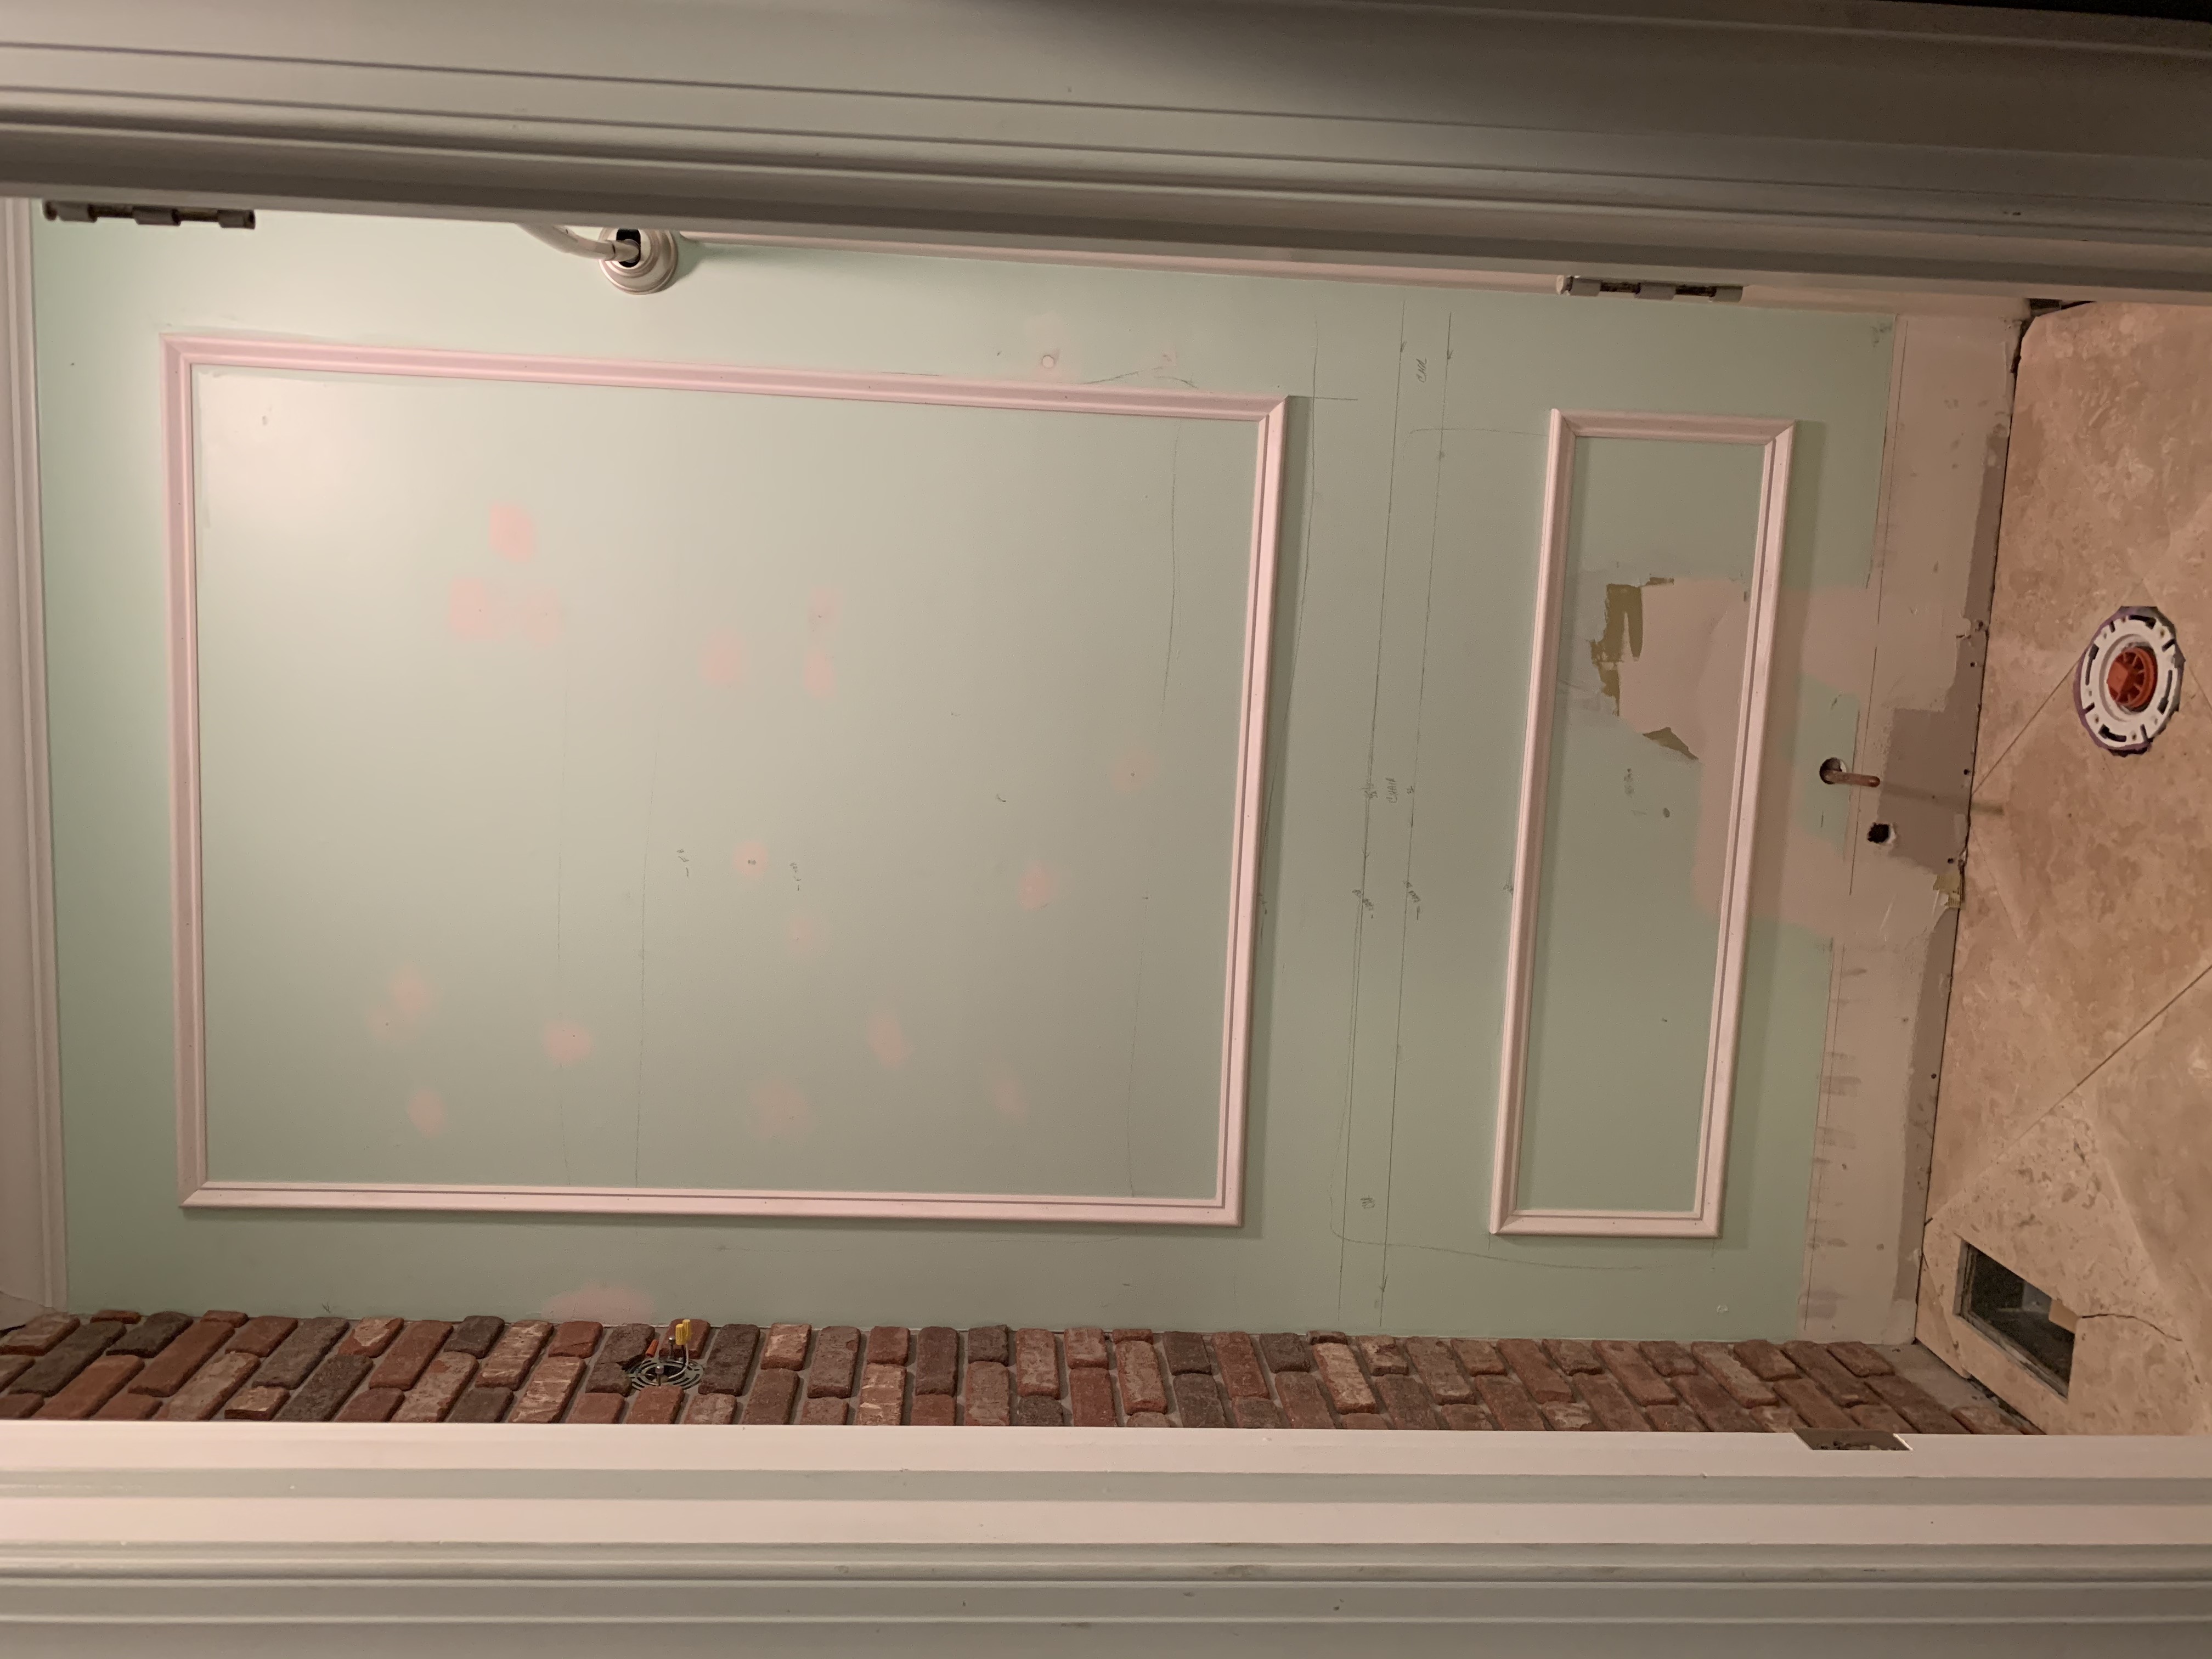
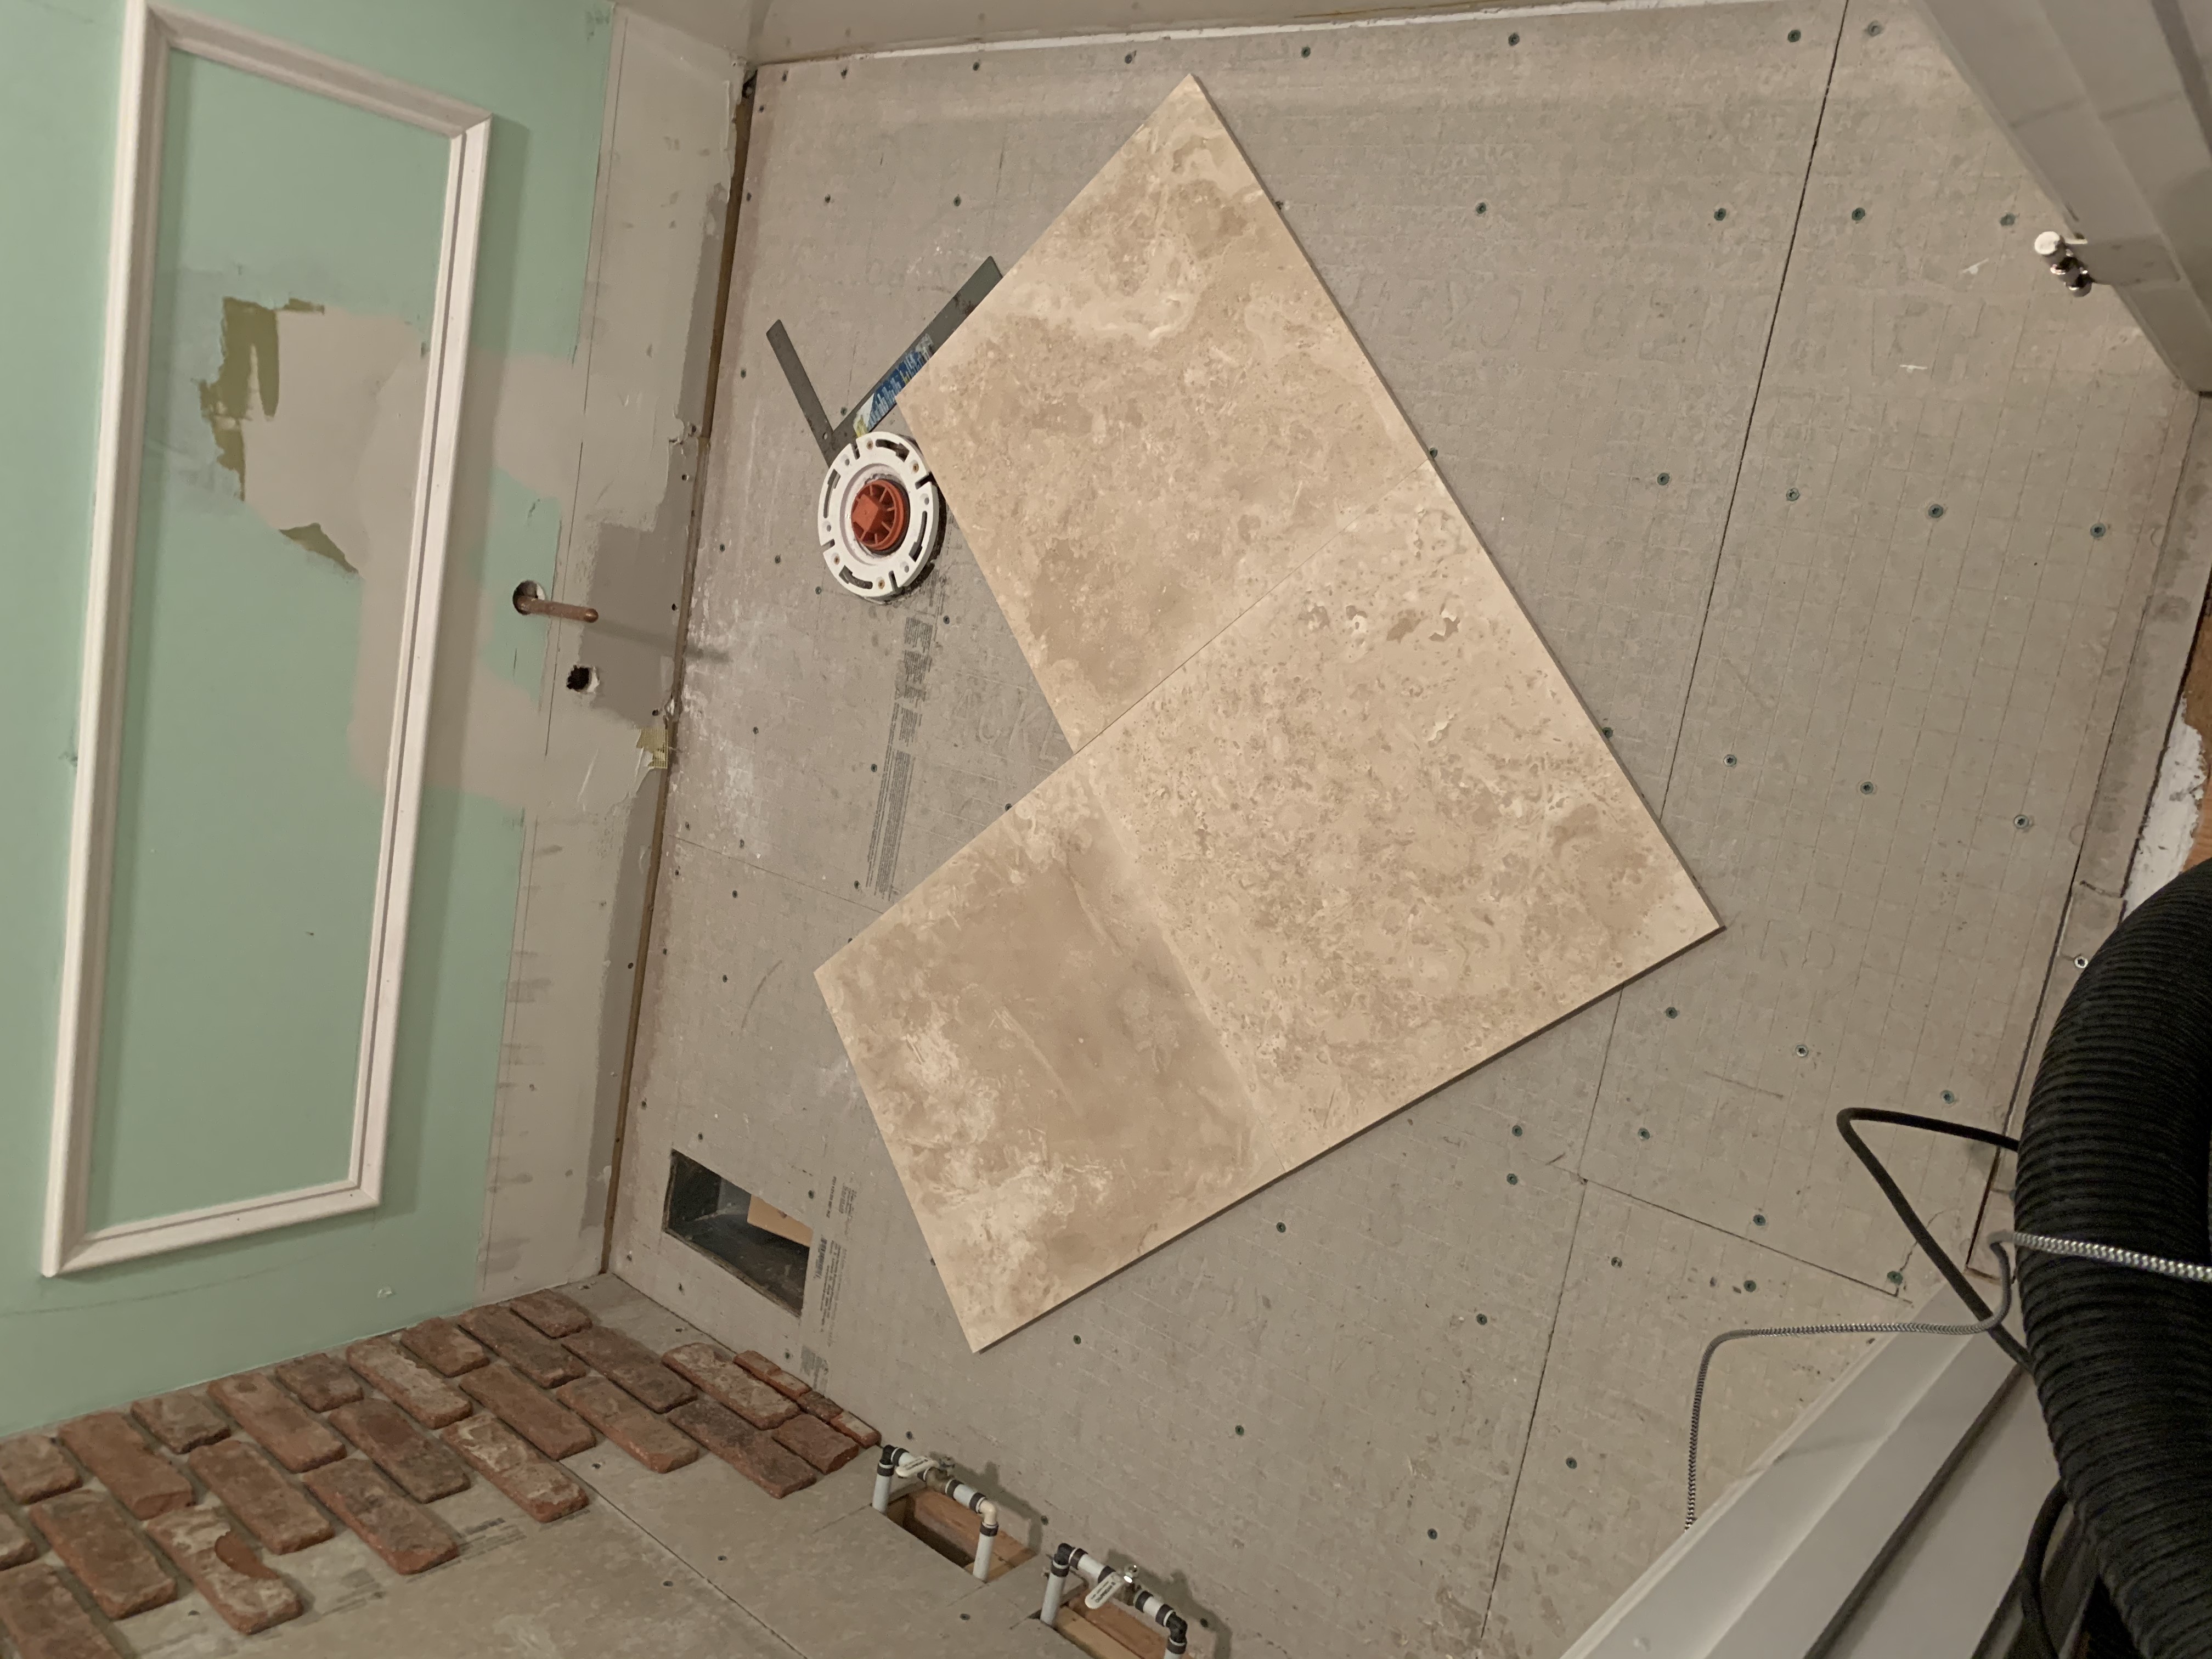
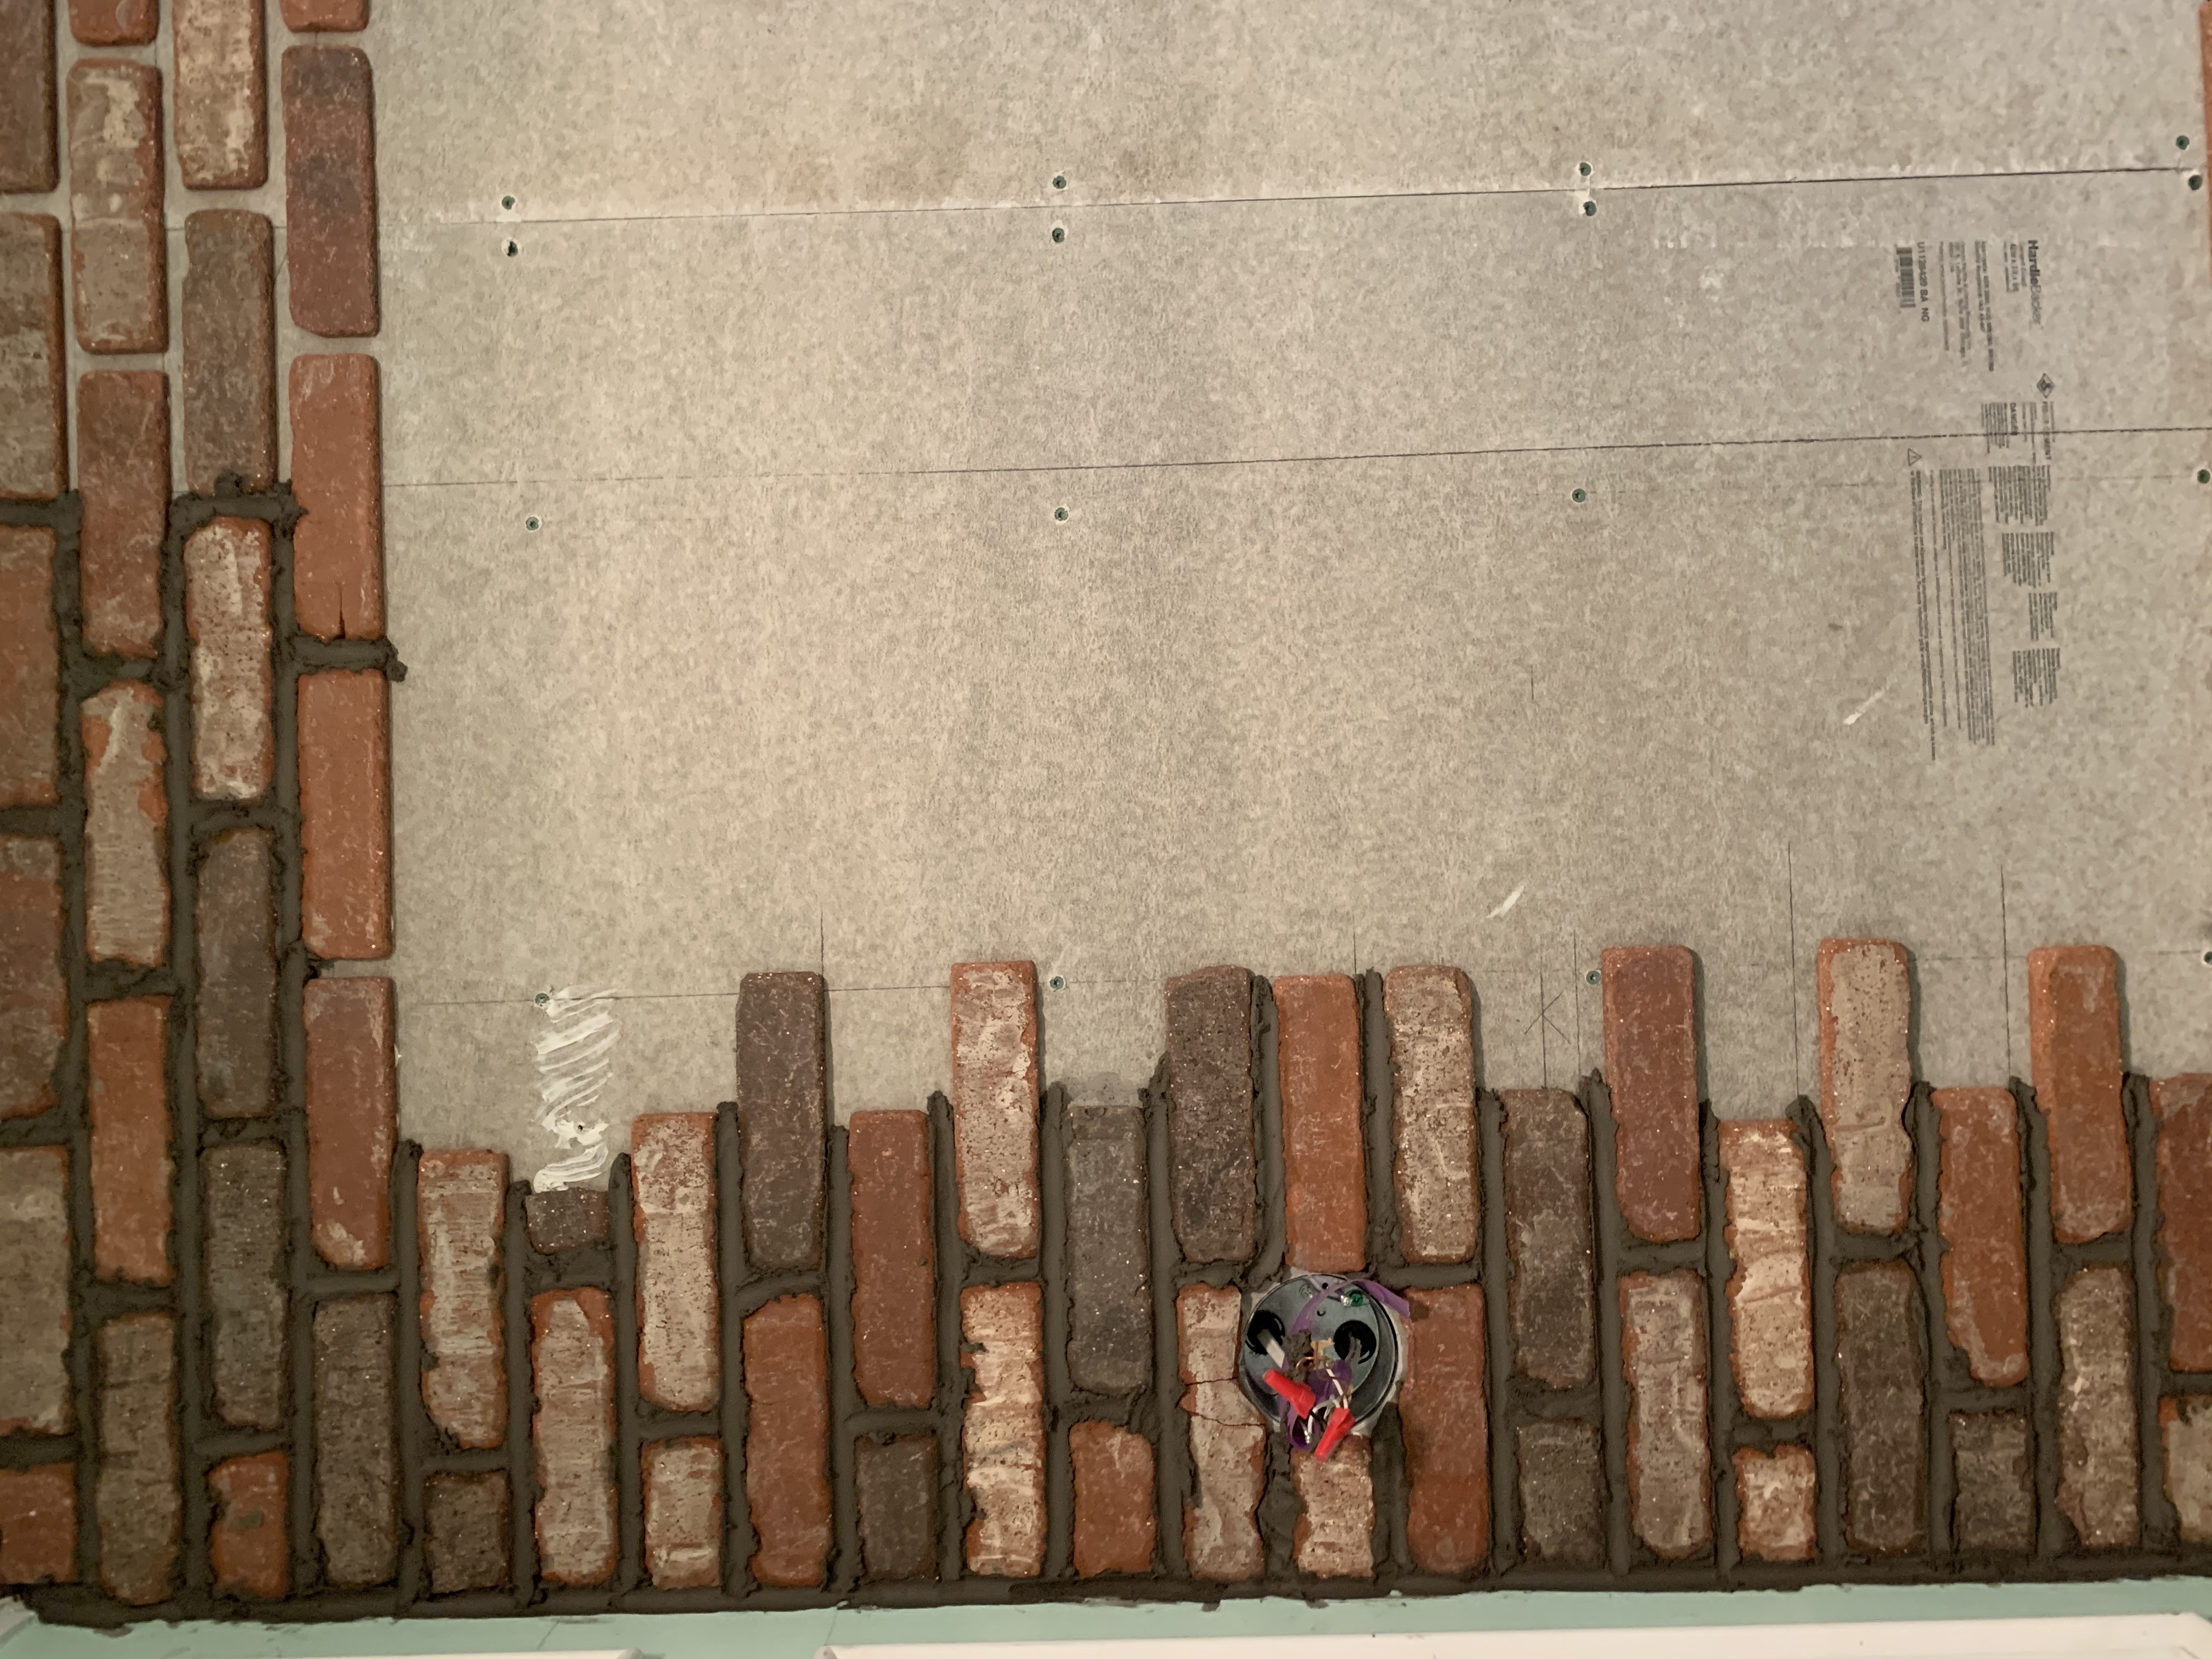
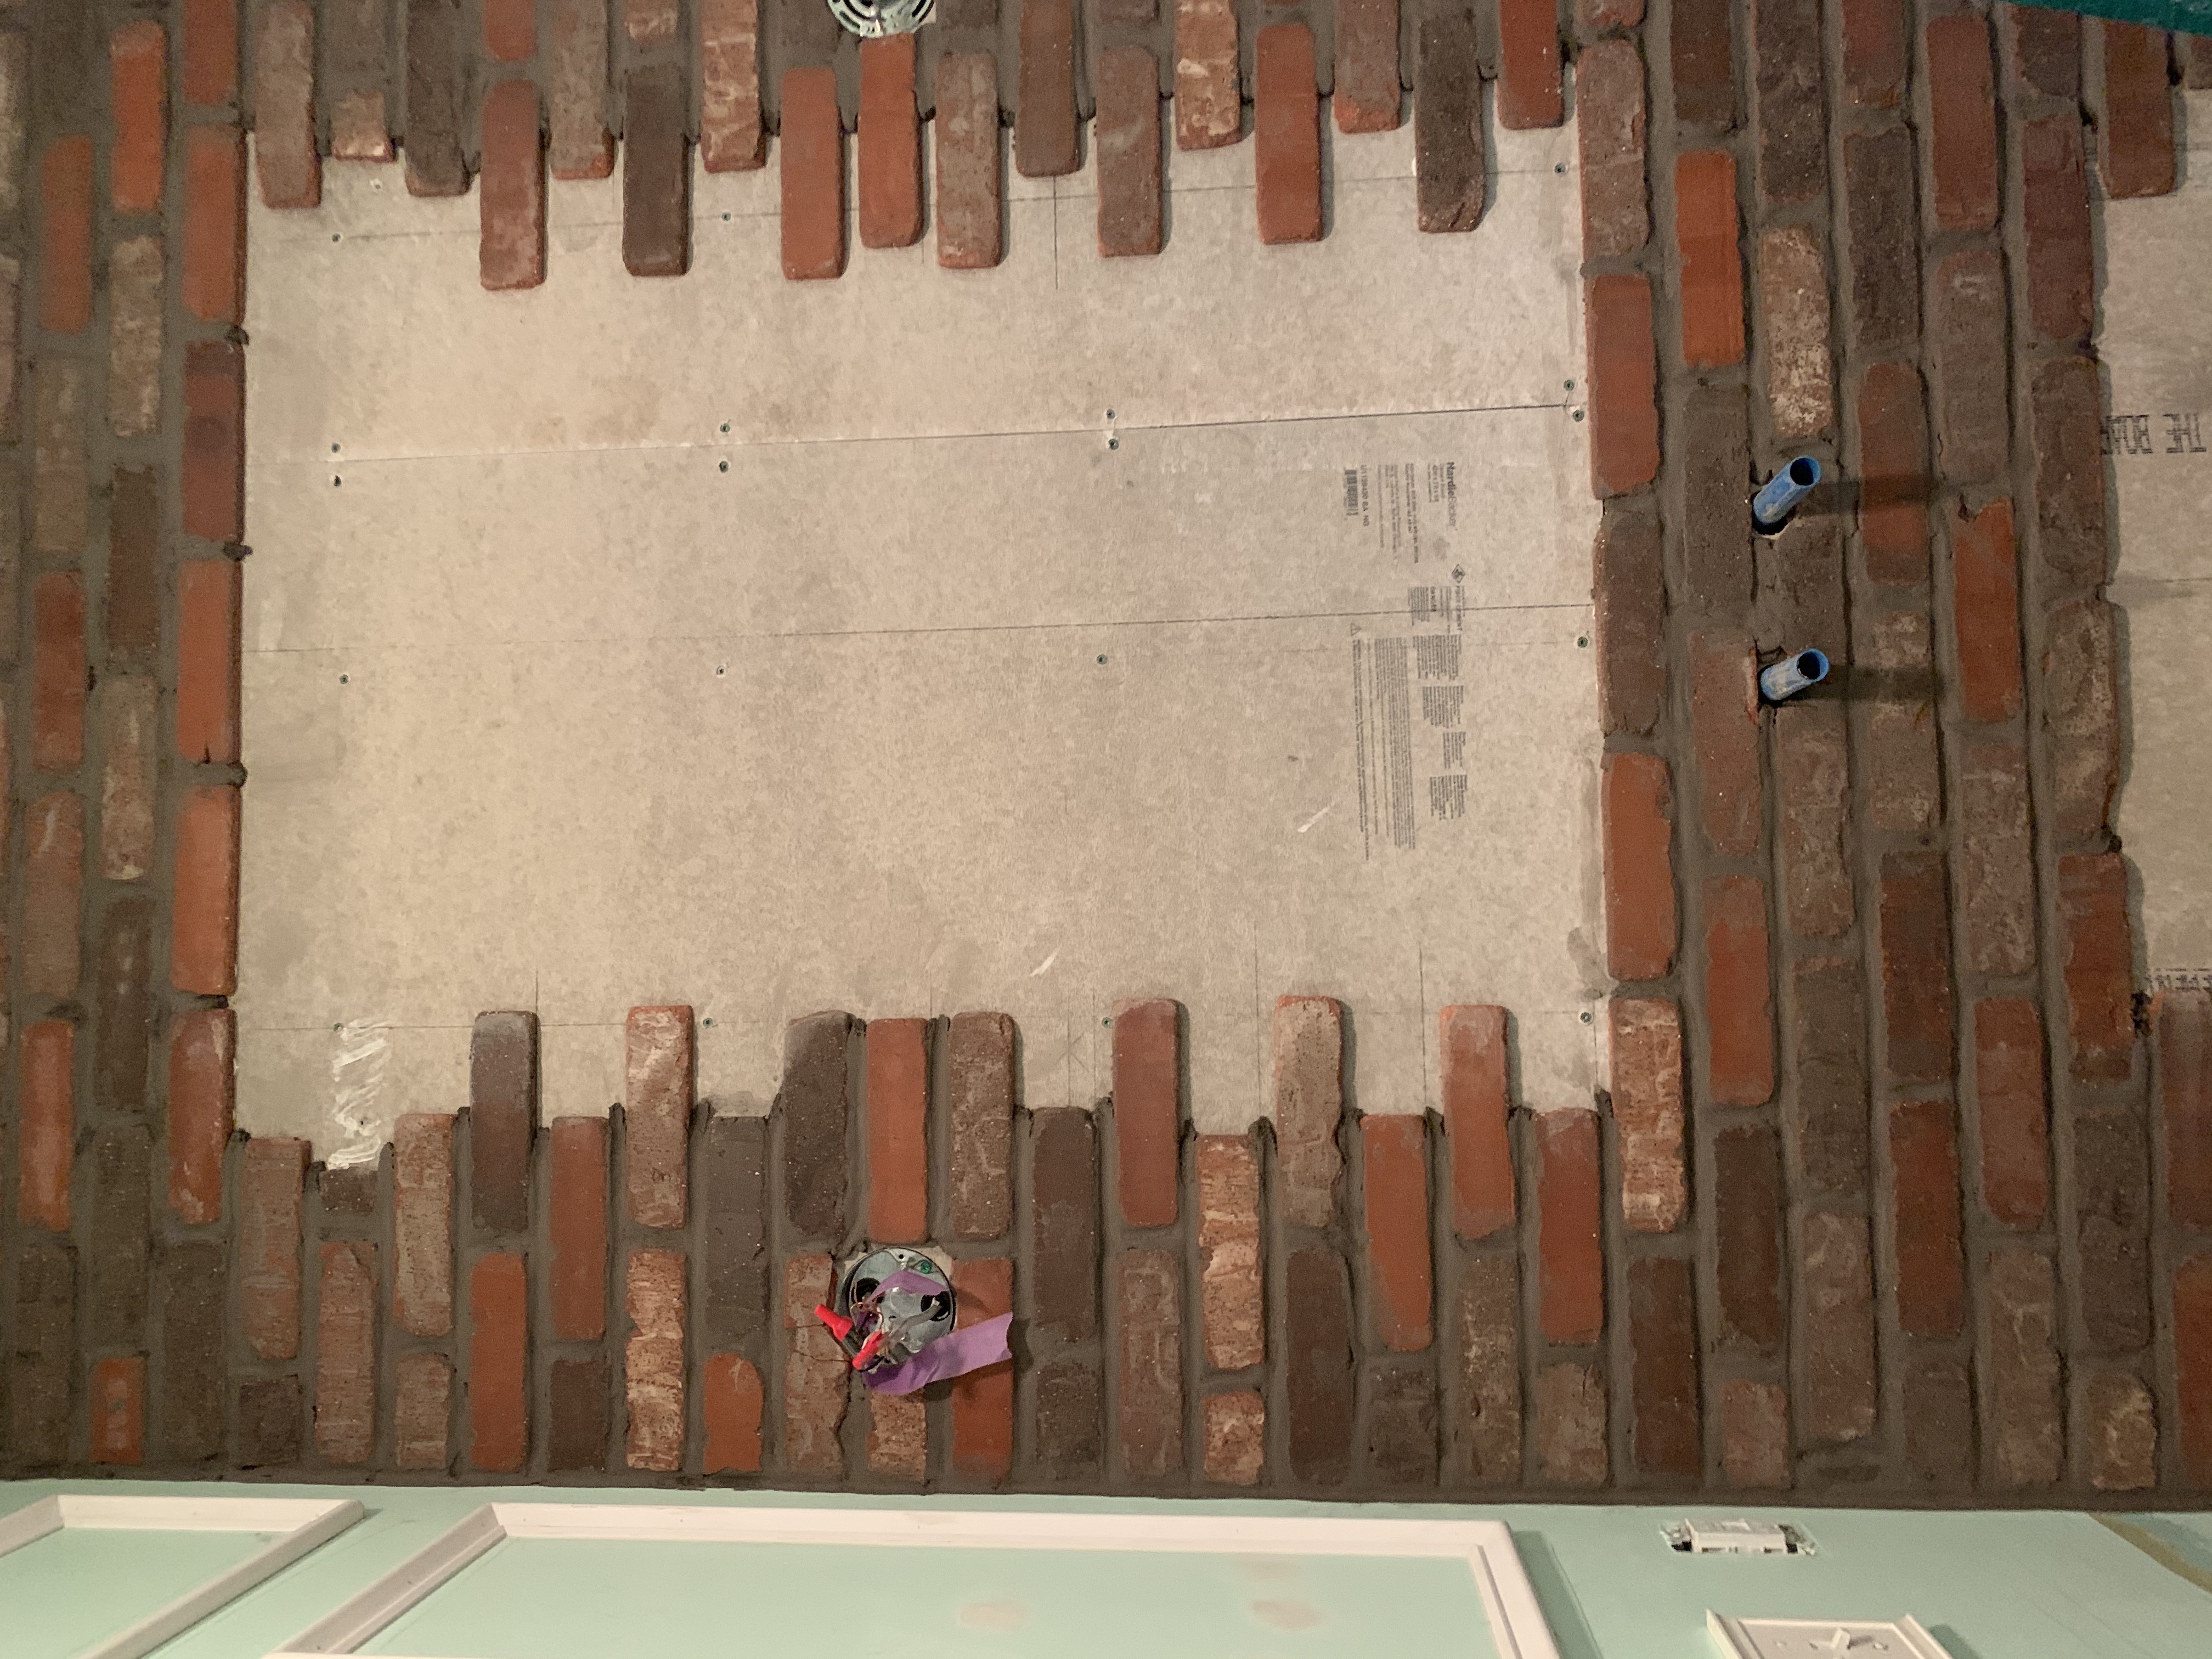
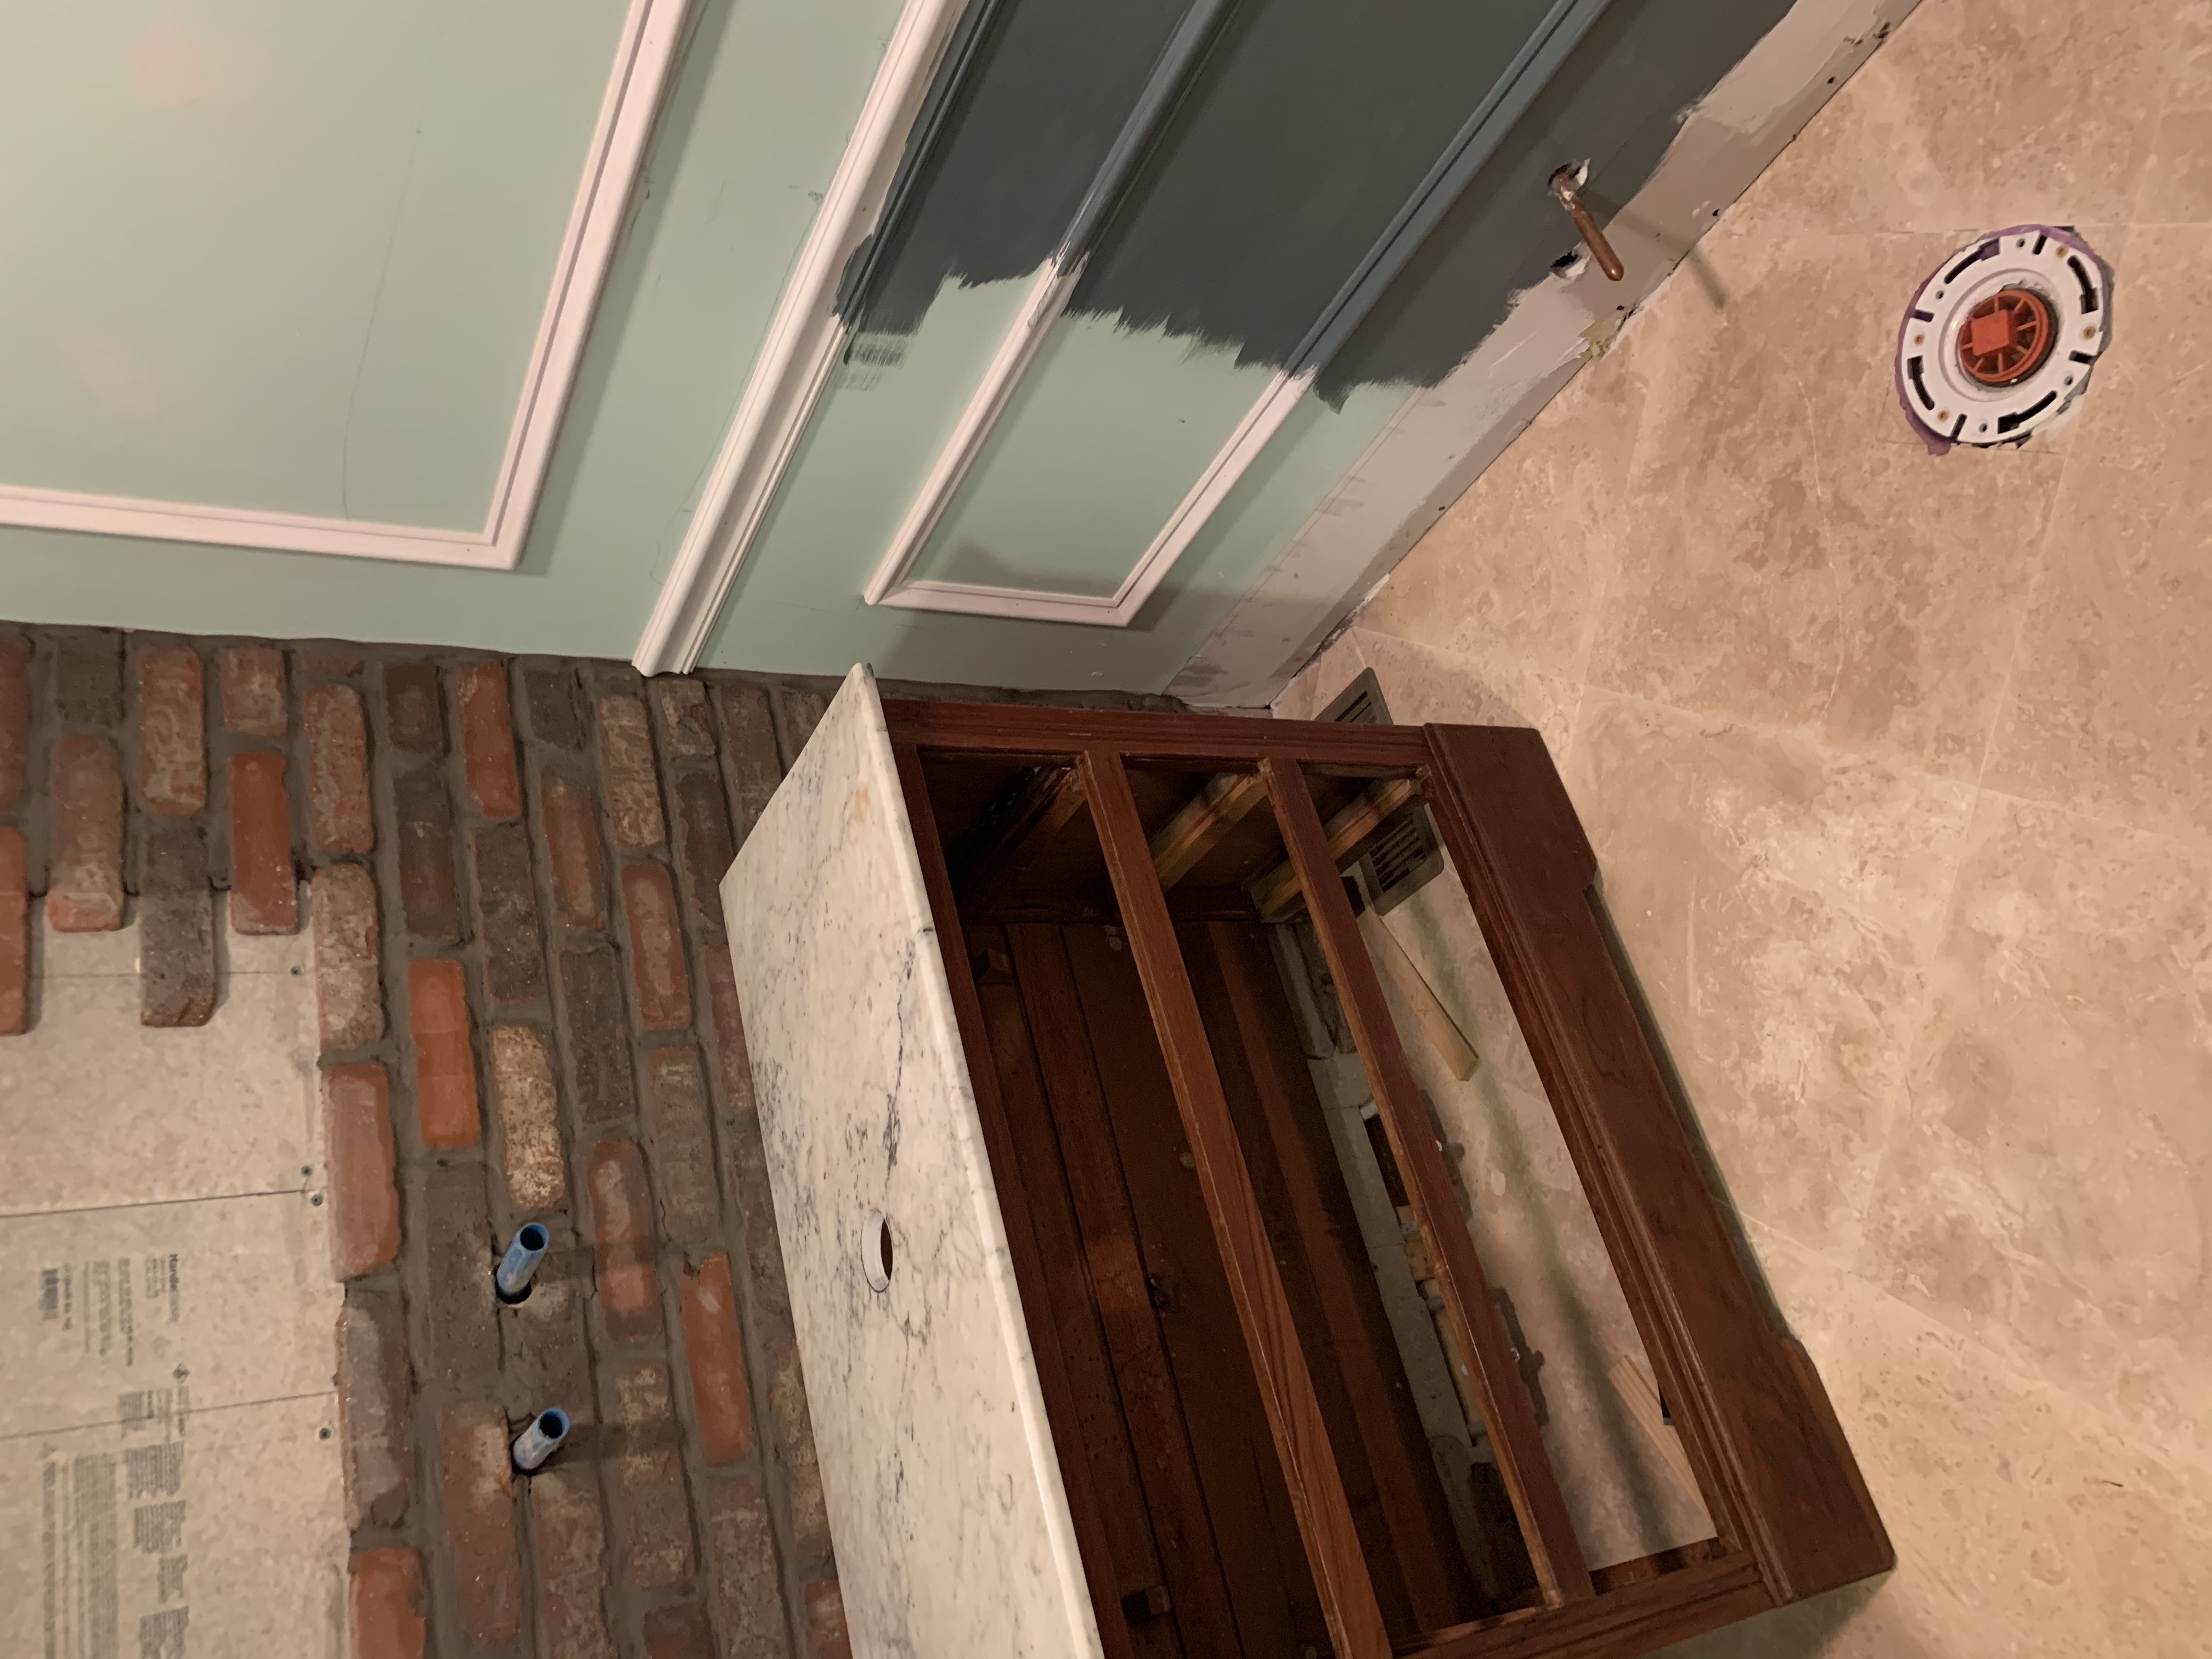
Here are some fun construction photos:

Don’t be discouraged by our two-week timeframe… we had to self-isolate for two weeks because we had a possible COVID exposure… so I very smoothly suggested that a lockdown would be an EXCELLENT opportunity to renovate the bathroom (for which we just happened to have all of the supplies)… This cut our normal construction time from about ten years per project to finished in about two weeks.


I think renovations are a lot like having babies: you only do it again because you forget how painful and messy it is. But, you keep doing it because the end result is AMAZING (even if the process involves pain, bleeding, and occasional screaming). I’m trying to remind myself of that because the ENTIRE downstairs is in a state of construction mess.

Also, the six year old has done 5000 drawings watching Youtube videos. She loves it when we’re distracted. Insert mom guilt.

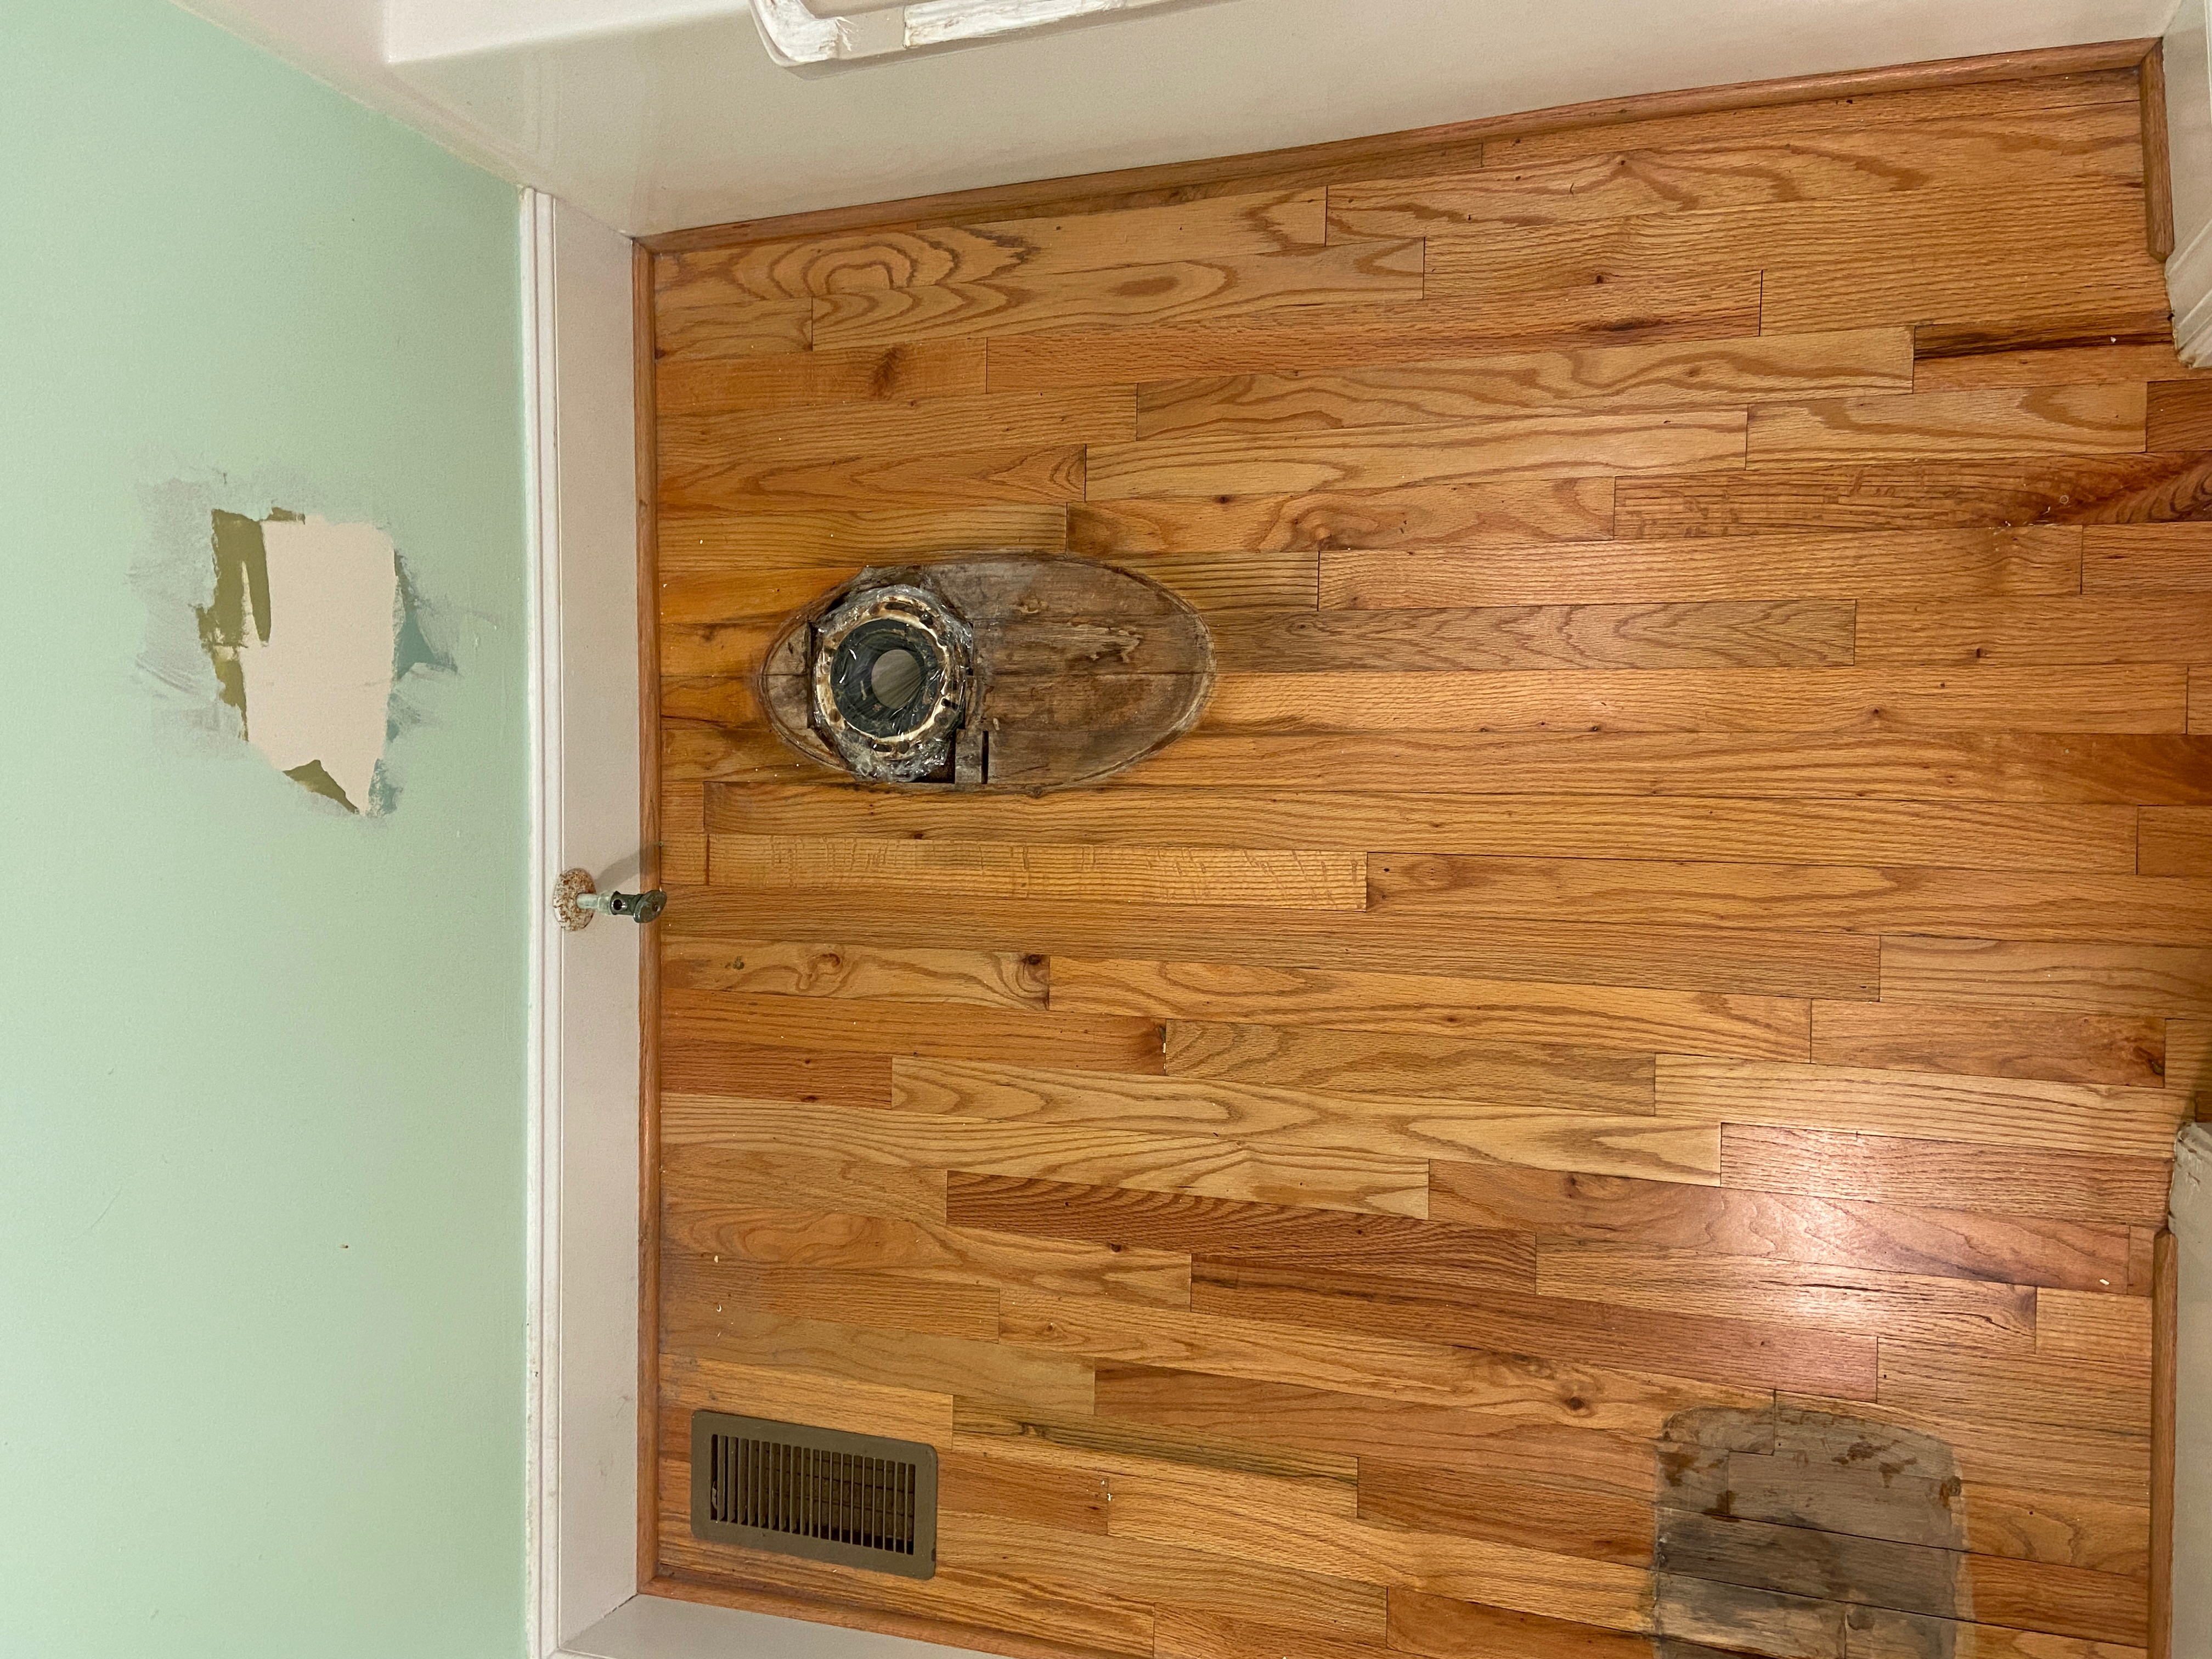
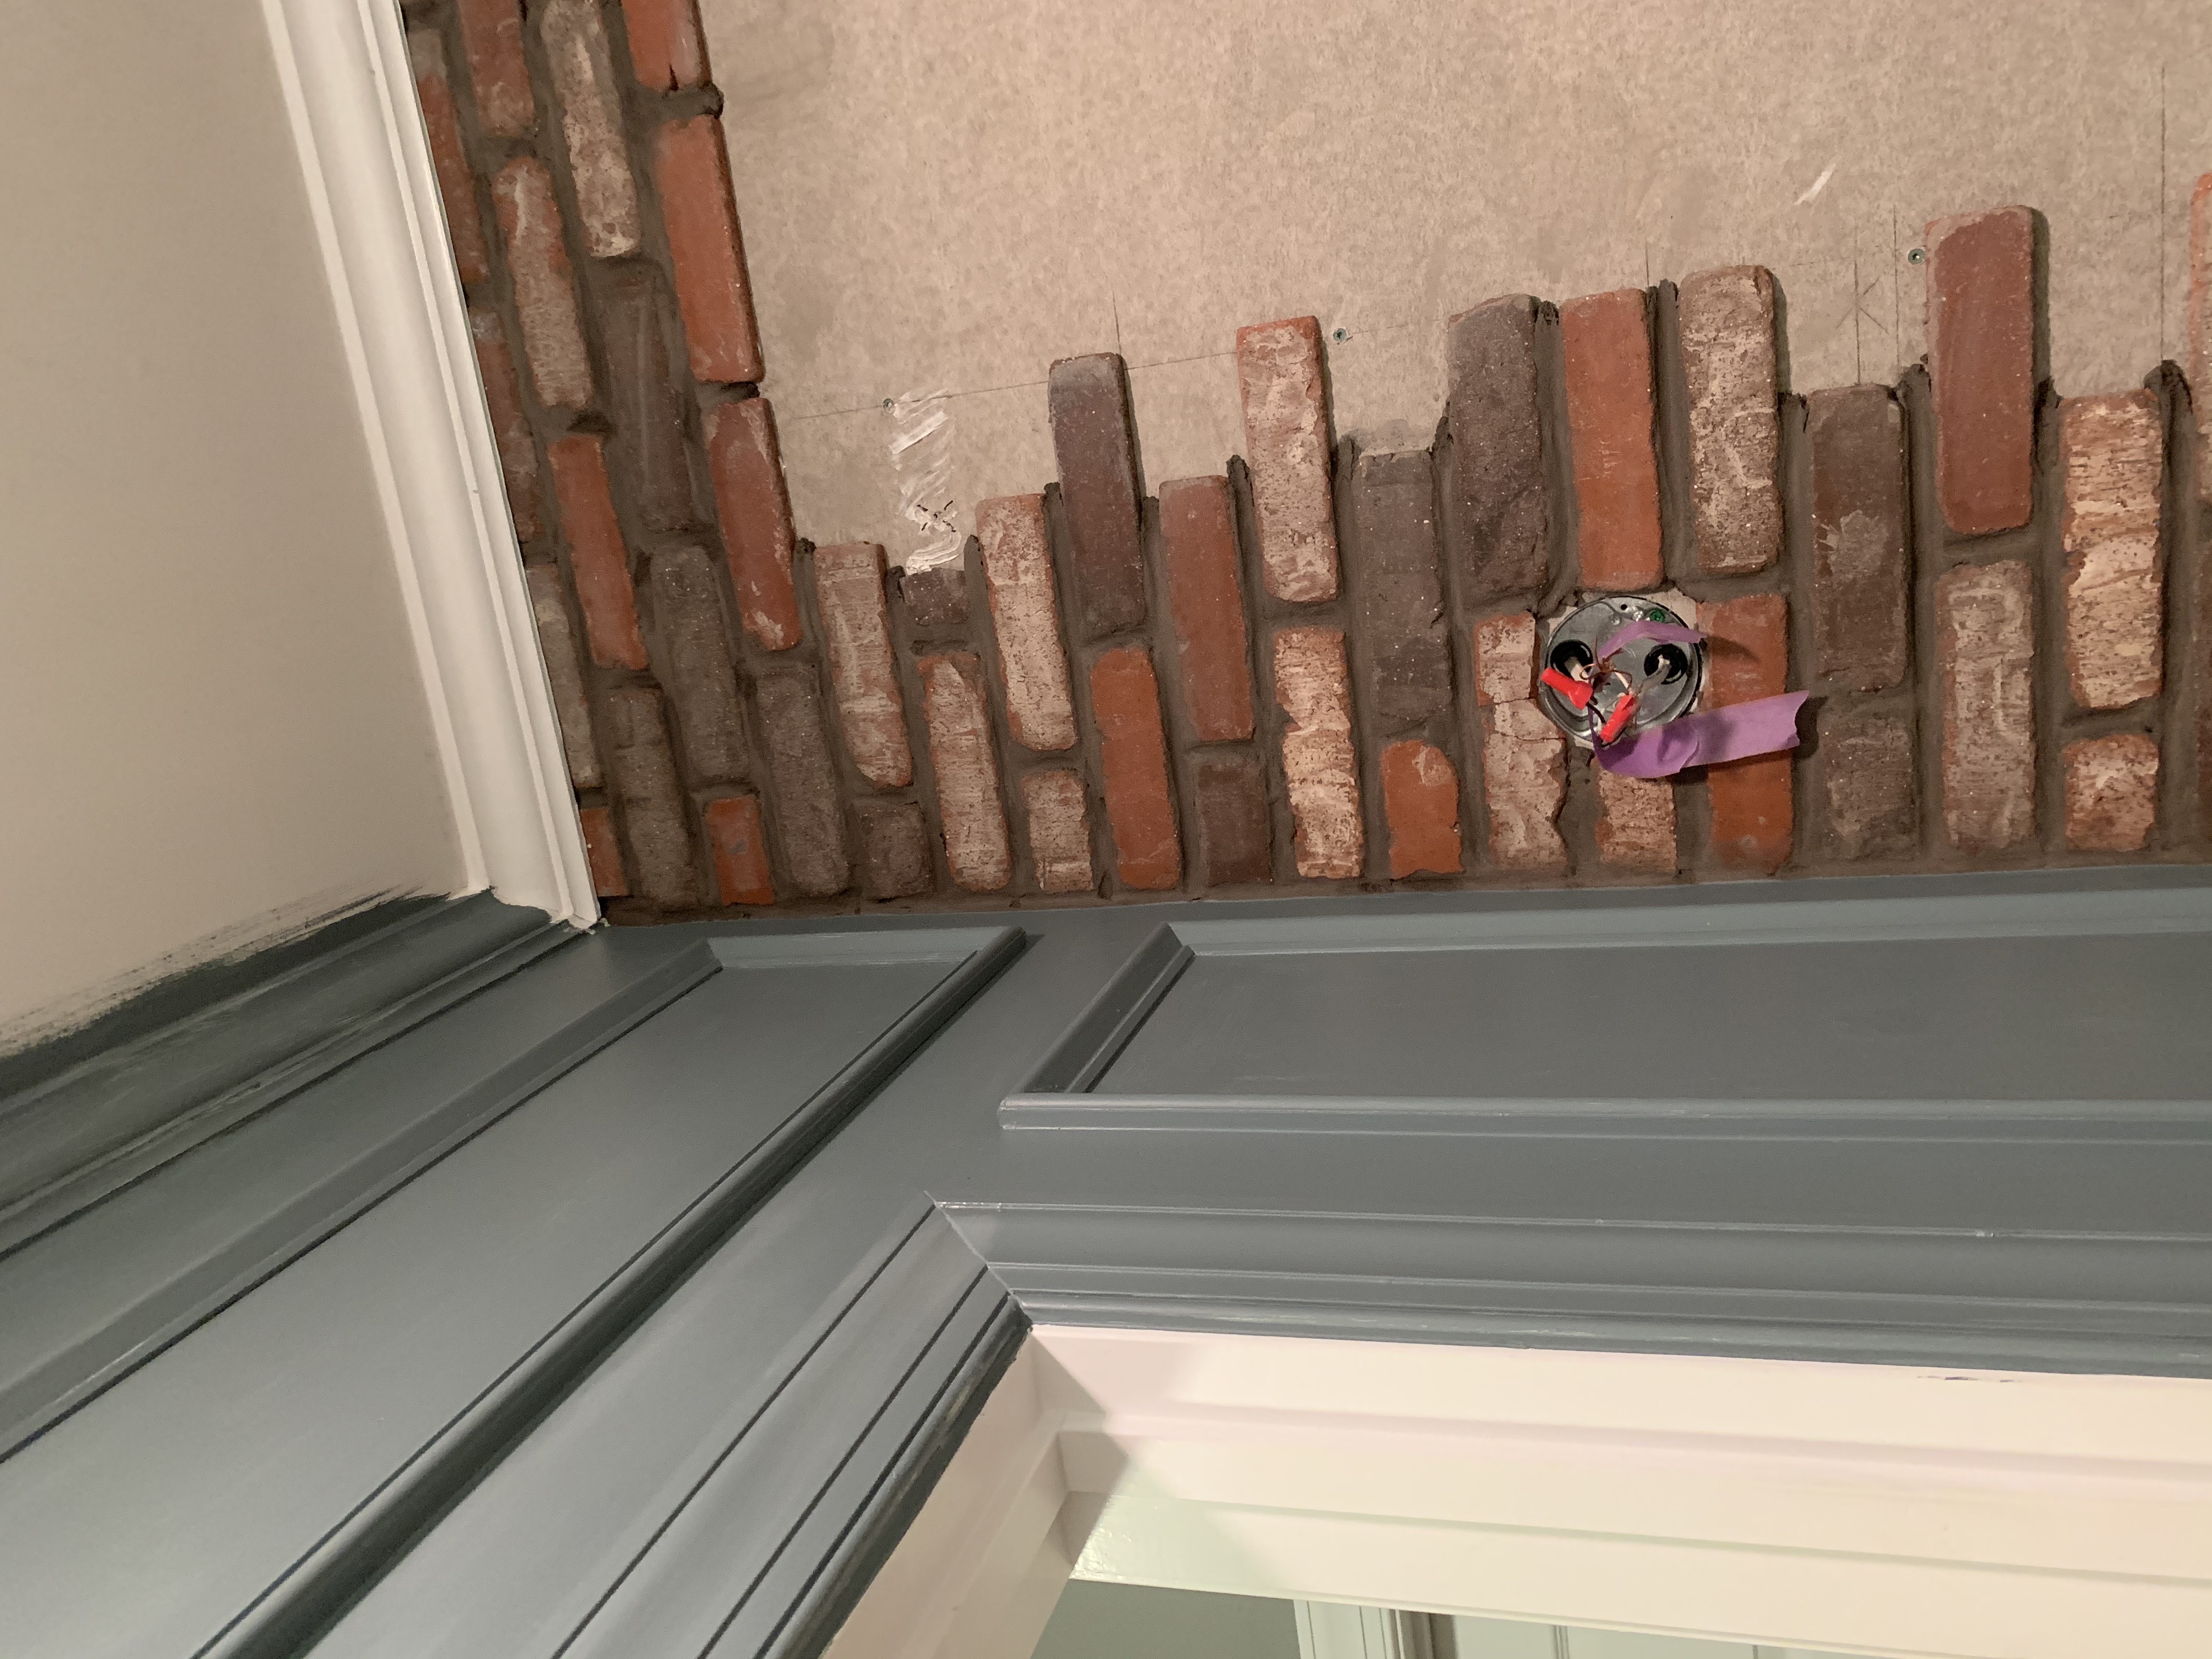
For those of you who have ever renovated a bathroom, you already noticed the water damage (NEVER, EVER PUT A WOOD FLOOR IN A BATHROOM). And you were already thinking, “I wonder if they have any extra plywood on hand for that subfloor because I bet it has rot.” And you’d be right.

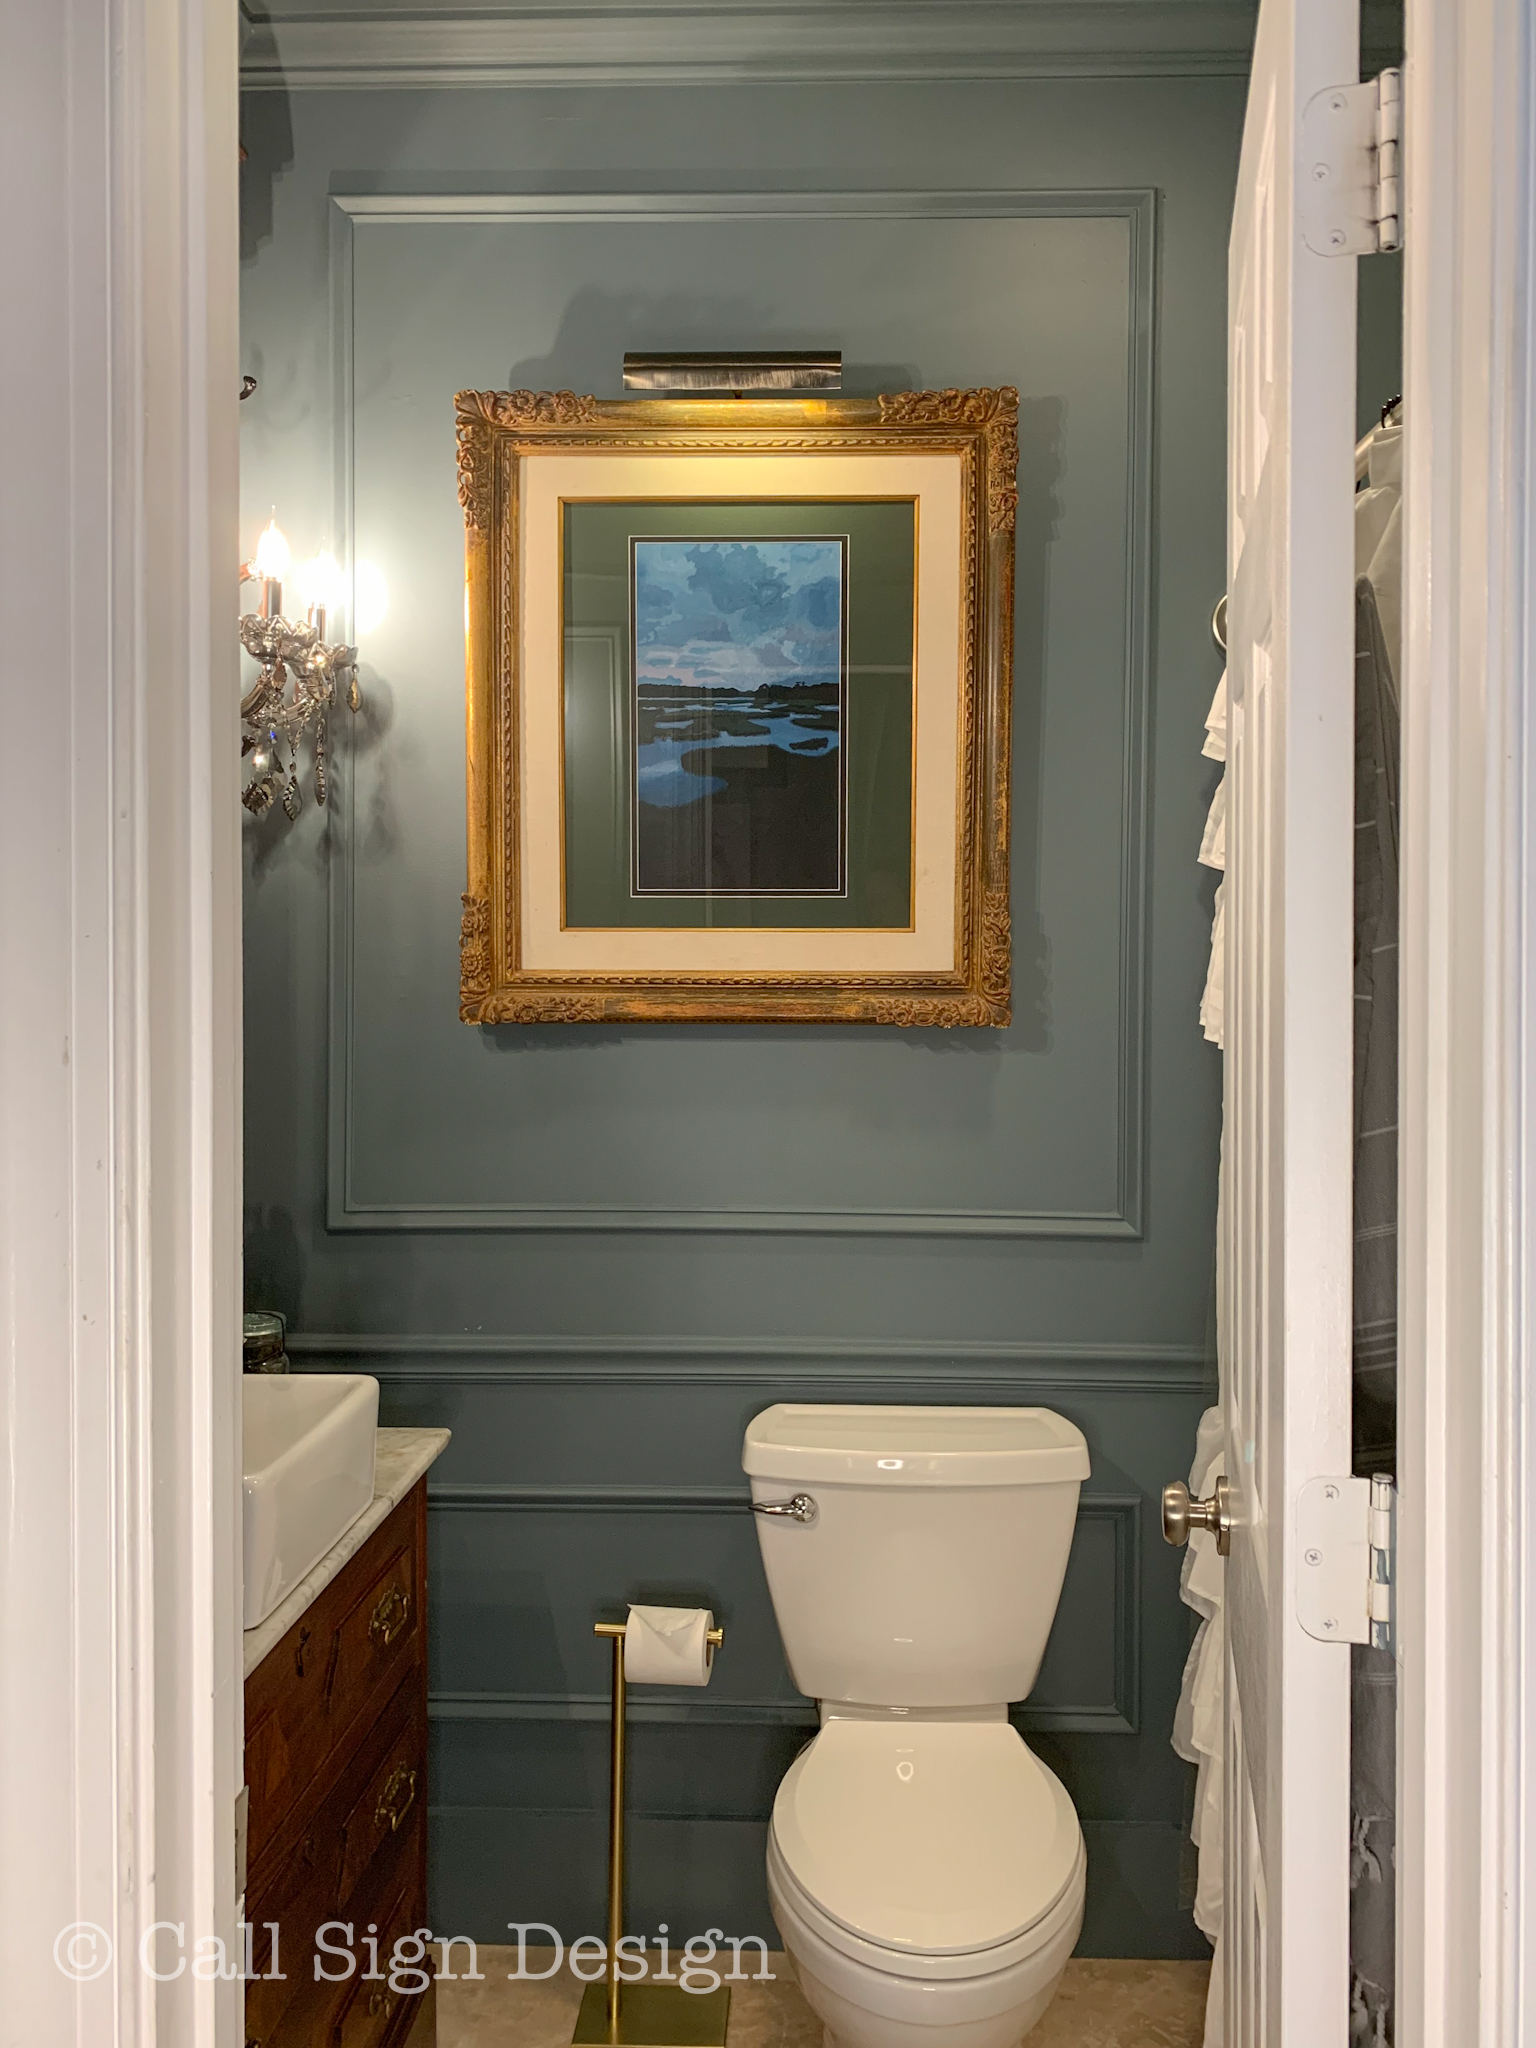
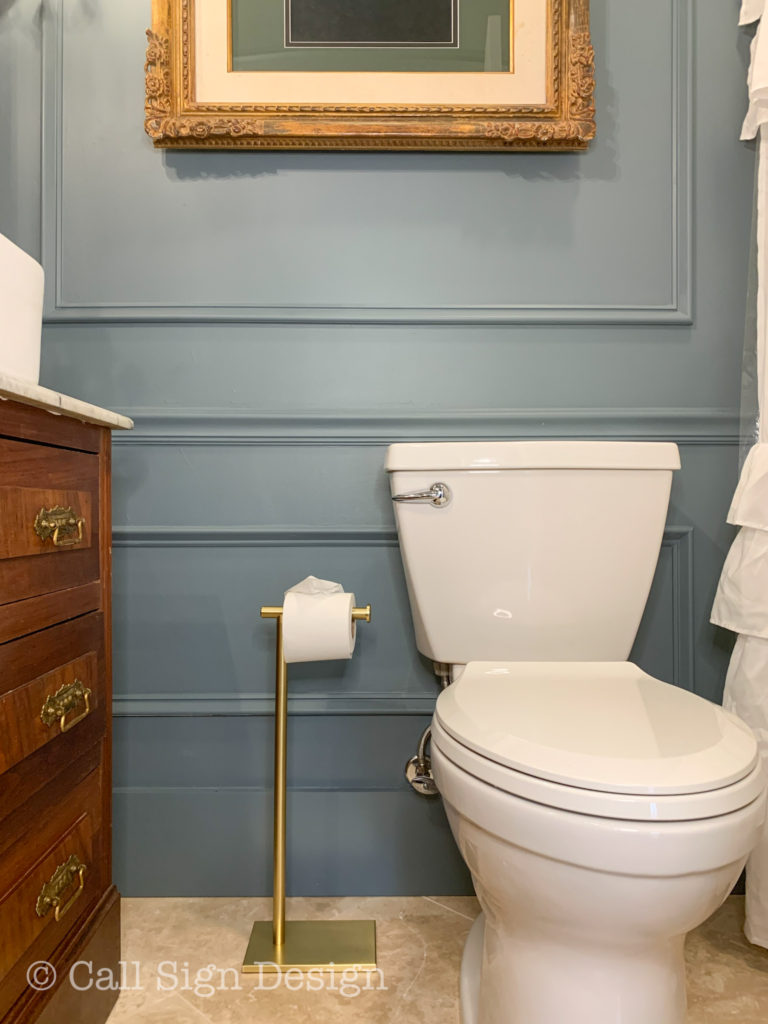
You noticed the color is different than the mood board? Yes, I changed my paint plan at the last minute (like THAT’S never happened before). I decided to go with Benjamin Moore’s Smoke Stack Gray.  I think it’s going to have the cozy feel I want anyway, because the room is very small and I’m painting EVERYTHING the same color (ceiling, walls, and trim).

But, here’s for the really fun part: FINISHED!!!

How To Create A Historic Bathroom In A New Home


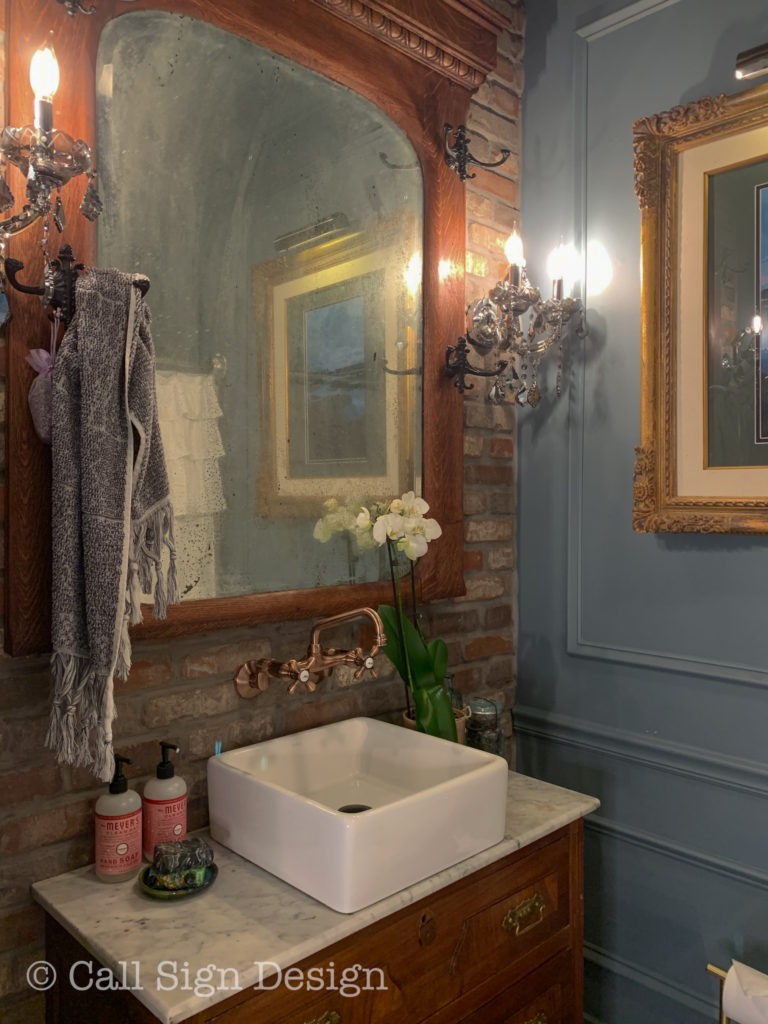
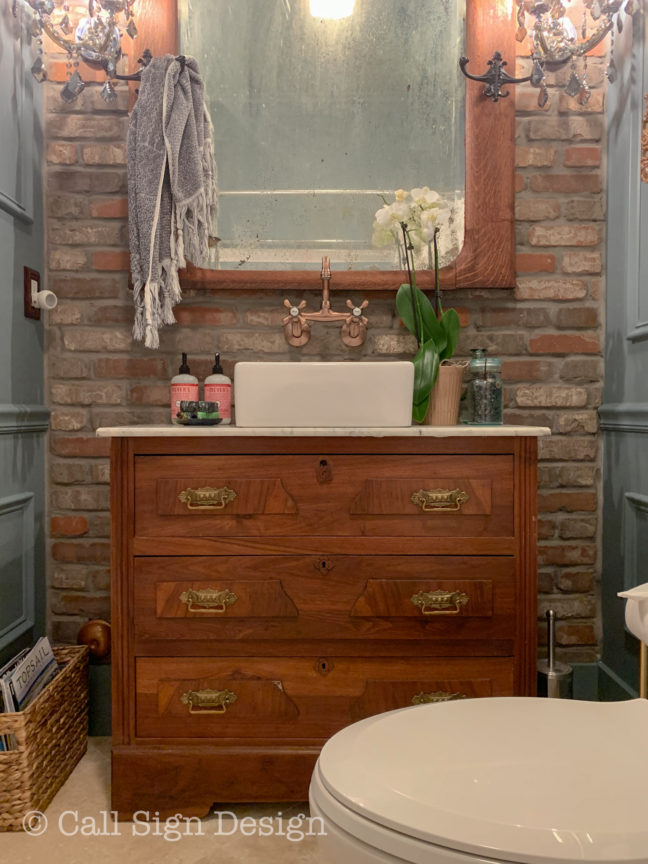
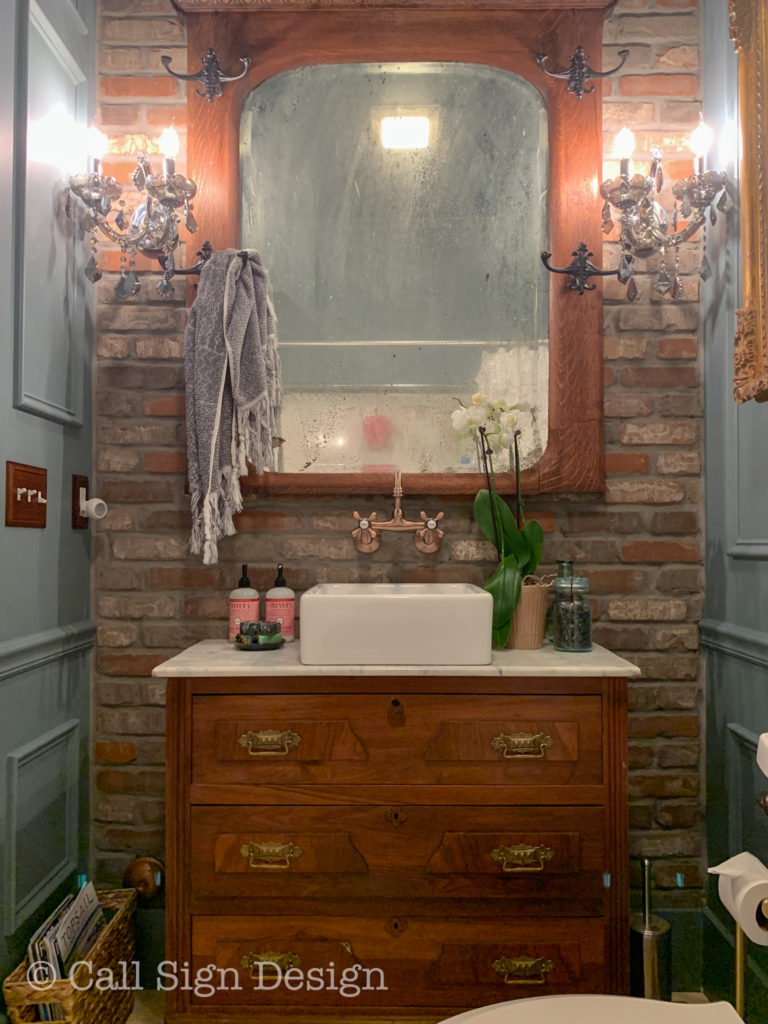
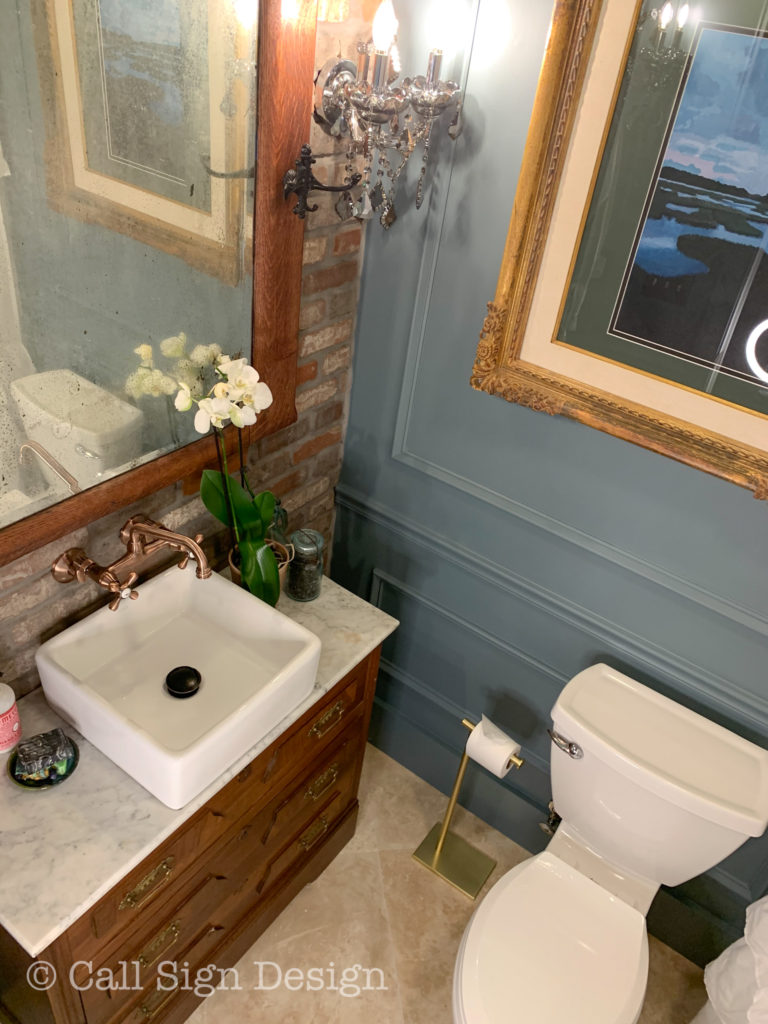
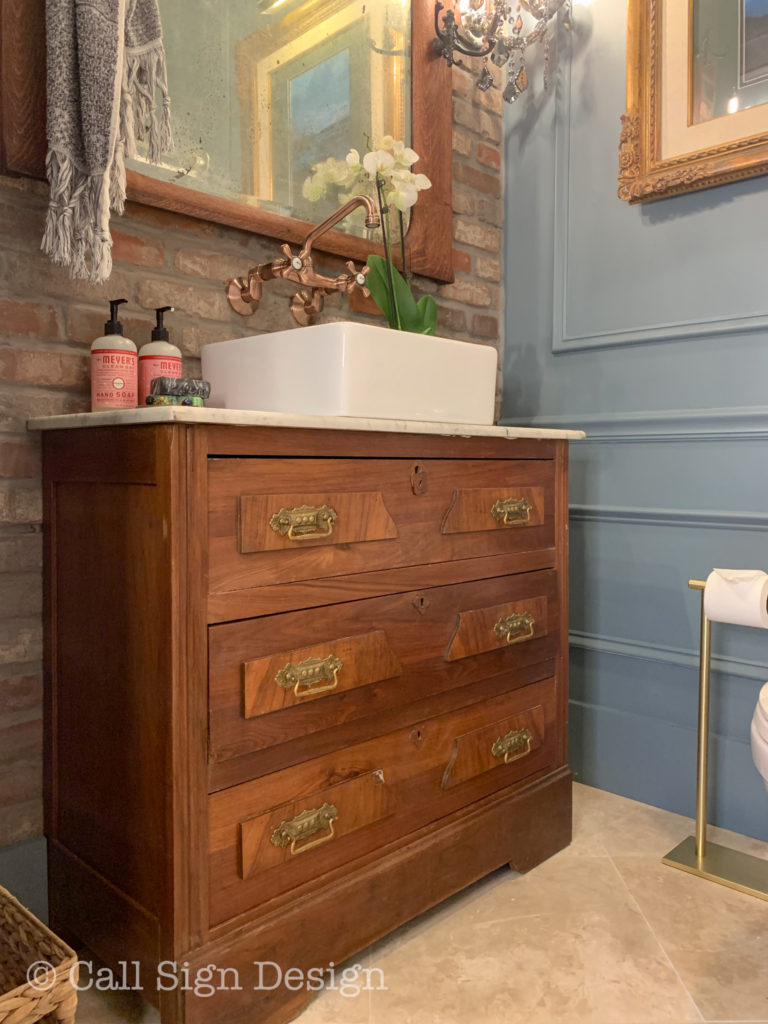
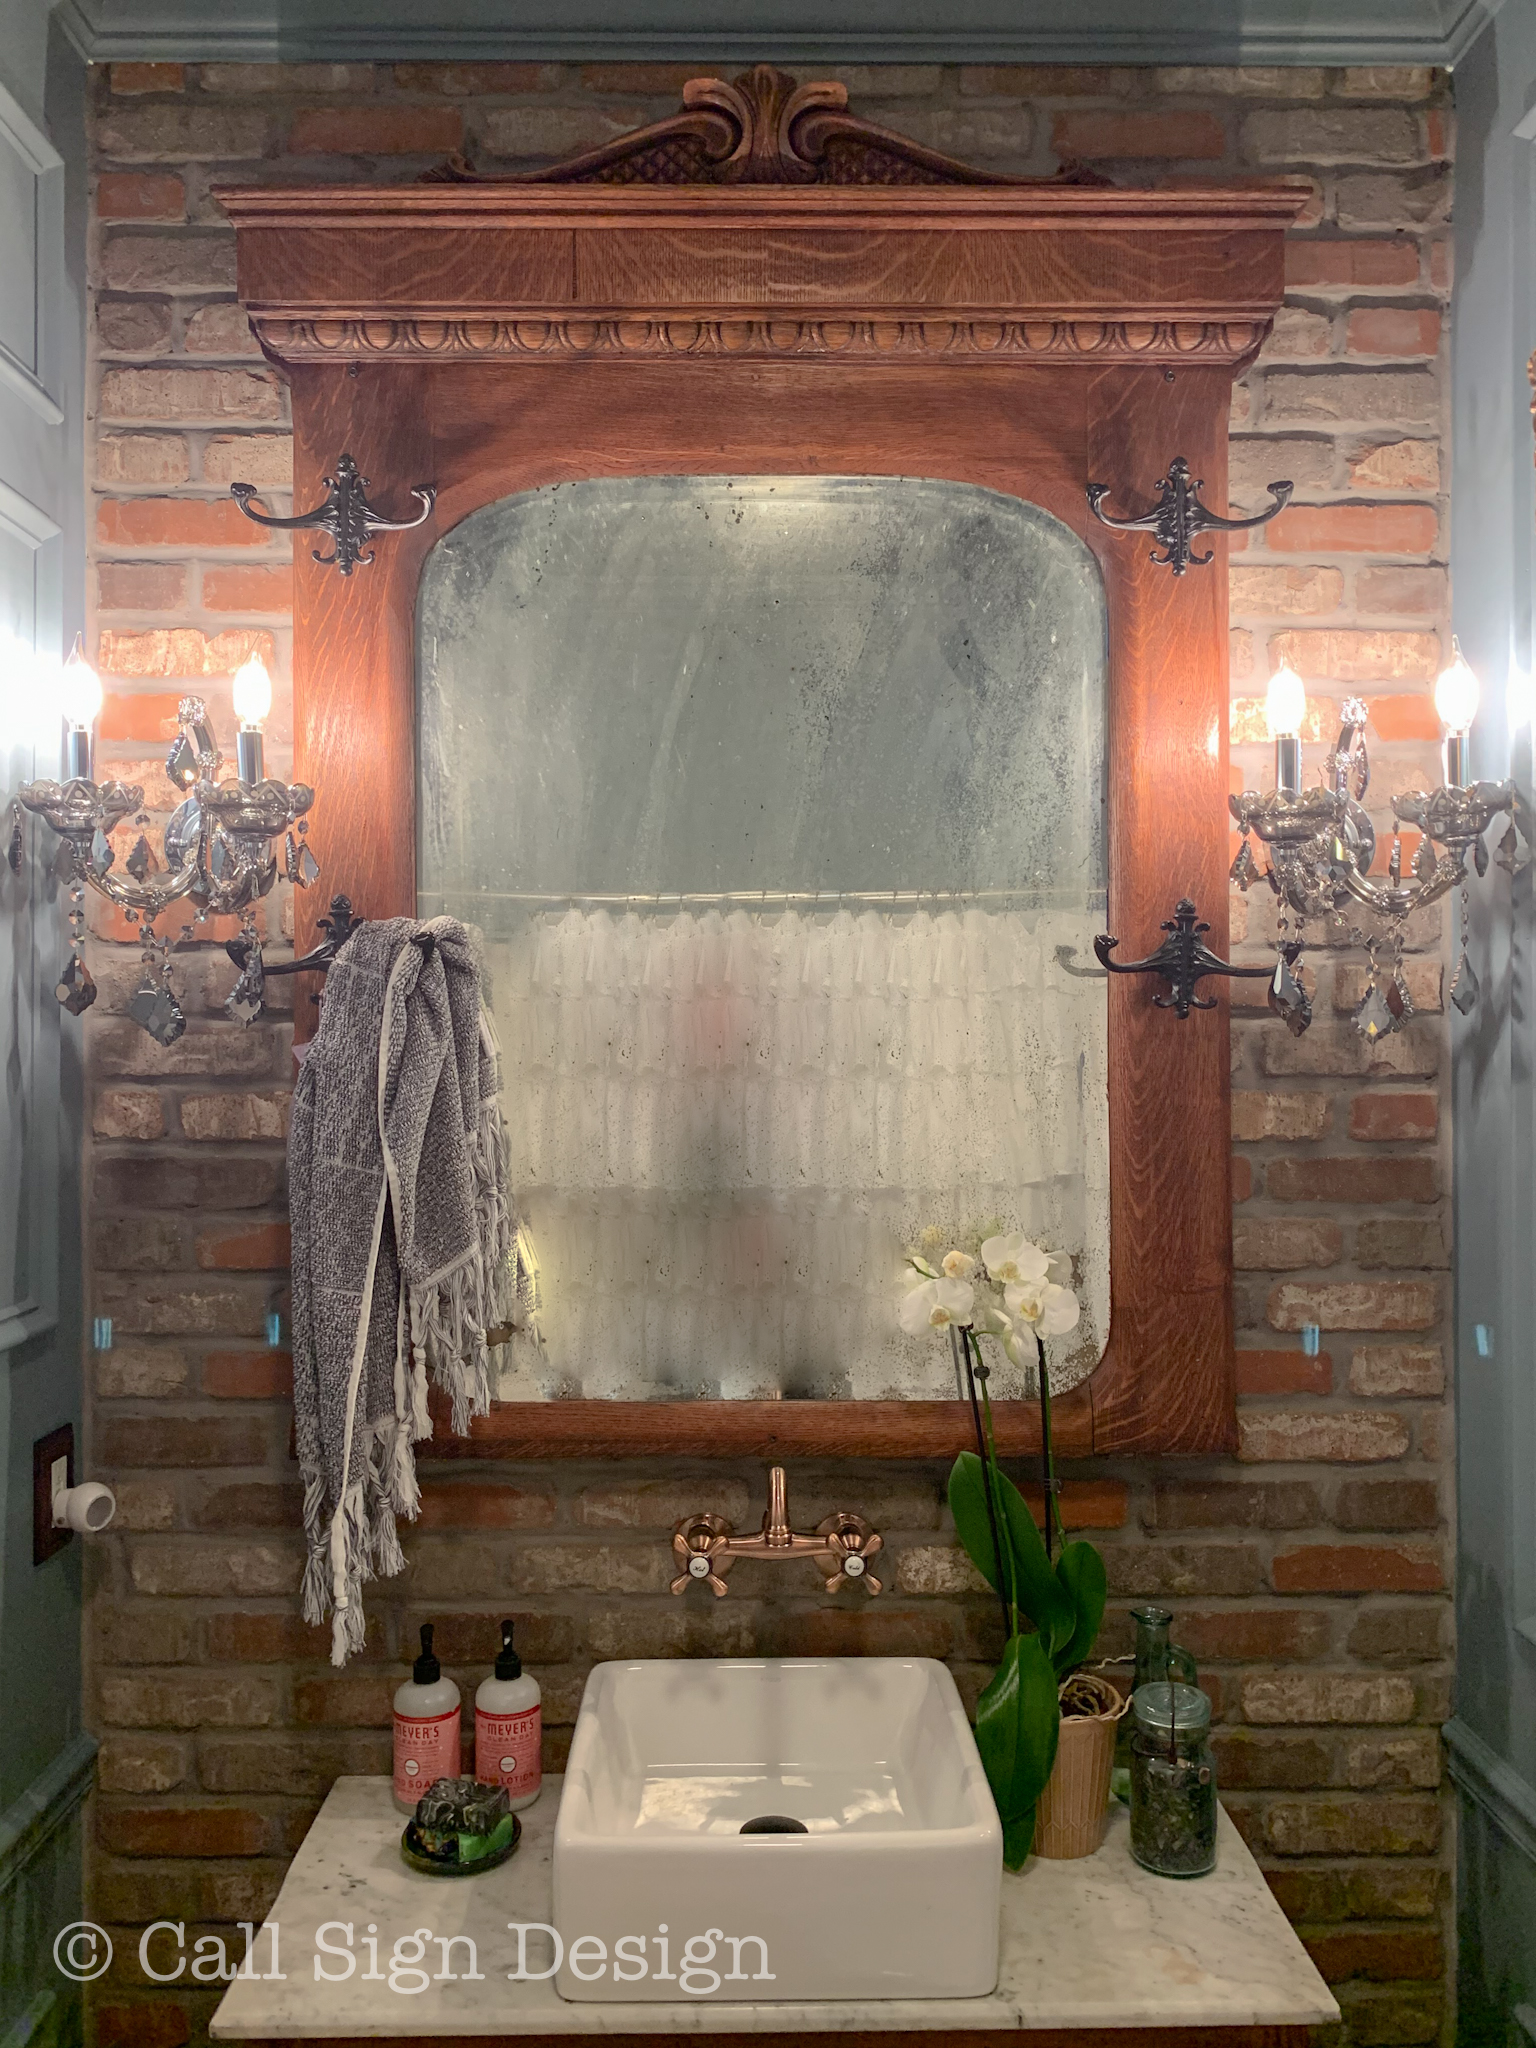
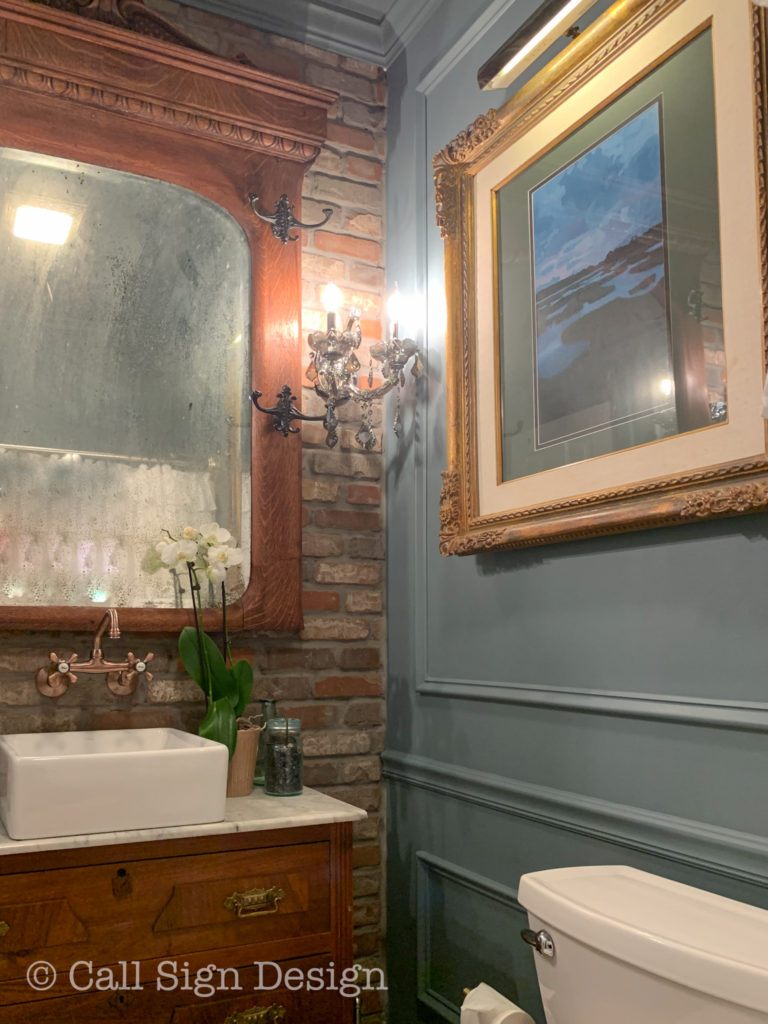
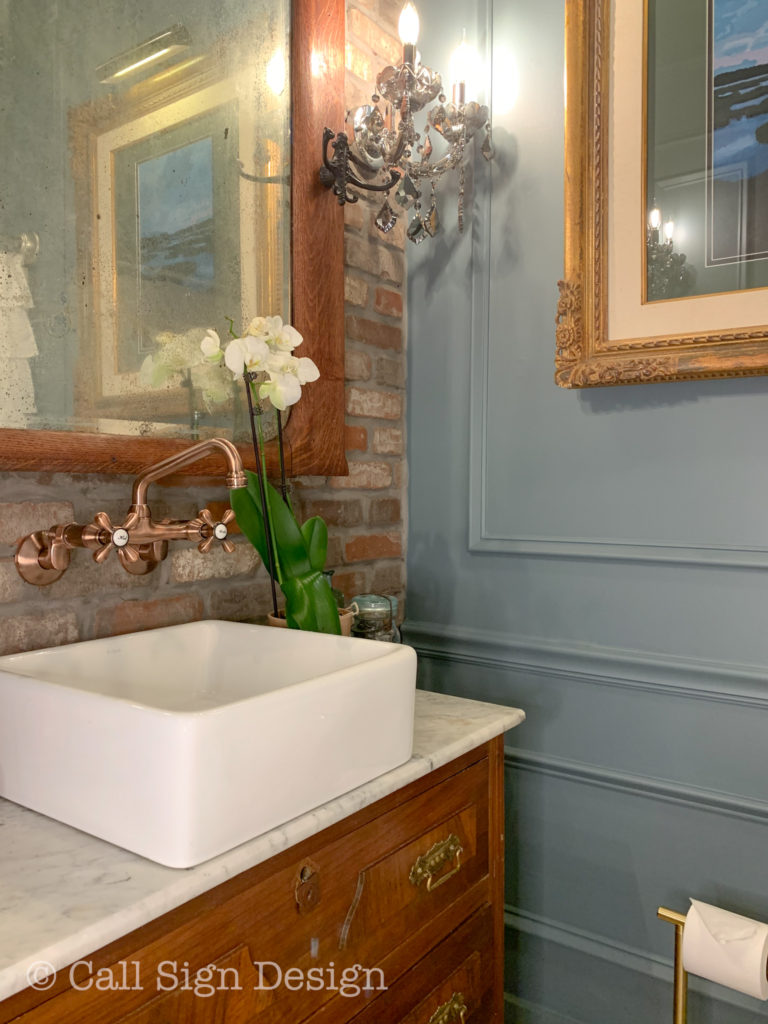
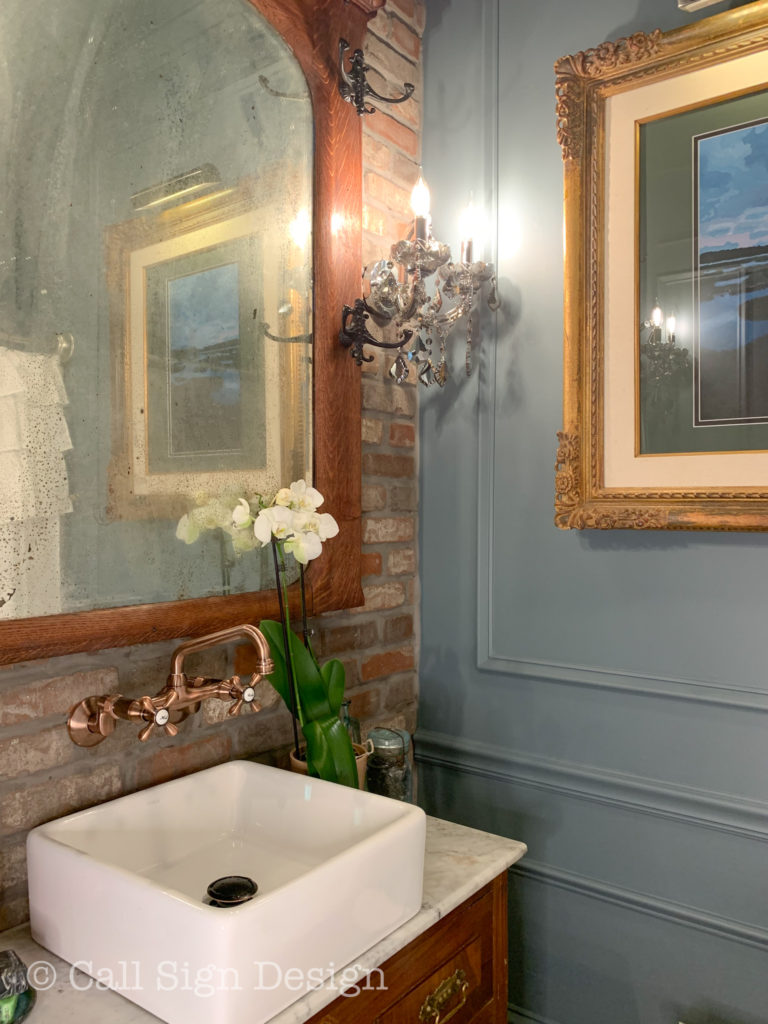
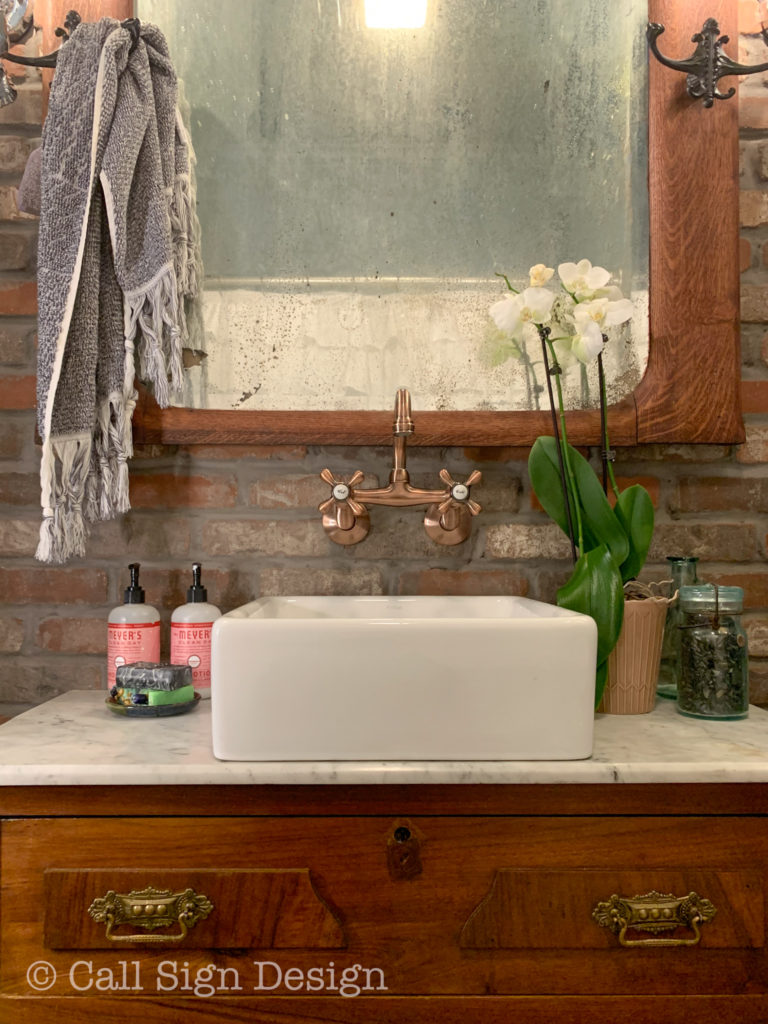
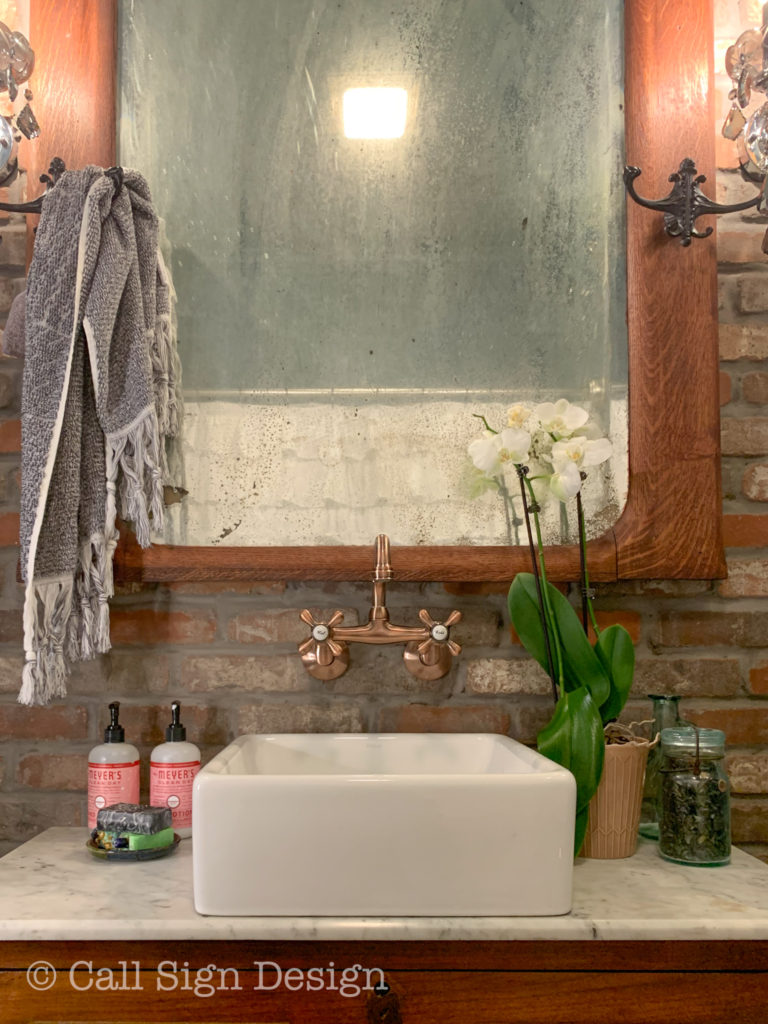
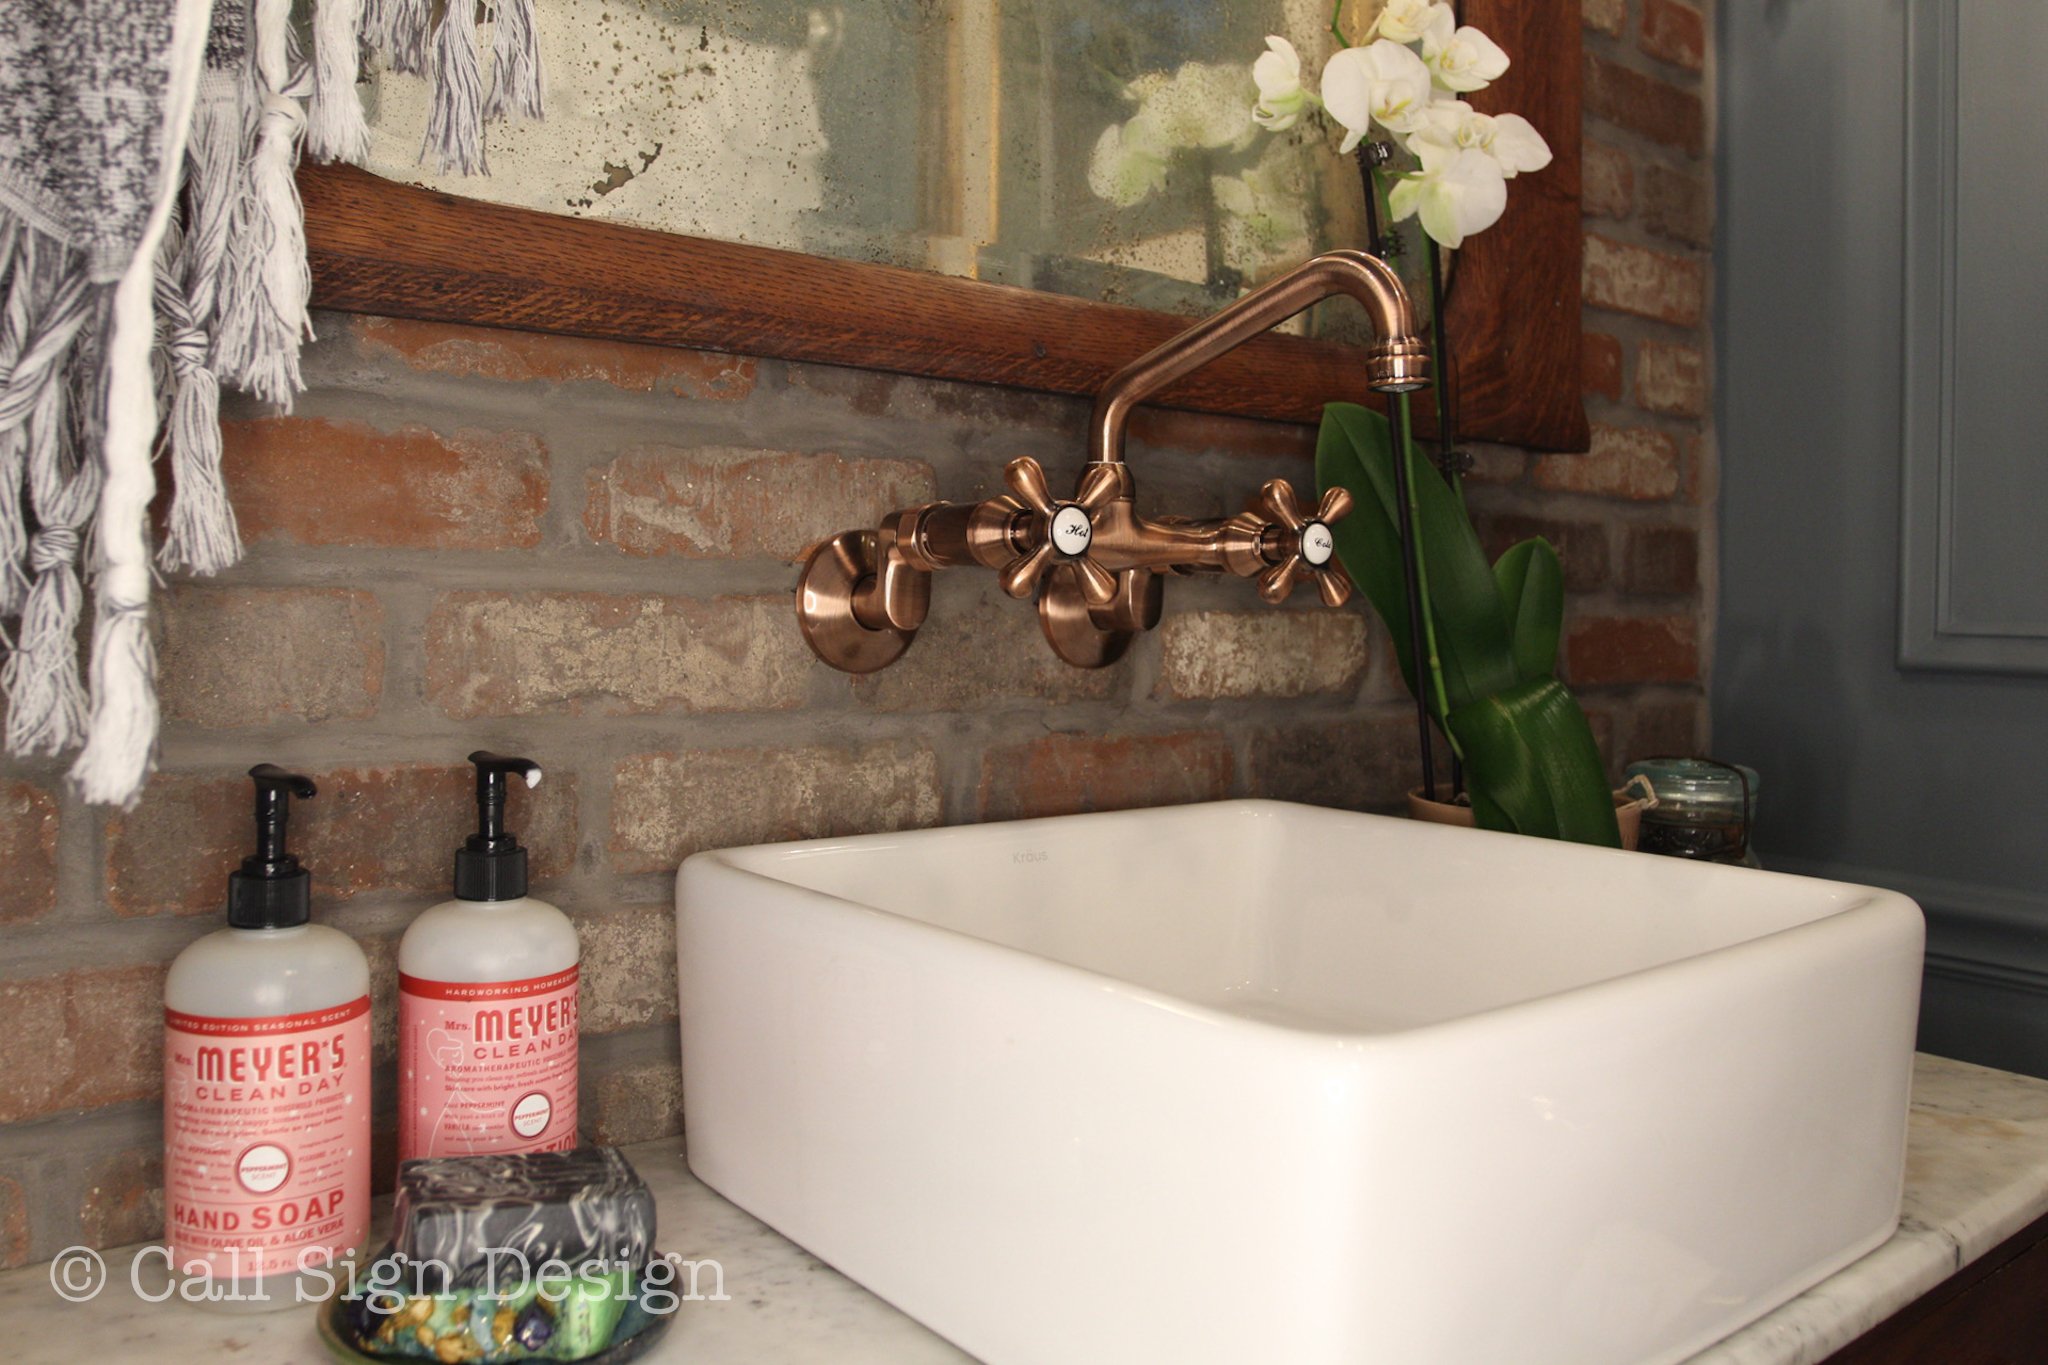
One of the best ways to save money on your sink vanity is to do an antique dresser vanity conversion. Vanities are super pricey, even the junky ones. So, why not build a beautiful custom one that’s not only WAY cheaper, but also way more awesome in every way?

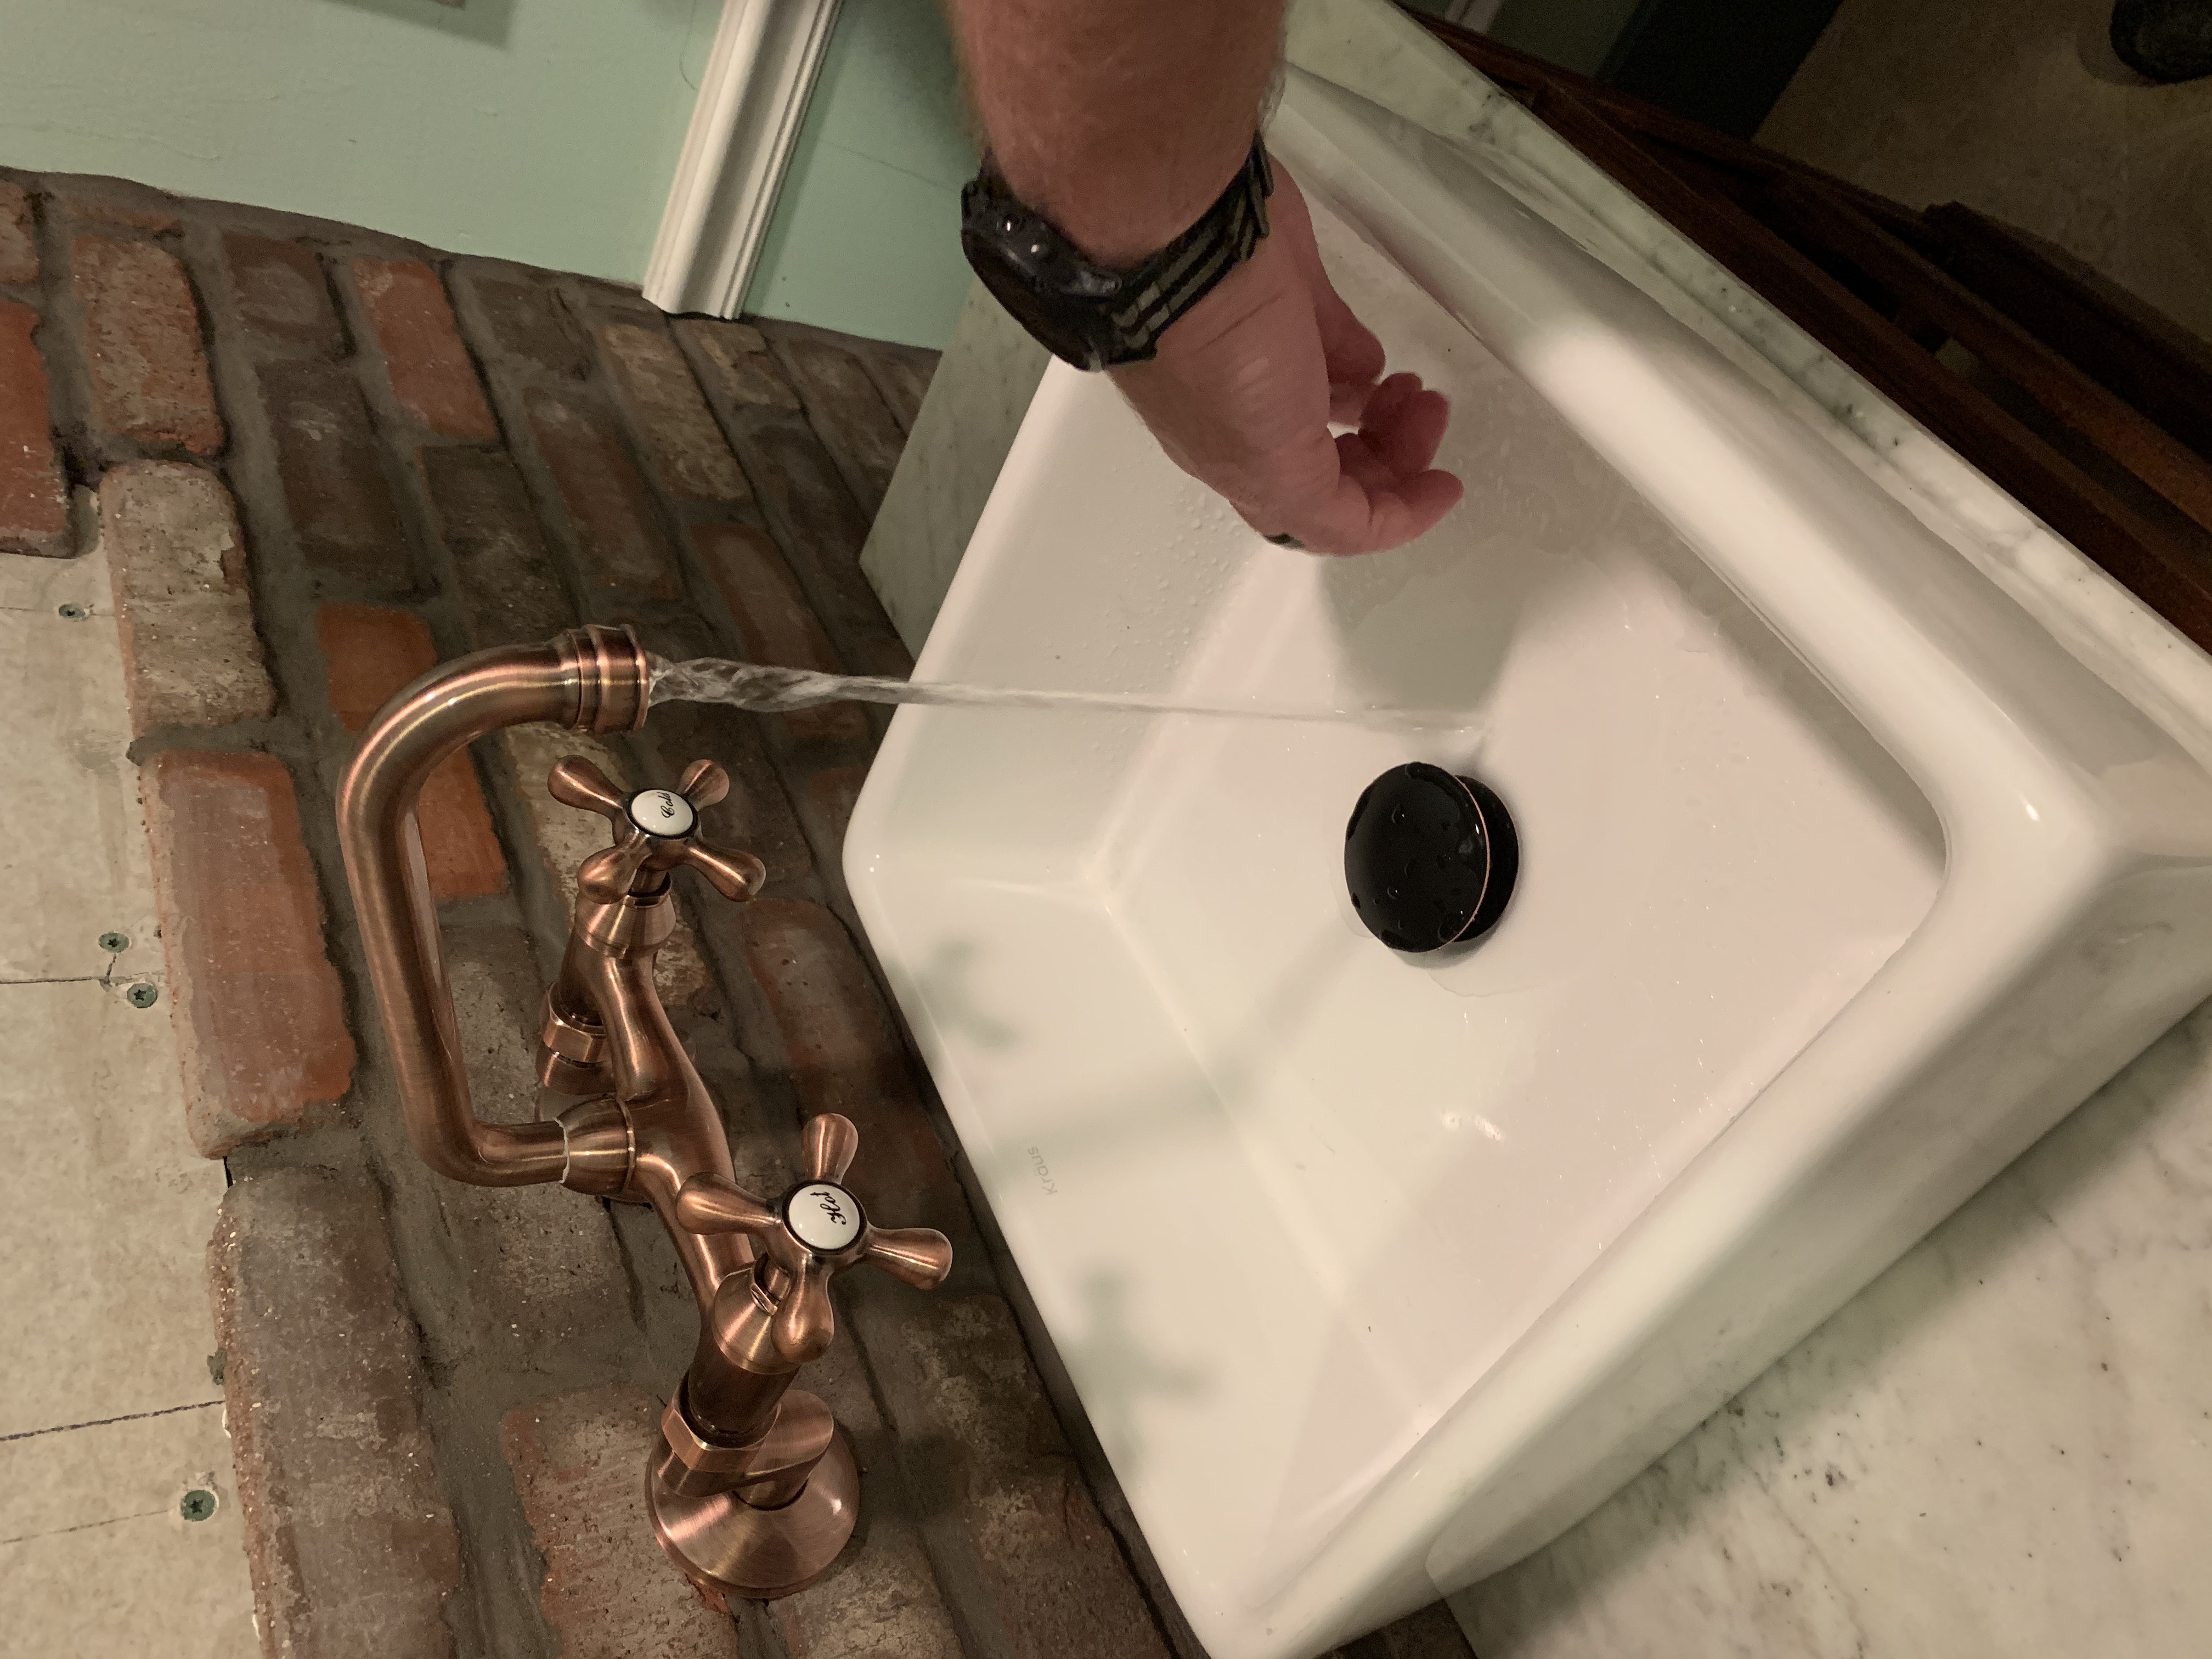
You can look for an antique dresser made into a bathroom vanity for sale (lots of people sell these on Craigslist), or you can just find the dresser and customize it with a smashingly fancy white porcelain vessel sink basin and any fixture you want.

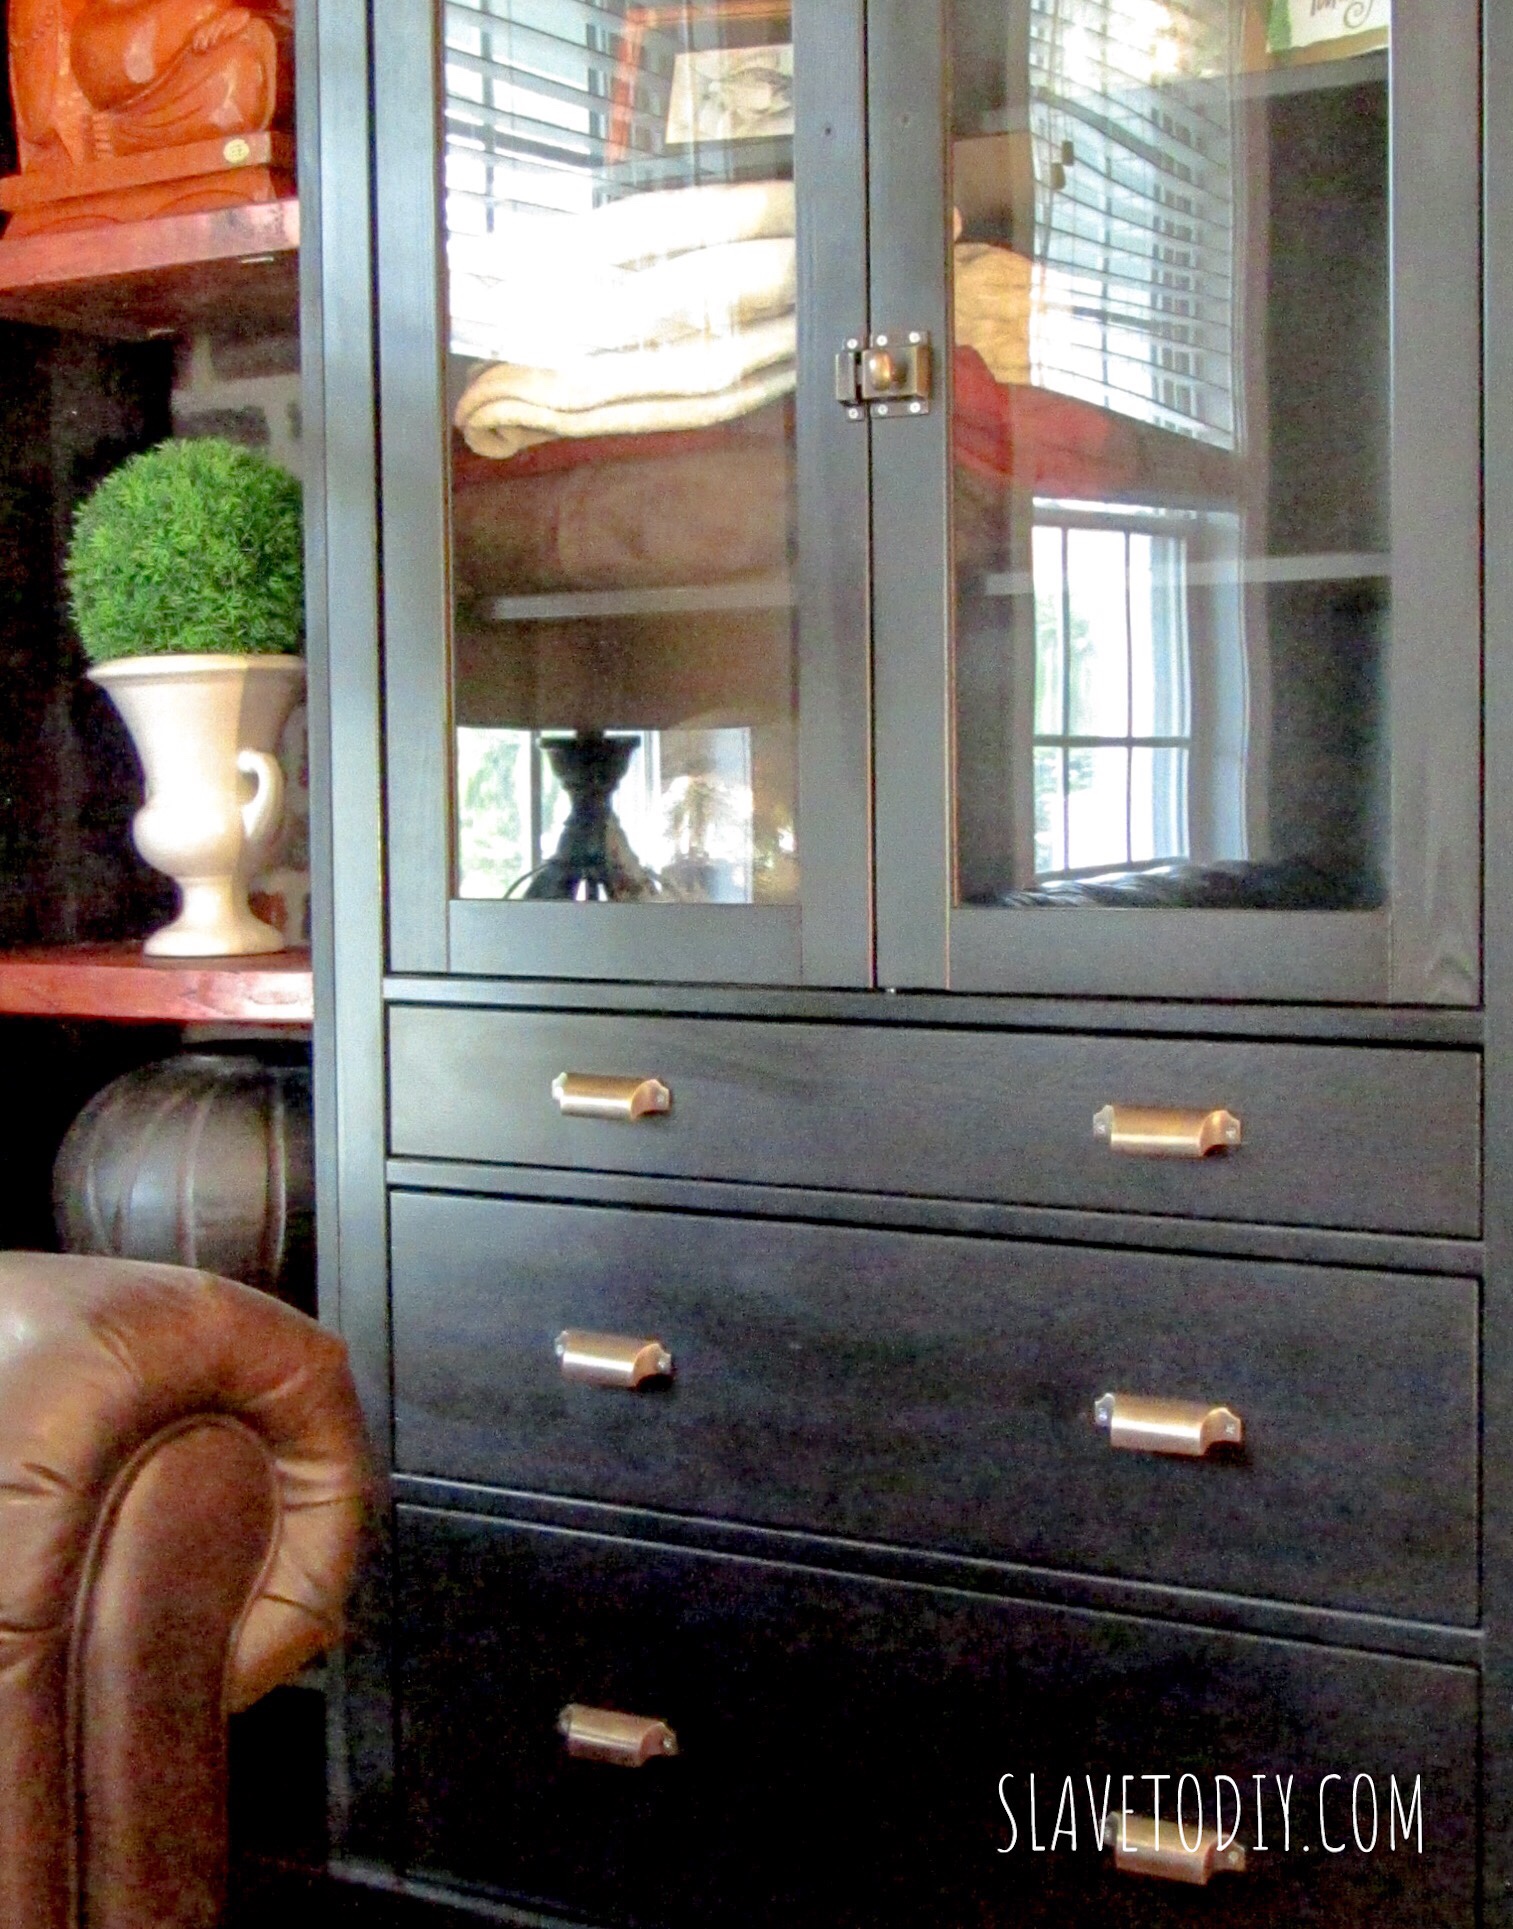
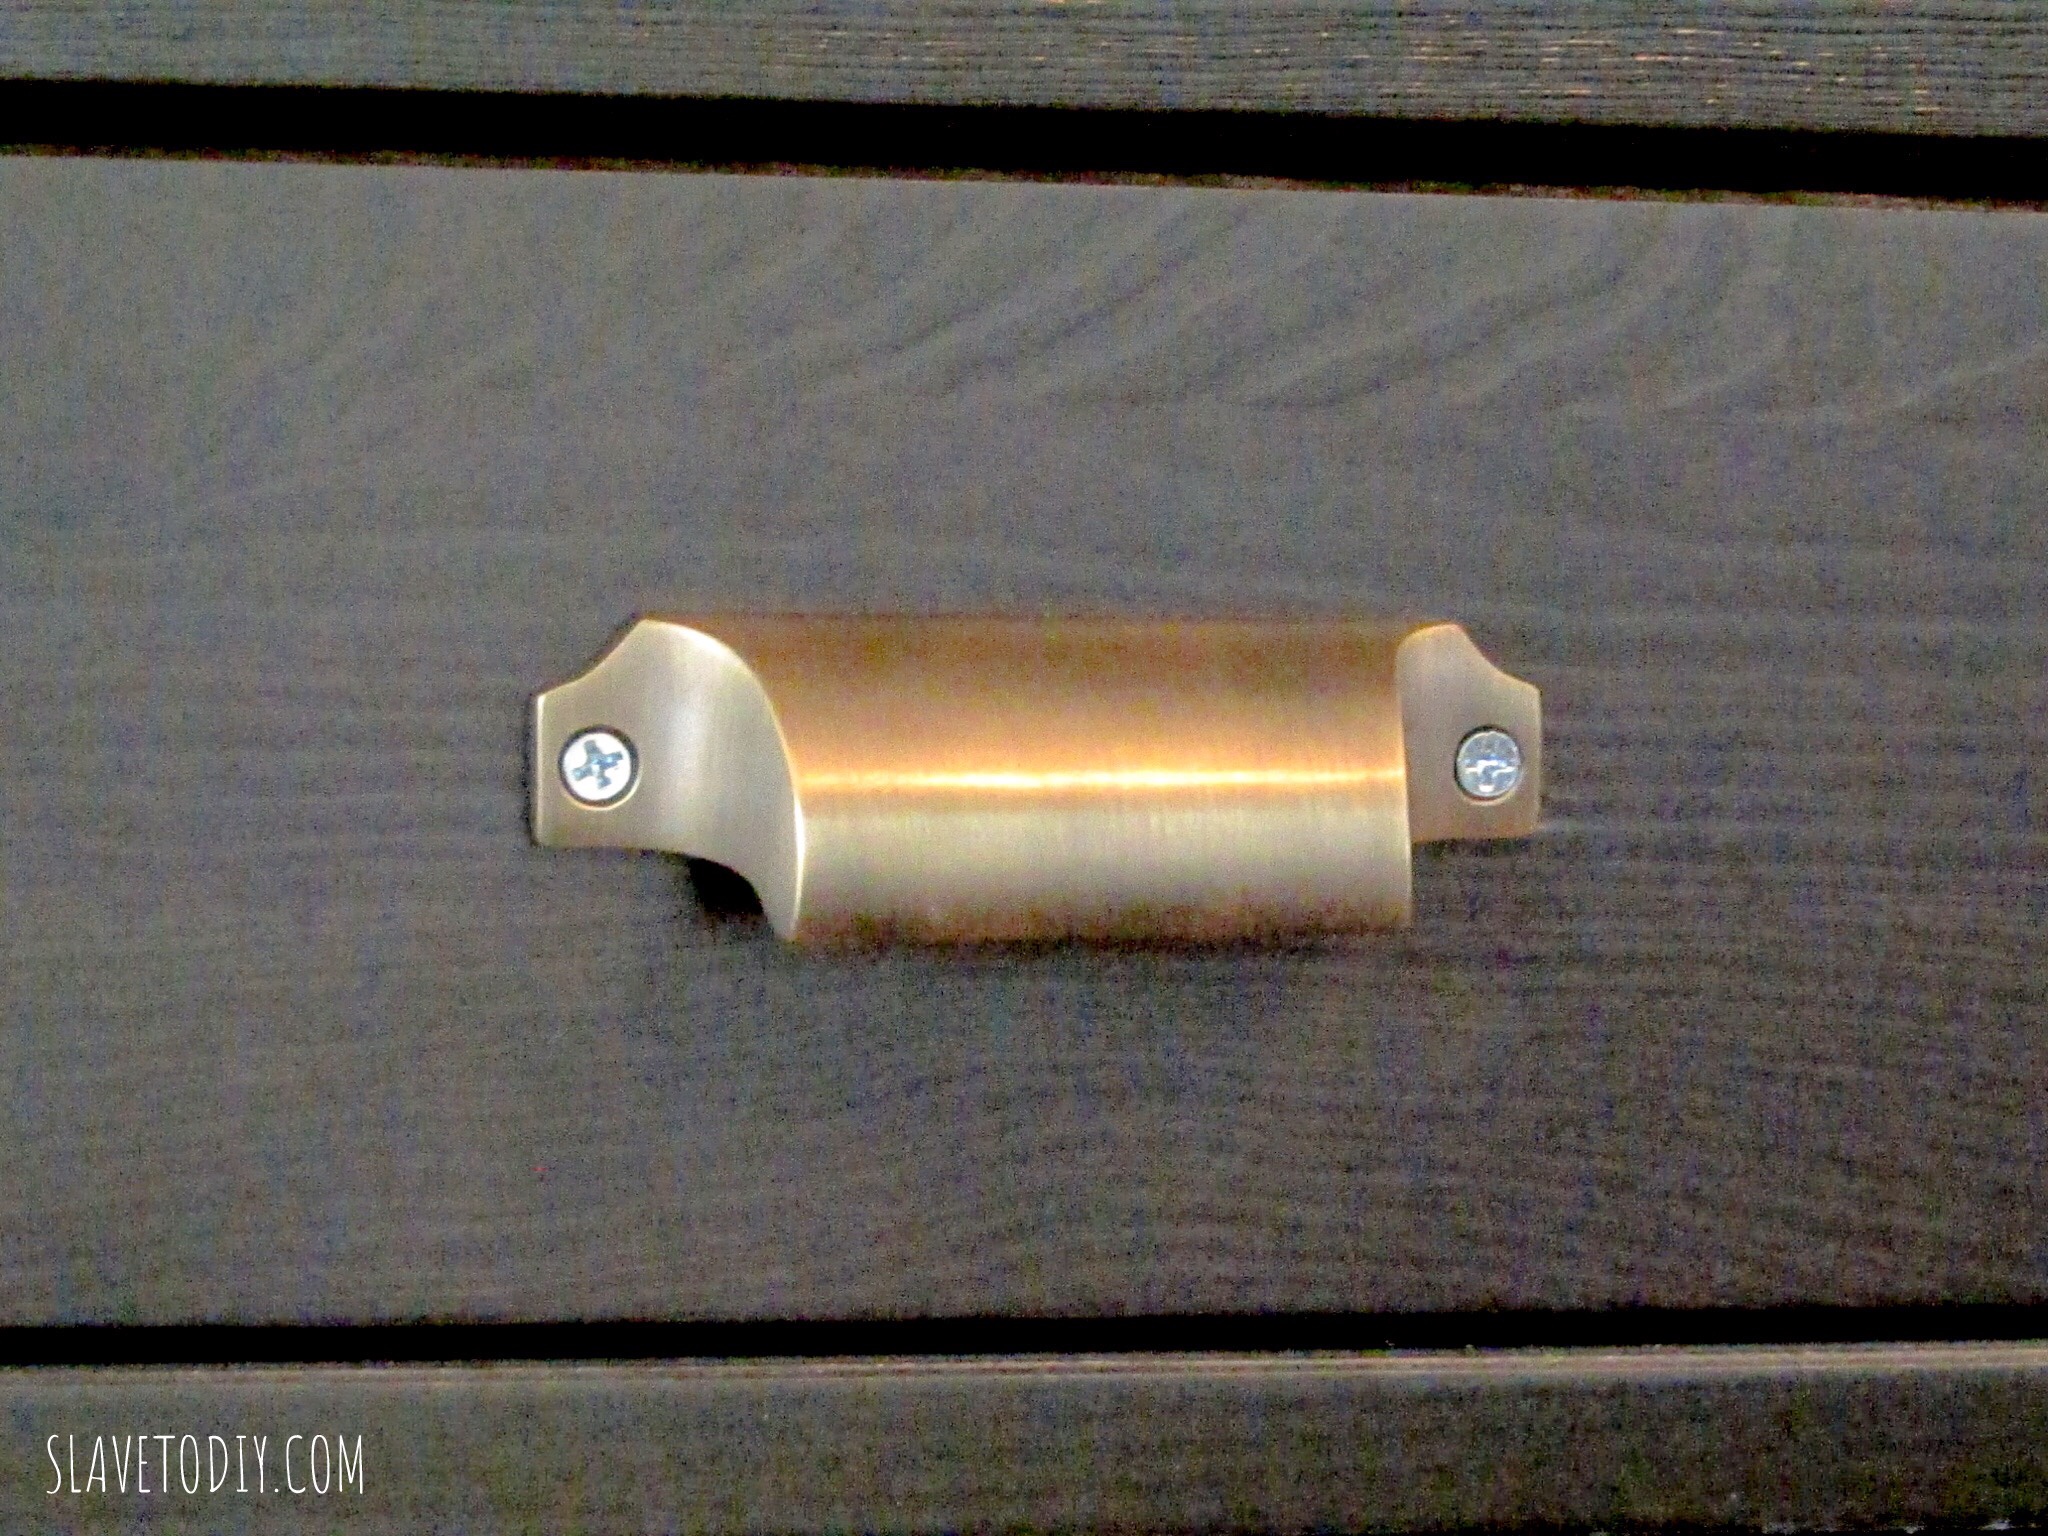
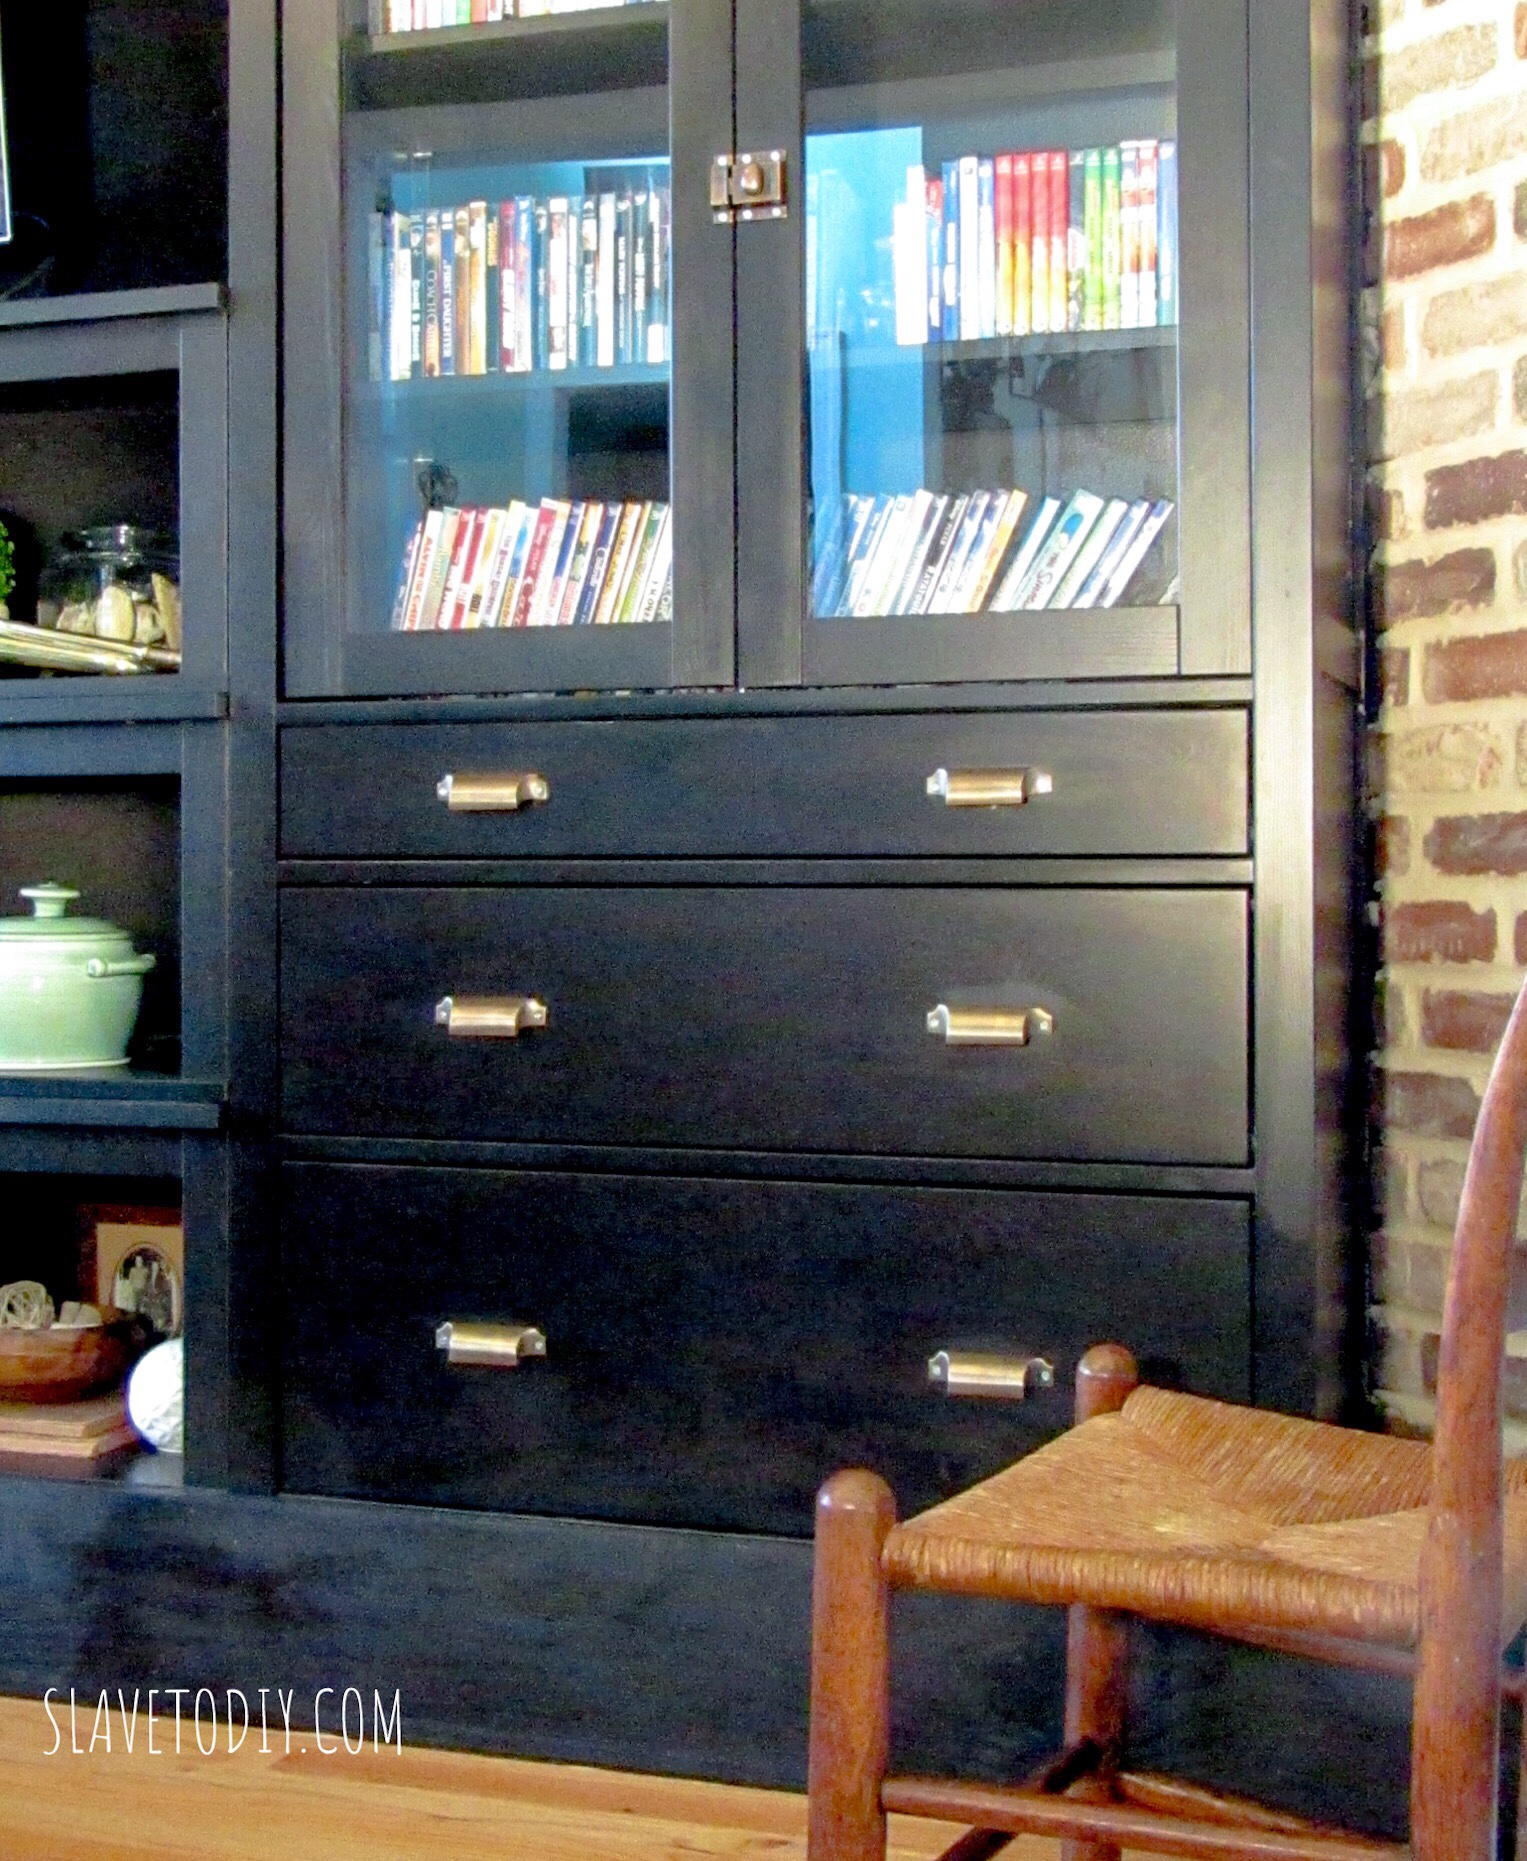
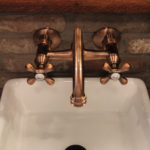
This dresser was only $40, including the carrara marble vanity top. The Kraus Vessel Sink was $141.49 and the Kingston 6-inch Adjustable Center Wall Mount Kitchen Faucet was $117.49 (pretty AMAZING for a solid brass wall faucet). You simply CANNOT find a vanity that’s not MDF garbage for that price.

How To Create A Historic Bathroom In A New Home


I was the most surprised by this incredible faucet: I had no idea it could be that cost effective and be so beautiful. Check out some close ups.


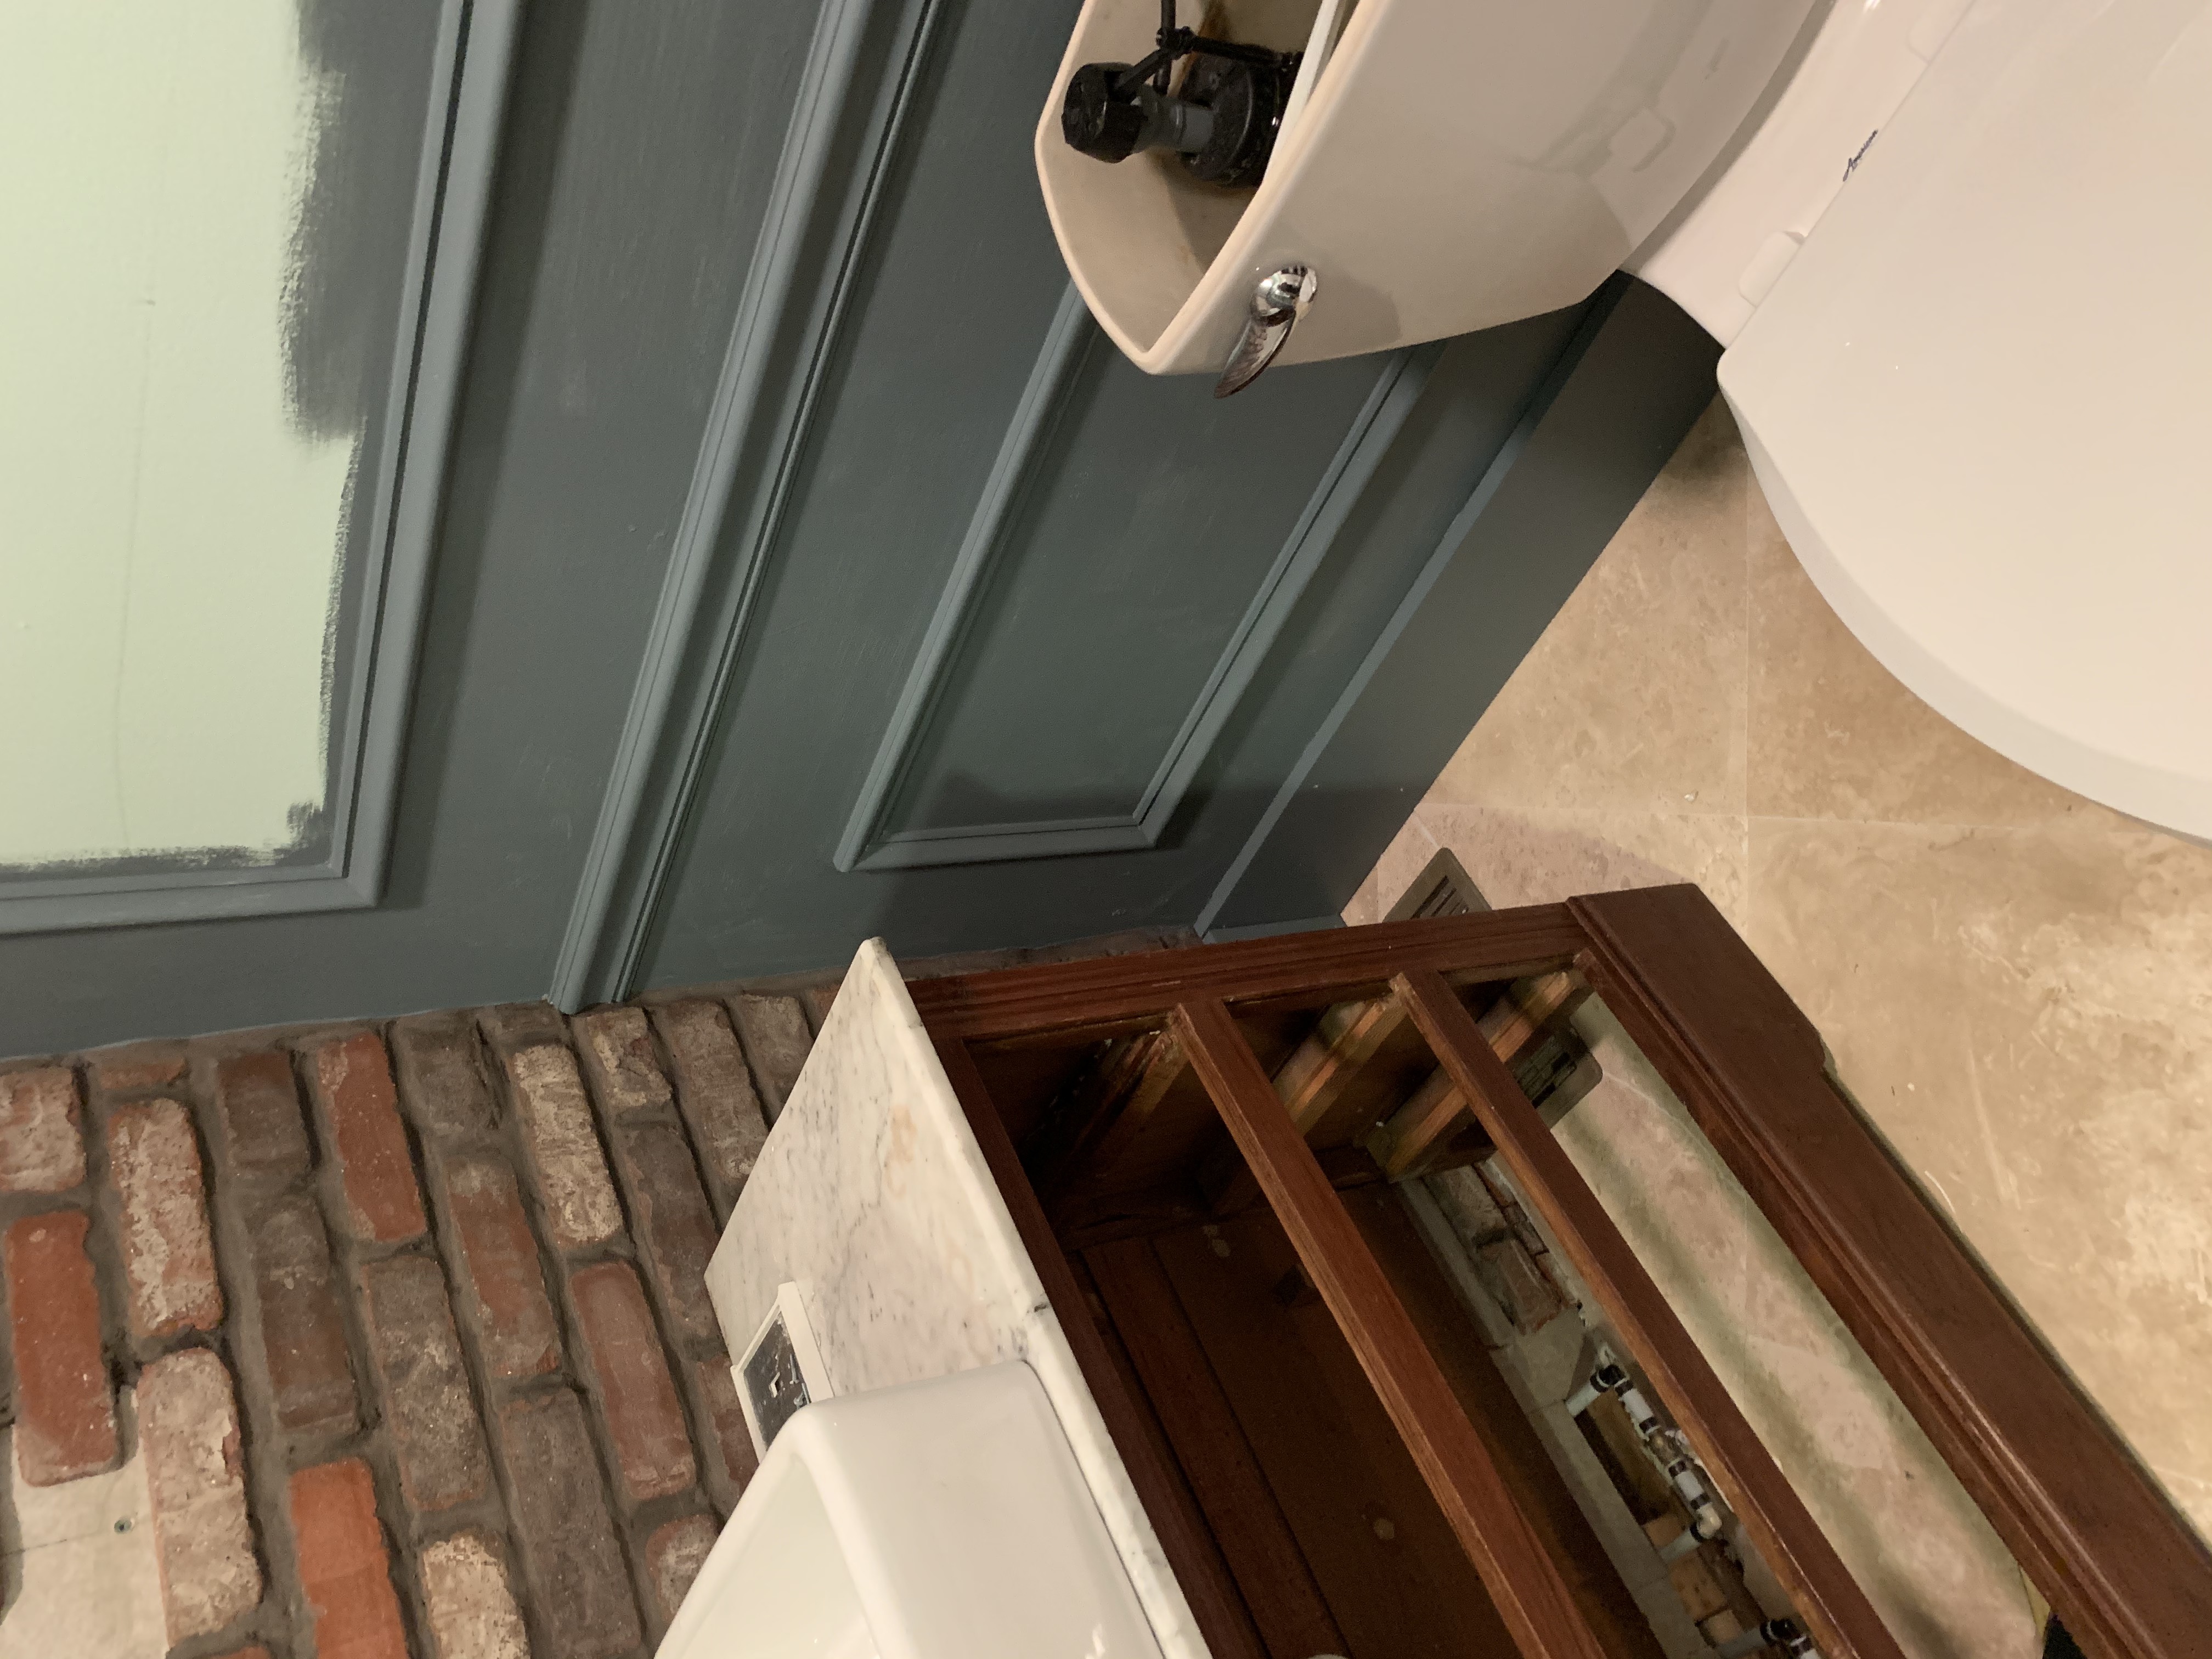
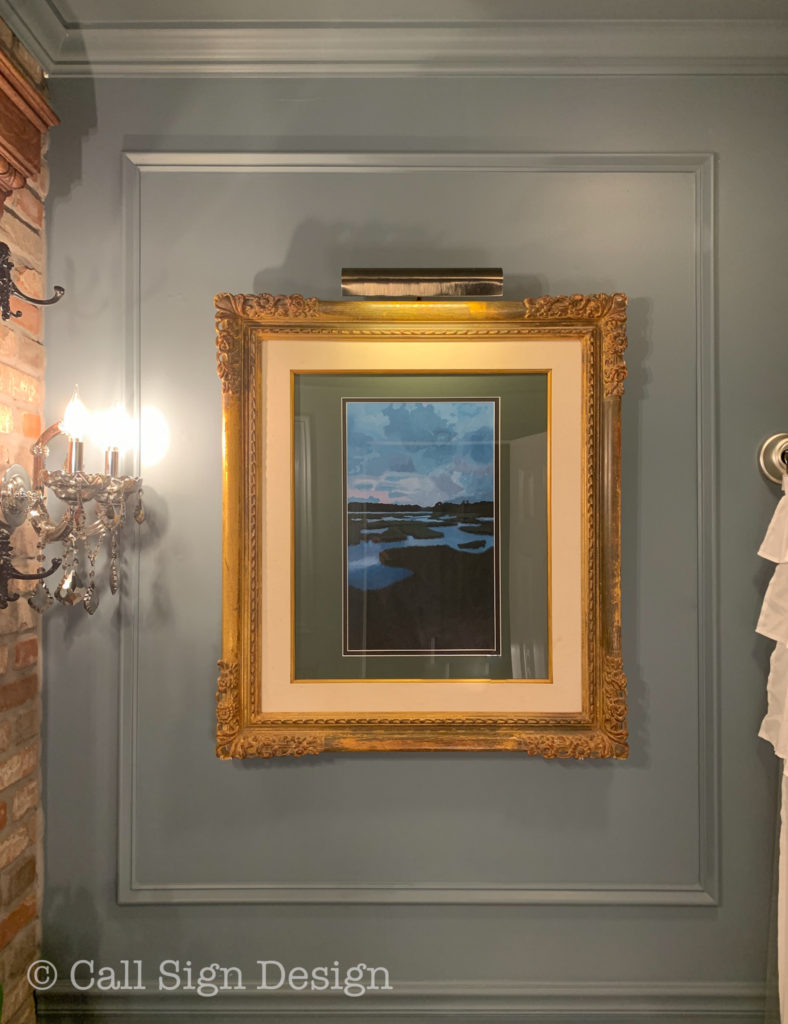
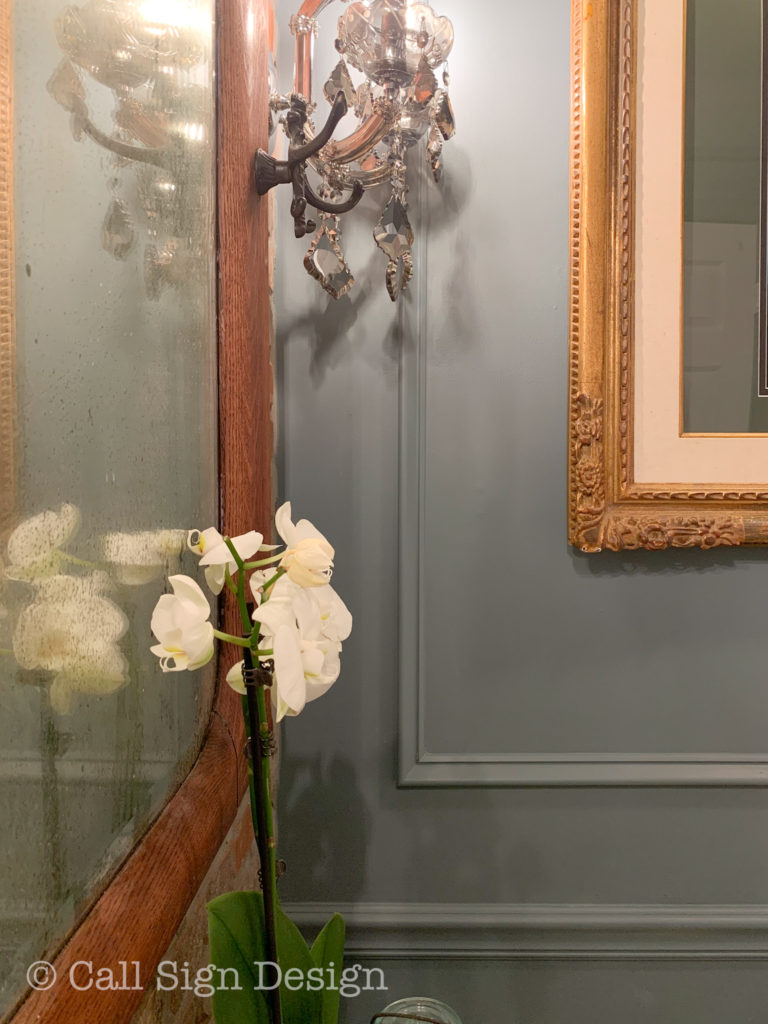
One of the easiest ways to add depth to walls (and get rid of that horrid new house feel) is to add moldings. I wanted this already small room to feel cozy, but not claustrophobic. By painting everything one color, it feels bigger and taller. We added picture frame moldings, chair rail, and put in new baseboards. We were able to reuse the crown molding.

And that fantastic art? It’s DIY. Check out the Full Tutorial On The Easy Way To DIY Breathtaking Landscape and Scenery Paintings.

The Easy Way To DIY Breathtaking Landscape and Scenery Paintings


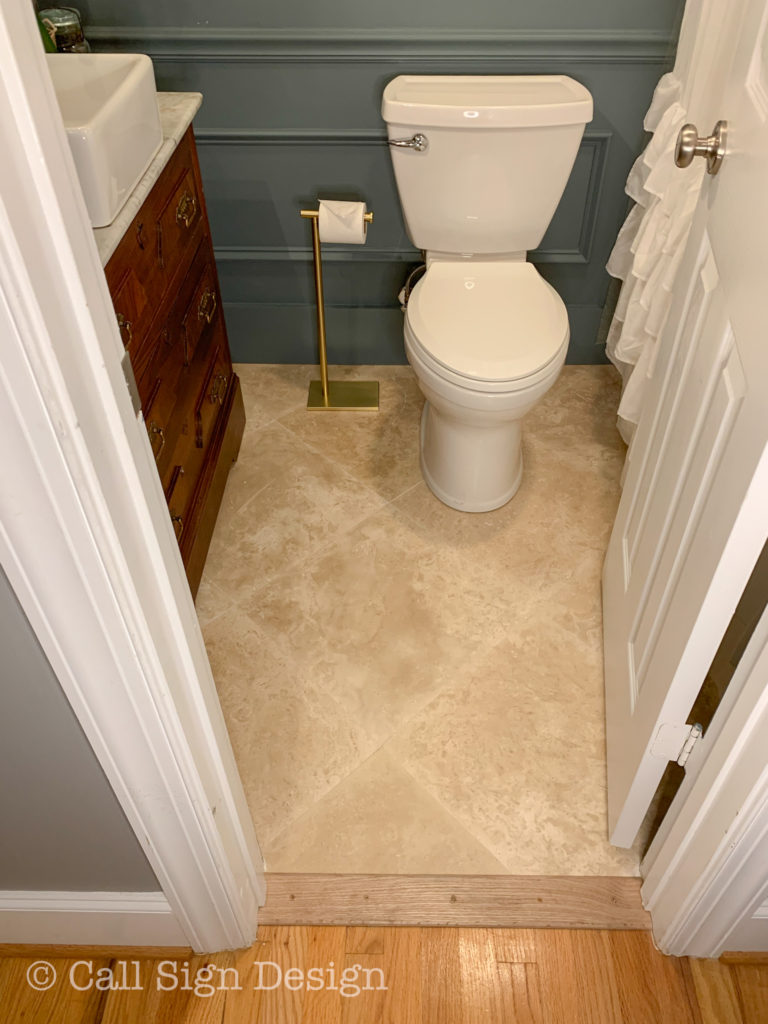
We pulled out the hardwood (why why why would you ever put wood in a bathroom???) and traded it for this gorgeous Travertine Field Tile in Ivory Honed (18″X18″). It is breathtaking but EXTREMELY finicky to install. We cracked two tiles during installation. The end result: SO WORTH IT. Travertine tile (limestone floor tile) is timeless and I made sure to pick one without the peachy/pink hues that I hate.

The commode we already had (we have upgraded every toilet in our last two houses to the American Standard Champion 4, because it is the UNCLOGGABLE toilet).  It’s also very attractive, so win win. This just required a removal to put down the floors and a reinstall afterward.

How To Create A Historic Bathroom In A New Home

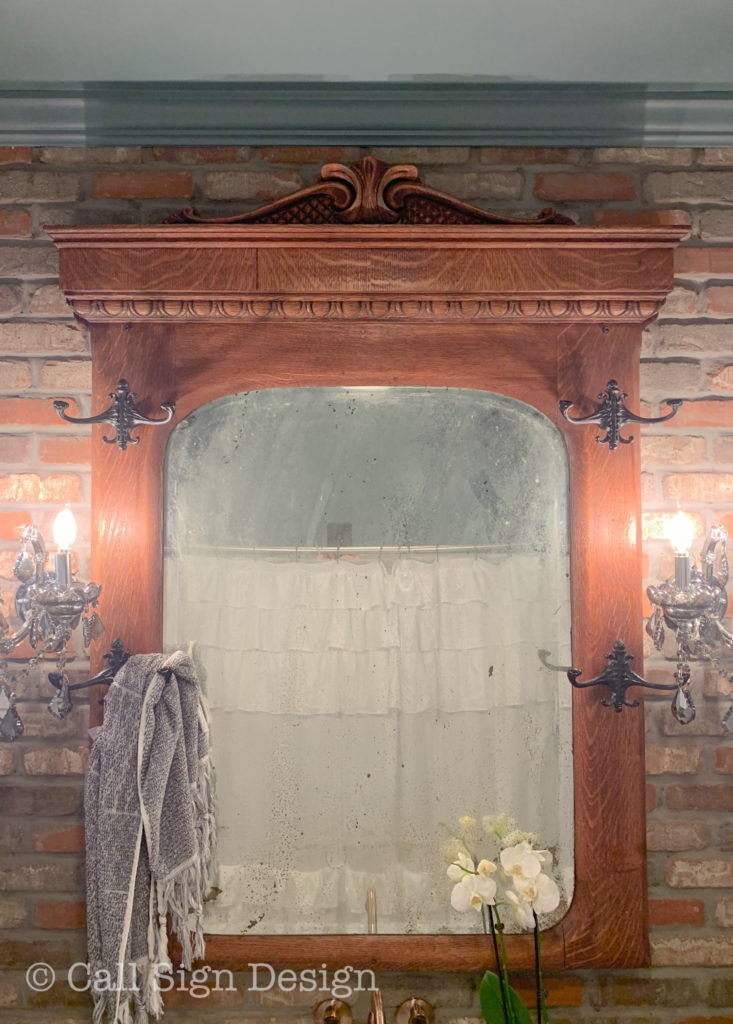
In this shot you can see the antique Hall Tree I found on Craigslist for (I think) around $100. It was painted in a robin’s egg blue, and it was no small task getting all the paint off, but I used this paint and varnish remover, and that helped tremendously. I absolutely ADORE how it turned out (and that I can use the hooks for towels).

One little problem, though. It is ENORMOUS.

Remember Mr. “That Bathroom Doesn’t Need to Renovated” from next door? Well, as penance I asked him and his son to come over to help hang it. This involved he, his son, and my husband squeezed into this tiny bathroom, holding it up, and trying to line the bolts up with the holes we had dry fitted.

I was balancing on the toilet lid behind them, waiting with the drill to drive home the bolts as soon as someone signaled they had a bolt lined up.

So, Rainman says, “I think it’s in.” And, without hesitation, I leapt into action… RAKAKAKAK… and drove that bolt home…

Smashing Rainman’s finger between the mirror and the brick.

We might have to work on our communication.

But, I’m betting the neighbor probably won’t mess with me after that. I feel like the head of an organized crime family. Be afraid, be very afraid.

Then there’s my son, who is apparently NOT afraid of me. He thought I needed to replace the mirror part for one less “antiqued” (which he brought up no less than thirty-seven times prior to installation). Pffffft. What he doesn’t know yet, because he’s an amateur is that this is the perfect party mirror: everyone looks lovely in it. He’s just not old enough to appreciate the beauty of an imperfect mirror.

How To Create A Historic Bathroom In A New Home


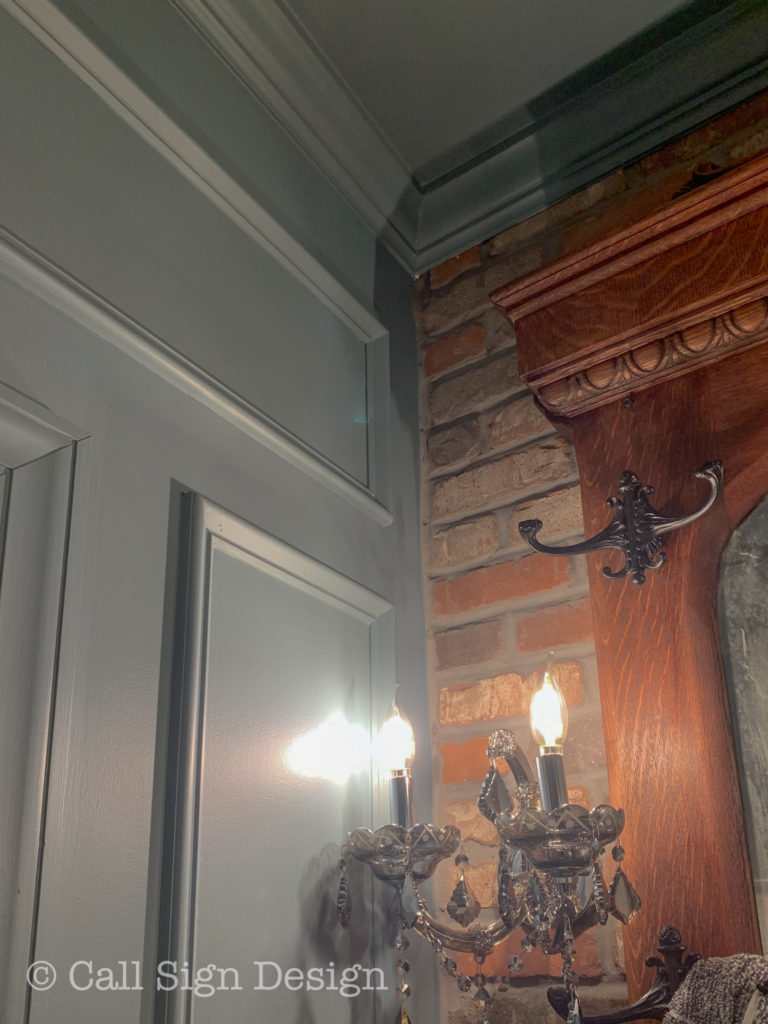
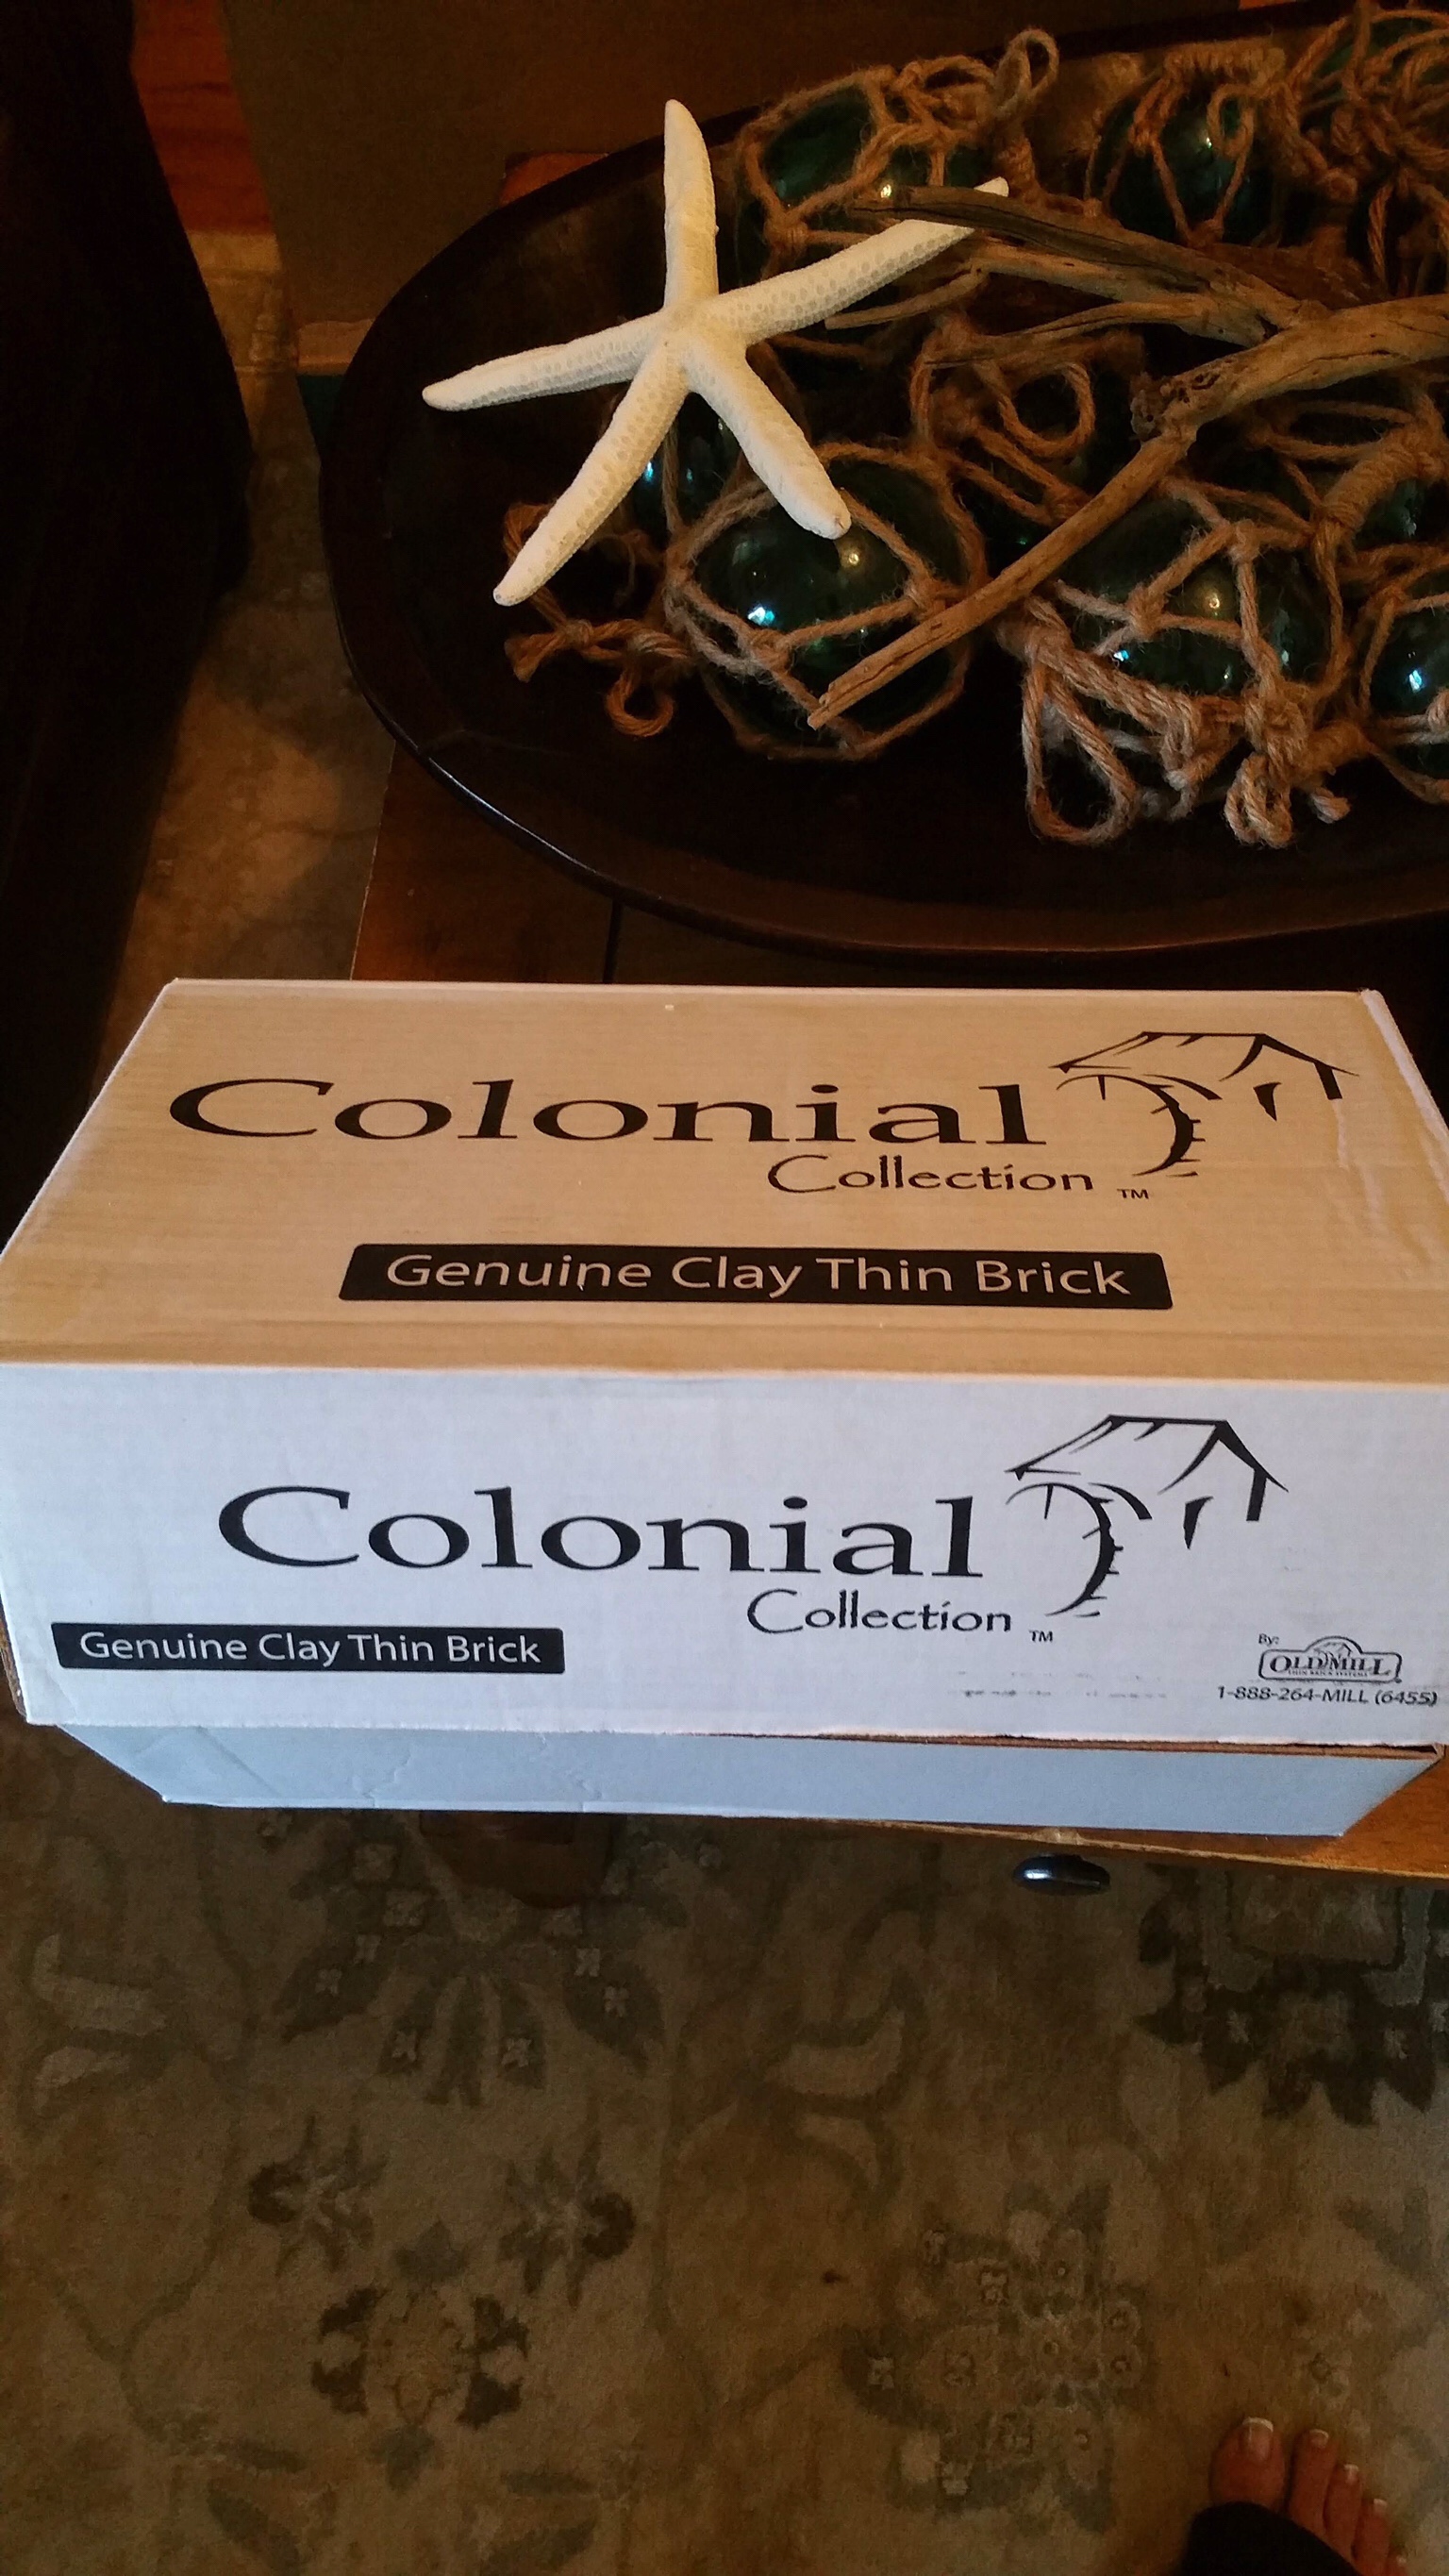
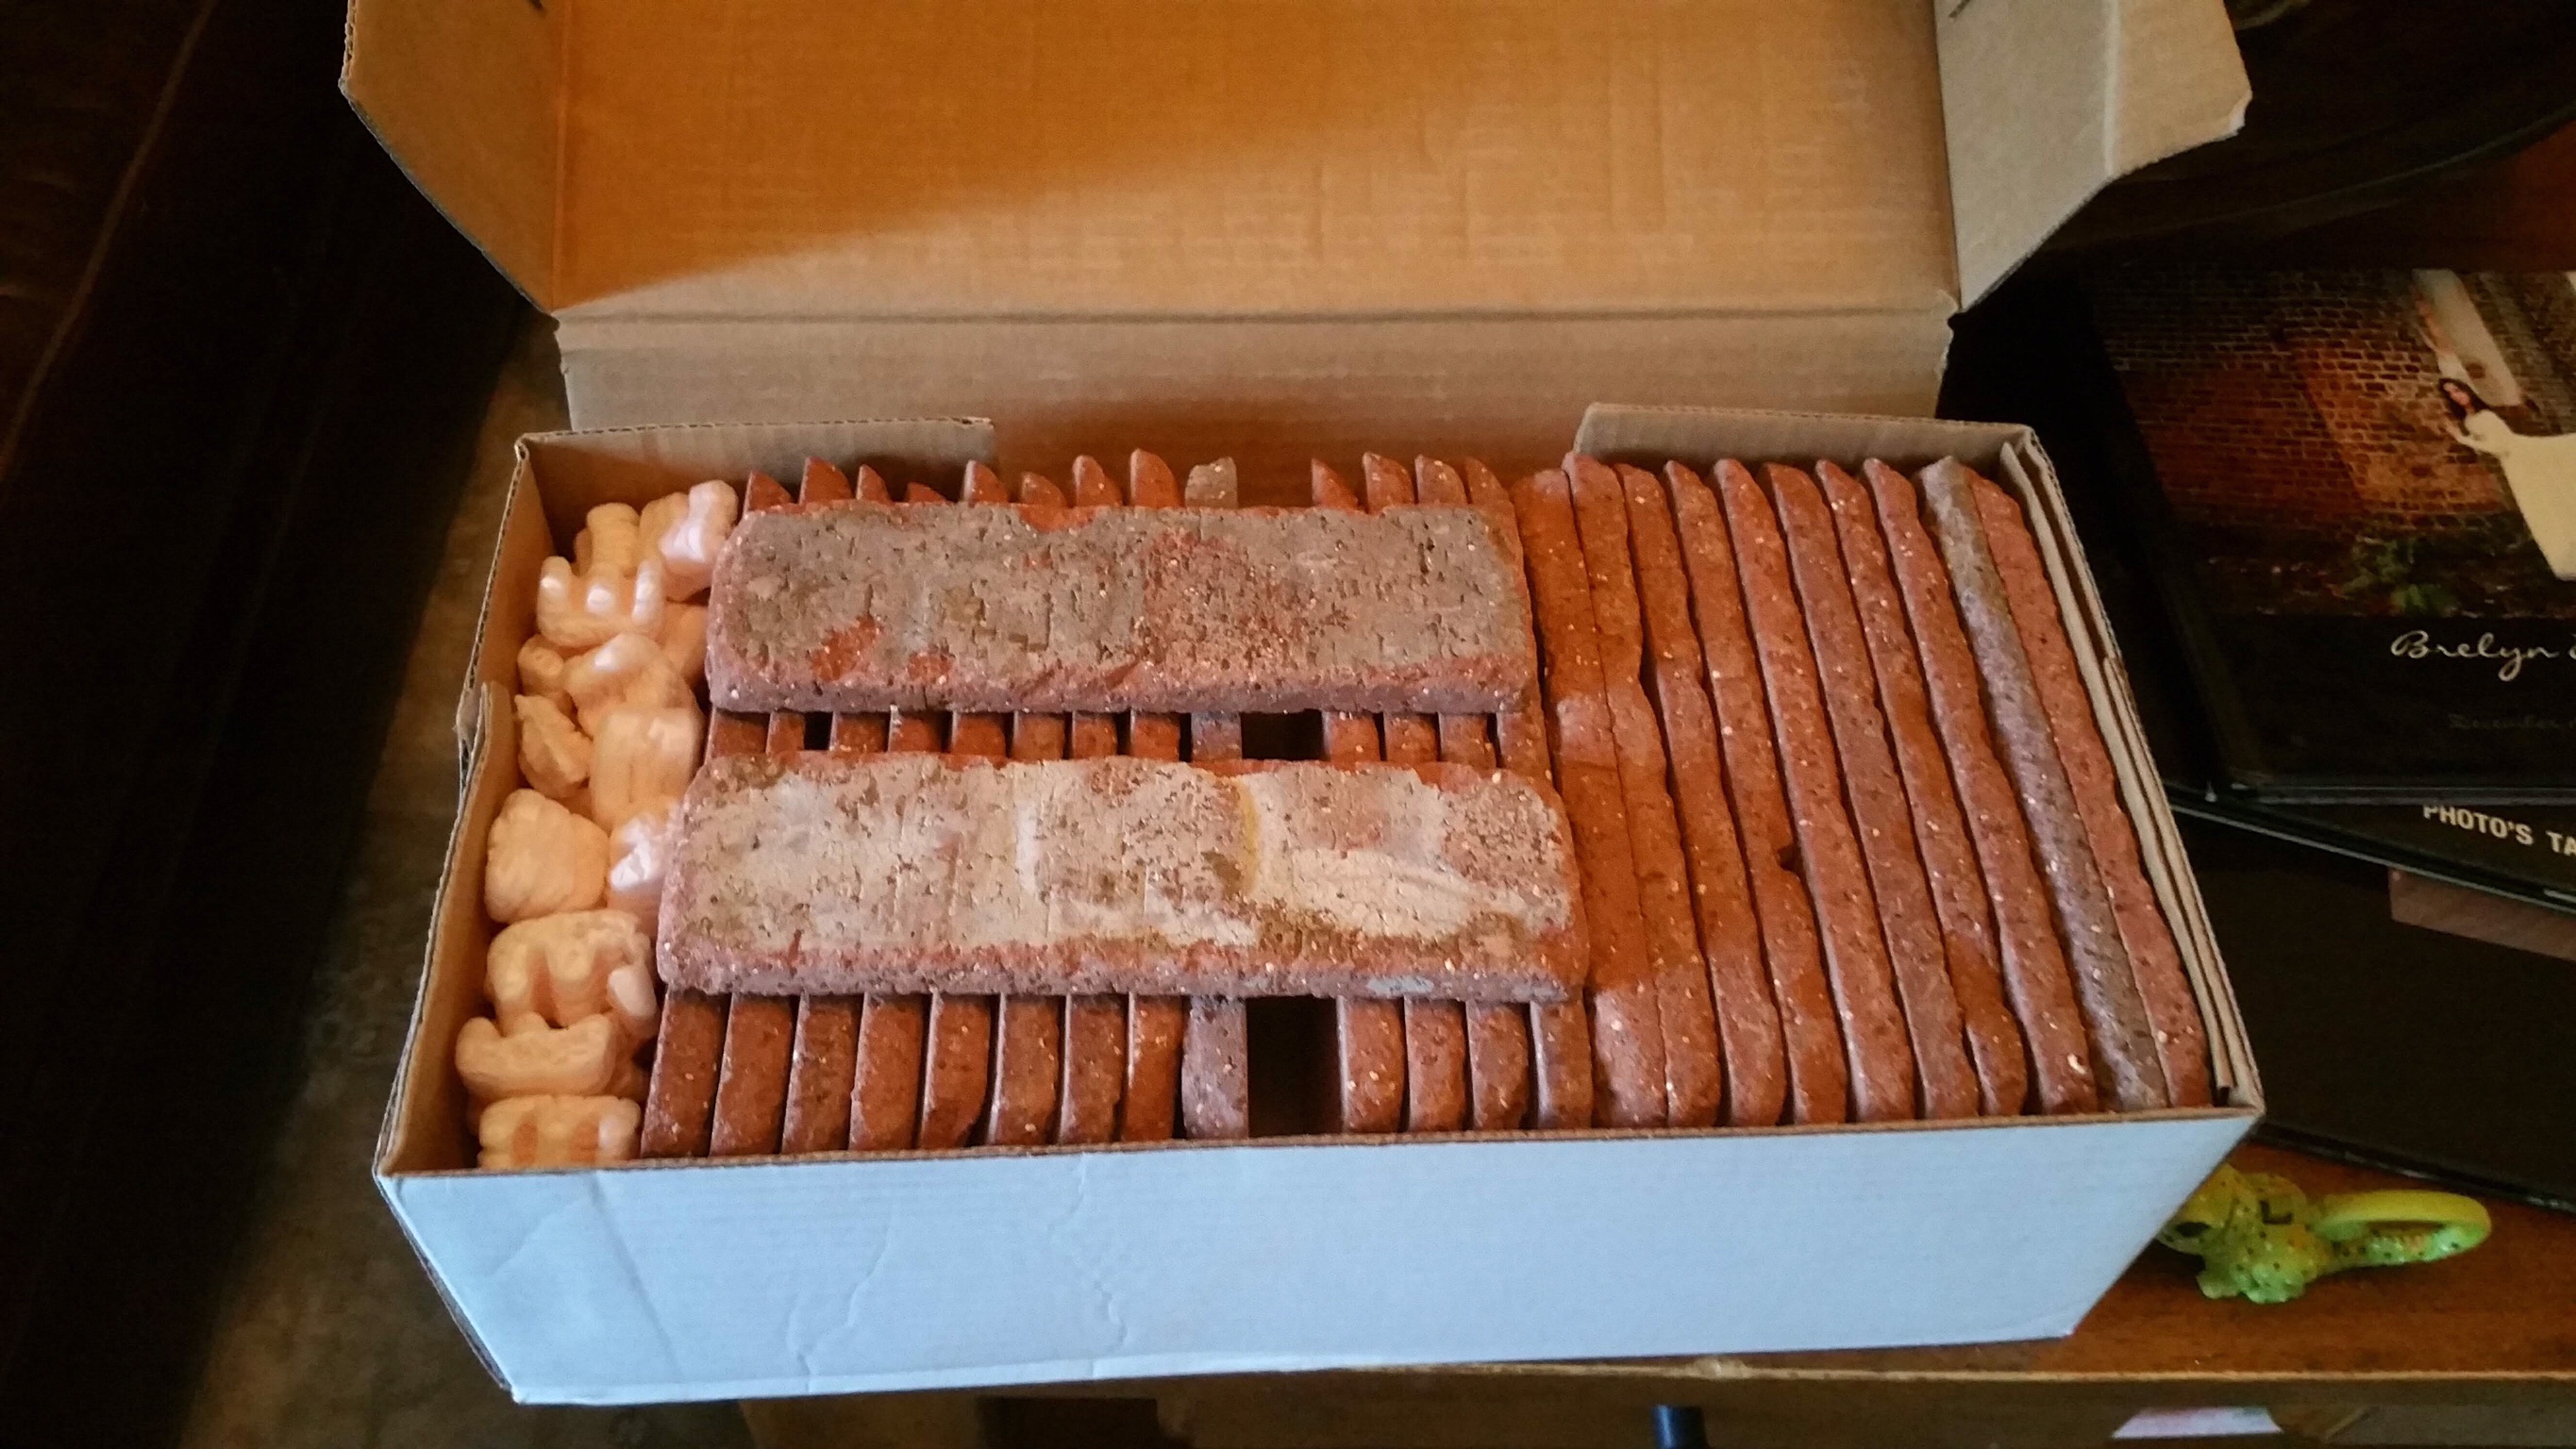
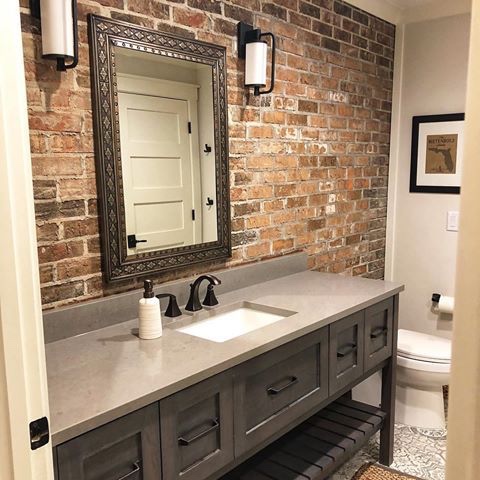
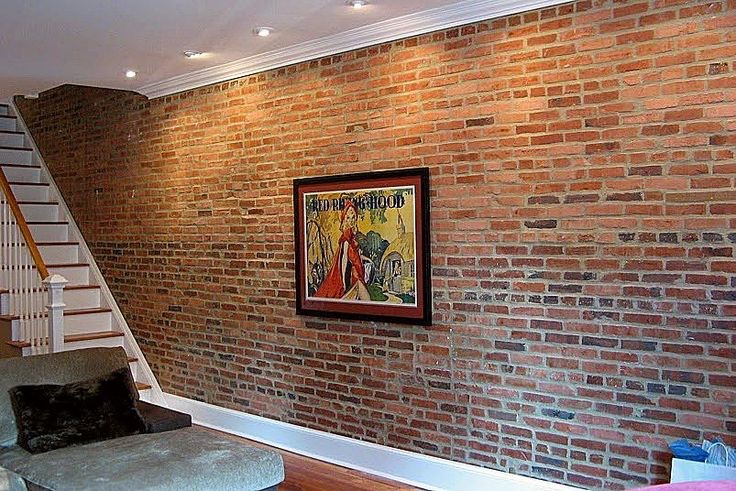
How about those awesome Veneer Bricks from Old Mill? This is the third time we’ve used these (the Castle Gate color) and they are absolutely FANTASTIC. They are 100% authentic brick, just thinner and easier to install. We went with a medium gray grout this time to achieve the antique look we were going for and I’m absolutely over the moon with how it turned out!

Watch for our installation tutorial coming soon!

How To Create A Historic Bathroom In A New Home


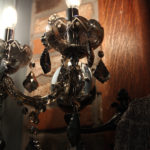
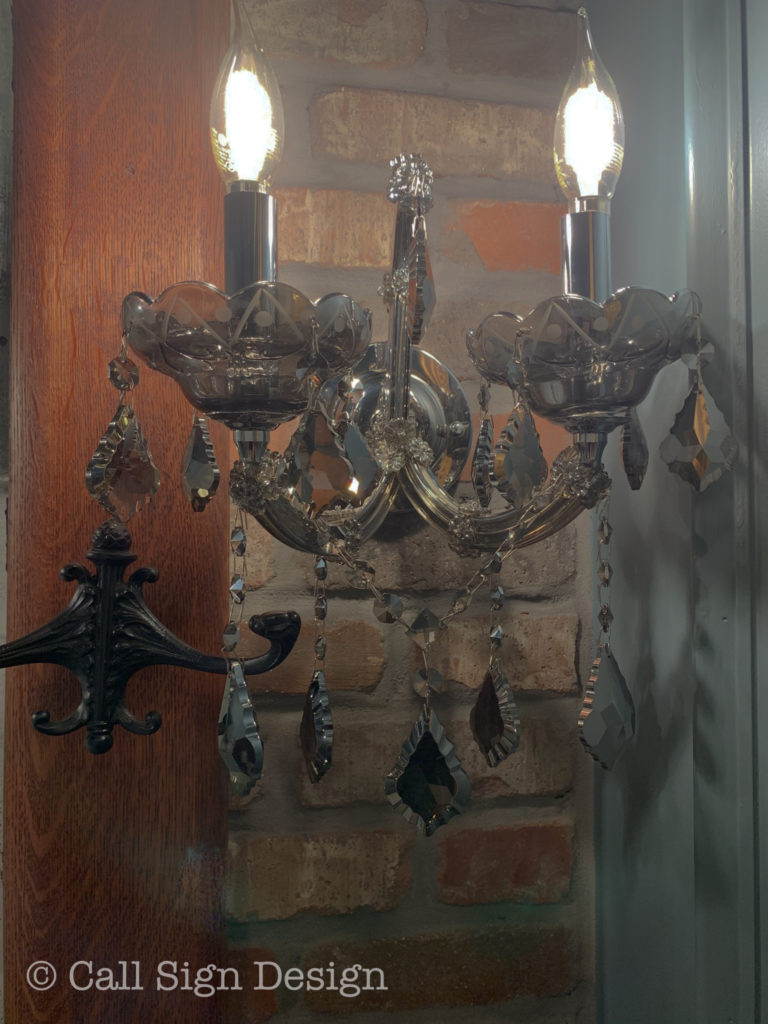
So, by now you’ve noticed those Dreamy 2 Light Sconces With Smoke Crystals. Yes, I’ll be buying more when they are in stock again. They match our RH Rococo Chandeliers (in smoke) perfectly, but with a much smaller price tag.

How To Create A Historic Bathroom In A New Home


And more pictures of my “Smithsonian bath,” (as my sweet sister dubbed it).

How To Create A Historic Bathroom In A New Home


How To Create A Historic Bathroom In A New Home


How To Create A Historic Bathroom In A New Home


How To Create A Historic Bathroom In A New Home


How To Create A Historic Bathroom In A New Home


How To Create A Historic Bathroom In A New Home


How To Create A Historic Bathroom In A New Home


How To Create A Historic Bathroom In A New Home


How To Create A Historic Bathroom In A New Home


How To Create A Historic Bathroom In A New Home


How To Create A Historic Bathroom In A New Home


Here is the complete source list for our bathroom reno (and staging items):

Old Mill Brick Veneer, Castle Gate

Smoke Crystal Two Light Sconce

Vintage Hall Tree Mirror: Craigslist

Kraus White Porcelain Vessel Sink

Kingston Brass Wall-Mounted Faucet

Dresser With Carrara Marble Top: Craigslist

Travertine 18″ Field Tile In Honed Ivory

Paint: Smokestack Gray, Benjamin Moore

Brushed Brass Freestanding Toilet Paper Holder

Cordless Remote Control LED 11.5″ Picture Light

Ruffled Shower Curtain

Hitit Jacquard Yarn Dyed Turkish Hand Towels With Tassels

Mrs. Meyers Peppermint Handsoap

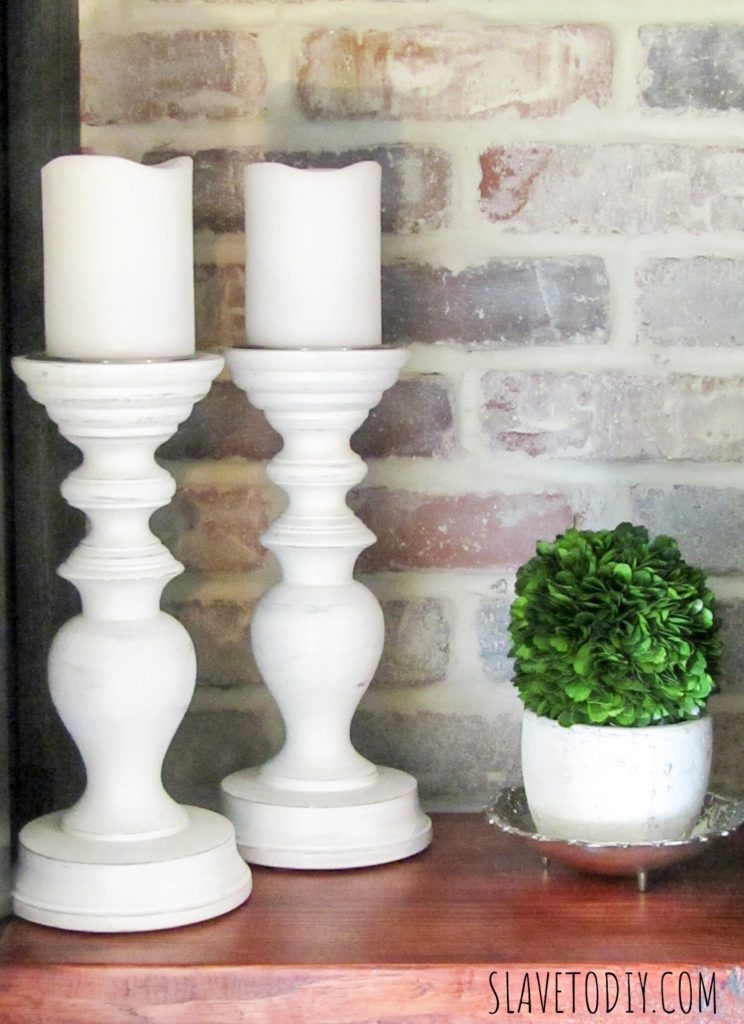
Water Hyacinth Magazine Basket

Molding: Lowe’s

Canvas With Vintage Frame: Easy Canvas Prints and Craigslist


So what do you think?

Can you see doing something like this in your bathroom?

Check out more fantastic projects and design inspiration on the blog!


Cheers!


*Legal stuff:

I am honest about my experiences with different products and write because I enjoy it.  I do however, have the opportunity to earn money for my writing, also.

Slavetodiy.com is a participant in the Amazon Services LLC Associates Program, an affiliate advertising program designed to provide a means for sites to earn advertising fees by advertising and linking to amazon.com.  Amazon offers a small commission on products sold through their affiliate links.  Each of your purchases via our Amazon affiliation links supports our cause at no additional cost to you.

If a blogger links to an Amazon product (with a special code for affiliates embedded in the link), and a reader places an item in their “shopping cart” through that link within 24 hours of clicking the link, the blogger gets a small percentage of the sale.  Amazon links are not “pay per click.”  If you click on the product link and stay around Amazon and purchase something else, however, I will get a commission on that sale.

This site also contains affiliate links through //Commerce/Sovrn. //Commerce or our Publishers may be compensated when you click through links on our site.

The Classic Living Room of My Dreams

I am super excited to be sharing our completed living room with you!!!  It’s hard to believe that it’s come this far from where we started, but one of the reasons we bought this place was its overall improvability.  I like everything customized MY way, and it’s nice not have to make any structural changes to achieve results, or to pay a higher price for a home that’s finished, but not necessarily what you would have chosen.  So, now we have EXACTLY what I wanted and it turned out even better than I dreamed.  See the complete source list below each photo!

*This post may contain affiliate links. Please see full disclosure at the end of the post.

So, here’s a flashback to what this place looked like before we moved in (eeeeek!).  But, with the high ceilings and great windows, it was ripe for an elegant update.  The house was super clean and ready for a facelift.

ec032231-9fac-436c-b2e9-43cb91c3eeb6

It is difficult to believe that this is the same room, but I am completely in love.  Check out the incredible results:


Classic living room with Pottery Barn Chesterfield sofa, RH 19th Century Rococo Iron & Crystal Round Chandelier, and RH knock off (DIY) velvet curtains

The fantastic light fixture from RH is the crown jewel of the space and really takes it to another level.  It is the 19th Century Rococo Iron & Crystal Round Chandelier in Matte Natural Iron/Smoke Crystal and it is breathtaking.

I started out with a great foundation piece from Pottery Barn, this Grand Chesterfield Sofa in Vintage Cocoa Leather that has held up great to kids, two cats, and a dog that occasional jumps up when we’re not looking.

The curtain rods with marble end caps were super reasonable and I got them at my local Lowe’s.

Also from Lowe’s are the metal globe lamps that flank the couch.

The side tables are from wally-world and are decent (they’re not show-stoppers because they are playing a support role here).

The customized Bourbon Barrel top is from Etsy and the shop name is KYBourbonBarrel.  This was a gift for my husband for Christmas and we just love it.

The velvet curtains were sewn by my mother and you can find the source links and project tutorial here.

The rug is from Home Depot and it’s one of my favorite finds.  It doesn’t feel cheapy and it wasn’t a small fortune like similar ones I like from Pottery Barn.  I wish I had a sourced a few others from there that I got online and didn’t totally love.

The pillow covers and blanket are all from Amazon: the whalecompass rose pillow covers, dark gray corduroy pillow covers, and fuzzy light gray blanket and pillow covers.

Hemnes IKEA Builtins in Black with Custom Hardware

Above are the semi-custom IKEA builtins that Rainman built for me.  You can find the components on the IKEA website  and the tutorial here.

We updated them with Antiqued Brass Bin Pulls and Antique Brass Cabinet Latches from House of Antique Hardware and it really changed the look of the whole unit.  The tutorial is here.

The beautiful, solid (and did I mention heavy) dough bowl is from Pottery Barn, although I’m not totally sure they have this dark wood one anymore.  In it are found driftwood, a starfish, and Japanese Fishing Floats.

The room was designed around the curved television so that it can be viewed well from almost any angle.  Rainman researched and decided on the LG 4H in a curved model.  It’s pretty awesome.

Classic Living Room with black builtins, leather chesterfield sofa from Pottery Barn, and Chandelier from Restoration Hardware

Most of the items in the builtins are things that I’ve collected over the years but there are a few that I’ve purchased recently to fill in just a few areas.  I believe in builtins because you need them, not to arbitrarily spend money for storage and display space that you don’t need.


IKEA black builtins, brick veneer, custom wood shelves flanking the builtins, RH Chandelier

The little punches of green are super important on the builtins and I love getting REAL preserved boxwood.  My artisan of choice is on Amazon and Etsy, Door and Decor.  The wreath below is from her, also, and her work is stunning.  The prices are slightly less than West Elm or other online vendors and her creations are far superior.


Rainman’s chair, with Kim Taylor Reece photography in Koa wood frames, Preserved Boxwood Wreath from DoorandDecor (Etsy)

To match the chesterfield sofa, we purchased the Lansing Leather Recliner in Vintage Cocoa from Pottery Barn.

The tutorial for the dried rose arrangement is here and the table is an antique hand me down from my mom.

The Octopus Pillow Cover and Compass Rose Pillow cover are both from Amazon.  The lantern looks very nice but I wasn’t super excited about the construction, so I won’t recommend it.

So glad you came to check out our finished adult living room!  Thanks for stopping by and check out our other updates, projects, and design inspiration on our Blog.  Cheers!

*Legal stuff:

I am honest about my experiences with different products and write because I enjoy it.  I do however, have the opportunity to earn money for my writing, also.

Slavetodiy.com is a participant in the Amazon Services LLC Associates Program, an affiliate advertising program designed to provide a means for sites to earn advertising fees by advertising and linking to amazon.com.  Amazon offers a small commission on products sold through their affiliate links.  Each of your purchases via our Amazon affiliation links supports our cause at no additional cost to you.

If a blogger links to an Amazon product (with a special code for affiliates embedded in the link), and a reader places an item in their “shopping cart” through that link within 24 hours of clicking the link, the blogger gets a small percentage of the sale.  Amazon links are not “pay per click.”  If you click on the product link and stay around Amazon and purchase something else, however, I will get a commission on that sale.

Slavetodiy.com is also a VigLink affiliate advertiser which works similarly.

DIY Black Builtins, Epic Hemnes IKEA Hack

I’m so excited the Hemnes IKEA builtins are finally finished!!! This has literally been a two-year process (of building custom-ish bookshelves) and life has been truly uncooperative. But, they are done and I am super psyched to be sharing our process and pictures with you!

Before I get started, I feel like a short discussion is warranted… a note on this new culture in which I find myself.

You know, when I was growing up, the word “hack” was a bad thing. Like, if someone called you a “no talent hack” or you were watching a movie about murderous chainsaw wielding “hacks”… or am I using that wrong? Anyway, so I’m old now, and apparently hacking is a positive thing. Unless, it’s computer related and you’re trying to pass high school by updating your math grade in the school by flashlight. But, suddenly life hacks are awesome, furniture hacks are even better, and IKEA hacks are the holy grail. So, now I’m hacking away, trying to fit in.

I’ve performed my very first IKEA hack (in my head I’m trying desperately to suppress the sound of a hair ball being coughed up every time I write the word “hack”).

This post may contain affiliate links.  Please see the full disclosure at the bottom of the post.

After much pinteresting and pinning and planning I finally bit the bullet and ordered the components for my long-awaited living room builtins (I challenge you to find hemnes hacks in black on Pinterest- they’re few and far between). The boxes of homeless decor were staring at me every time I walked by and rendering the media room, which was temporarily storing the wayward decor, unusable. Enough was enough. And this HAD to be easier than building from scratch with MDF and poplar/pine as we’ve done in the past. And, of course, that dreamy factory finish is just impossible to accomplish without, you know, buying it from the factory.

So, we’ve previously done four sets of built ins of slightly varying design, each time getting better and learning tricks along the way. However, when you’re working with afternoons and weekends, and your own personal OCD- Rainman husband, they take FOREVER. It was worth seeing whether these would look as nice (or better) and if the process would go any more quickly. Fingers crossed. This is in my living room. So, no pressure if I hate it, right?

Listing photo from before we purchased the house.

Before.

Our New House, getting unpacked!

Here’s how this went down. In case the cops ask.

So, I ordered the hemnes components after measuring, remeasuring and adding their weirdly sized measurements together (these are designed with metric measurements, so the conversion is generally some oddball number and 5/8s). So, I got my 6th grade math hat on, did my measurements, made a pretty drawing on graph paper, left PLENTY of wiggle room in the design, and ordered online. This is literally drawn on graph paper. And yes it’s still okay to use a paper and pencil. This is a big wall, and those of you that follow our journey, know I like to use the WHOLE wall when we do builtins. Go big or go home, right?

And now I can’t find my sketch, so I have no proof that ever happened.

A design note: I fell in love with white cabinets and built ins for years. We did white builtins in the last place and I adored them (so did the buyers apparently). But, is that dreamy white kitchen on Pinterest really timeless? Are the built ins? Or will they be the next victim of HGTV inspired design trend that date the home? I’m so glad I waited, because we went with black, and I feel like it’s way more US, and timeless. Dare I say classic? I would hate to be here in 15 years and think, “nice going, 15 years ago self. That looks like garbage.” So, time will tell. But, I feel like black is like that little black dress that will stand the test of time. (I’m not hating on your white builtins, they’re just boring me to tears lately and I’m way to moody for all that cheerfulness).

Total cost on the bookshelves and bridging shelves from IKEA (not final cost with support lumber and trim) was $1591.64. This was the general plan:

IKEA Hemnes Builtins Hack, in black, bridging shelves and bookshelves

Buying from IKEA, a few things to note:

I purchased when I did because they were offering 20% off. Once you add the shipping, it comes out to about what it would’ve otherwise cost. Shipping on furniture is almost never free at IKEA, so if you’re waiting on that it will be a long time. Furniture delivery took about two weeks and was delivered by a different delivery service (as in scheduled with an appointment time, not FedEx or UPS). There was one damaged box with a nicked shelf and one of the seven bridge shelves was missing completely (I did the math on weight and figured out that it never shipped from IKEA, not that it disappeared en route).

So, I immediately emailed with the discrepancy and, after not getting a reply, called IKEA. After 59 minutes on hold listening to the elevator version of “I love you, always forever” by Donna Lewis mixed in with Ikea advertisements, I was approaching homicidal, but got a human being in time that my phone didn’t become just another statistic. Well, it turns out they didn’t ship it on purpose because it wasn’t in stock (could I get a heads up???). Also, helpful-insider-info-Ikea-customer-service-guy shared with me that they never get to the emails, so just call next time… good to know. Back on hold with electronica Donna Lewis…. Yay! They shipped it via FedEx so I don’t even have to be there for delivery. But, wait! The shelf! Back on hold… sigh.

The missing bridging shelf arrived a few days later, not so much the other shelf. Let’s see if I ever get around to calling them on that.

Assembly:

Assemble components. Follow the directions. Leave the el-cheapo back covers off (this is the cardboard-ish thin backer board).

Bridging shelves. Well. Most of them. Stacked. Tempting cats to cause a mishap.


IKEA hemnes bookcase with drawers and cabinets. Partially assembled.


IKEA Hemnes Bookshelf in Black


Helpers assembling Hemnes IKEA with Rainman


Wall prep.

So, for installation the baseboard had to be removed, and not being totally sure where the shelves would cover to (due to the *cough *cough extreme precision of my design plan) I decided to spackle and sand the uneven spots. I hate mud. I hate sheetrock. I hate sanding. Shoot me.

Paint:

I kept seeing all of these great shelves with an accent color on the back wall. So, I chose a color at the paint store, and hated it. My pretty gray turned out purple and I waited a couple of months before admitting that I hated it, and got the wall painted black before the installation began. Yeah, I said months. This is why we don’t six-week challenges. Six MONTH challenges would be record-breaking for us.

Purple. Blech. It was supposed to be gray.

So, we survived the holidays and I dropped not so subtle hints about beginning the installation on our anniversary weekend when we were both coming down with colds. I mean, I painted (again) so now we were waiting on HIM. Not my best moment as me and grumple-stilt-skin headed to Lowe’s with Chatty-Cathy in tow. Thank the Good Lord the Lowe’s car shopping cart was available. About a hundred bucks later, with black cabinet screws and framing lumber, we escaped back to our nest where I decided we collectively needed a break and SEC football was more important than my built ins. Oddly, I didn’t get any protests.

The black looks good, though, right?

Two days later he built the base for the bridging shelves to sit on and we were back to waiting on…. ourselves. Because we were not sure what we wanted to do for a conduit to hide all the crap that goes behind the TV. Well. I’ll let you know.

It’s going to be a few days because it snowed in North Carolina and the state is shut down. My husband was doing donuts in the cul-de-sac in his truck with the kids, so that’s a better day, ANY day, than installing built ins. Snow man 1. Built-ins 0. Send help.

And the kids were out of school for a WEEK. No snowplows. (Did you happen to notice that we’re nowhere near done and these aren’t so much as attached to the wall, but I already started putting stuff in them?)

Cord hiding solution win. I pulled the surge protector out so you could see where it was all hiding.

Several installation sessions happened in the spring. I finally decided on a cord hiding solution (which is totally genius and I should definitely receive a prize for) so my tired Rainman got to work. The cord hiding solution ended up being three rectangles, one in each center shelf, hiding from view the two-inch diameter access holes through the horizontal panels. The cords thread through behind with super easy access.

To be fair… Looking back, I realize that the hesitation for Rainman on this project actually had to do with the odd shape of the hemnes components. And this is something to keep in mind during the design phase.

Front and Side View of Hemnes Bookshelves from IKEA, Dimensions

Basically, the back is not flush on any of them. Presumably this is to allow for the whole unit to sit flat against a wall with base molding, (with the top of the back sticking out further than the bottom) but makes installation as built ins maddening. Several times we had to pull pieces of trim out and reseat them because we lost track of which edges On the face were supposed to line up flush.

In hindsight, it would’ve been easier if we had trimmed the tops on each component so that the back sat completely flat against the wall and we didn’t have to shim each component to line them up. He suggested that after the initial component assembly and I shot it down because all I saw was an afternoon of wasted time disassembling, trimming, and reassembling components. I like the way it ended up because now I can install a light kit with existing gaps, but in hindsight this project would have been WAY faster without the bumped out tops. He was right. I was wrong. Don’t tell him I said that.

This is how ridiculous my life is. It was December when we ordered the IKEA components. It is now July, and wouldn’t ya know, that s&@# is still. Not. Finished. We’re agonizingly close. But, life and work just won’t step aside to allow us to finish the built ins.

Side note, I can blame an entire lost work day, last Sunday, on a collapsed shelf in the garage. Little shelf? No, huge shelf. Like shelf that runs along the entire back of the garage shelf. I went out to get a water out of the beverage fridge and the door was WIDE open. “Which one of you little $#&% left the damn door open and how long has it been that way?” I thought to myself. I pushed on it. Harder. Nothing. I looked up. Why was the beverage igloo pushed forward against it?

Then I saw it, the giant shelf collapsed on top of the fridge, on top of the filing cabinets and router table, BARELY missed the bottle on top of the hot water heater. I distinctly remember warning a certain someone that those were crappy shelves were going to collapse. We installed really strong, nice shelves, that are bolted into ceiling joists. UGH. I managed to only say I told you so once, and everything on the shelf fit up on the new shelves. I still want to find the jackass who built that shelf and have a short conversation with him.

So, here we are again, NOT finished. However, we’ve made some progress. I almost, in a moment of desperation, changed the design plan in favor of the version that would get us to the finish line faster, but I’m just not willing to throw in the towel, yet.

We began installing the components and securing them to the wall and to each other, which proved challenging. This is because of the aforementioned bumpouts which leaves only one section of each component actually touching the wall. We secured them to the studs with black cabinet screws. We used pine boards for the transition areas since they were going to be painted black.

And I have to say, the details are turning out BAD ASS. We ordered some brick veneer from Home Depot (after I price compared with a local brick distributor that needed six weeks lead time to create the veneer and only sold big pallets). It’s called Old Mill Brick, comes in neatly stacked cardboard boxes and is really nice. I looked at all the types first on their website and ended up choosing an antique style, “Colonial Collection Castle Gate”, 59.97 for a box of 50 bricks. Not cheap, but reasonable. Here’s the thing, the cost of the brick detail just on the outside shelves, cost about $120. The mortar and grout ran around $70. But, it’s the thing that makes them awesome. Don’t let the “veneer” part fool you.. It’s real brick. Just thinner.

Castlegate, Old Mill Brick
Castlegate, Old Mill Brick, Veneer

Tip: When measuring for your brick, include your anticipated grout lines in the height and width of your bricks and you won’t ordered $120 worth of extra brick. Yes, we literally ordered twice what we needed. We used half-inch grout lines so our measurements should have been 8.225 x 2.75 instead of 7.625 x 2.25. Luckily, we’re planning to use this same brick as an accent in the kitchen so no biggy.

Concrete Backer Board

We installed concrete backer board on the walls where the brick was going, but looking back, we probably didn’t really need it.


Old Mill Brick, Castlegate, on the accent walls flanking the buitins

We got the brick installed… (that is a much longer story). And I’m not going into it. Because it was misery.  Working in the tiny space was awful.  I look forward to doing this on an open wall.


Anyway, it looks awesome. Took three different tries and one of the biggest, messiest, most tedious installation processes ever. The brick installation process is coming soon.  Maybe.  If I have the strength.

 But, this is what it looks like when we finished the outside edges:

And as you can see we installed the awesome floating shelves on the outer edge. This, combined with the brick really makes this installation special. These little customizations are what make the IKEA hacks look super awesome and non-generic.

Oh, and I’m sure you noticed the pure awesomeness of that pretty hardware (hint: NOT IKEA). See the tutorial on updating the hardware.

So, here’s what they look like empty. Awesome. And most importantly, finished.

IKEA Hemnes Builtins in black

For those of you looking for stuff to buy to “dress your shelves”, I hate you. Built ins are for unpacking 10 boxes of stuff you already had, not arbitrarily purchasing junk so your built ins look good. That’s insane. Find stuff around the house. Arrange it. Never, never buy stuff to fill shelves. Also, never buy anything you don’t ABSOLUTELY have to have. I learned this from my mother who had to smuggle outdated decor out of the house when my dad was out-of-town.

Anyway, how cool is it that we went from THIS:

ec032231-9fac-436c-b2e9-43cb91c3eeb6

To THIS:

IKEA Hemnes Hack-in-black Builtins, dressed and finished.

I don’t know if you noticed the fantastic, gray velvet curtains, but you can find that tutorial here: DIY Restoration Hardware Knock Off Velvet Curtains.

I’m SO super excited we’re finished.  My SUPER EXACT recollection of how much this project cost was around $2500, including the hardware update. Using the brick veneer definitely added some cost but I think the effect is spectacular, and lends itself to the CUSTOM look we were going for.

Thanks for checking out our FINISHED project and we’d love for you to check out more on our Blog.  Cheers!


*Legal stuff:

I am honest about my experiences with different products and write because I enjoy it.  I do however, have the opportunity to earn money for my writing, also.

Slavetodiy.com is a participant in the Amazon Services LLC Associates Program, an affiliate advertising program designed to provide a means for sites to earn advertising fees by advertising and linking to amazon.com.  Amazon offers a small commission on products sold through their affiliate links.  Each of your purchases via our Amazon affiliation links supports our cause at no additional cost to you.

If a blogger links to an Amazon product (with a special code for affiliates embedded in the link), and a reader places an item in their “shopping cart” through that link within 24 hours of clicking the link, the blogger gets a small percentage of the sale.  Amazon links are not “pay-per-click.”  If you click on the product link and stay around Amazon and purchase something else, however, I will get a commission on that sale.

Slavetodiy.com is also a VigLink affiliate advertiser which works similarly.

Customize Your IKEA Hack

IKEA hacks are all the rage, and with good reason. Pre-built, reasonably priced items that can be totally customized give me plenty of reasons to get on board. Can you say: factory finish?

*This post may contain affiliate links. Please see full disclosure at the end of the post.

So, when it comes to the Hemnes line (Hemnes is IKEA’s real wood, upgraded line)- the hardware is a dead give away that you’re using IKEA shelves. Updating the hardware creates a HUGE impact for not very much money.

IKEA Hemnes cabinets with stock hardware

On our giant living room wall builtins IKEA hack, we used two sets of black Hemnes cabinets, each with three drawers and glass doors (please excuse our tardiness- they’re not finished). They were totally snooze-fest level with the existing hardware.

IKEA Hemnes cabinets with stock hardware

You can completely change the look and feel of the whole thing by finding hardware that speaks to you. At first I really wanted long, brass handles. However, 16″ hole separations on the drawers really limit non-custom options (the quotes I got on custom bars were in the $100 each range, and I needed six). So, I went back to the two pulls per drawer option and found something in the same family as what I wanted before.

IKEA Hemnes stock drawer hardware

I found these Antique Brass Bin Pulls pretty reasonably and the two Cast Brass Cupboard Latches for a total of $142, both from House of Antique Hardware.

House of Antique Hardware, bin pulls and cabinet latches

They made such a difference. Aren’t they just gorgeous?

House of Antique Hardware, bin pulls and cabinet latches

A few notes on installation: the pulls came with screws instead of two sided hardware. No way were we risking that accident-waiting-to-happen with our fifty kids, so I sent Rainman with one of the pulls down to the hardware store to hunt for a screw, washer, and nut that would work and go all the way through inside the drawer. Since we purchased them at Lowe’s our color options were limited. I haven’t decided whether I want to paint the hardware heads to match the pulls yet.

House of Antique hardware bin pulls

I originally intended to use one pre-drilled hole on each side but after we looked at the spacing we decided to straddle the existing holes and drill all new holes for each bin pull. They just looked better balanced.

The cabinet latches were a little more difficult because the pre drilled holes were too far back (toward the glass).

There is not a whole lot of wiggle room when installing these latches. I moved them down to a place I liked better visually and filled the old holes with a basic brushed brass Chicago screw. They have to go to the very edge to latch and the drilling has to be done very precisely.

96606fe3-0c20-499e-971f-0664d3e50664

Here are the Chicago Screws we used to cover the existing hardware holes.

I would love to see different ways you customize your own IKEA hacks! Thanks for joining our adventures!

Check out more of our projects here.

*Legal stuff:

I am honest about my experiences with different products and write because I enjoy it.  I do however, have the opportunity to earn money for my writing, also.

Slavetodiy.com is a participant in the Amazon Services LLC Associates Program, an affiliate advertising program designed to provide a means for sites to earn advertising fees by advertising and linking to amazon.com.  Amazon offers a small commission on products sold through their affiliate links.  Each of your purchases via our Amazon affiliation links supports our cause at no additional cost to you.

If a blogger links to an Amazon product (with a special code for affiliates embedded in the link), and a reader places an item in their “shopping cart” through that link within 24 hours of clicking the link, the blogger gets a small percentage of the sale.  Amazon links are not “pay per click.”  If you click on the product link and stay around Amazon and purchase something else, however, I will get a commission on that sale.

Slavetodiy.com is also a VigLink affiliate advertiser which works similarly.

16 Ways To Use Brick Veneer Inside Your Home

When I’m perusing Pinterest late at night when I’m supposed to be sleeping (don’t tell me you’re not guilty), I find that I’m always attracted to images of older homes. Beautiful, preserved stone or brick walls that have either been re-exposed in a renovation or have been there the whole time.  Stone mixed with plaster, crumbling/repaired brick, or even painted brick fireplaces… I love them all. One of the things I have chosen as a challenge for myself in transforming various projects is making them feel like they’ve always been there. Even if they’re new and modern, they should feel homey… like there’s history behind them.

*This post may contain affiliate links. Please see full disclosure at the end of the post.

My new obsession is using accent walls of brick veneer to add some age and depth to different projects. It’s smart and it’s classic. Brick has been around in different forms since the dawn of time, and I LOVE it.

49077a92-a0e3-4d49-aa17-b3ec95960311
Built in shelves, part of IKEA hack, with Castlegate Old Mill Brick Veneer, dressed with farmhouse candlesticks and preserved boxwood


Our first experiment with brick was a complete and total pain in the tail. I, of course, chose a super narrow space to install it, because I feel like Rainman really needs the additional challenge of working in a tight space on top of doing something he hasn’t done before. I’ll do a project tutorial soon, but I’m just not ready to relive that pain yet, nor do I have enough wine in the house to really delve into it.

Anyway, along the way, as I was researching different looks I found some fantastic applications for brick veneer in the house. I’ll share my favorites with you:

As an accent behind builtins or shelves:

6b89b47e-8f76-468e-af7b-11afbb00f0de
Built in shelves, part of IKEA hack, with Castlegate Old Mill Brick Veneer, dressed with farmhouse candlesticks and preserved boxwood

This is our unfinished builtins project (IKEA hack) with the brick veneer behind the shelves. I love the effect. After researching multiple options, I finally decided on Old Mill, Castle Gate Brick Veneer. I always check a local distributor first, and although he was able to do it for 5 cents cheaper a brick, we had to buy an entire pallet and there was a six-week lead time. In any case, we really love how it turned out, and the Old Mill quality was excellent.

Here are some of the images that inspired me and continue to provide planning inspiration for possible future projects:

As an accent wall in the bathroom:

Image Source Unknown (Instagram Account Deleted)

So, this is a great space. I really like the vanity. But, honestly, without the brick accent wall this room would be pretty vanilla, right? It was a fantastic choice in this room.

In the bathroom with antique fireplace:

1e2609f7-9f2e-4283-8b21-ffcac3f66c41-1
Image from Signature Hardware

There is a lot going on with this bathroom. I honestly don’t LOVE the shower, because I think the “modern” level is overdone and clashes with the other AMAZING elements. The preserved antique brick fireplace is incredible (minus the hearth in the modern tile). The clawfoot tub is equally fantastic. I also love that they refinished what appear to be original wide plank floors. If you look carefully you can see a chandelier in the shower glass reflection…. reinforcing my deep belief that no bathroom is truly complete without a sparkling chandelier. Bravo.

As a foyer accent wall:

From diyfurnituremaven.com

This is such an amazing space. The combination of herringbone wood floors, the brick, the incredibly detailed wood moldings, the classic settee, and of course, the maps. This person might love Restoration Hardware. It’s a rich, warm, classic look and I just adore it.

As a kitchen accent wall:

img_1325
From carmenza.spotlife.se

The antique brick really adds interest to this space. I also dig the bank of apothecary drawers and the banquette seating.

For a more modern take on the kitchen with an antique wall:

Image from myhouseidea.com

The scale of this room is part of what makes it so cool (did you see how thick that table slab is???). Doing this wall in brick veneer would be a pricey undertaking.

Over the stove:

Image from housetrends.com

Sigh. Yes, the antique brick surround for the stove wall is happening and in our future kitchen renovation. For real. Don’t you love the beams and the lighting?

On the fireplace:

Image from designsponge.com

This is one of the coolest two-sided fireplaces ever. And I love the faux skin rug. I would’ve loved to see a wide plank, hand finished hard wood with this. It would have been epic.

A totally different take on a fireplace:

Image from betweennapsontheporch.com

This fireplace inspires my inner Hobbit. So much movement, and paired with what appears to be heart pine… what more could one want?

As an accent on window walls:

img_1326
Image from Pocket.co

I love brick accents around windows, especially if they are original, or made to appear to be the outer wall of the home. These are uniquely awesome because of their depth- they were able to incorporate a great panelled look on the inside. Really nicely done with superb depth.

Image from Theloftsofgreenville.com

The loft pictured here is incredibly well done all around. They really captured a moody ambiance.

As a column wrap:

img_1328
Centophobe.com

My favorite part of this column wrap is that it appears to actually be an original home element. Very cool that they kept it.

As an archway wrap:

img_1334
Image from Houzz

The difference in materials on the archway does a masterful job of separating living areas. The flow between spaces here is exquisite.

img_1335
Image source unknown

Isn’t this an awesome transition from foyer to living area?

In the dining room:

img_1330
Image from emeco.net

This is obviously a commercial space, but what a perfect combination of gray velvet tufted seating, antique mirrors, rustic wood floors, iron table bases, classic artwork, and of course, the brick.

On the basement wall:

Image from howtobuildahouseblog.com

Once again, realize this would be an expensive undertaking. But, the look is so unique. I love it paired here with medium tones in wood flooring and the bright white baseboards.

As a brick ceiling:

Image from ElMueble.com

After a fairly frustrating installation of brick on a wall, I’m not totally sure how one would accomplish a ceiling installation. Nor do I think I know anyone with a marriage strong enough to survive a joint brick ceiling installation. But, if it was possible, the results are breathtaking.

Brick floor inlay:

Image from enchantedhome.com

Isn’t this amazing? I love combining the materials of deep wood tones with the whitewashed-look brick. It is really something special. They accomplished something very similar below.

Image from architecturaldesigns.com

Something interesting to note on the image above is that I believe this is new construction. This is varsity level use of different depths, textures, and finishes to make the house feel homey and not too new. There are three different styles of doors in one hallway and the mixed use of wood floors and brick is cool (though I’ll admit the antique-size brick would have been a visual and authentic improvement). Overall, really well done.

Master bedroom accent wall:

Image from Magnolia Realty, Instagram

I really like the style of this entire space (it’s new/old), classic/eclectic, well done and homey. The heavy grout is very popular right now.

As a staircase brick accent wall:

Image from seabelle.tumblr.com

If I ever walked into this space, it is truly “gasp” worthy. Unbelievably elegant and warm.

Have you used brick veneer interior applications?

Using brick inside offers an opportunity to completely transform the feel of a space. It creates warmth, texture, and depth. Are there other interior brick applications you love? I would love to see pictures in the comments section!

Thanks for joining us and check out more of our fabulous DIY and project blog here!

*Legal stuff:

I am honest about my experiences with different products and write because I enjoy it.  I do however, have the opportunity to earn money for my writing, also.

Slavetodiy.com is a participant in the Amazon Services LLC Associates Program, an affiliate advertising program designed to provide a means for sites to earn advertising fees by advertising and linking to amazon.com.  Amazon offers a small commission on products sold through their affiliate links.  Each of your purchases via our Amazon affiliation links supports our cause at no additional cost to you.

If a blogger links to an Amazon product (with a special code for affiliates embedded in the link), and a reader places an item in their “shopping cart” through that link within 24 hours of clicking the link, the blogger gets a small percentage of the sale.  Amazon links are not “pay per click.”  If you click on the product link and stay around Amazon and purchase something else, however, I will get a commission on that sale.

Slavetodiy.com is also a VigLink affiliate advertiser which works similarly.