How To Stage Your Kitchen Like A Pro

I have officially reached the end of Pinterest. I have saved every kitchen that I love in my kitchens folder. I AM NOW READY TO START RENOVATING MY KITCHEN. (Do you think he heard me?)

As you already know: I am ALWAYS in design mode on my own house and looking for ideas for clients. I’m also sort of a real estate junkie and I make it my business to know the local market and am always scouting for real estate deals! What do those things all have in common? KITCHEN OBSESSION. (Yes, I love that million dollar home but the kitchen… IS… AWFUL).

*This post may contain affiliate links. Please see full disclosure at the end of the post.

Yes, I am obsessed with kitchens. Recently, as I was staging for photographing our project in Vermont, something occurred to me: STAGING IS EVERYTHING.

Check out the before and afters on our Vermont Kitchen Project!

Whether you’re entertaining or showing your house that’s on the market, staging is the make it or break it of beautiful (or even MEH) kitchens. If you sift through your Kitchen board on Pinterest, what you’ll discover is that the ones you REALLY love are staged really well (which is why you saved it, whether you realize it or not!).  They have been tricking you all this time… You saved a beautiful flower or branch arrangement that happens to be in a kitchen. But, you saved it, which is the important take away!

Don’t believe me? I’ll show you!

Via @kellynuttdesign Instagram

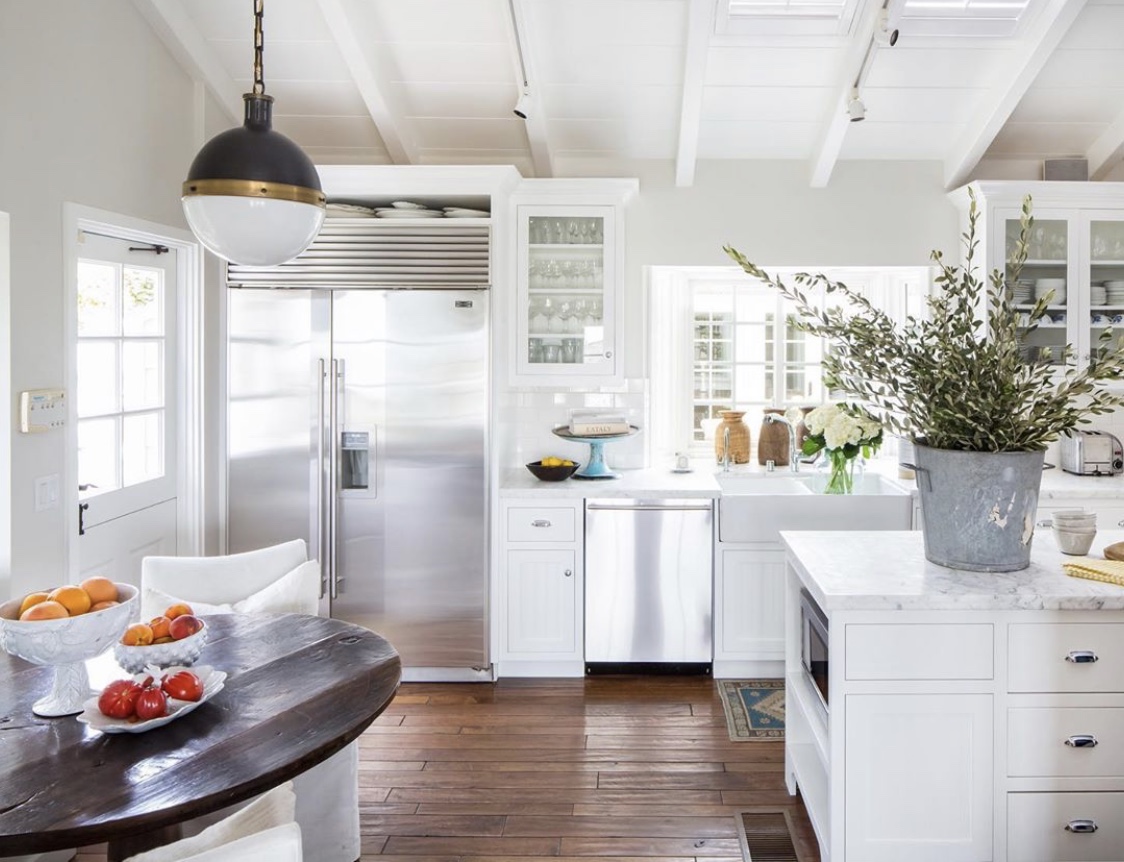
This kitchen, though probably stunning in person, would be a washed out BLAH in photos without the greenery and fruit. Notice how the big tin bucket with branches anchors the right side of the photo.


Via @wdesigncollective Instagram

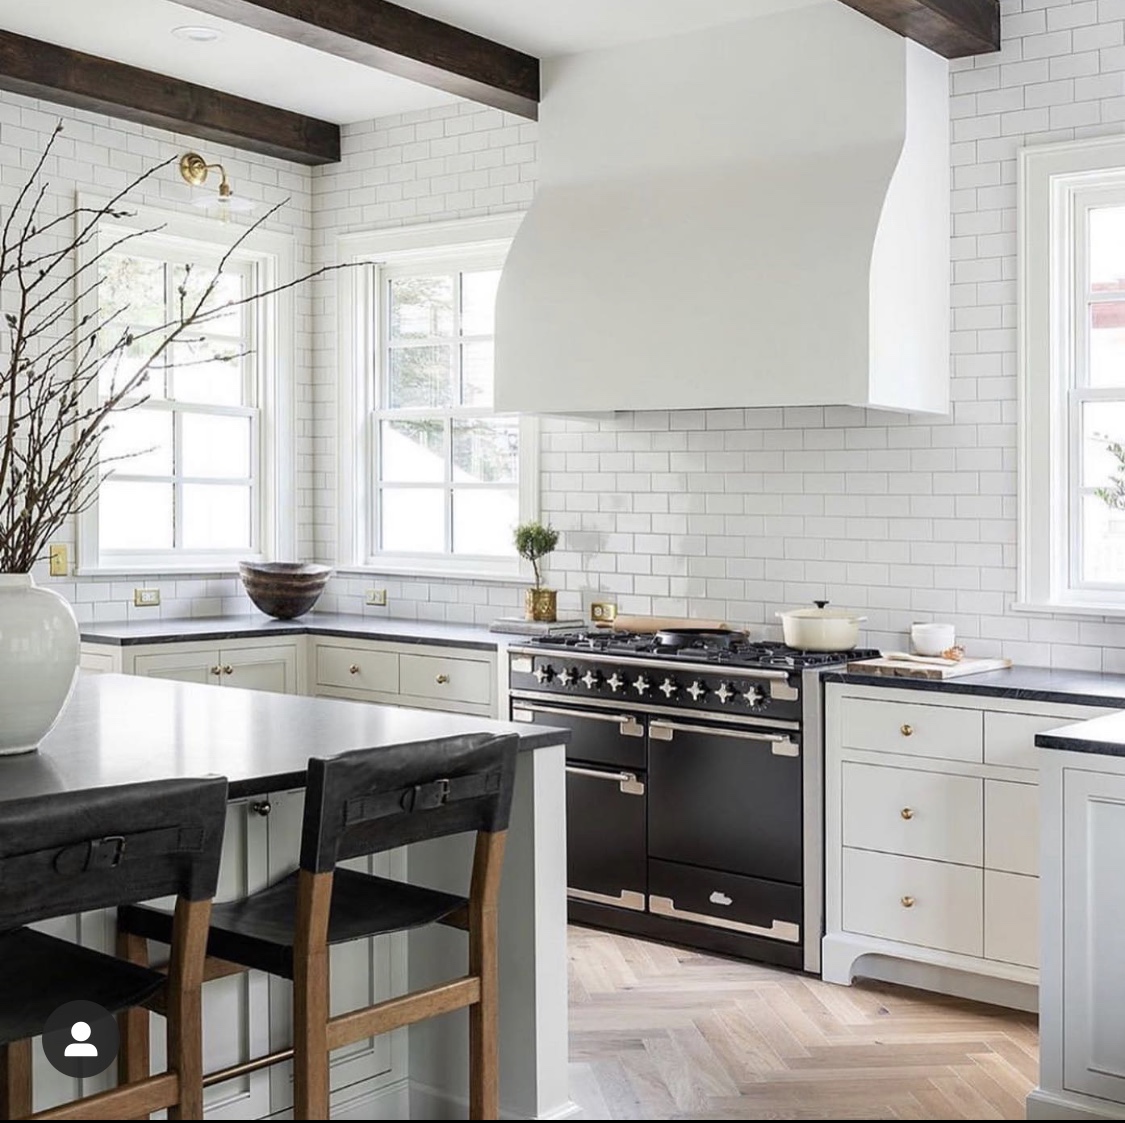
Just like the photo before, this kitchen is stunning. However, it has the potential in photos to appear too monochromatic and kind of cold. The branch arrangement, once again, anchors one side of the photo.


Via @ckandm Instagram

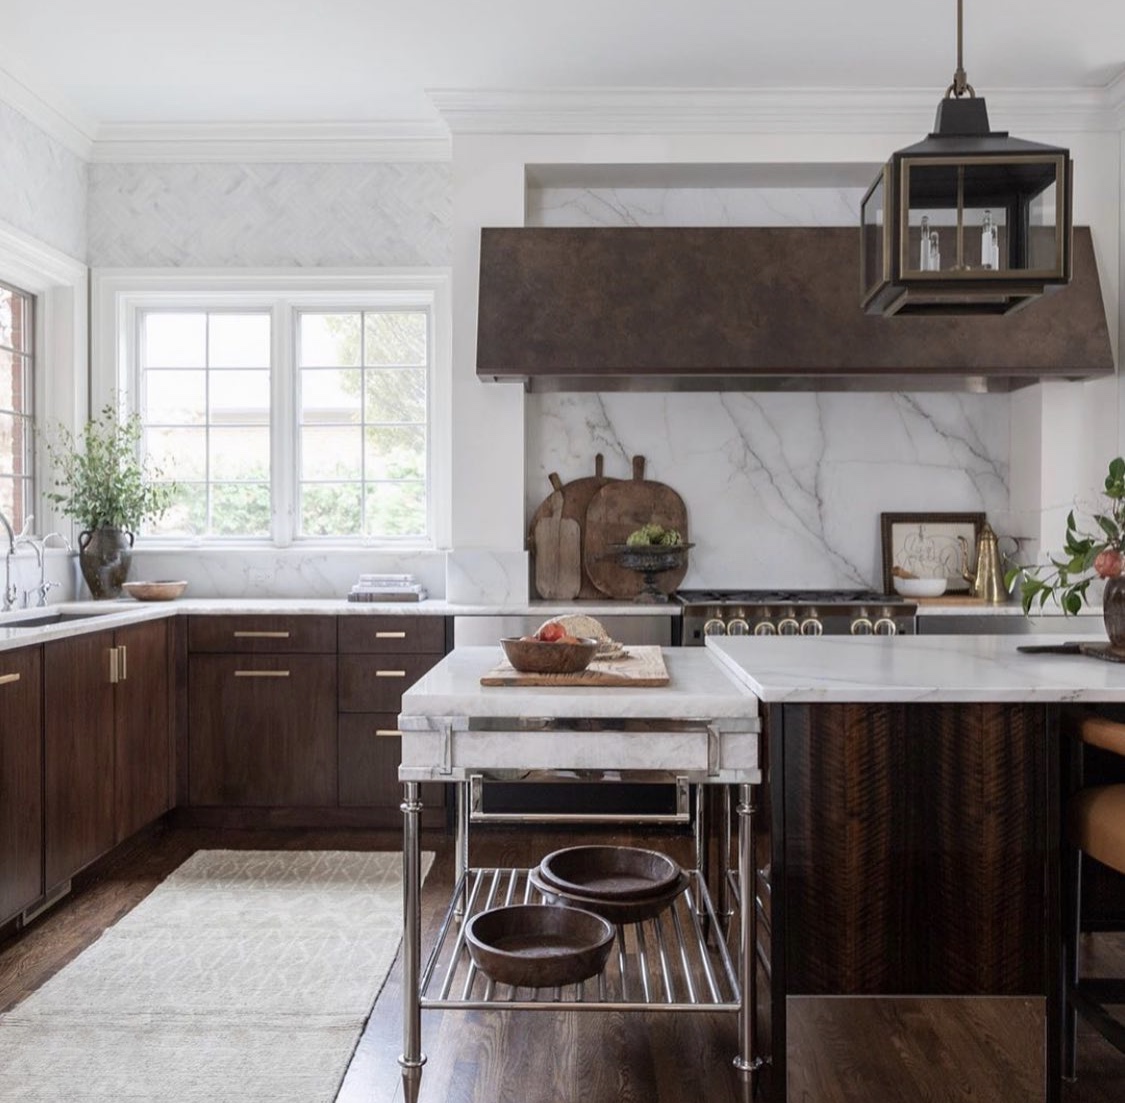
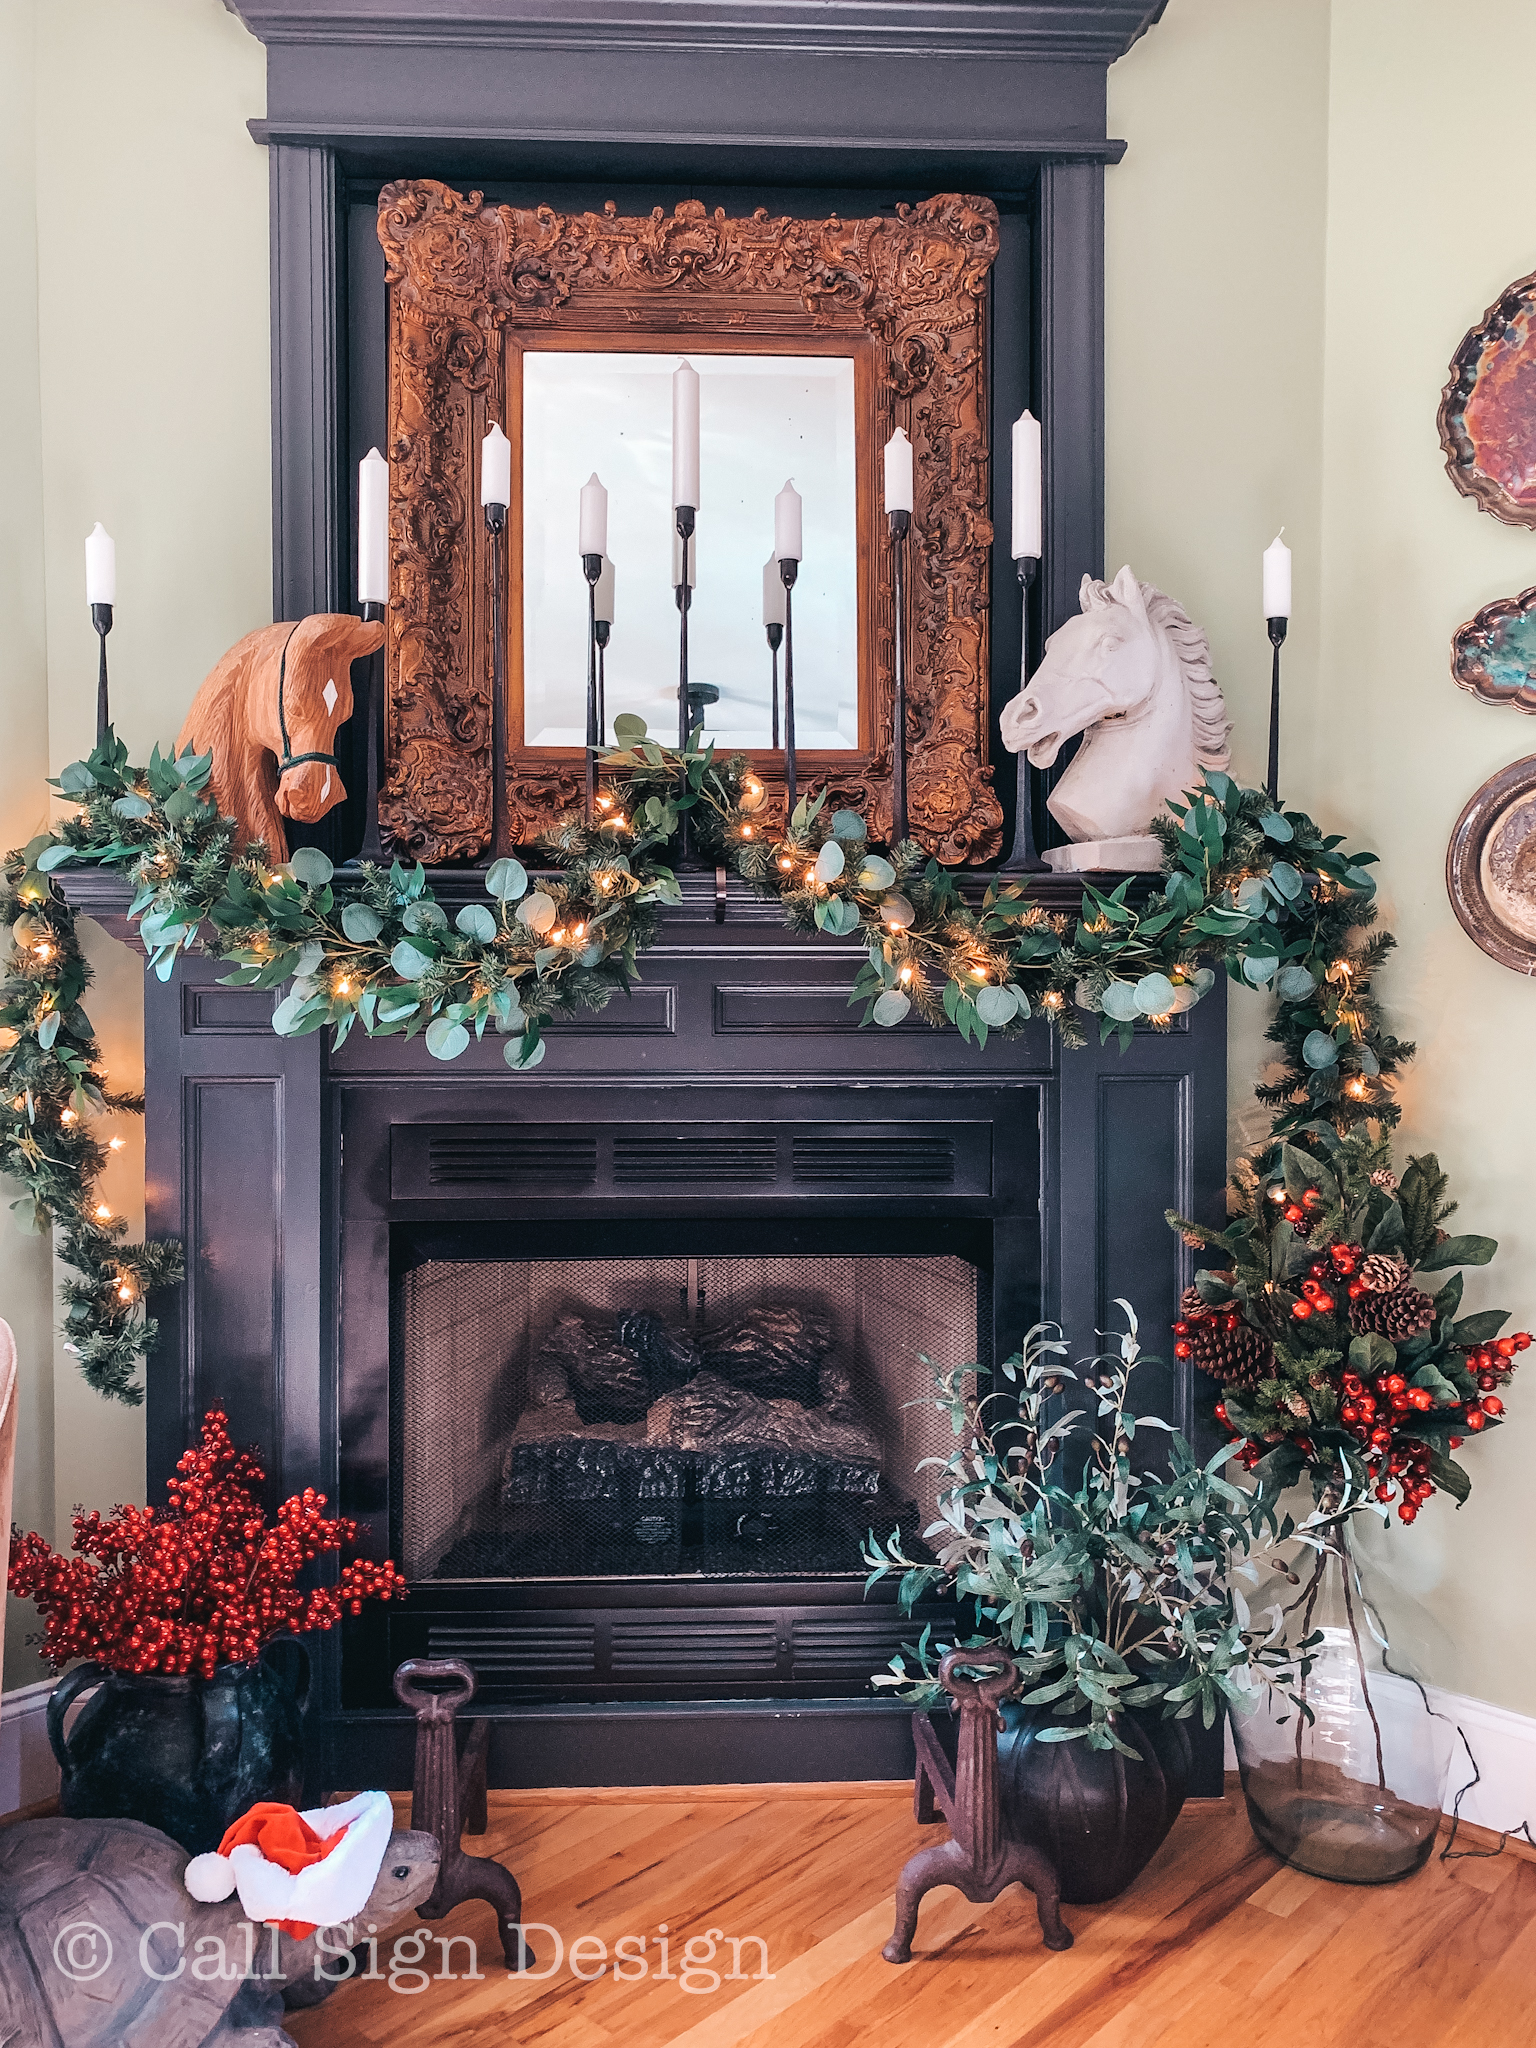
Look carefully… If you removed all of the accessories, would this space be very memorable? It’s not that it’s not an amazing kitchen, it’s breathtaking. But, in photos, it really needs some visual interest to look like a DREAM kitchen… which it certainly does here. They have arrangements on both sides here providing an interesting frame.

Would you save this photo? Of course you would!

And, wait, if you saved it… SO WILL YOUR FUTURE BUYERS! They’ll save it to their Pinterest board and obsess about it until they make you an offer over asking price and want to move in, like, yesterday!

So, how do we do that, Campers? Well, I’m going to tell you.  I promise.

Step one: take everything off the countertops. Take everything off the shelves. Then add a few, specific things and shop your own stuff!

It’s really that easy: I’m going to show you how and provide links for everything we used here! Altogether, we spent $350 on staging, not including dishes (shhh, don’t tell!!!) and here is how it turned out:


Before and After Pictures of Grandma's New Vermont Cottage Kitchen: Sponsored by Lily Ann Cabinets and designed by @callsigndesign on Instagram and @slavetodiy on Pinterest.
Before and After Pictures of Grandma’s New Vermont Cottage Kitchen: Sponsored by Lily Ann Cabinets and designed by @callsigndesign on Instagram and @slavetodiy on Pinterest.

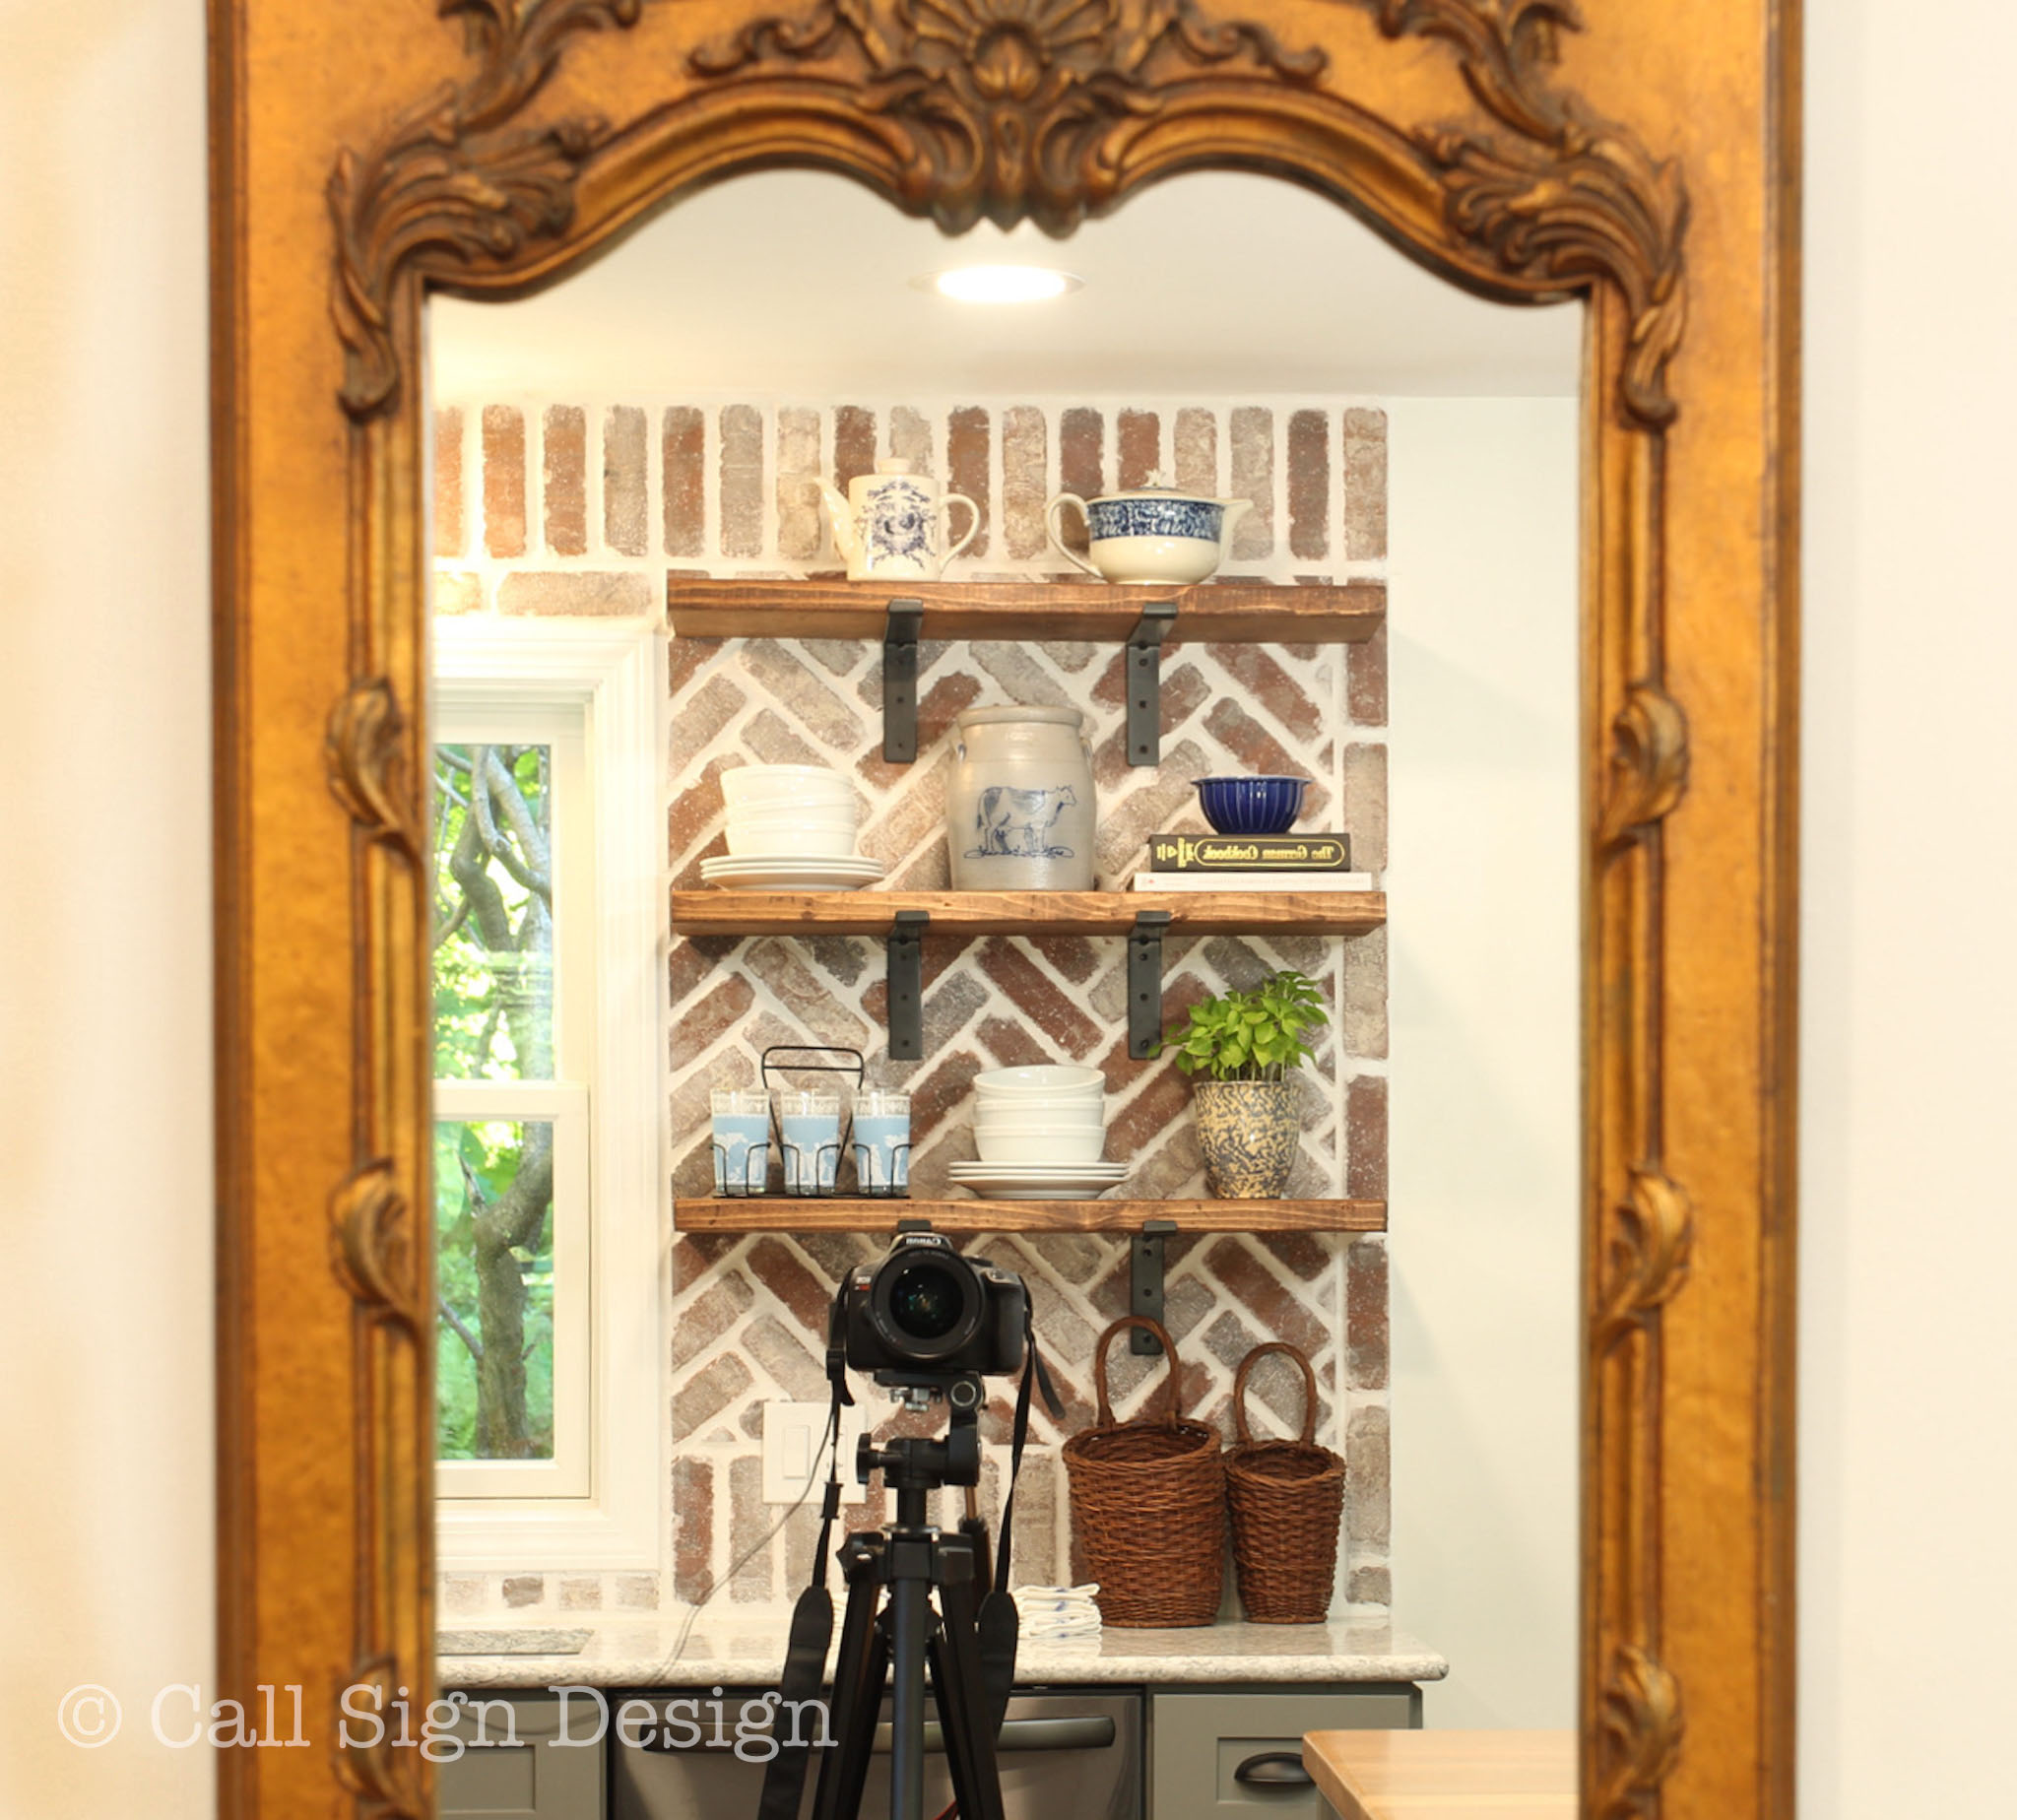
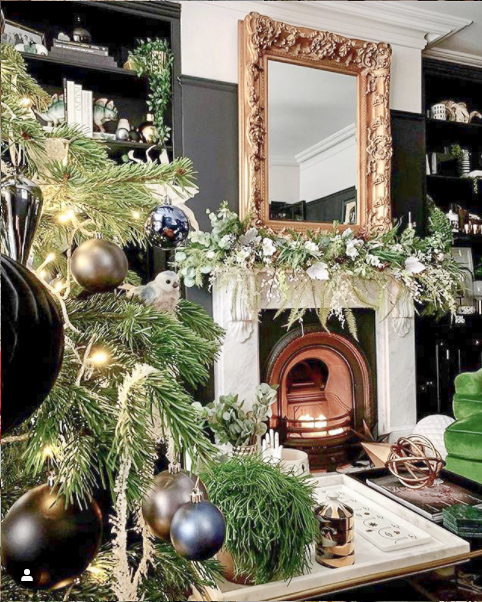
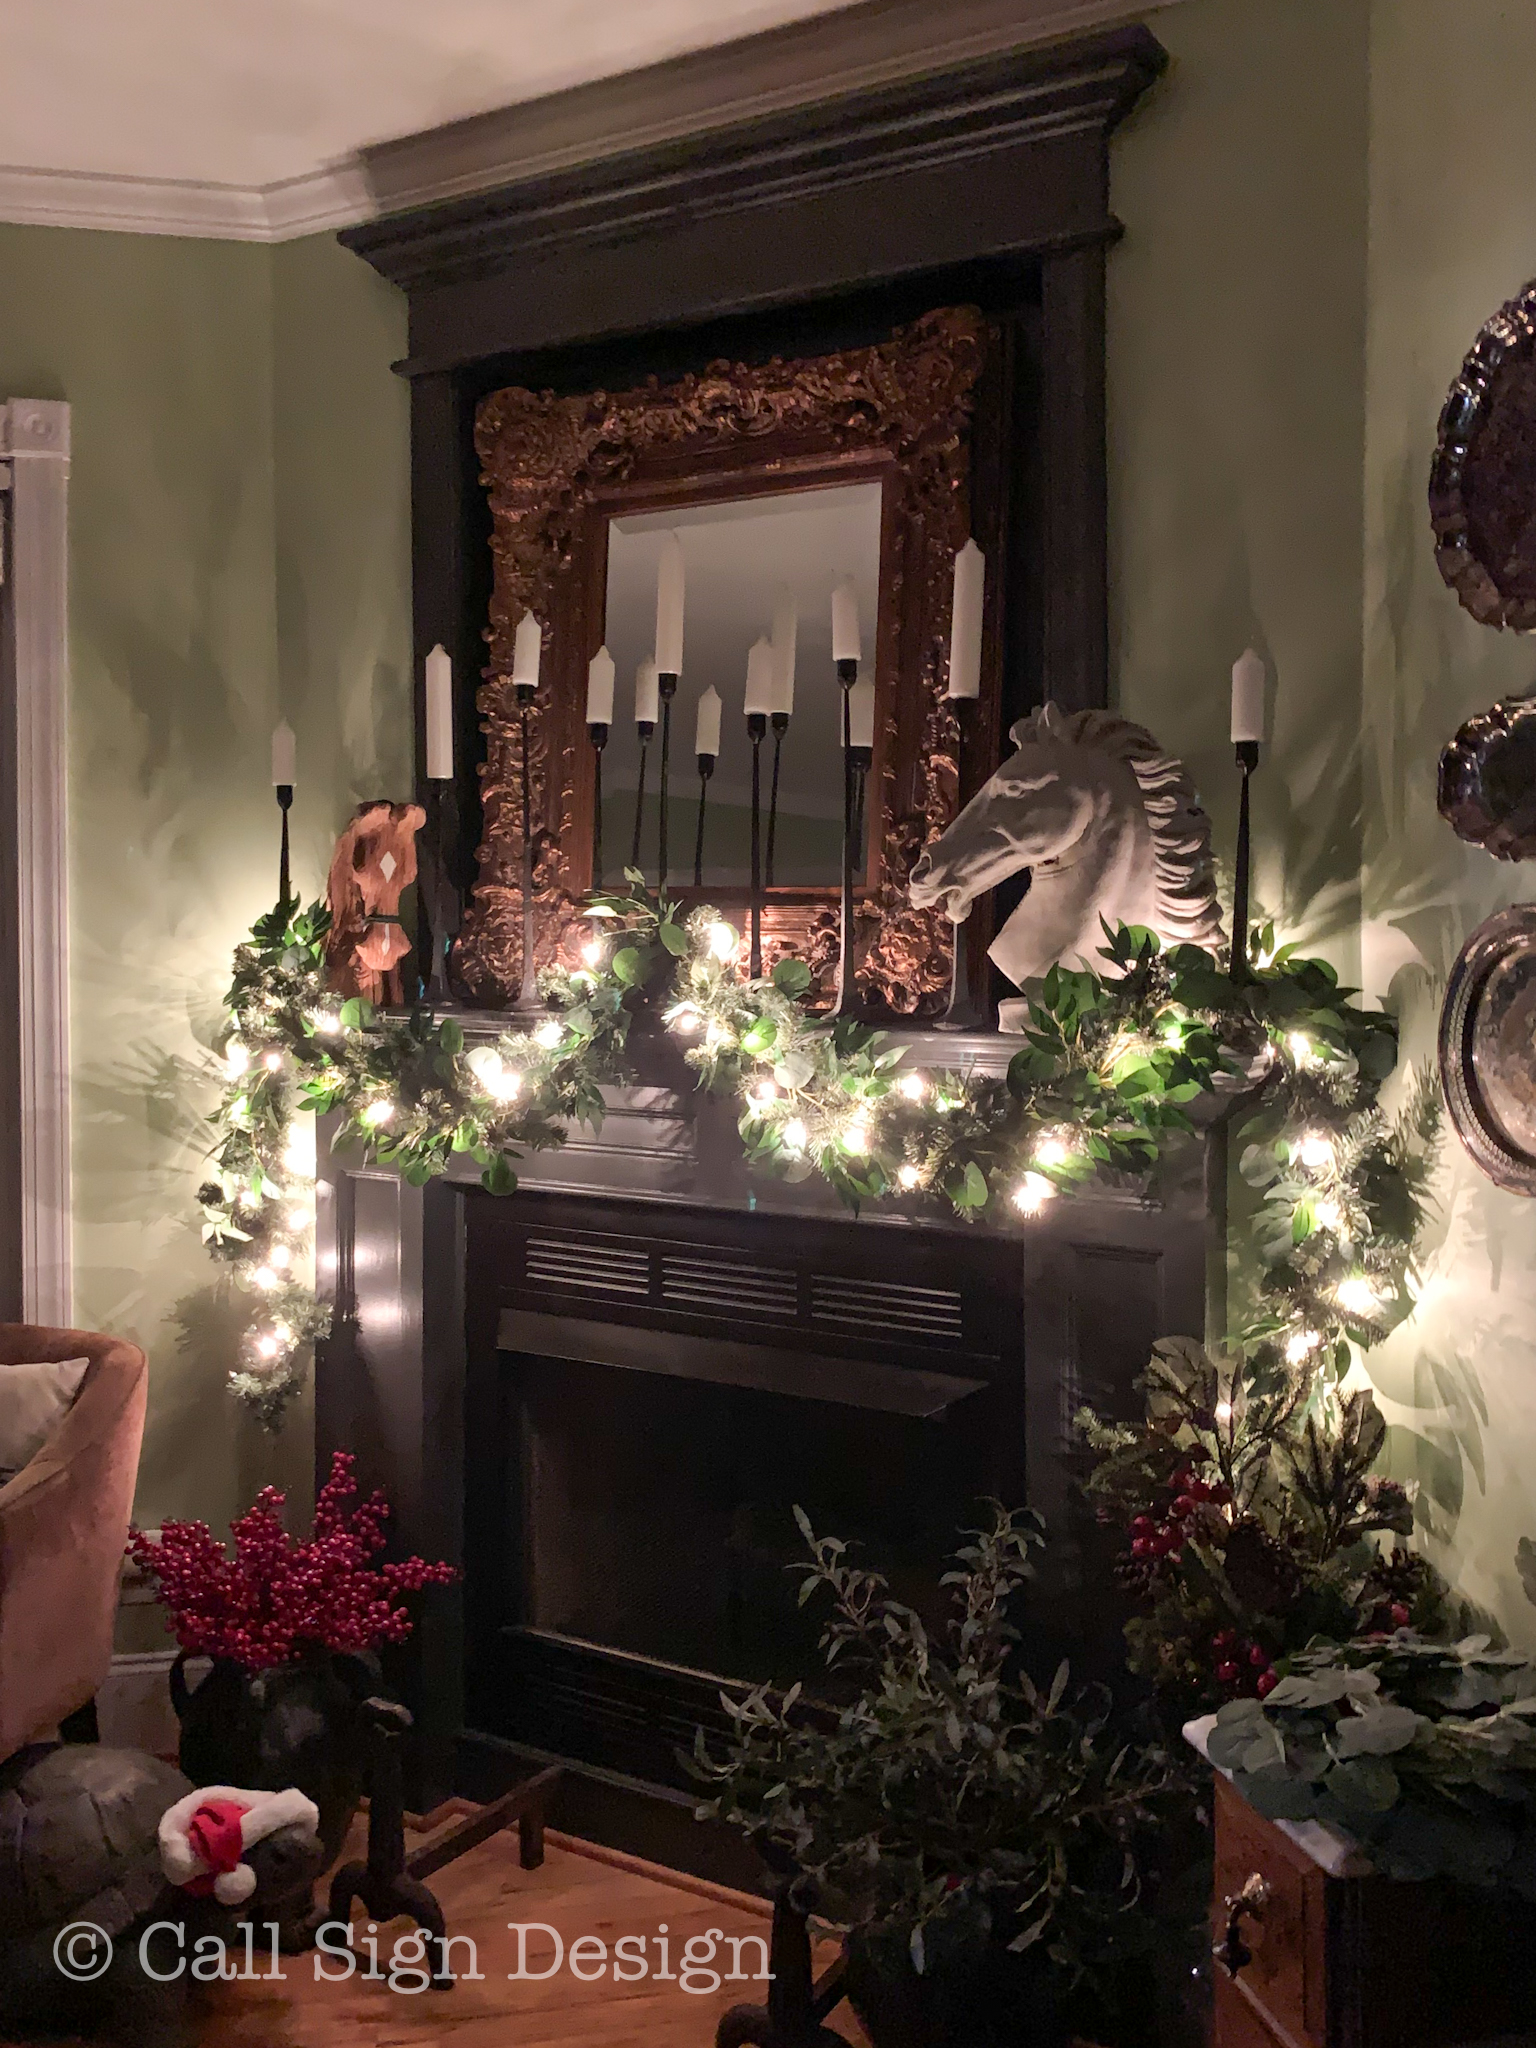
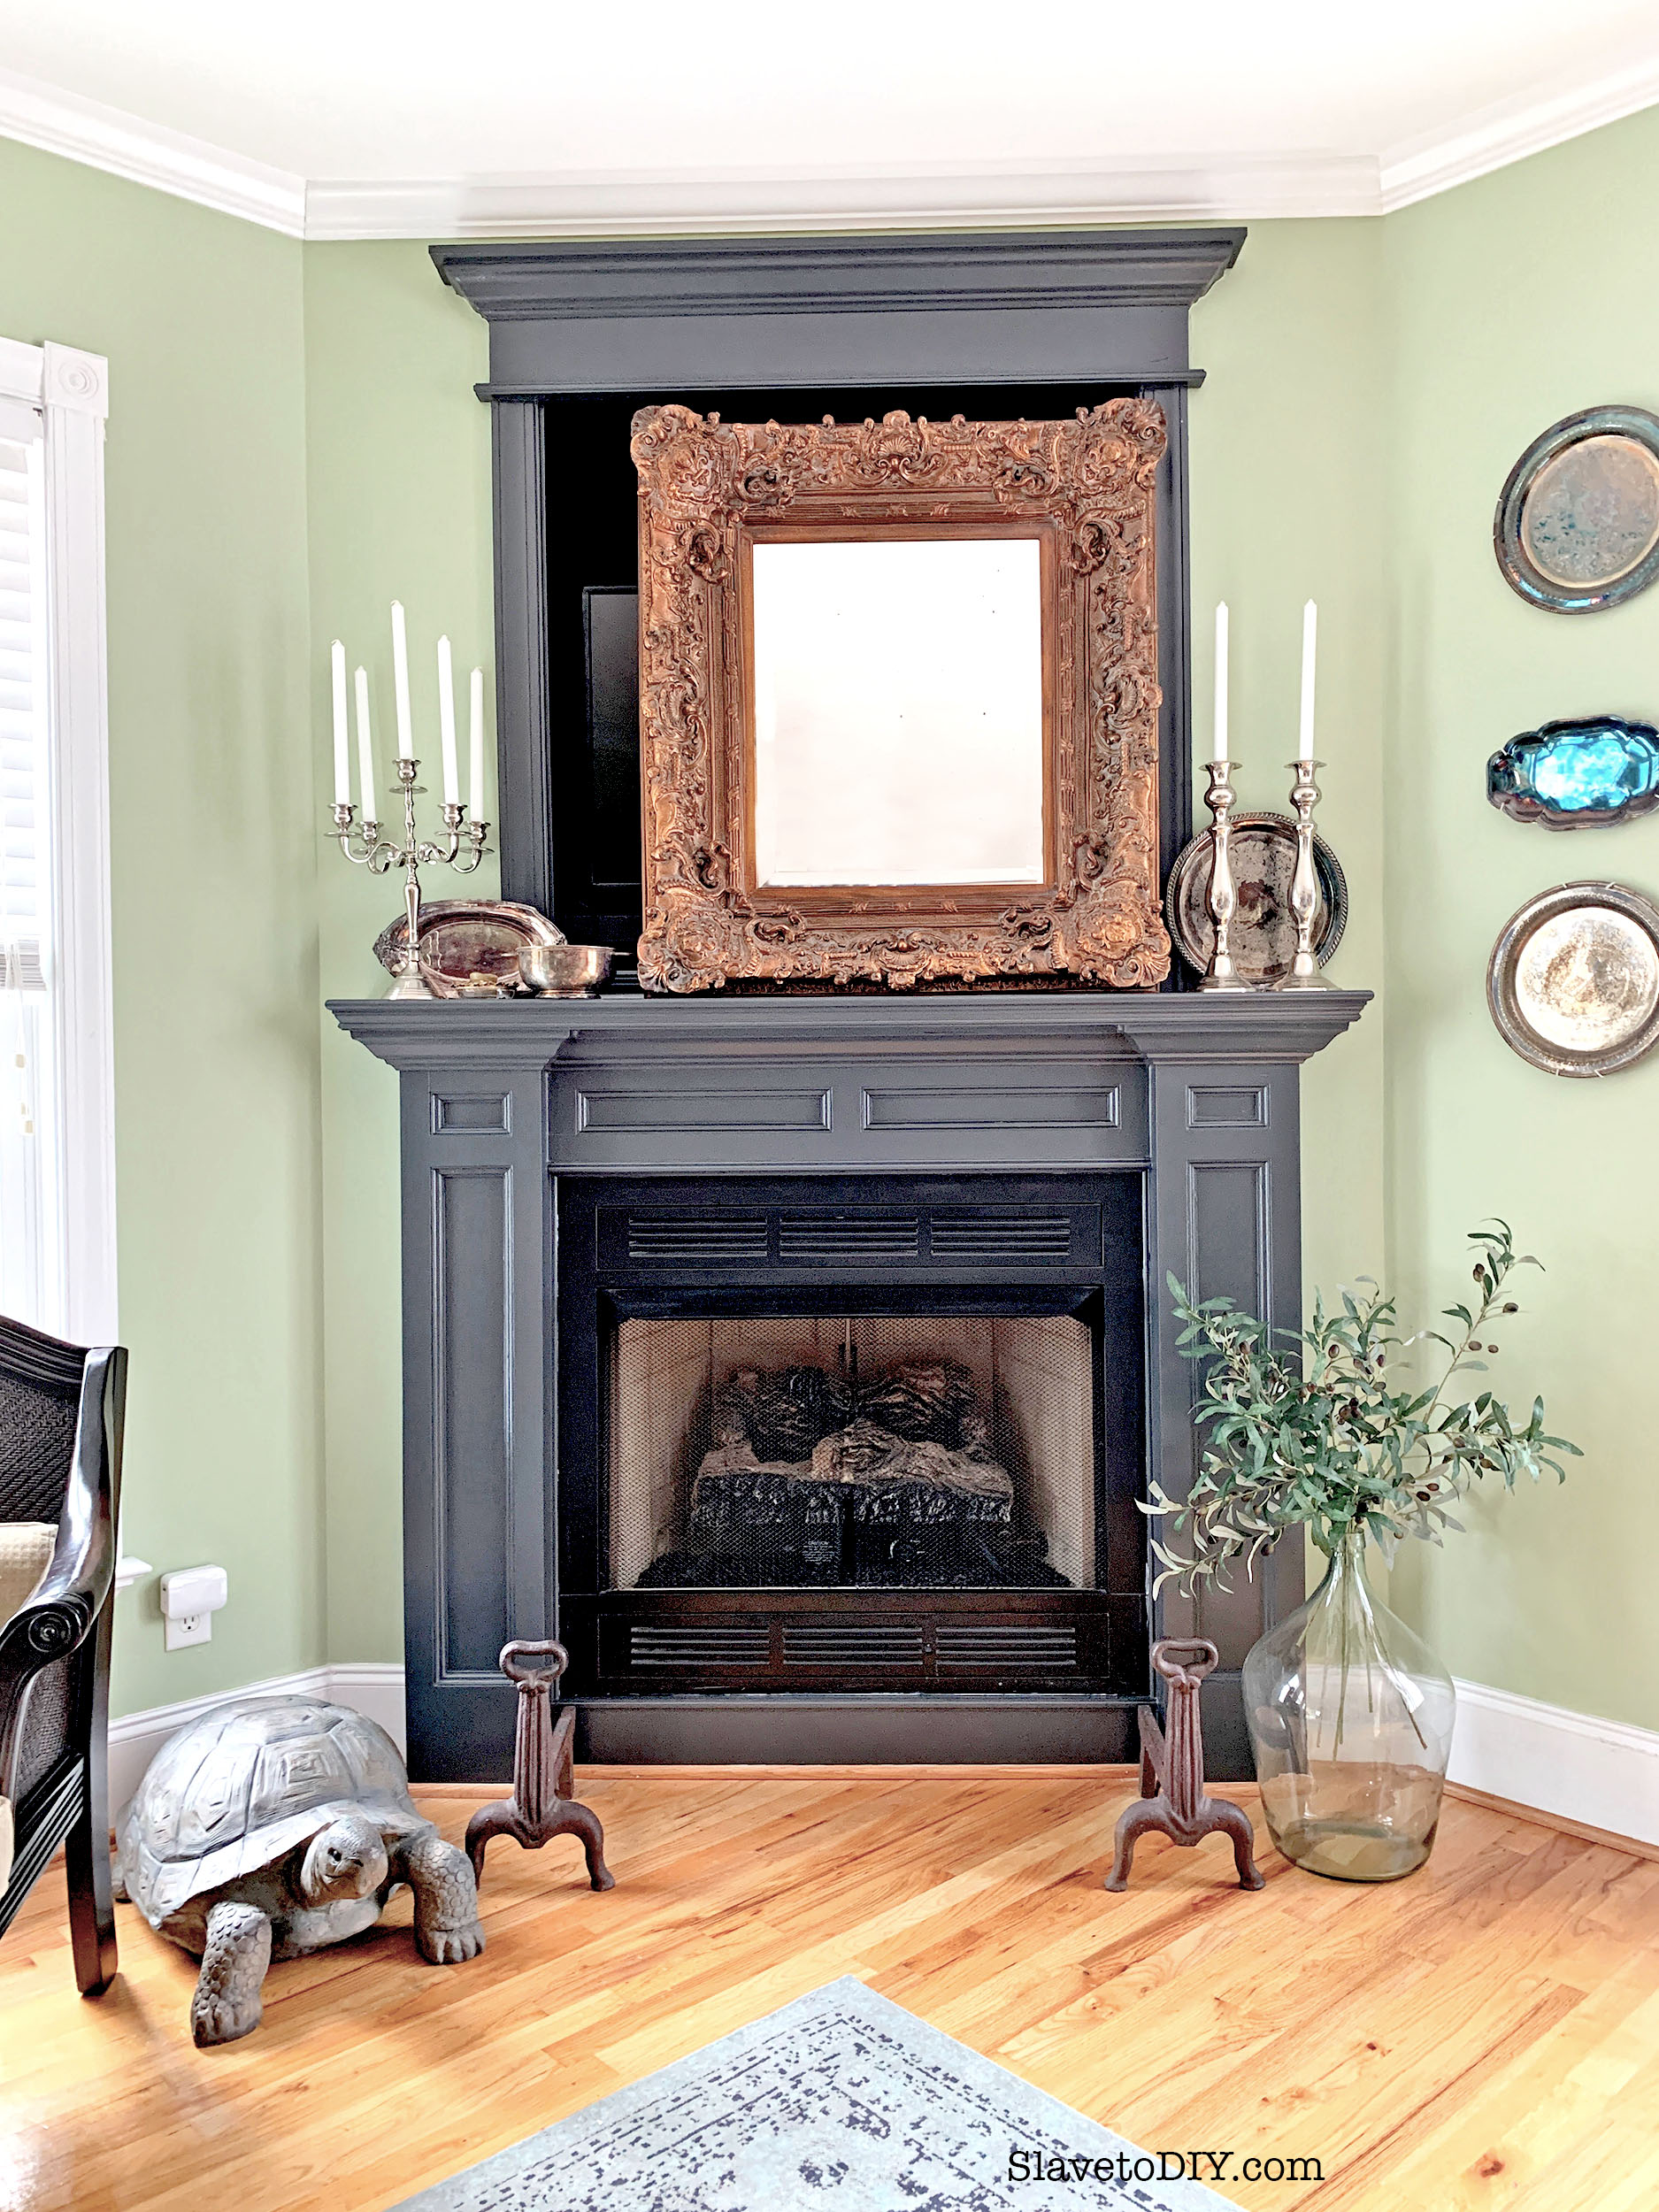
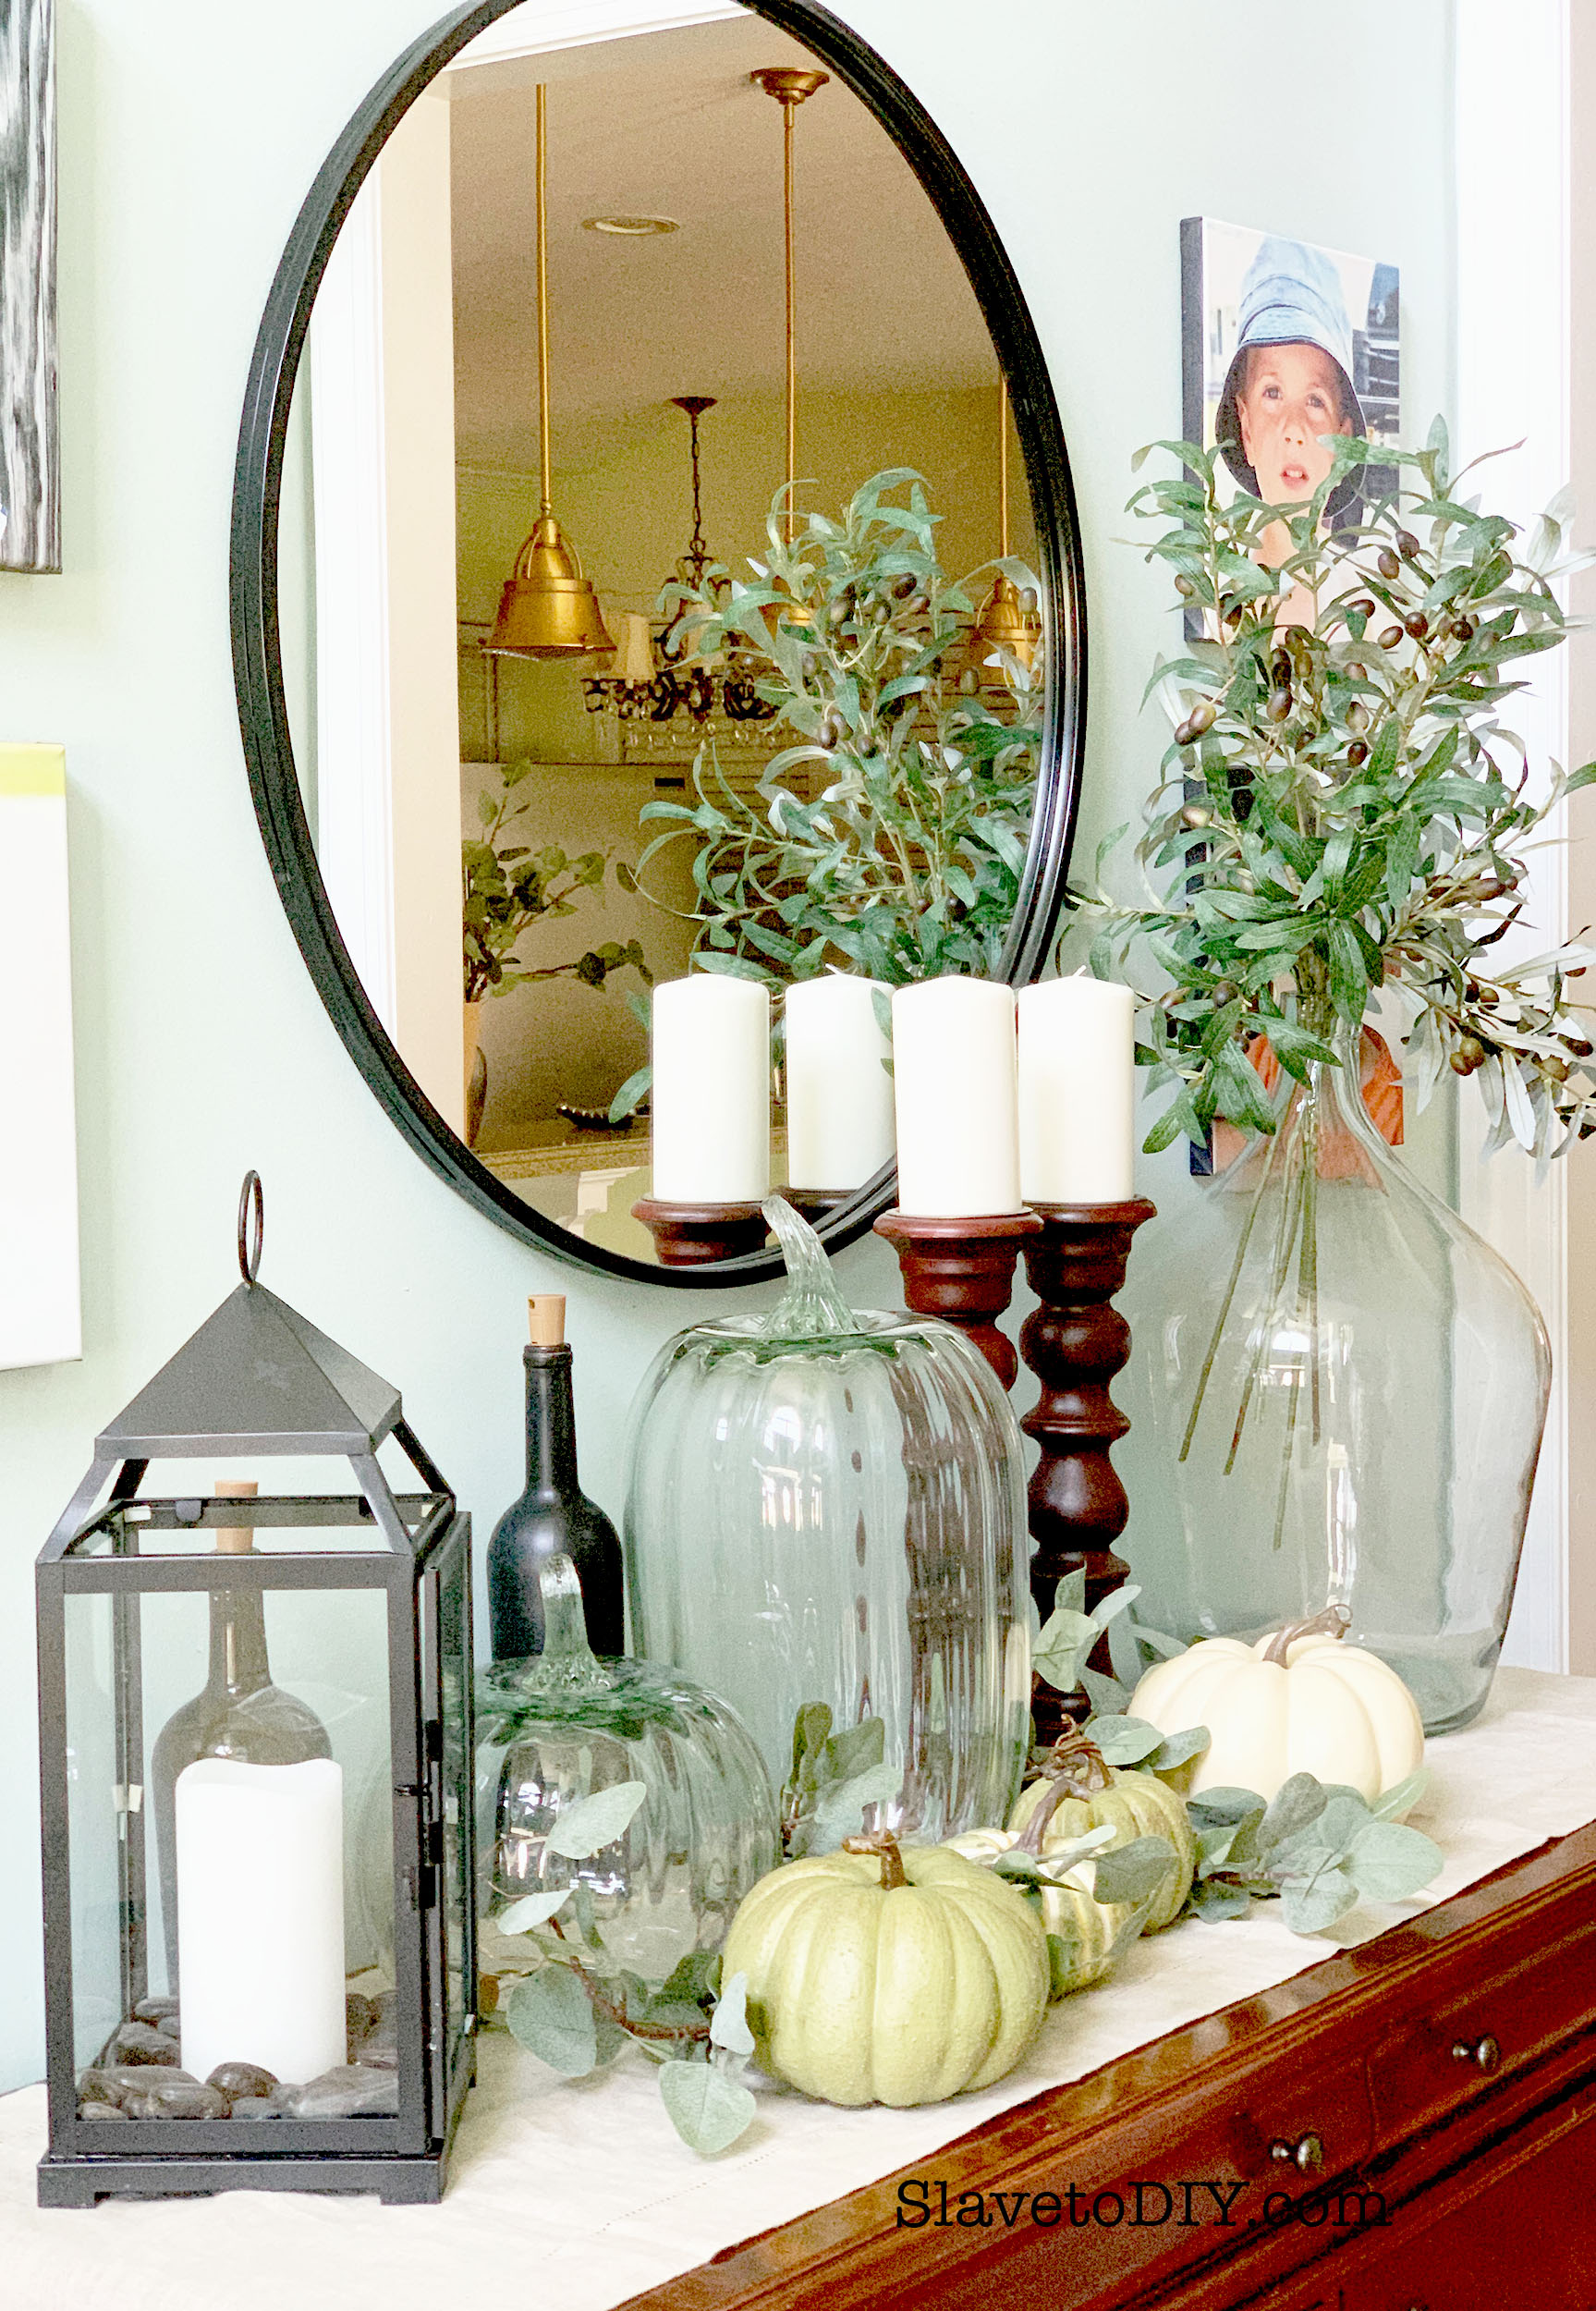
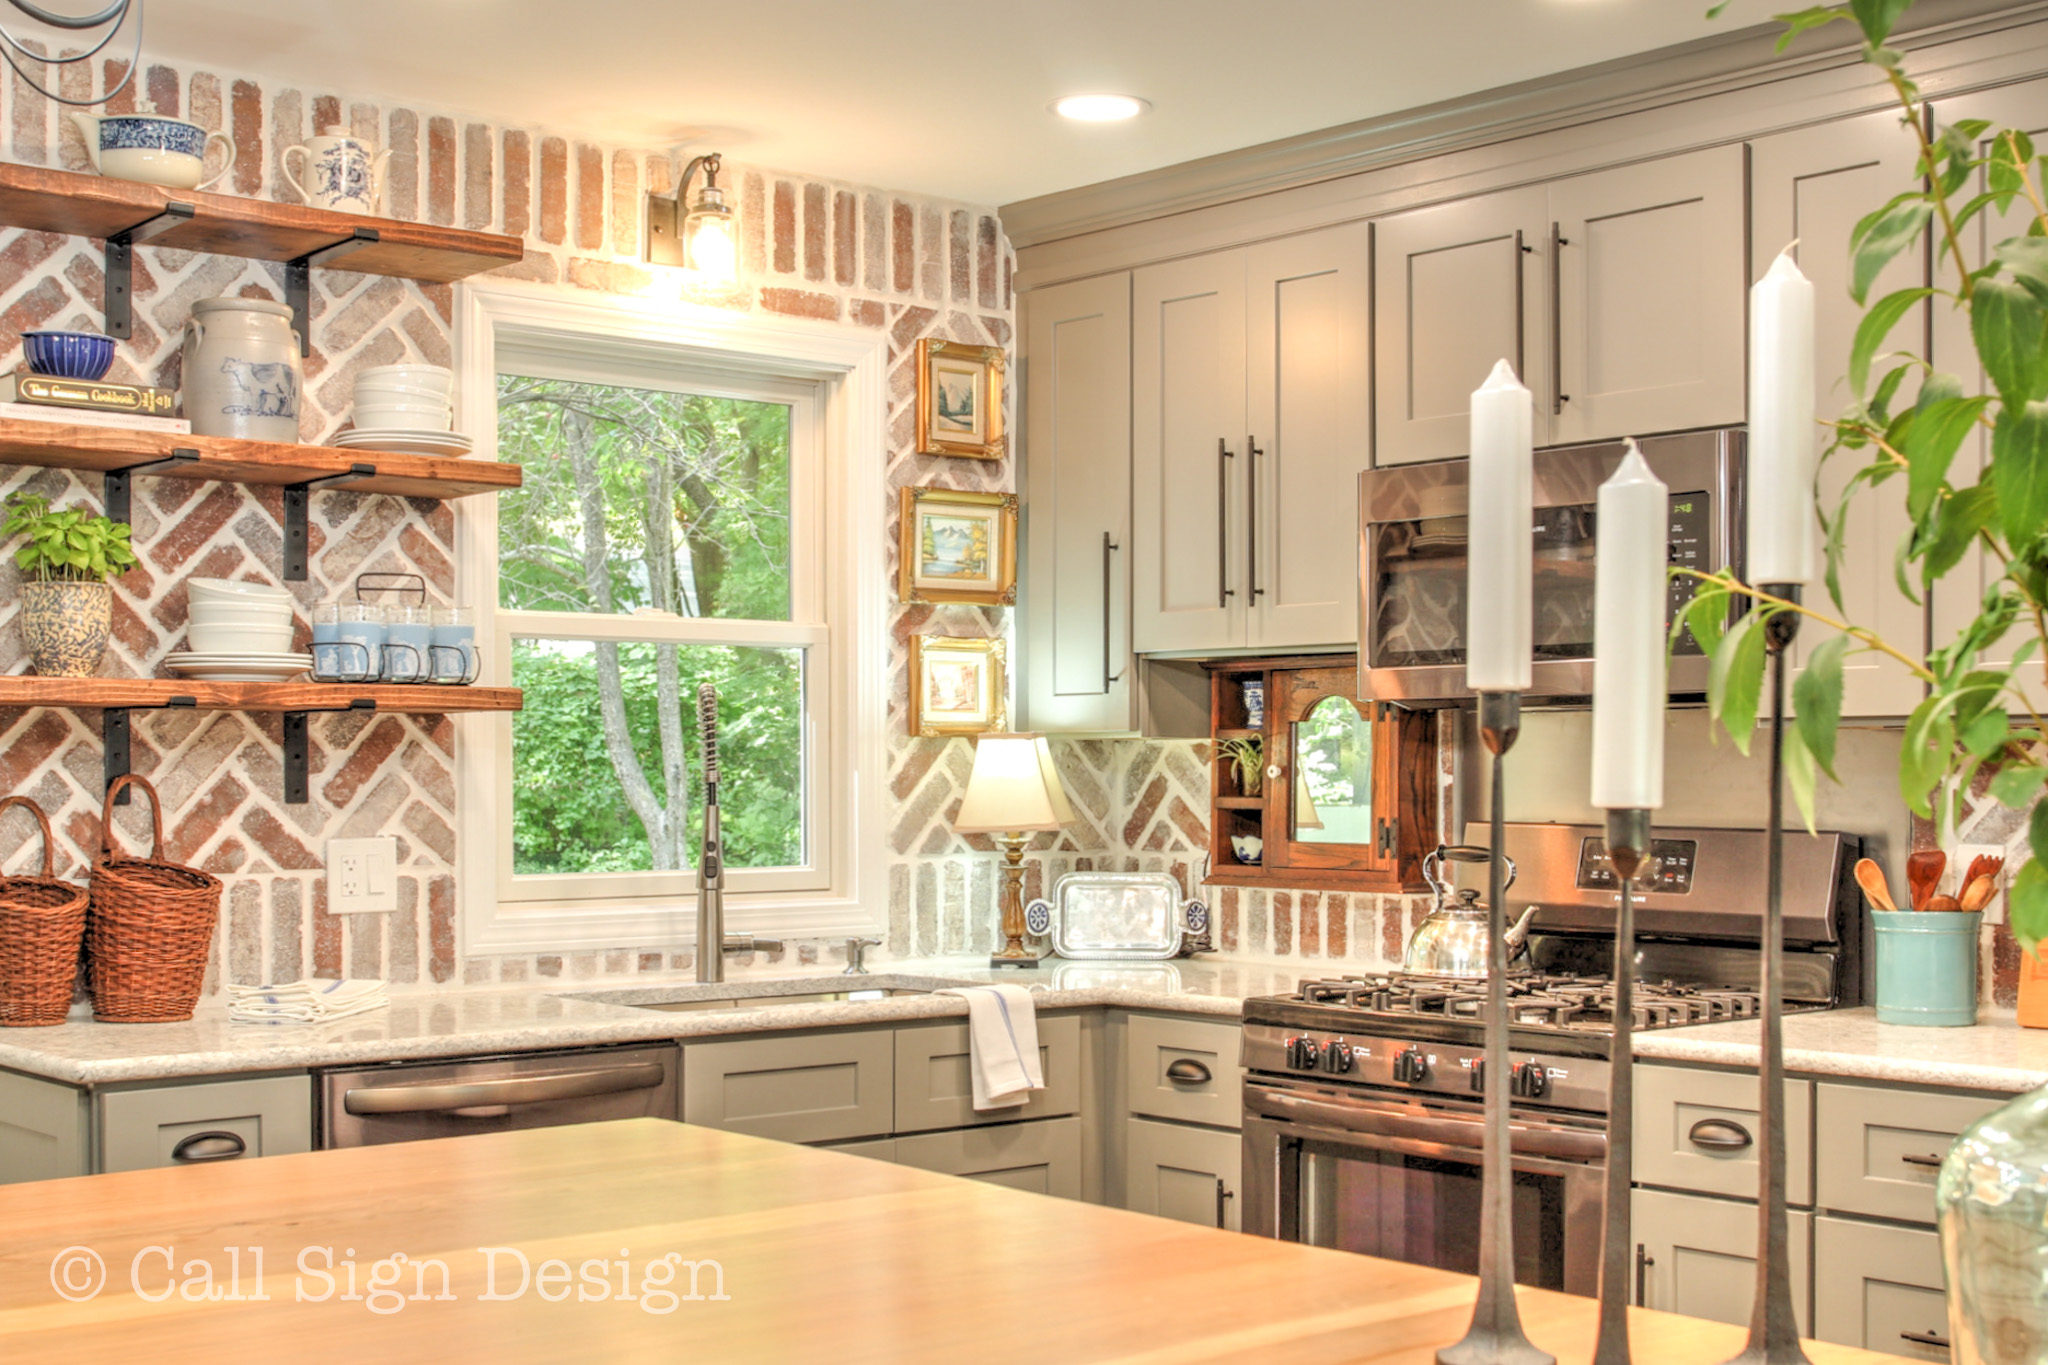
A mirror in a kitchen you say?  I say YES. A blank wall in between two windows was begging for a mirror. Mirrors brighten small spaces and reflect light. Win, win. Scale it BIGGER! (Unexpected can be GOOD and in this case, it’s kind of awesome). If you have a tiny kitchen, or a dark kitchen, I’m talking to you.

This mirror we found on Craig’s List for $60. (“If you stalk long enough, you will have success,” I always say!)


The Complete Kit For Staging Your Kitchen Like A Pro
Kitchen Herb Kit from IKEA: The Complete Kit For Staging Your Kitchen Like A Pro

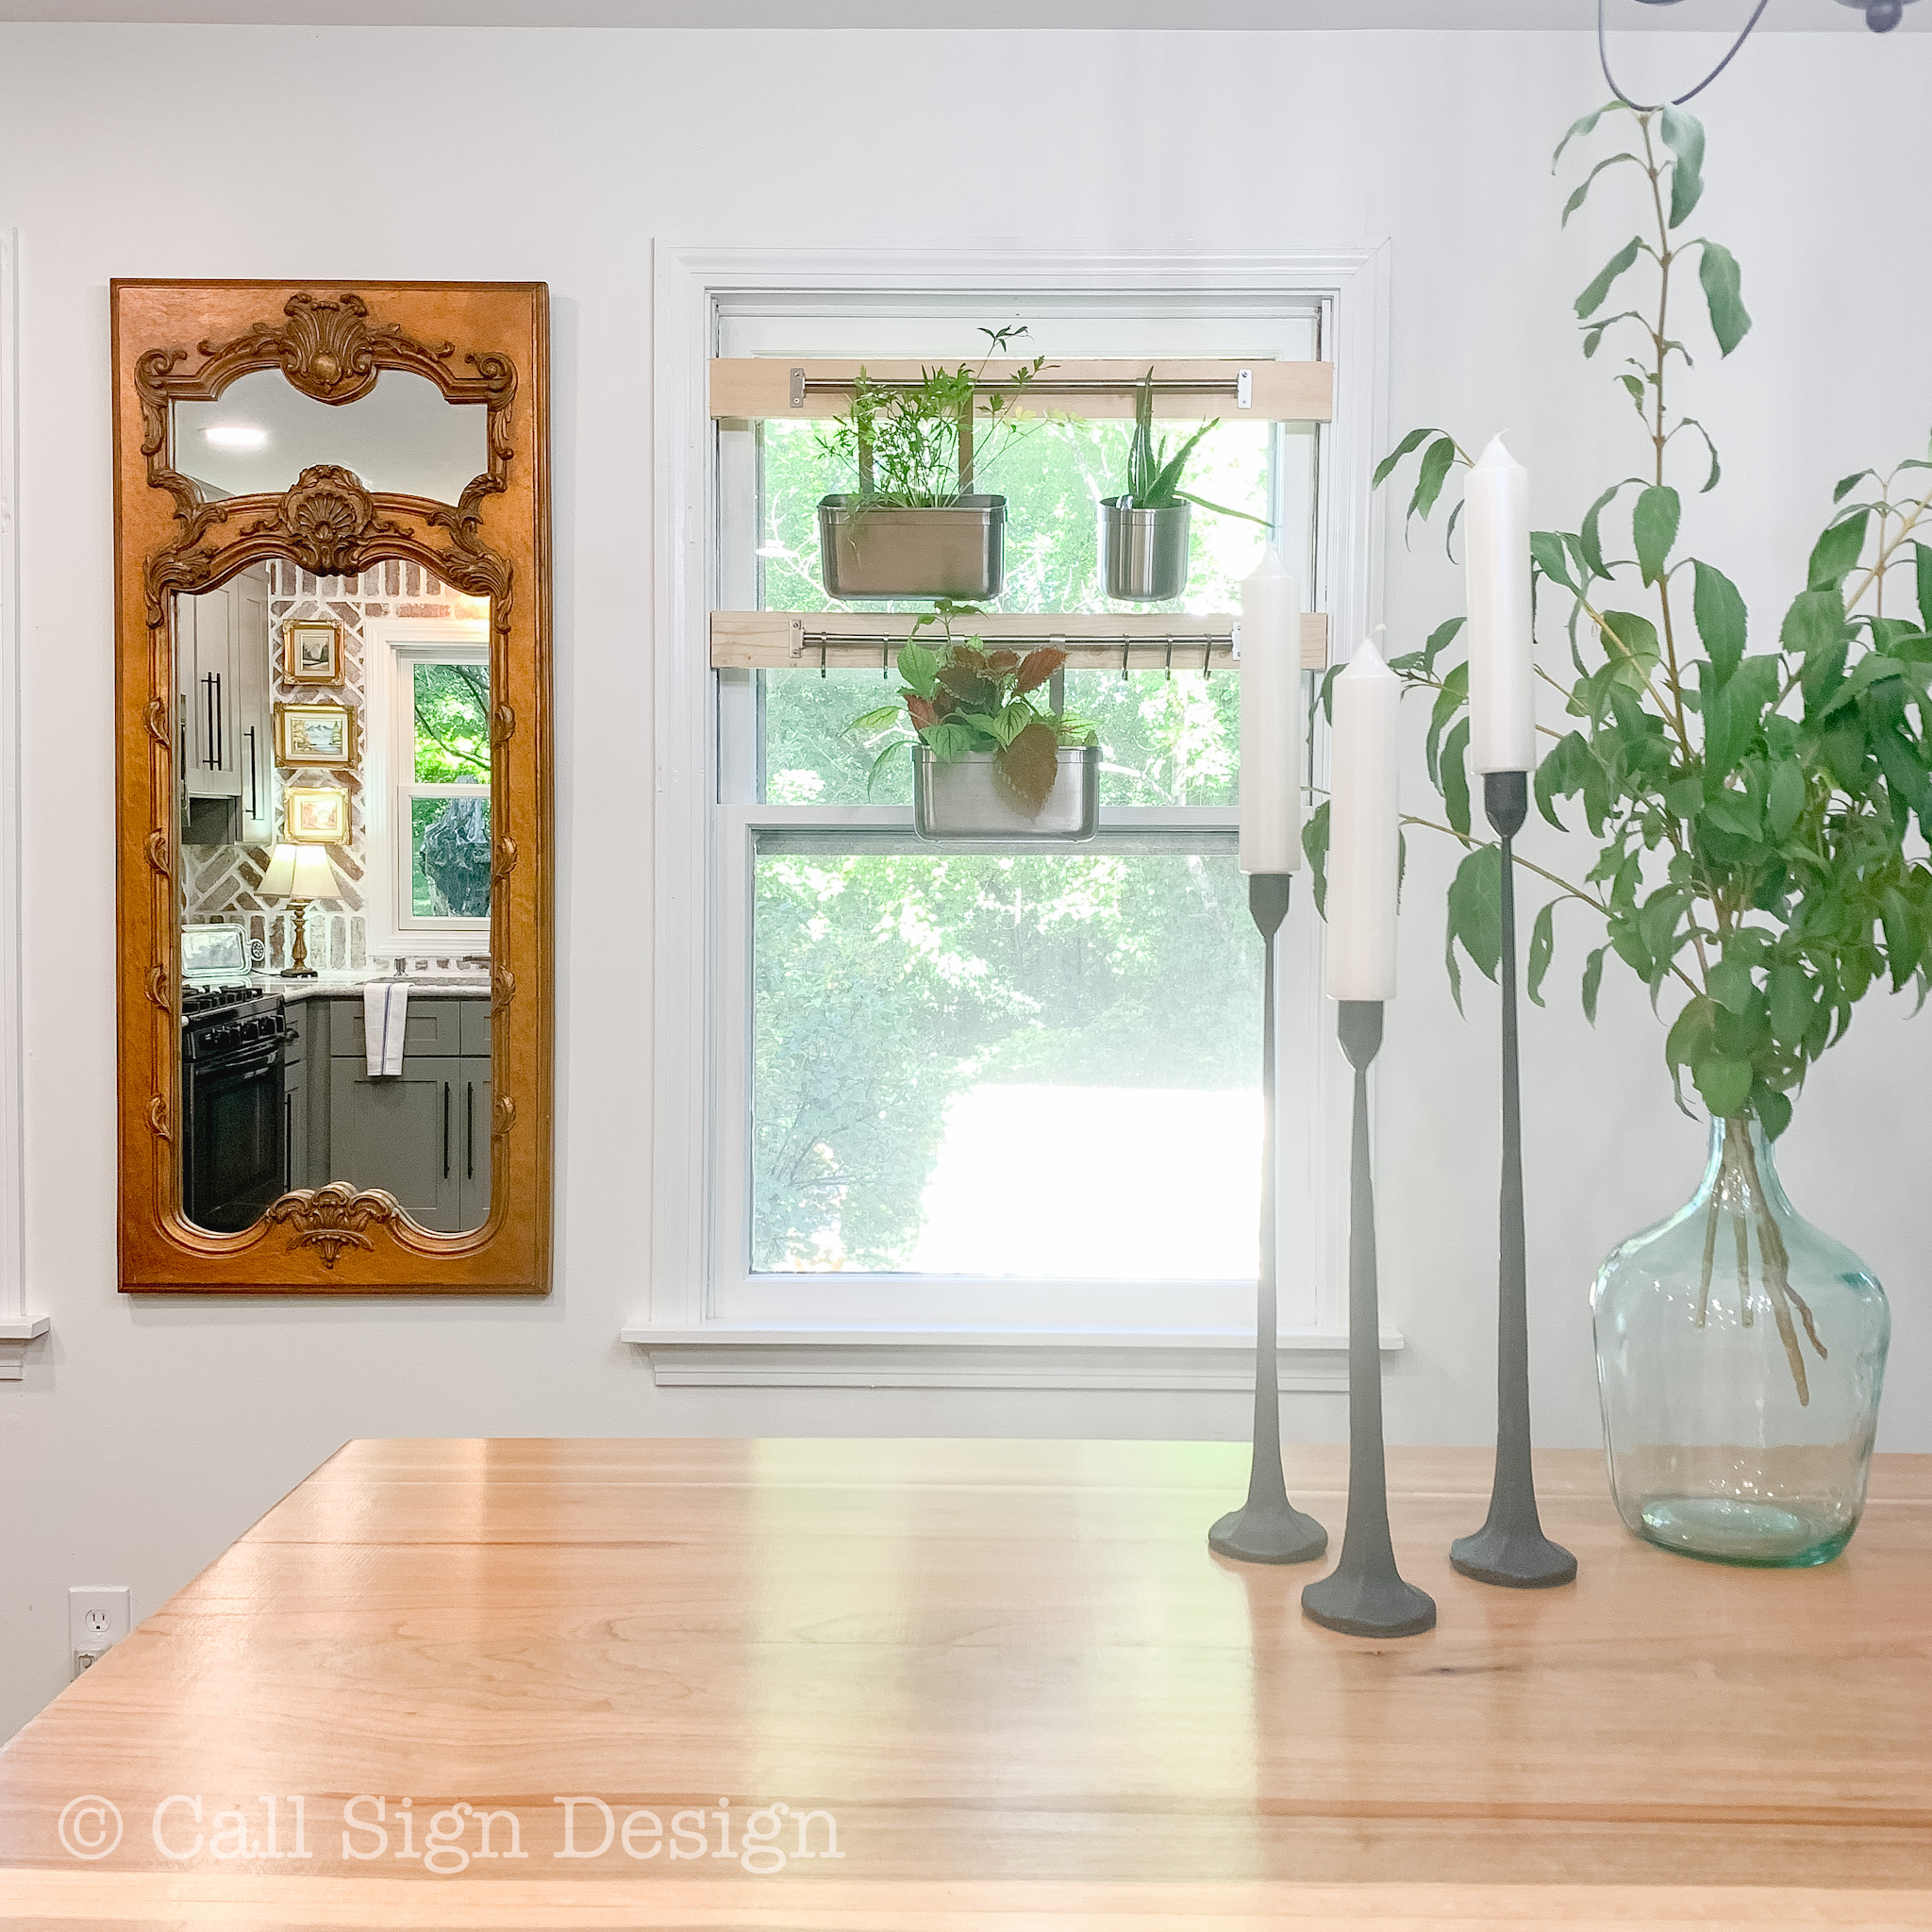
Don’t judge me. I have a thing for herbs in the kitchen, and this one wasn’t going without! The rails and bins are from the Kungsfors IKEA Collection. They are both beautiful and functional, and make the kitchen feel that much more cozy. The window is wider than the rails so we used scrap lumber and a Kreg Jig to install them.

Fresh herbs in the kitchen say, “There is some serious professional chef level cooking going down in this kitchen. You must buy this house.”

Don’t want to deal with hanging all those spice racks? Some fresh herbs tied with ribbon on the counter (in front of the chopping block) serves the same purpose for photos.


The Complete Kit For Staging Your Kitchen Like A Pro

HOW CUTE IS THIS???

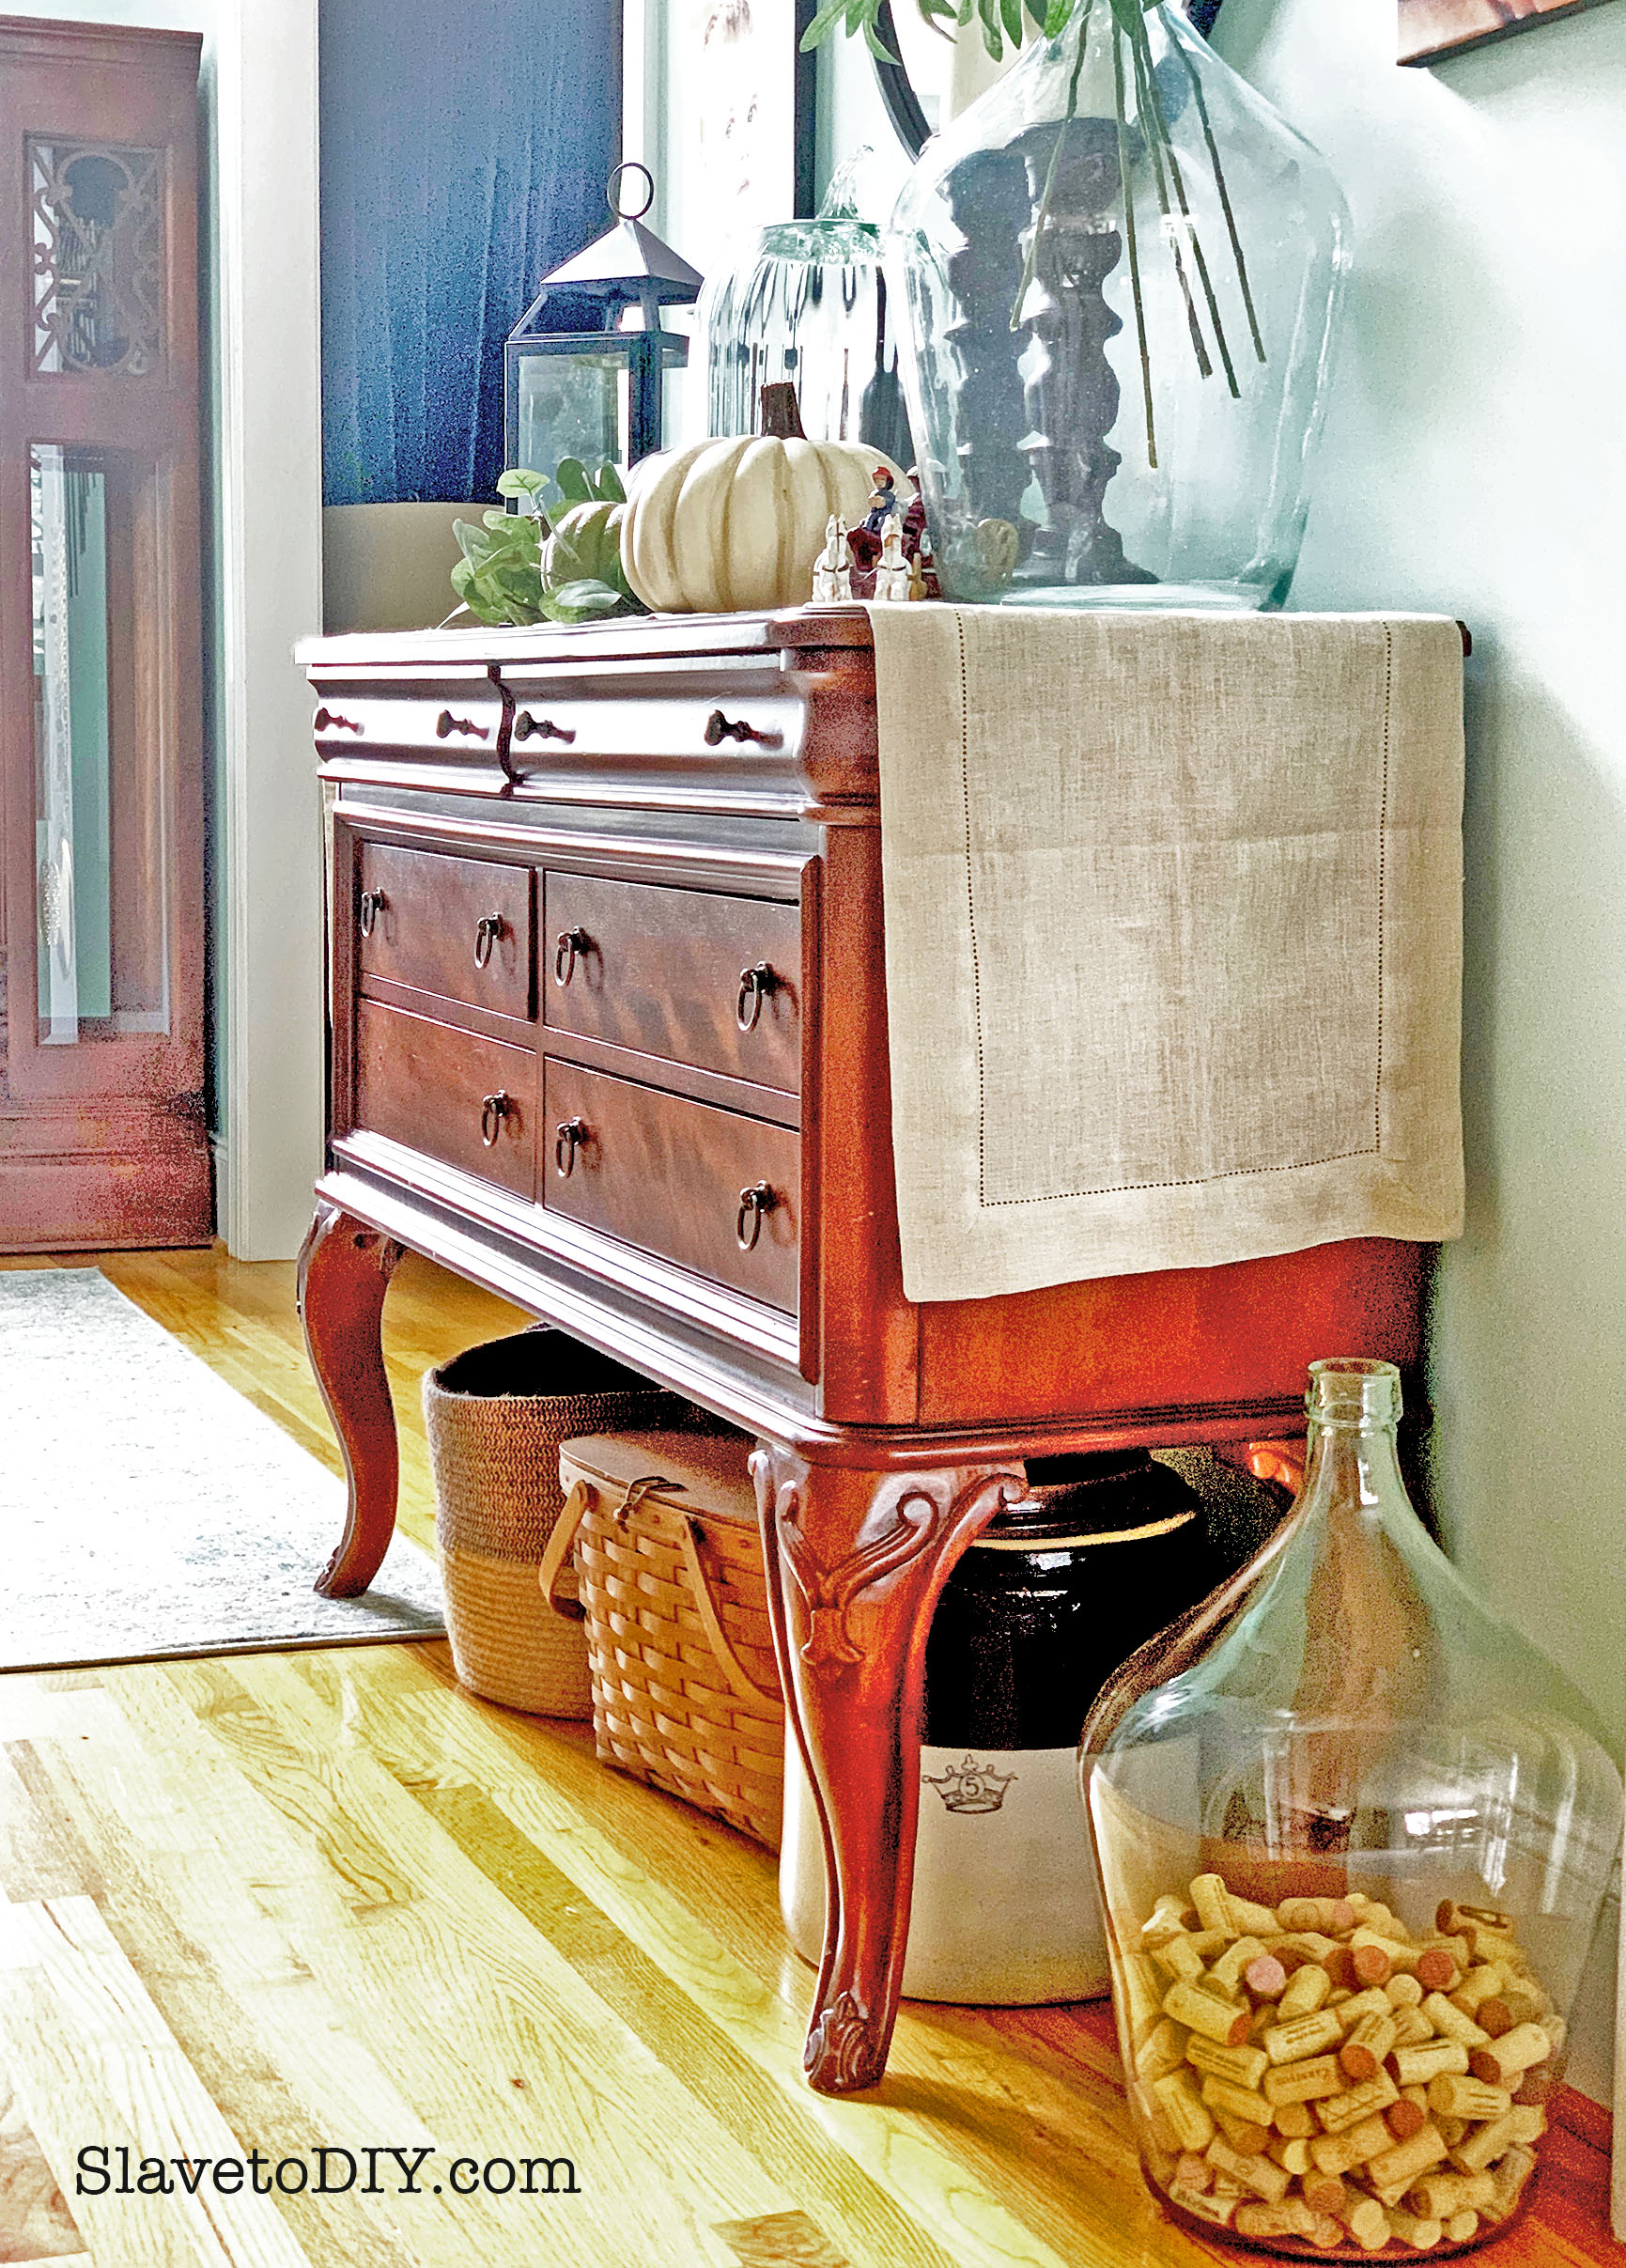
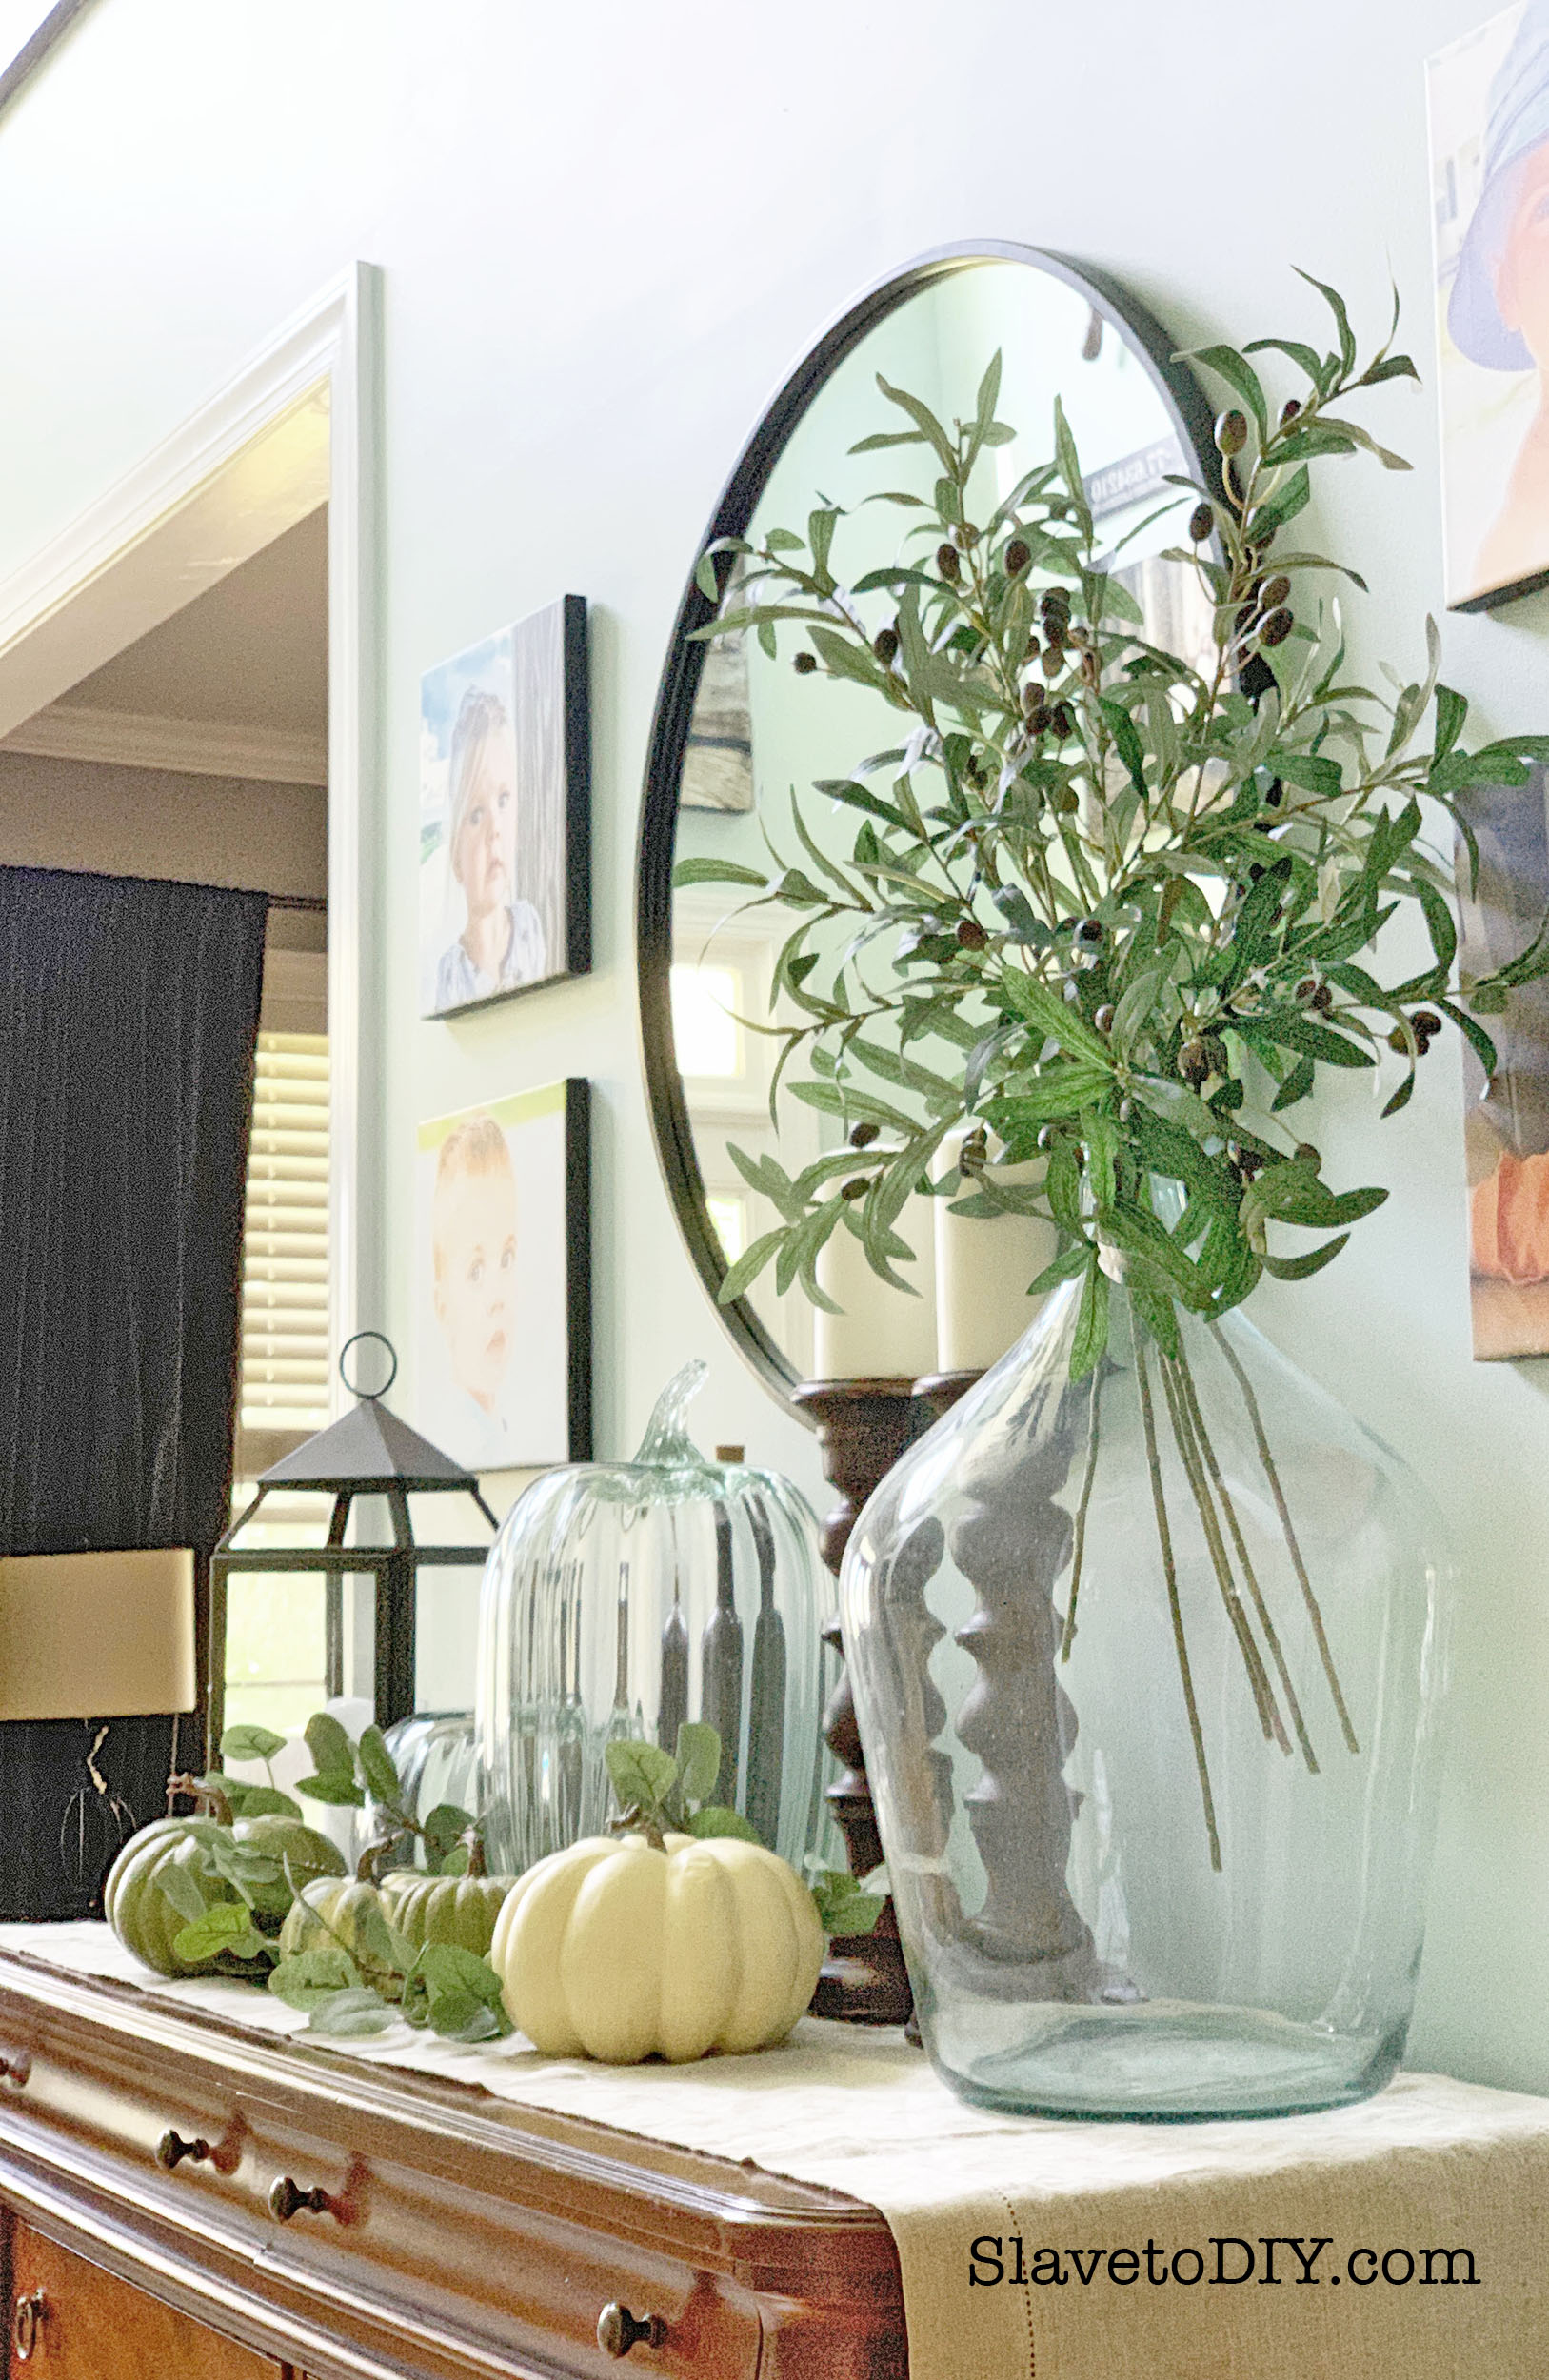
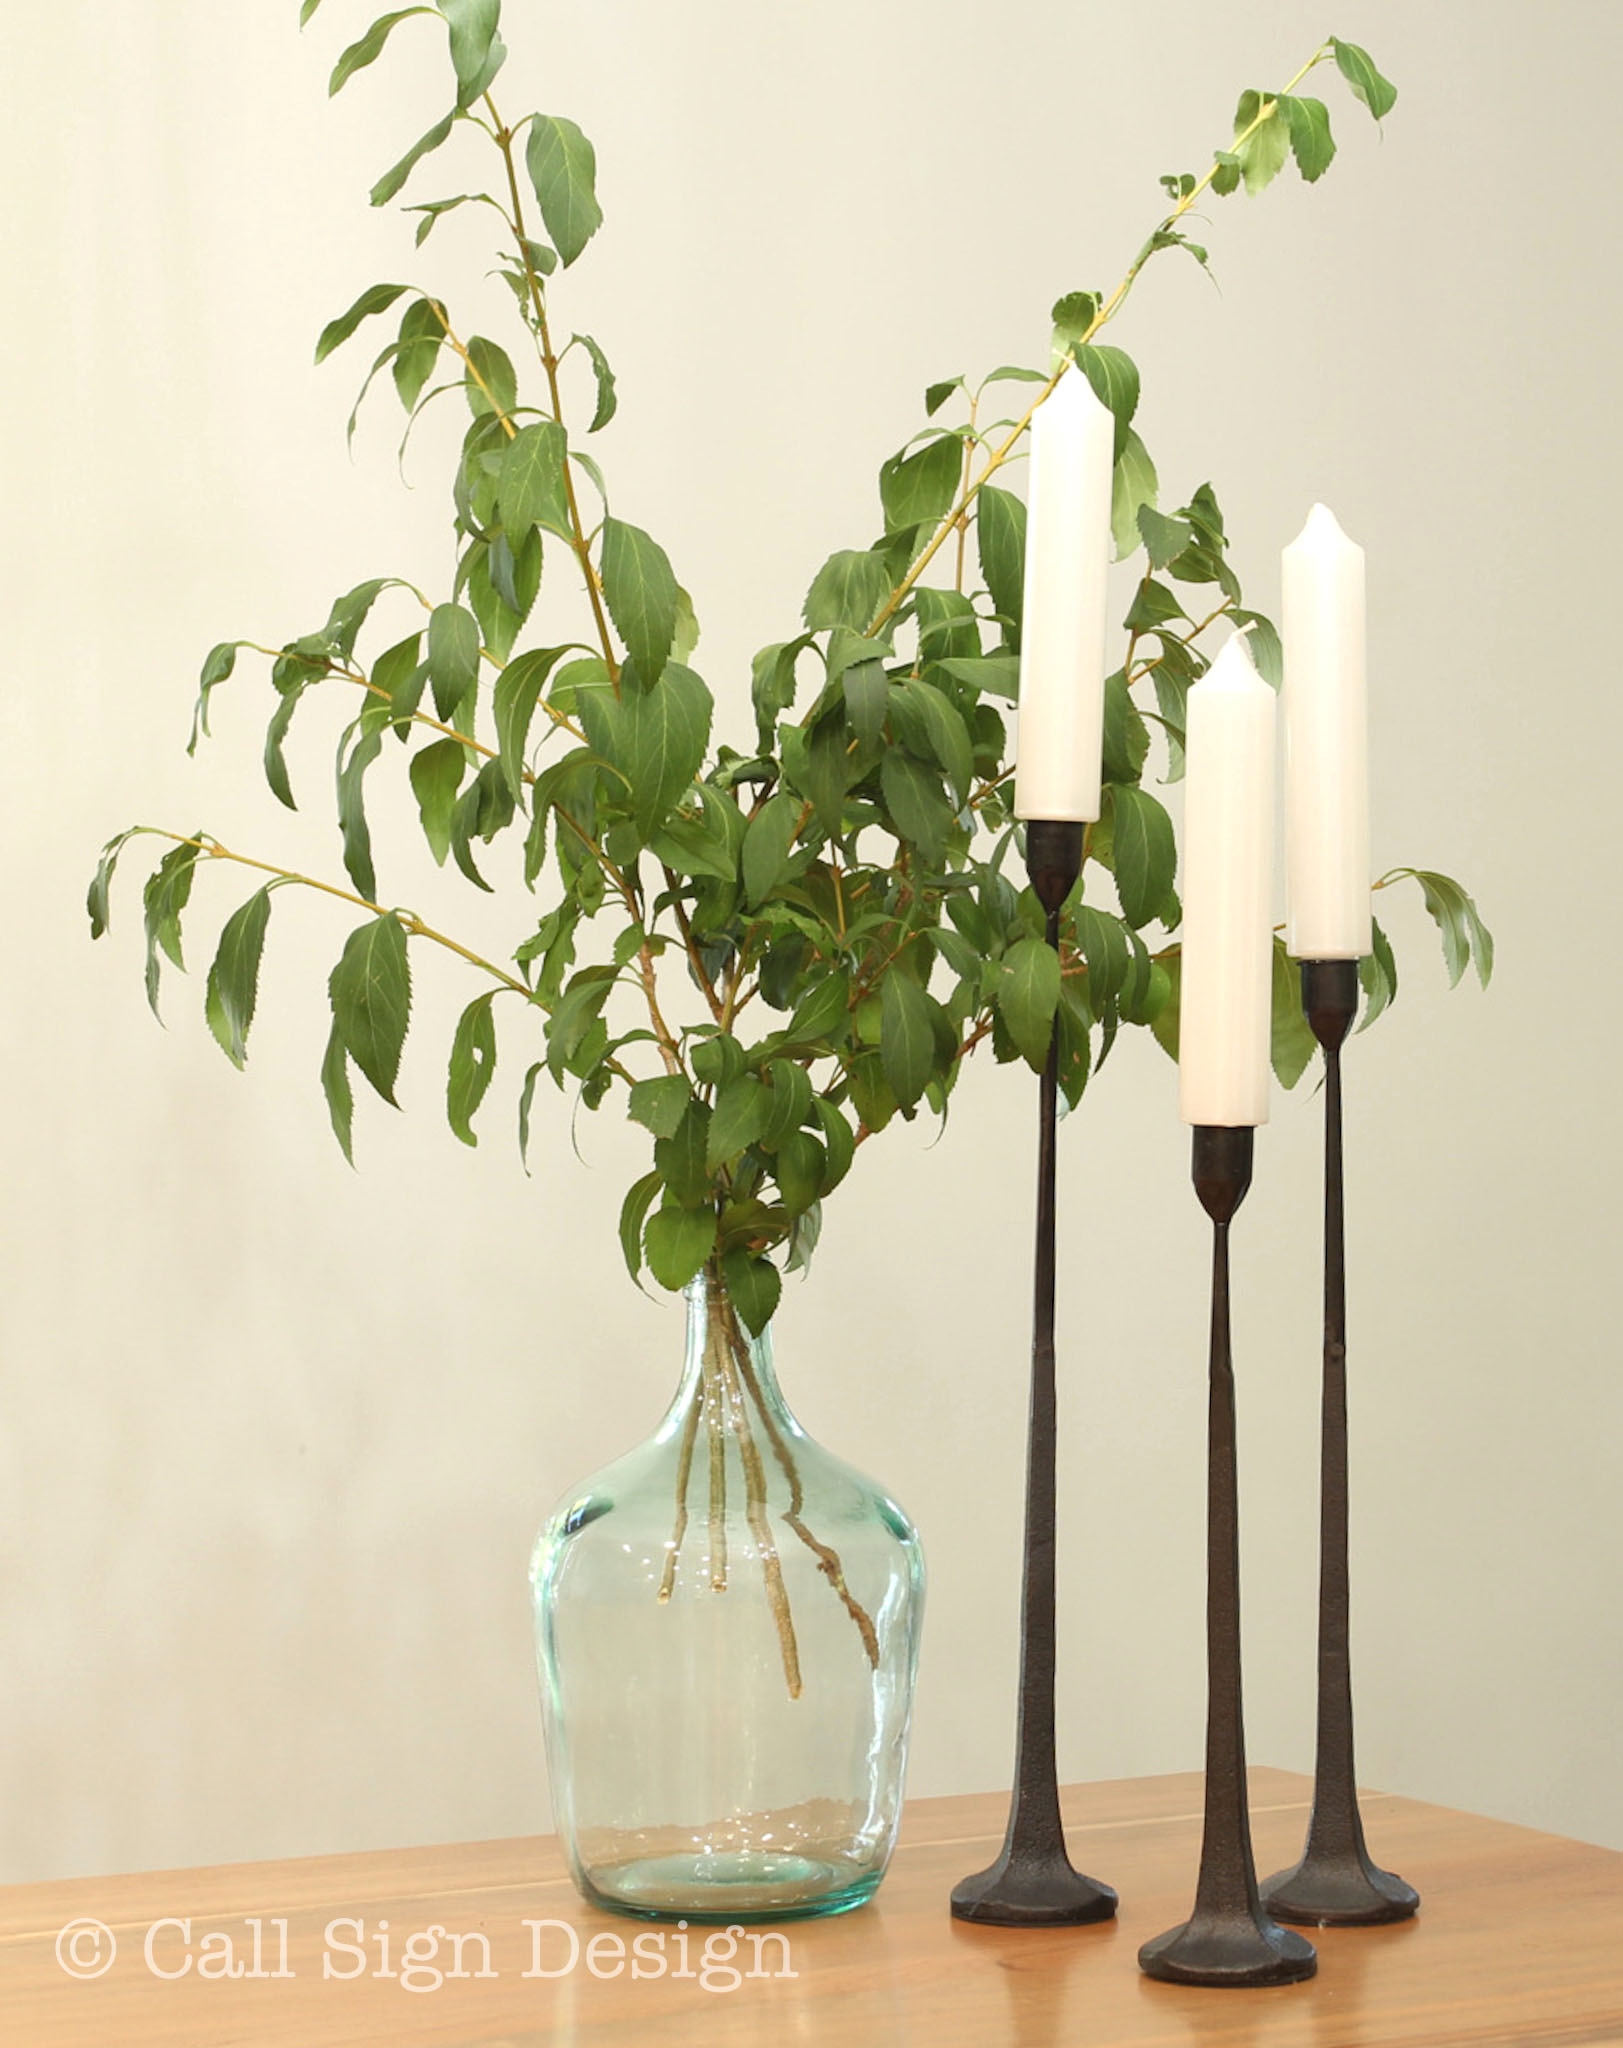
Demijohn: I’ll admit, I’m a little bit of a demijohn snob. What is a demijohn, you ask? I’ll tell you: What is a demijohn and how to use it in your decorating… I like them enough I wrote a whole post about them, because I’m an obsessive nerd. We found this perfect little demijohn at Hobby Lobby for around $20 and it’s perfect for this application!

Candlesticks: Also shown here, these TOTALLY AWESOME real Iron Candlesticks from Hobby Lobby are about $20 each (which I just went on and purchased more of because they’re on sale).  Score!

Tree branch: Scalped right out of the woods on the kitchen property. FREE! (Visualize the clients AND Rainman looking at me sideways on staging/photo day walking toward the woods with pruning sheers in hand… “Where are you planning on putting a branch that big, Griswold?” But, I’ll leave it there, and keep it PG).

And that’s all you need for the corner of the island! As the photographer moves around, move your arrangement around so it’s anchoring the outside frame of the picture.


Before and After Pictures of Grandma's New Vermont Cottage Kitchen: Sponsored by Lily Ann Cabinets and designed by @callsigndesign on Instagram and @slavetodiy on Pinterest.
Before and After Pictures of Grandma’s New Vermont Cottage Kitchen: Sponsored by Lily Ann Cabinets and designed by @callsigndesign on Instagram and @slavetodiy on Pinterest.

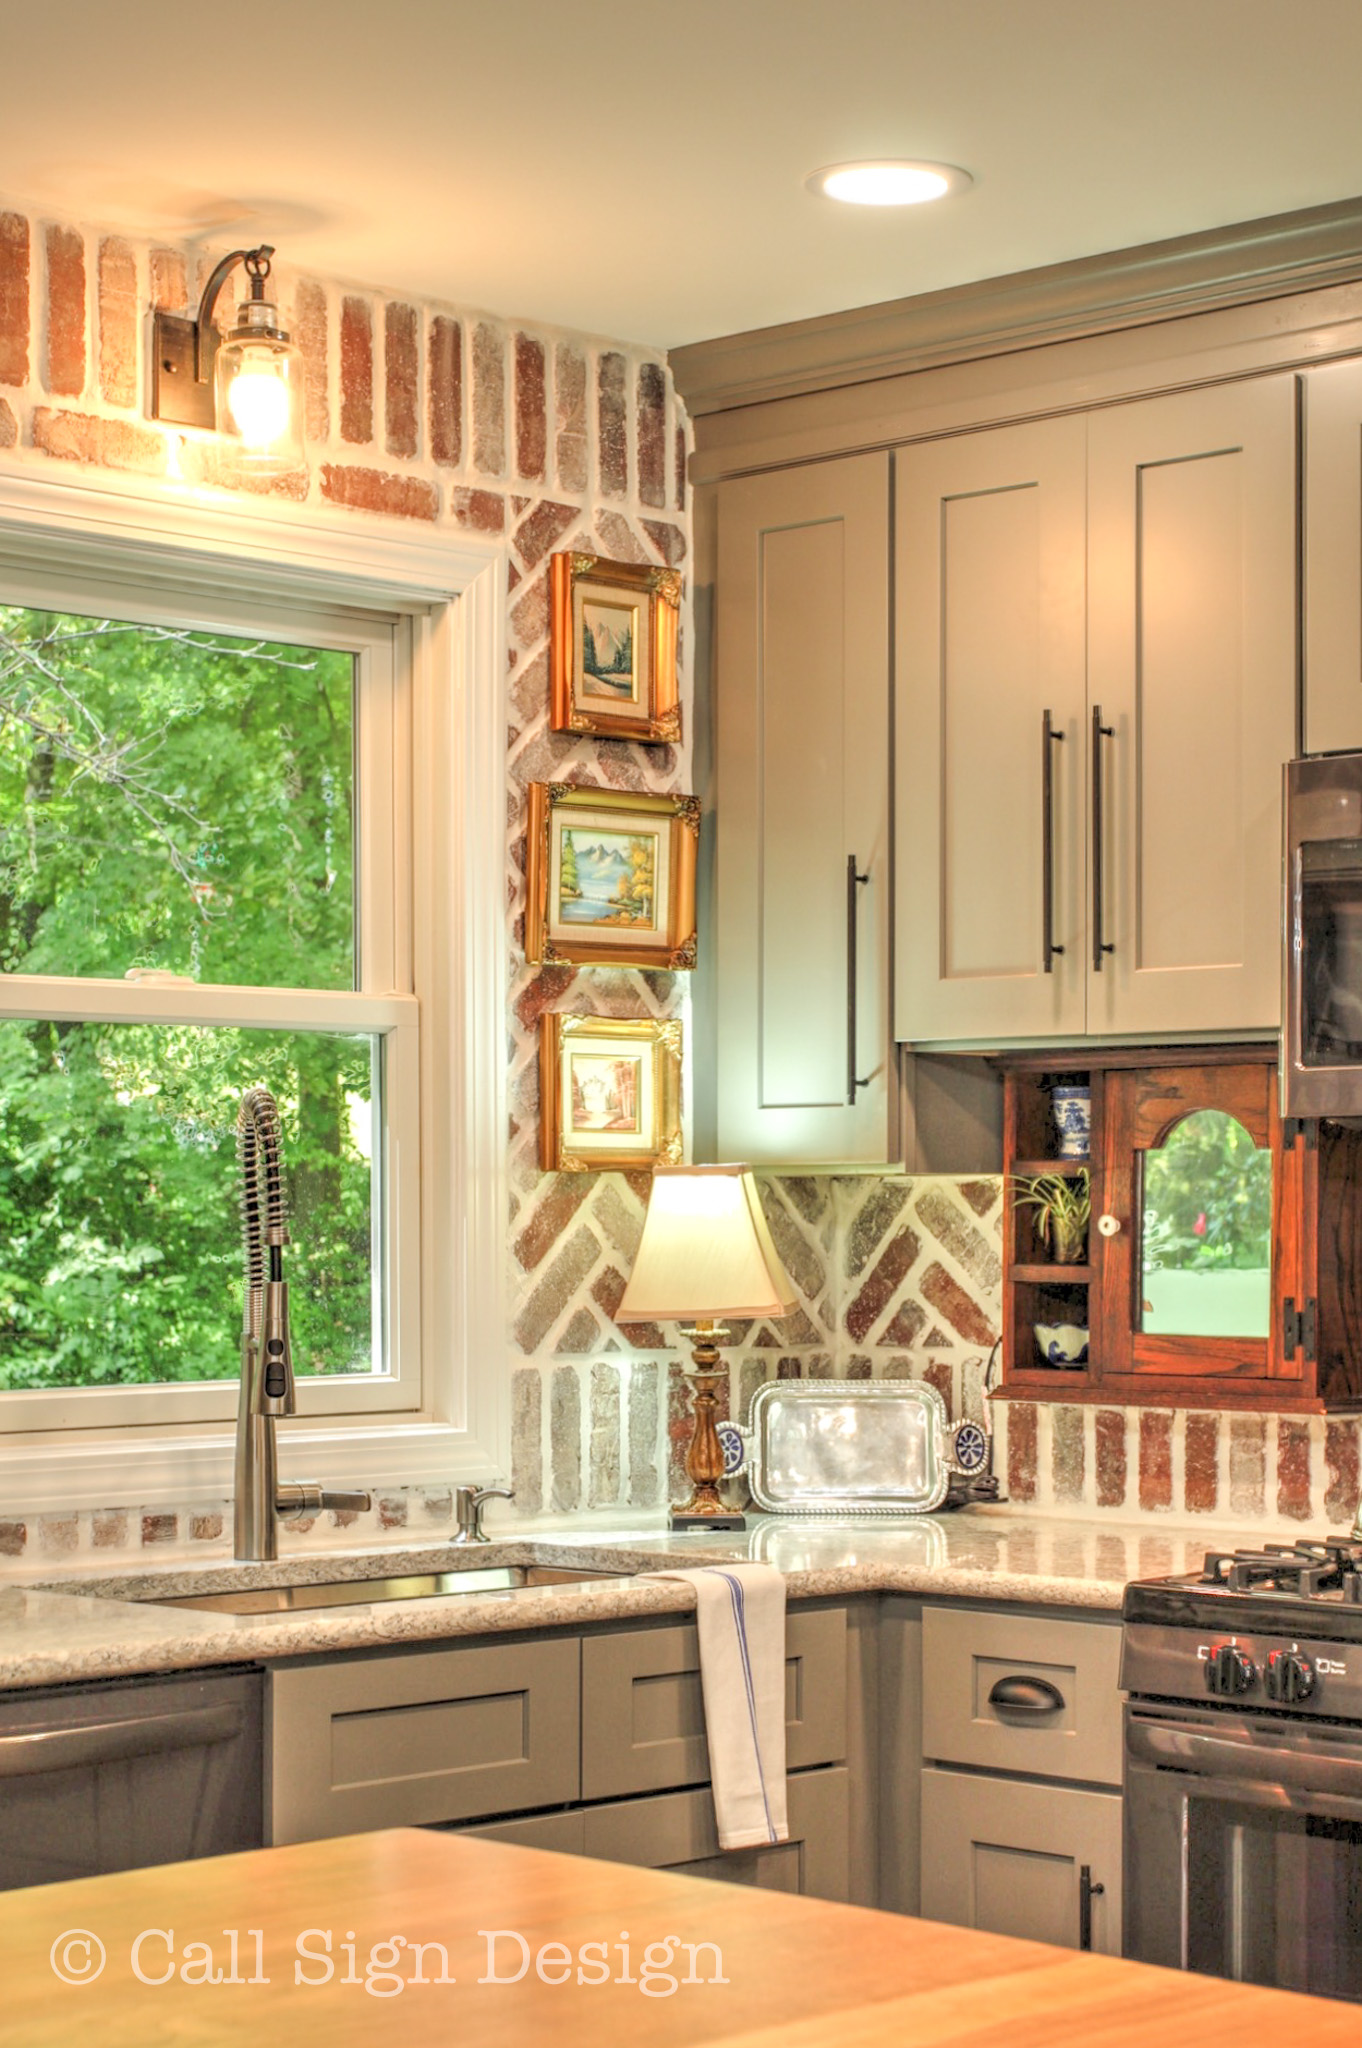
For this next corner I borrowed some items that belonged to the client (shop your own house!)… The little silver tray I used to hide the cord from the lamp. The little vases and tiny plant were also hers, and they look adorable in the spice cabinet!

And that lamp? I looked at about 500 lamps before I found this one with just enough fancy and just enough cottage-style to be convincing. And after I spent hours looking… I finally found it no place other than Amazon: The Perfectly Sized French-Style Countertop Lamp for around $30. (Some of the other sites are REALLY proud of their lamps and I’m just trying to be reasonable here).

The little oil paintings with gilded frames were a bit of a splurge and I found them on Ebay. I’m pretty sure there are some fairly convincing knockoffs at Target if you don’t want to be too extravagant and you’ll ultimately achieve the same look.


Before and After Pictures of Grandma's New Vermont Cottage Kitchen: Sponsored by Lily Ann Cabinets and designed by @callsigndesign on Instagram and @slavetodiy on Pinterest.
Before and After Pictures of Grandma’s New Vermont Cottage Kitchen: Sponsored by Lily Ann Cabinets and designed by @callsigndesign on Instagram and @slavetodiy on Pinterest.

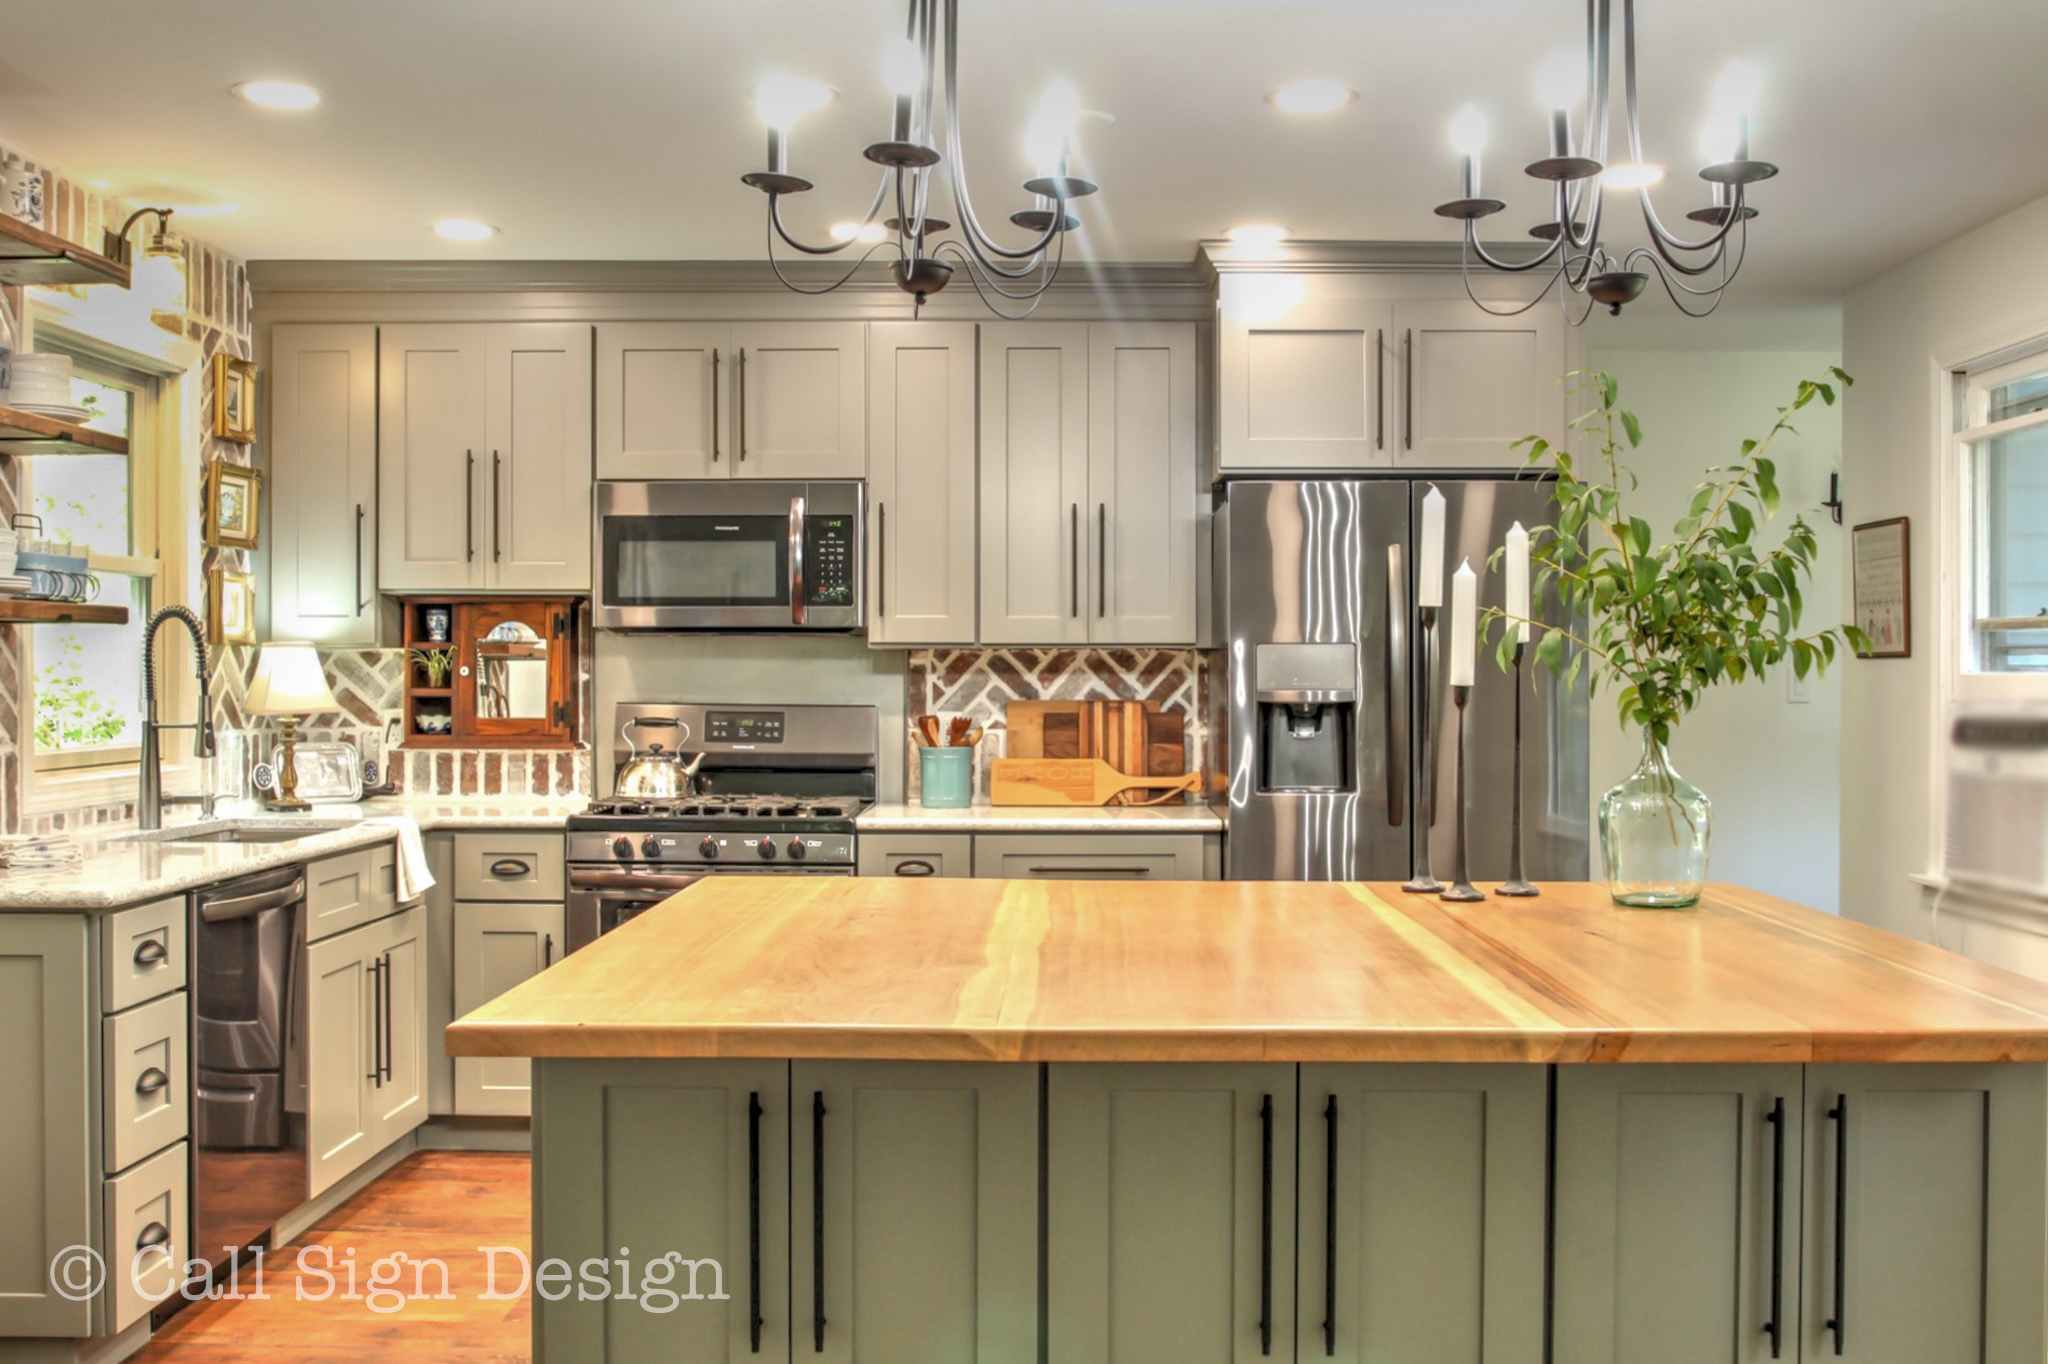
Notice how we moved the demijohn and candles for this shot? We moved them just enough so they’re anchoring an uninteresting side of the room and creating balance.


Before and After Pictures of Grandma's New Vermont Cottage Kitchen: Sponsored by Lily Ann Cabinets and designed by @callsigndesign on Instagram and @slavetodiy on Pinterest.
Before and After Pictures of Grandma’s New Vermont Cottage Kitchen: Sponsored by Lily Ann Cabinets and designed by @callsigndesign on Instagram and @slavetodiy on Pinterest.

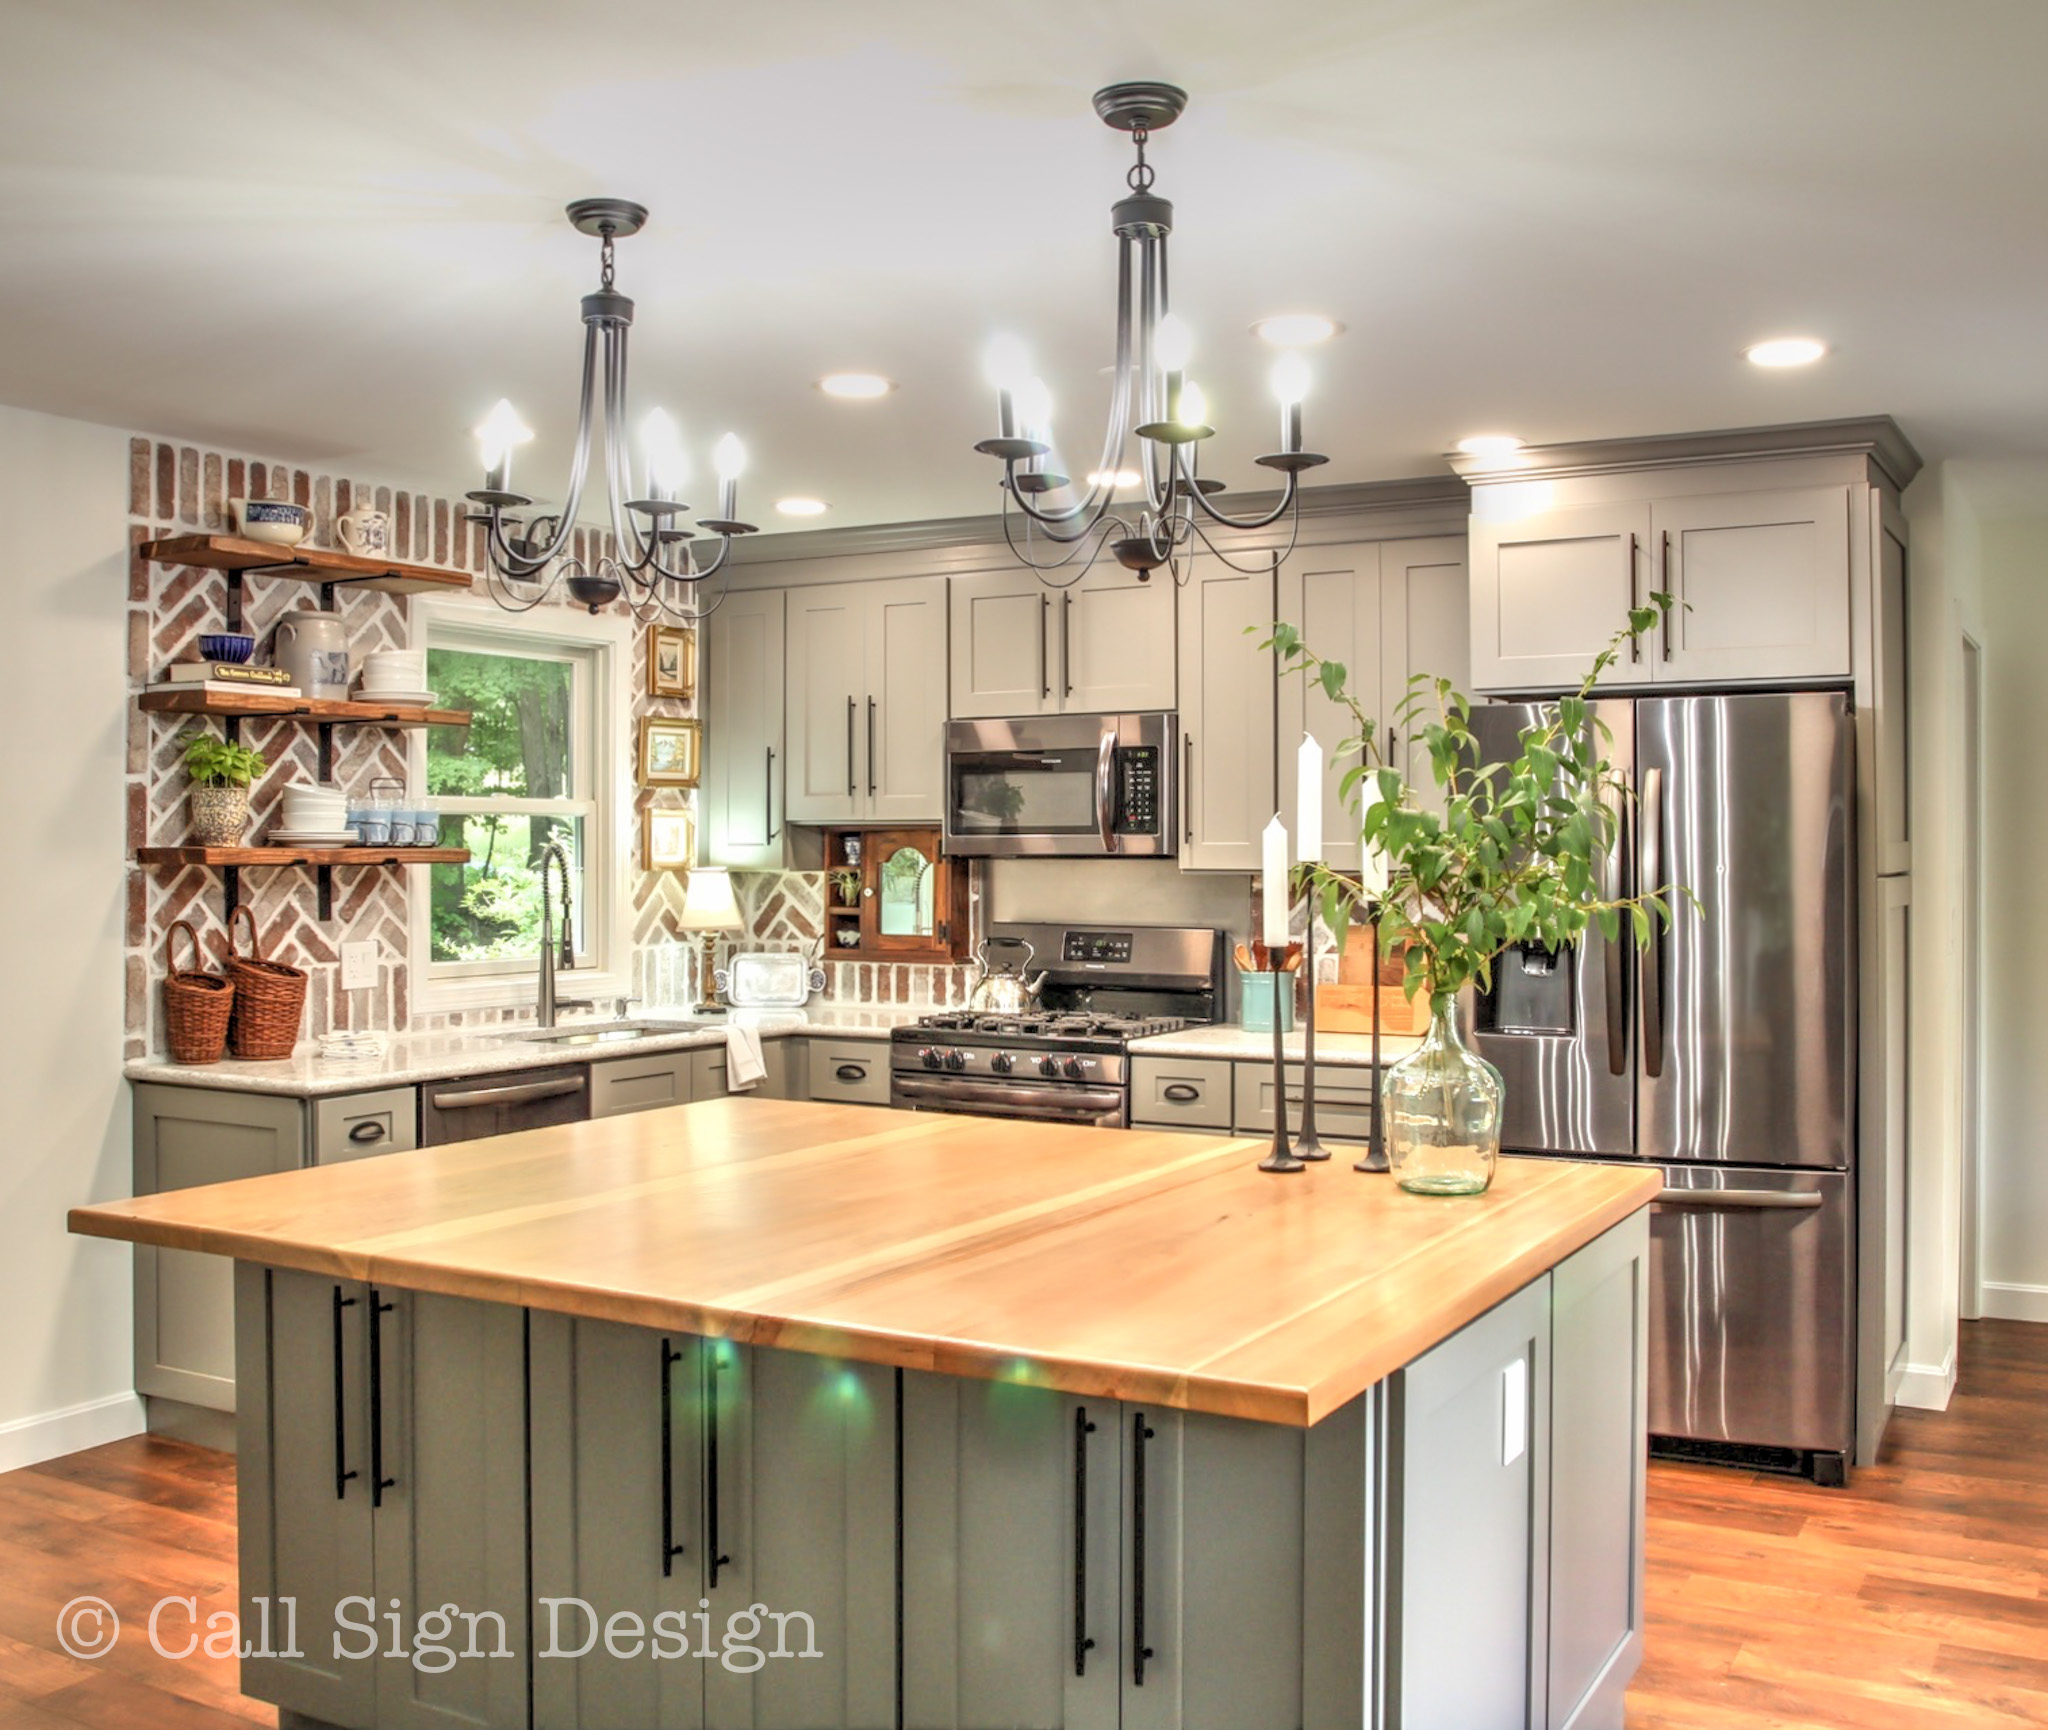
Every time we changed the camera angle, we repositioned the candles and spun the branches so they looked nice and full, but also just wild enough to be wonderful and daring.


Before and After Pictures of Grandma's New Vermont Cottage Kitchen: Sponsored by Lily Ann Cabinets and designed by @callsigndesign on Instagram and @slavetodiy on Pinterest.
Before and After Pictures of Grandma’s New Vermont Cottage Kitchen: Sponsored by Lily Ann Cabinets and designed by @callsigndesign on Instagram and @slavetodiy on Pinterest.

Another angle for good measure! (Aren’t those fat candles just the coolest? Also on Hobby Lobby, if you’re looking).


Before and After Pictures of Grandma's New Vermont Cottage Kitchen: Sponsored by Lily Ann Cabinets and designed by @callsigndesign on Instagram and @slavetodiy on Pinterest.
Before and After Pictures of Grandma’s New Vermont Cottage Kitchen: Sponsored by Lily Ann Cabinets and designed by @callsigndesign on Instagram and @slavetodiy on Pinterest.

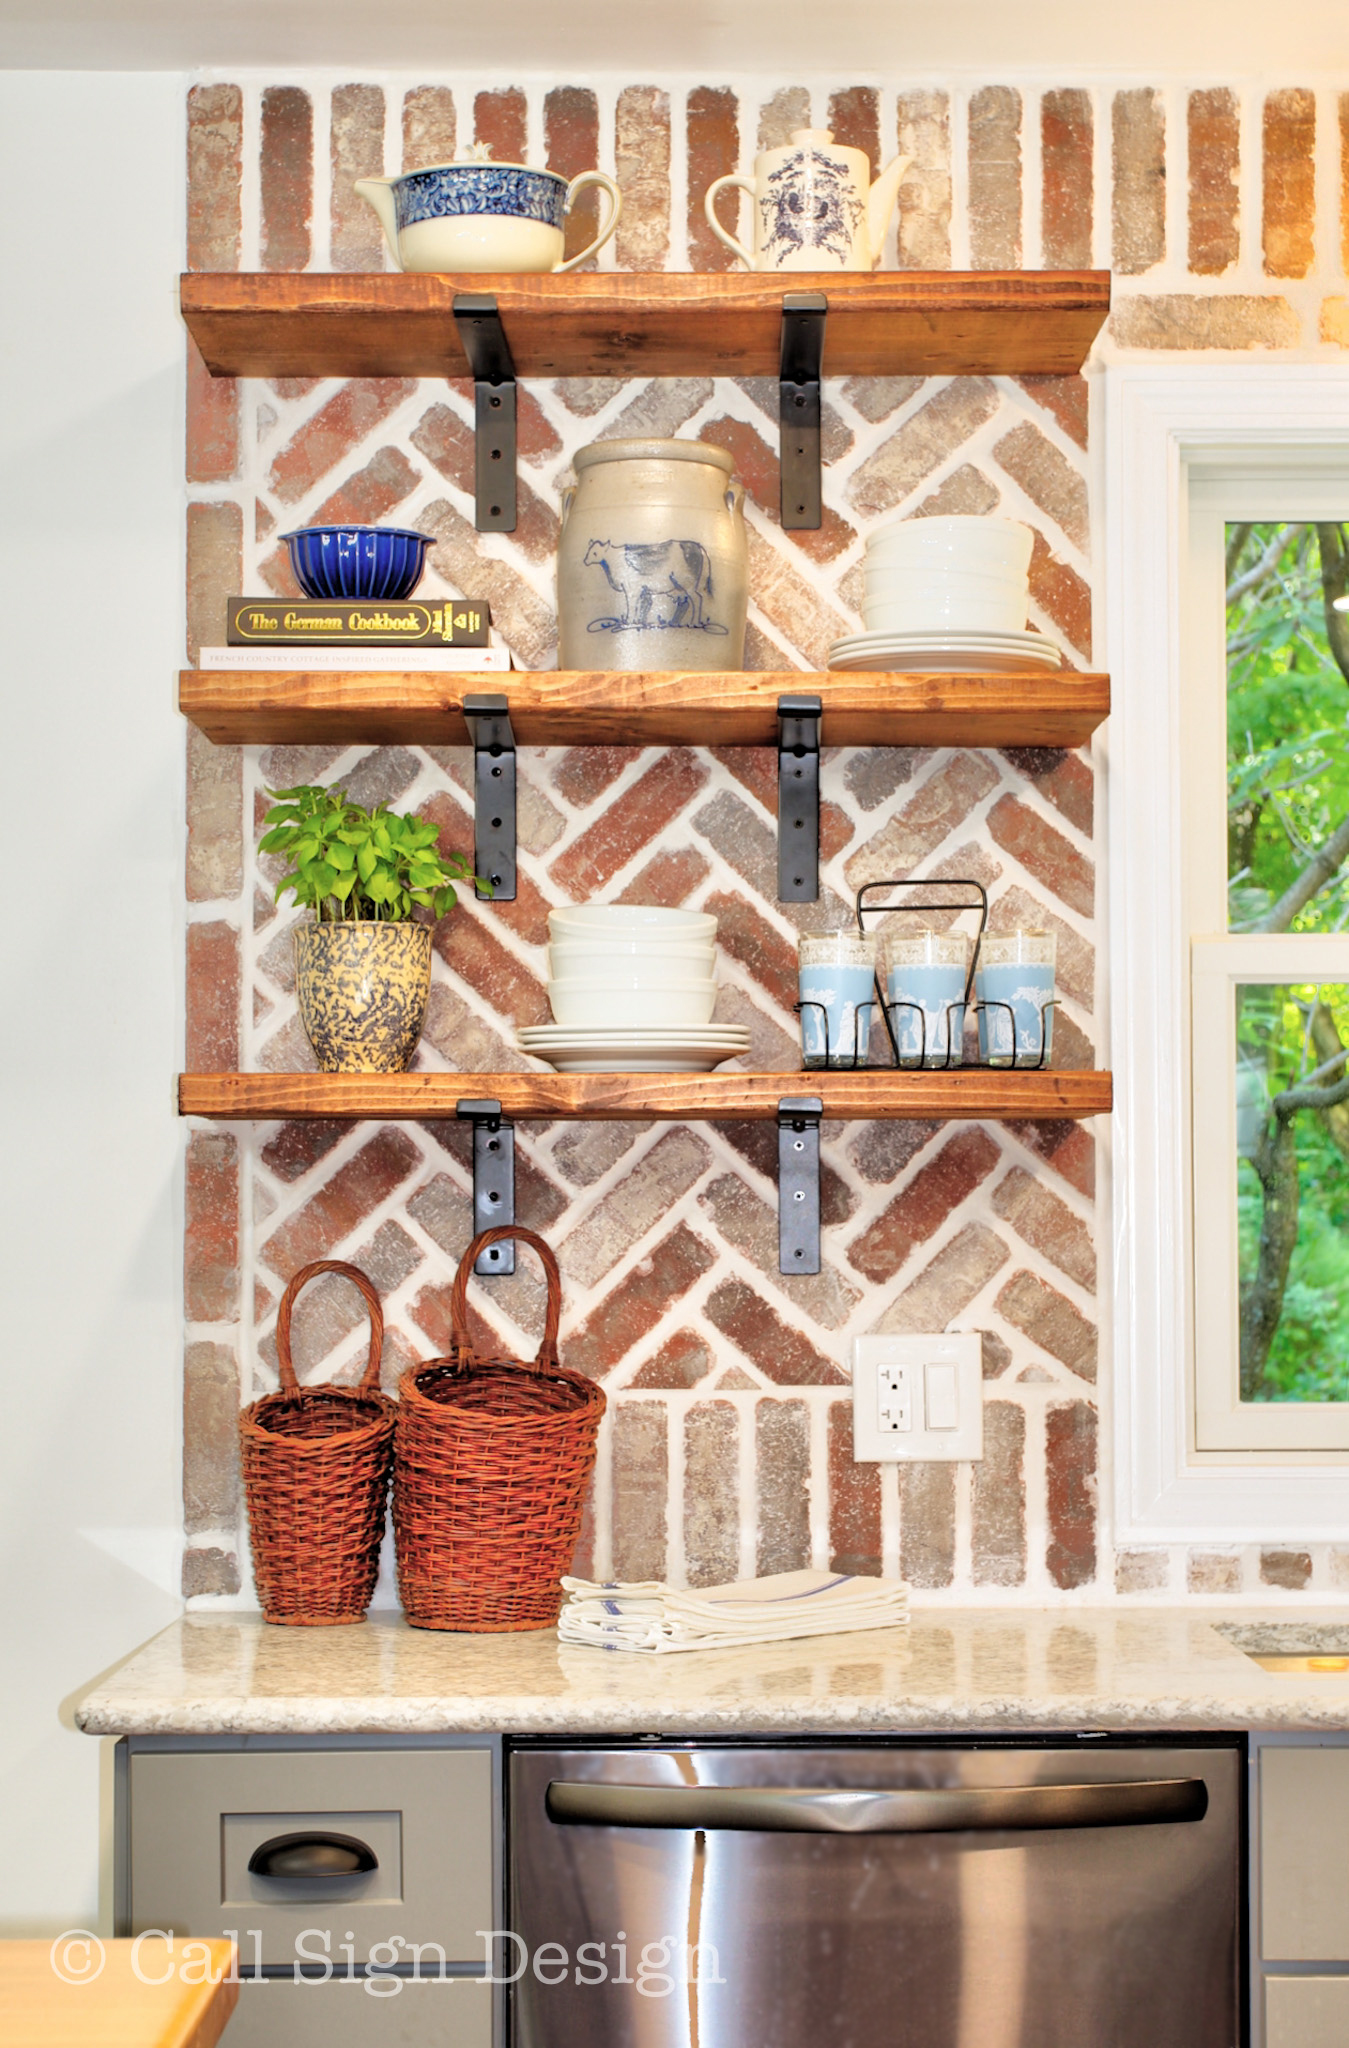
Now, if you haven’t mastered the art of the shelfie, here’s a quick crash course:

Arrange in threes and in triangles. Okay, so we have a couple “twos” but it’s all about balance.

Here, everything but the new blue stripe dish towels and the White Pantry Soup Bowls and Plates from Williams Sonoma the client already had! It’s just a matter of arranging them in a pretty, uncluttered way.

There is a triangle of “tall items” and a triangle of bowls and a triangle at the top of crocks and teapots.

Believe it or not, those shelves used to be the temporary stair treads to the basement. You can find the black metal shelf brackets here if you’re looking to open up some space on your own wall!

Is your kitchen atrocious and preventing your house from selling? Check out our ideas on The Best Ways To Transform An Outdated Kitchen On A Tiny Budget.


How To Stage Your Kitchen Like A Pro
Butcher block, cutting boards, and charcuterie boards, (Oh My)… How To Stage Your Kitchen Like A Pro. Designer: @callsigndesign (Instagram). Photographer: @loganbspring (Instagram). Cabinets @lilyanncabinets_ (Instagram)

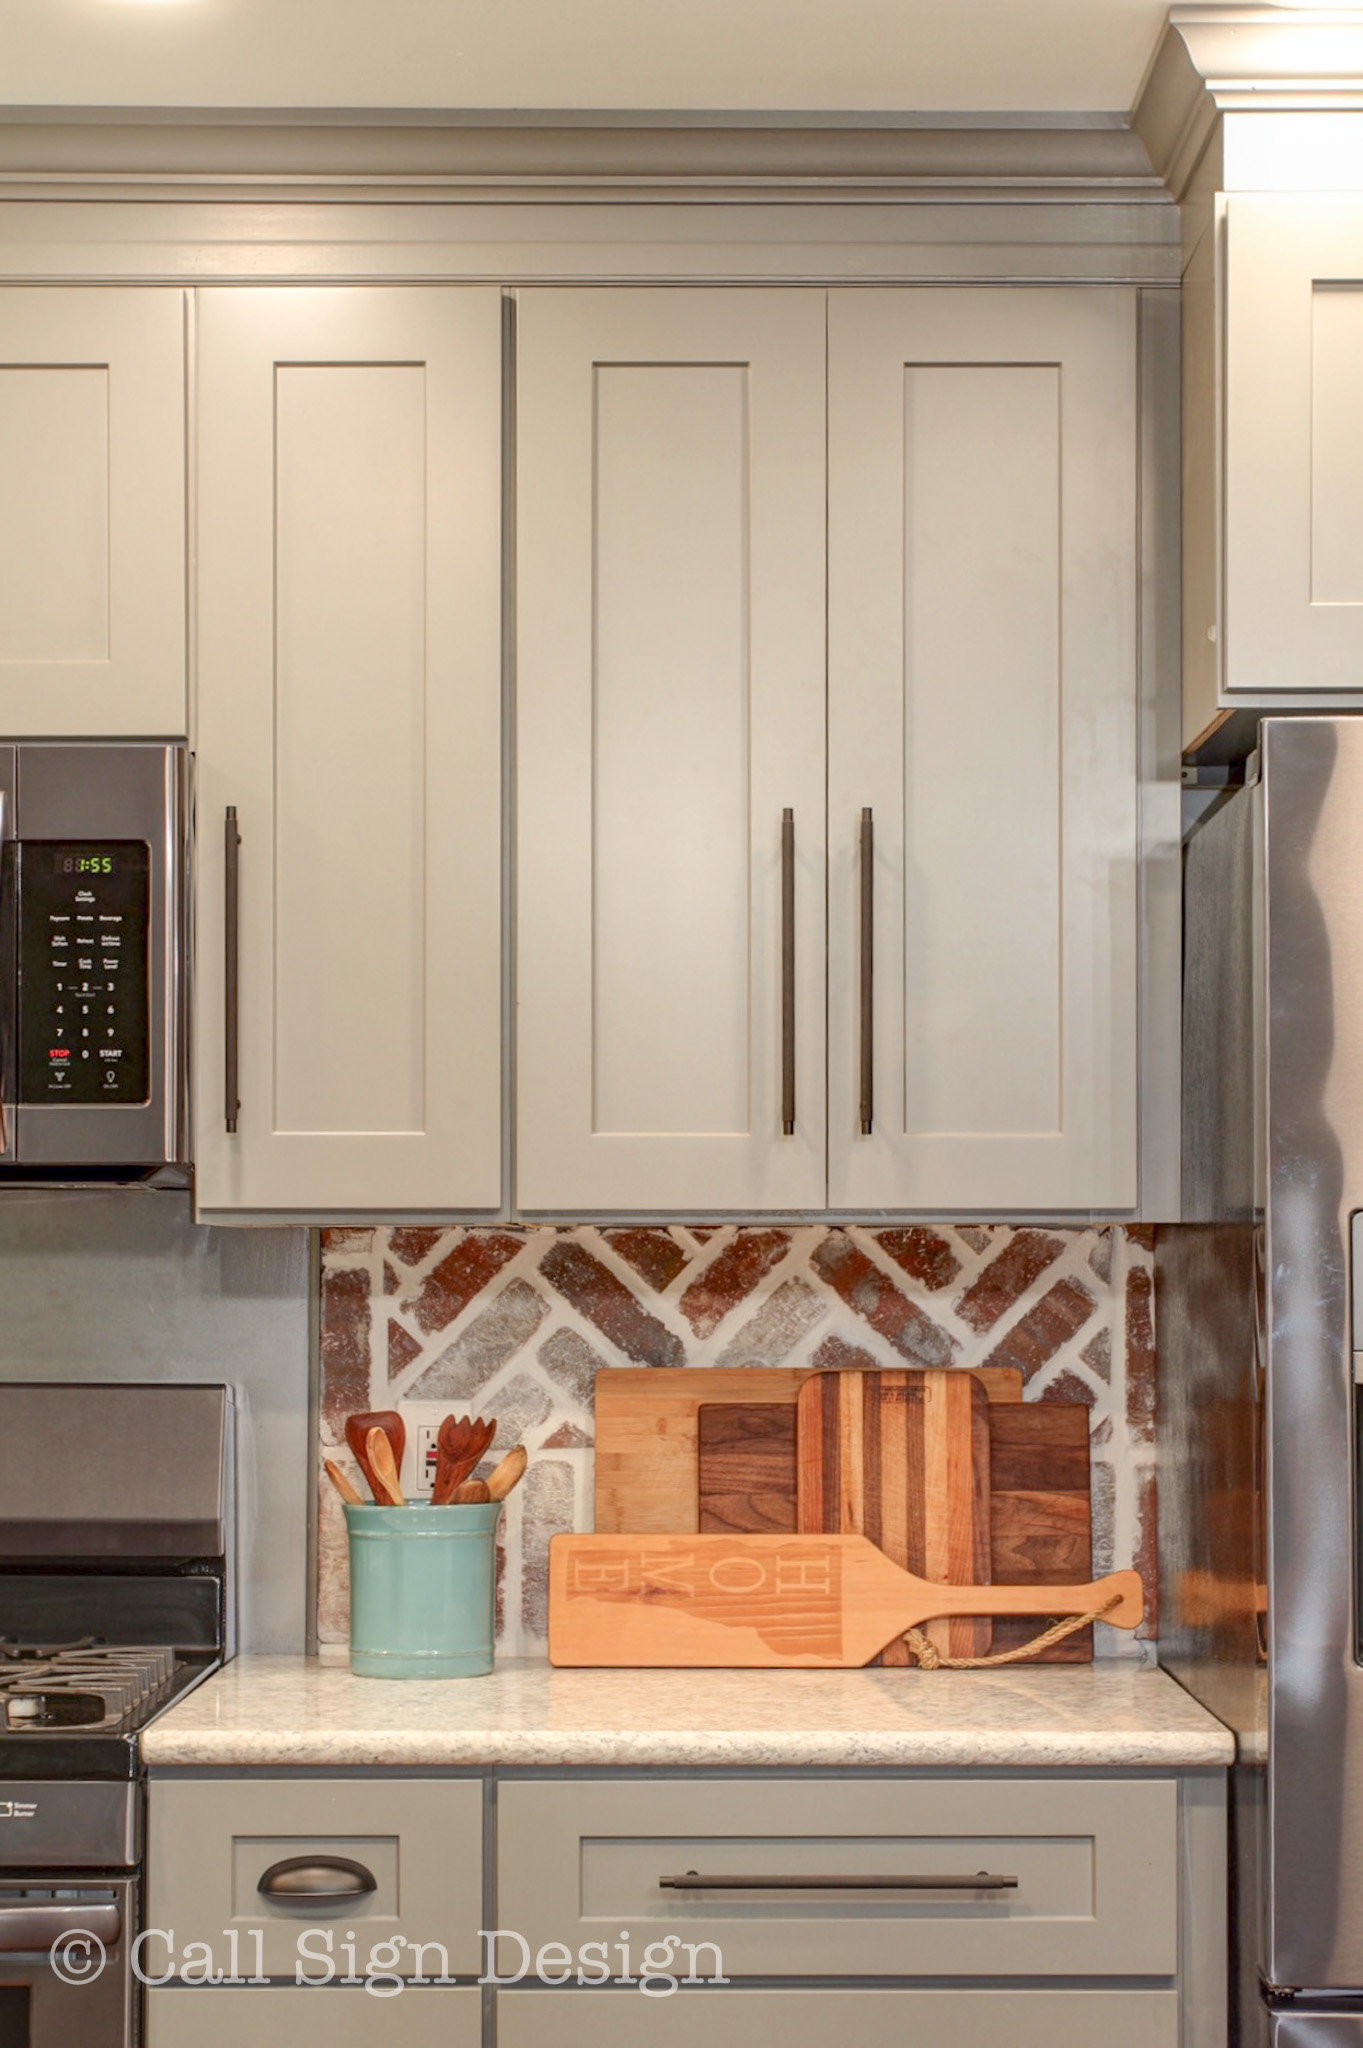
The perfect cutting/charcuterie board corner: every one of these the client already had!

The Cambria Stoneware Kitchen Utensil Holder was from Pottery Barn but I think they may have been discontinued in that color. We displayed her wooden spoon collection in them and I think they look perfect!

Shades of blue created perfect, subtle pops of color in our staging. Wouldn’t you like to do some cooking in this kitchen?

If you’re in the market for quality RTA cabinets go to Lily Ann Cabinets and use offer code SDIY2018 to get 5% off! (The cabinets pictured are Grey Shaker Elite).

Have a house on the market? Download The Ultimate Home Showing Checklist FREE on how to get ready for and nail your real estate showings!

Can you think of some other important parts of staging a kitchen? Let us know in the comments!

Thanks for hanging out today! Cheers!


*All photos by @loganbspring on Instagram


*Legal stuff:

I am honest about my experiences with different products and write because I enjoy it.  I do however, have the opportunity to earn money for my writing, also.

Slavetodiy.com is a participant in the Amazon Services LLC Associates Program, an affiliate advertising program designed to provide a means for sites to earn advertising fees by advertising and linking to amazon.com.  Amazon offers a small commission on products sold through their affiliate links.  Each of your purchases via our Amazon affiliation links supports our cause at no additional cost to you.

If a blogger links to an Amazon product (with a special code for affiliates embedded in the link), and a reader places an item in their “shopping cart” through that link within 24 hours of clicking the link, the blogger gets a small percentage of the sale.  Amazon links are not “pay per click.”  If you click on the product link and stay around Amazon and purchase something else, however, I will get a commission on that sale.

Slavetodiy.com is also a VigLink affiliate advertiser which works similarly.

Mashup Monday: Classic Christmas Mantels That Will Be In Style Every Year

“Ok, Campers!  Rise and shine, and don’t forget your booties cause it’s COLD out there!” Phil Connors from Groundhog Day. So, no it’s not cold yet, but I am so in the mood to completely skip all of the other festivities and head straight to Christmas. It is HANDS DOWN my favorite time of year and I’m always on the lookout for better ways to make my house warm, beautiful, and wonderful for my family.

*This post may contain affiliate links. Please see full disclosure at the end of the post.

For those of you wondering how to decorate your fireplace for Christmas this year: I compiled some of my favorite Christmas Fireplace Mantels from last year that hopefully will give you some inspiration!

I’m going to start with our Christmas mantel this year, which I whipped together the day after Halloween like a crazy person. I didn’t realize how many changes we’ve made in this room since last year (and I’m loving it dressed in Christmas)!

Mashup Monday: Classic Christmas Mantels That Will Be In Style Every Year
Mashup Monday: Classic Christmas Mantels That Will Be In Style Every Year. From @callsigndesign on Instagram and @slavetodiy on Pinterest.


If you’d like to duplicate our mantel:

We combined a standard lighted fir garland with Willow and Silver Dollar Eucalyptus Garland (we have two strands).

In the black Pottery Barn vase I have these Red Berry, Or Cranberry, Stems.

In the black found pot to the right I have these Olive Branches.

Those super cool Black Iron Candlesticks are from Hobby Lobby, as are the White Club Candles.

And a fun clip of decorating:


But, enough about us! On to classic mantels!

This one (how amazing is this mantel?) is done in beautiful mixed greens, sleigh bells, and woven grass and twig pieces for great texture. How awesome are those crochet stockings and all those white twinkly lights?

Christmas Mantels 2020
Christmas Mantels 2020: Via @the.little.bird on Instagram


This next one is simple and beautiful, in mixed natural fabrics and minimal decoration, it feels like home and I’m definitely in for the Griswold trip to go cut down a Christmas Tree.

Christmas Mantels 2020
Christmas Mantels 2020: Via @harpergrayce on Instagram


This, for my more sophisticated readers that like a little more bling in their Christmas cheer, is amazing in all of its glittering glory. Mercury glass mixed with some playful patterns, greenery, and fresh cut white flowers is as fun as it is elegant.

Christmas Mantels 2020
Christmas Mantels 2020: Via @theglampad on Instagram


This next mantel (and gorgeous tree) is done in traditional blue and gold tones, for a truly timeless Christmas display.

Christmas Mantels 2020
Christmas Mantels 2020: Via @lynnallmandesign on Instagram


I was giggling a little here… I have this SAME mirror over my fireplace but the mantel greenery is FAR superior to anything I’ve tackled myself. How amazing is that fireplace insert?

Christmas Mantels 2020
Christmas Mantels 2020: Via @therealmlandreth


And for you farmhouse gals, I’ve got you covered, too.  Decked out in stark whites, with abundant winter greenery, paired with eucalyptus and a fantastic mixed-metal candlestick collection, this is a fireplace to envy for any real (or faux) farmhouse. If you’re looking for some inexpensive Eucalyptus swag for your own mantel, check out my tutorial on How To Make Your Own Eucalyptus-Fir Mixed Christmas Garland For A Fraction Of The Price.

Christmas Mantels 2020
Christmas Mantels 2020: Via @loveresideshere on Instagram


I love the simple black accents here and elegant greenery draped in a warm, fireplace hug. And, as always, all we need is a little more COWBELL!

Christmas Mantels 2020
Christmas Mantels 2020: Via @champagne.chaos on Instagram


Which one of these is your favorite?

Is there an element that you have to have every year on your mantel?

I’ll leave you with this night-time shot of our Christmas mantel that is seriously giving me all the feels:

Mashup Monday: Classic Christmas Mantels That Will Be In Style Every Year
Mashup Monday: Classic Christmas Mantels That Will Be In Style Every Year: Night time shot of Christmas Fireplace Mantel by @Callsigndesign on Instagram.


Thanks for hanging out with us today and be sure to check out more of our DIY and design inspiration on our blog.

Cheers!


*Legal stuff:

I am honest about my experiences with different products and write because I enjoy it.  I do however, have the opportunity to earn money for my writing, also.

Slavetodiy.com is a participant in the Amazon Services LLC Associates Program, an affiliate advertising program designed to provide a means for sites to earn advertising fees by advertising and linking to amazon.com.  Amazon offers a small commission on products sold through their affiliate links.  Each of your purchases via our Amazon affiliation links supports our cause at no additional cost to you.

If a blogger links to an Amazon product (with a special code for affiliates embedded in the link), and a reader places an item in their “shopping cart” through that link within 24 hours of clicking the link, the blogger gets a small percentage of the sale.  Amazon links are not “pay per click.”  If you click on the product link and stay around Amazon and purchase something else, however, I will get a commission on that sale.

Slavetodiy.com is also a VigLink affiliate advertiser which works similarly.

The Dark and Moody Fireplace Update

If you follow us, about a year ago I started thinking about the fireplace (and how NOT enamored with it I was). I dug up some fireplace inspiration in the hopes that I would find something awesome and reasonably cost friendly.  The thing is, we have some really pretty millwork around the fireplace, but over the fireplace is an awful TV space, meant for one of those gigantic tube TVs. Aside from the part where it a terrible waste of space, it is a complete eyesore, as well.

*This post may contain affiliate links. Please see full disclosure at the end of the post.

The more I looked, however, the more I realized that I have REALLY expensive taste. The fireplaces I love would require a complete gut, a big mess, and a LOT of money (like upwards of $3000 just for the fireplace surround). So, the alternative is to keep what I have and build upon it. I came up with a design that I think I’m really going to love, that’s very US, and added to it a bit. Rainman is going to kill me when he sees what I added to the project (but ultimately he’ll love how it looks).

This is what we’re starting with (the before):

The Dark and Moody Fireplace Update
The Dark and Moody Fireplace Update, Before We Started


Okay, so it’s not really that bad. I should stop my crying and just stay with what I have, right? (insert evil laughter).  We both know that’s not going to happen. And, is there a reason that I’m showing the whole wall and not just the fireplace? Oh yes, there is. But, we’ll get to that.

Right now, it is a very classic-ish, plain fireplace with some pretty mill-work and a crazy, giant opening up top. This is a shot of it with the cabinet doors that I ordered from Cabinet Door World. So, yeah, you can make cabinet doors (pretty easily), however, with no working wood shop currently, and very little time, I ended up ordering them instead. The quality is very good and the ordering process was easy. I got them exactly the size of the opening, so I’m sure we’ll need to do some sanding once we dry fit the hardware.

The Dark and Moody Fireplace Update
The Dark and Moody Fireplace Update; Doors To Be Mounted Above


For the color we chose Benjamin Moore’s “wrought iron” and I think it will be fantastic. I’m planning on using it for the cabinets we’re moving out of the kitchen into the mudroom area, also, so this will be a good test run. Check out the tutorial on how we used a great, super cheap spray gun to paint the cabinet doors!

The Dark and Moody Fireplace Update
The Dark and Moody Fireplace Update; Our Favorite Paint! Benjamin Moore, Wrought Iron


Project tip: We were painting over a semi-gloss, so we sanded with a sanding block first, then wiped down the whole thing and let it dry before painting (a good three coats because of the color!).

The cabinet hardware, from House Of Antique Hardware is still backordered, so I will update once that comes in and we get the doors up, but for now, I couldn’t WAIT to show you how amazing the fireplace looks with a fresh coat of paint! Drum roll, please.

The Dark and Moody Fireplace Update
The Dark and Moody Fireplace Update; Painted and Updated


It blows my mind sometimes how much a simple color change can transform a space! (And yes, I’m planning on painting the walls… but there are more dining room projects that have to happen first, like the new doors and the stone veneer on the wall to the left of the fireplace… Welcome to my project A.D.D.)

The Dark and Moody Fireplace Update


And one more, just because I’m so in love:

The Dark and Moody Fireplace Update
The Dark and Moody Fireplace Update; With Pretty Lighting


Project Update:

You’ll remember that we weren’t actually done, I just had to show you the paint because I was way too excited. The most difficult part of the project was still to come: actually installing the doors over the fireplace.

A quick word of advice: If you have to work with your spouse, find something that works for you. I find a combination of wine and a mute button work best when he’s doing something for me. I throw in some compliments and thank yous about the awesomeness of his work and shut my mouth. If I have the urge to OPEN my mouth and say something, I open it and insert wine. It has worked out pretty well thus far and has yielded tremendous results.

I ordered the doors so they exactly fit in the opening. That means that in order to account for the fact that the opening is not square and unlevel areas on the mantel, the doors had to be dry-fit, then trimmed down. Now, let me tell you, this is the most Rainman-iest project in Rainman land. It also means that we couldn’t paint them until they were fitted and trimmed.

Full disclosure: I love this man. 

First, was the problem of explaining why we needed to build trim above to act as a stop for the doors and fill in the dead space above when the doors are closed. It’s not that he doesn’t understand my “I don’t want a gap above the doors”, it’s just that explaining something conceptually doesn’t always translate to something concrete in his brain. So, a little while later, he devised a solution.

The Dark and Moody Fireplace Update
The Dark and Moody Fireplace Update, Installing Trim Over Fireplace


“YES, my love, that will fill in the gap. It’s perfect. What’s the next step?” (sips wine)

The Dark and Moody Fireplace Update
The Dark and Moody Fireplace Update, Trim Above Doors


 Back to Rainman Land: 

This installation involves a plumb-bob, multiple levels, obsessive measuring, remeasuring, shimming, shimming again, dry fitting, shimming again.  Measuring again.  Splitting the difference. Rainman muttering about the lack of squareness in the opening. Let’s just say that I may or may not have started drinking before 5 PM that day (but once again, in my hurry to slap it up there and be done with it, I’m quite sure it wouldn’t have been so downright balanced and lovely in the end).

The Dark and Moody Fireplace Update
The Dark and Moody Fireplace Update, Shimming Doors


After it was shimmed (I don’t mean to undersell the length of that process), I held the doors while he aligned the hinges (more wine, more wine, more wine), and eventually, after much careful sanding and trimming, the doors were hung, and had all the clearance they needed to open and close.

The Dark and Moody Fireplace Update
The Dark and Moody Fireplace Update, Doors Dry Fitted


Now, we are waiting on it to be not blustery weather so we can take the doors down and paint them.  And then we will actually be done.

Update: Finally painted!

The Dark and Moody Fireplace Update
The Dark and Moody Fireplace Update; Painting the doors with the Critter


Check out our post on how to use this awesome little paint gun and get that professional, WOW finish! You can find the paint gun we used, the critter spray products siphon gun, on Amazon.

The Dark and Moody Fireplace Update
The Dark and Moody Fireplace Update; Finished Painted Doors


I’m really fond of drum rolls, so let’s do that again.  Here’s a shot with the doors on and DONE!


The Dark and Moody Fireplace Update
The Dark and Moody Fireplace Update: Doors On And Ready To Hide The TV


And one with the doors painted, on, and CLOSED. WOOT! (Can’t see the TV, can ya, Russ?)

The Dark and Moody Fireplace Update
The Dark and Moody Fireplace Update; Doors Painted, On, and CLOSED

 It may seem like a small thing to other people, but this project has been on the list for a long time. It’s just a matter of making it a priority and having the time to do it. But, of course, that makes each little change that much more awesome!

Here is the breakdown:

Project Cost:

  • Benjamin Moore Paint and supplies: $96.66
  • Two Cabinet doors: $149.57 (delivered)
  • House of Antique Hardware 2X Pair of 9″ Smooth Iron Flush Mount Spear Strap Hinges: $43.94

Total: $290.17

And just for fun, let’s see that before and after one more time:

The Dark and Moody Fireplace Update
The Dark and Moody Fireplace Update, Before We Started
The Dark and Moody Fireplace Update
The Dark and Moody Fireplace Update: The After: Doors above the fireplace, fresh paint, and a new light fixture


It sure is amazing what some doors, paint, and a light fixture can do to a room, right??? And, here’s a shot with what it looks like with the dining table and chairs (which will soon be replaced, but that’s a story for another day!).

The Dark and Moody Fireplace Update
The Dark and Moody Fireplace Update, Dining Room With Updated Fireplace and Light Fixture


I would love to see before and afters on your own paint projects! Thanks for playing with us and, of course, cheers to all of your updates in the New Year and check out more project awesomeness on our blog.


*Legal stuff:

I am honest about my experiences with different products and write because I enjoy it.  I do however, have the opportunity to earn money for my writing, also.

Slavetodiy.com is a participant in the Amazon Services LLC Associates Program, an affiliate advertising program designed to provide a means for sites to earn advertising fees by advertising and linking to amazon.com.  Amazon offers a small commission on products sold through their affiliate links.  Each of your purchases via our Amazon affiliation links supports our cause at no additional cost to you.

If a blogger links to an Amazon product (with a special code for affiliates embedded in the link), and a reader places an item in their “shopping cart” through that link within 24 hours of clicking the link, the blogger gets a small percentage of the sale.  Amazon links are not “pay per click.”  If you click on the product link and stay around Amazon and purchase something else, however, I will get a commission on that sale.

Slavetodiy.com is also a VigLink affiliate advertiser which works similarly.

Charcuterie Boards: Easy Appetizers For Holiday Entertaining To Wow Your Guests

I know you’ve been stalking those beautiful Charcuterie Boards on Pinterest and Instagram, don’t lie. I too am LOVING the whole concept, and we recently hosted a Black Friday Party and just SLAYED the appetizers, presentation and all. I’m going to show you what we did, where we got our supplies and show you how they all came out- you can totally do this!

*This post may contain affiliate links. Please see full disclosure at the end of the post.

So, one of the things I was wondering when I gathered all of the goodies to make the boards (which we MOSTLY did with platters, but it’s the same concept) is if they would actually get eaten. To my surprise, people REALLY did dig in and eat just about everything but the garnish!

And, you know what’s so COOL? I got almost everything for the boards from Costco (and since Sams carries many of the same things, I’m betting you could shop this same list there).

The other coolest thing: I gave her all of the stuff and my daughter made all of the boards so I could finish cleaning and setting up the rest of the party. It’s so awesome having artistic kids!

Charcuterie Boards: Easy Appetizers For Holiday Entertaining To Wow Your Guests


Step One: You don’t actually need those $200 boards. Use different cutting boards and platters you already have. Have some antique silver or pewter platters? Those work, too! I have a ton of little ramekins that I use for sauces etc every day and these work PERFECTLY in this instance to hold sauces or juicy things that you don’t want soaking the surrounding foods (nobody likes soggy crackers).

Charcuterie Boards: Easy Appetizers For Holiday Entertaining To Wow Your Guests


Step Two: Shop your list!

Get something to put all those dips and goodies on: We shopped Costco for crackers (we like Carr’s Water Table Crackers), Hawaiian Rolls, Artisan Breads, mini Naan bread, Stacy’s Pita Chips etc. These are to make little sandwiches and sample sauces, cheeses, and meats.

Salty foods: Black, green, and kalamata olives. Cocktail dill pickles, marinated artichoke hearts, stuffed tomatoes/peppers (Costco has a Charcuterie platter with these already made!), marinated mushrooms, and heart of palm.

Fresh, colorful foods: Cherry or grape tomatoes, cranberries, grapes, kiwis, strawberries, blueberries and pomegranates. Try to find good ones that are in season!

Cheeses: Costco has an artisan cheese section by the wine. Get an assortment of stinky cheeses, soft cheeses, marinated mozzarella balls, etc. Try some new ones!

Meats: In the same section as the cheese there are artisan and fancy meats: pepperoni, prosciutto, and smoked salmon. I went WAY overboard on meat. Keep in mind how big your platters are!

Garnish: Herbs are great for garnish to add a little green in places that need it.

Sauces and Dips: We used tzatziki, hummus, spinach dip (Knorr vegetable dip with fresh chopped spinach instead of cooked), cream cheese and red chili pepper spread (for the salmon).

Crunchy foods: We used pine nuts, but you can do little bowls of walnuts, pistachios, etc, also.

Charcuterie Boards: Easy Appetizers For Holiday Entertaining To Wow Your Guests


Preparing: It’s really tough to time this right, but with a little common sense, you can get these out just as your guests are arriving.

Tip: Not feeling creative? Use a picture from Pinterest and copy the board (the greatest form of flattery!).

Charcuterie Boards: Easy Appetizers For Holiday Entertaining To Wow Your Guests


Start with your crackers and room temperature items (black olives, nuts, etc). Then move to cutting the cheeses and meats (when you’re done, stick them back in the fridge to keep them cool until you’re ready to add them to the platters). Next add the cold fruits, the cheeses and meats, and finally the cold sauces and dips in ramekins.

The last thing you should be doing is toasting your bread just before the guests arrive!

Tip: Use clean, white flour sack towels to wrap over your warm rolls to keep them warm and moist until people start digging in!

Charcuterie Boards: Easy Appetizers For Holiday Entertaining To Wow Your Guests


Arranging: The idea is to keep sets of complementary foods next to each other. On the smoked salmon platter we had the chili jelly and cream cheese and water crackers nearby to build a little sandwich on.

If you have something especially unusual or you just like labelling things, you can make little Alice in Wonderland signs “Try me on a cracker with red jelly and cream cheese!” These cardholders on Amazon are super cute and reusable!

Charcuterie Boards: Easy Appetizers For Holiday Entertaining To Wow Your Guests


Displaying: I like using all of my serveware! If you have cake stands, etc, get those out and put your desserts on them. It gives the table different heights and depths.

Charcuterie Boards: Easy Appetizers For Holiday Entertaining To Wow Your Guests


For fun centerpieces (that don’t take up a ton of room) check out these wine bottle cork fairy lights to put in your saved wine bottles- at about fifty cents apiece you really can’t go wrong! It gives the table some additional interest, height, and color!

Charcuterie Boards: Easy Appetizers For Holiday Entertaining To Wow Your Guests


These little porcelain ramekins are awesome and we use them for individual dipping sauces all the time. They have been super hardy and durable!

Charcuterie Boards: Easy Appetizers For Holiday Entertaining To Wow Your Guests


As you can see, I use the platters as a centerpiece and layer around them. We almost always have deviled eggs (because they’re MY favorite) and adding pies makes for a fun evening paired with your favorite wines and spirits. That beautiful wooden cake stand comes with a pretty glass dome and I use it all the time! The egg plate and four bowl server are both from Pottery Barn, but unfortunately I don’t think they’re available anymore.

Charcuterie Boards: Easy Appetizers For Holiday Entertaining To Wow Your Guests


For more ways to use your saved wine bottles, we have a Great Wine Bottle Post on upcycling! And those low white porcelain serving bowls with the bread and crackers are one of my new favorite brands: Dowan on Amazon, their stuff is sturdy, well made, sourced responsibly, and sturdy!

Charcuterie Boards: Easy Appetizers For Holiday Entertaining To Wow Your Guests


Do you have favorite goodies that you serve around the holidays? If you have combos you love on charcuterie boards, I’d love to hear about them in the comments section below!

Check out more great content on our blog!

Cheers and Happy Holidays!


*Legal stuff:

I am honest about my experiences with different products and write because I enjoy it.  I do however, have the opportunity to earn money for my writing, also.

Slavetodiy.com is a participant in the Amazon Services LLC Associates Program, an affiliate advertising program designed to provide a means for sites to earn advertising fees by advertising and linking to amazon.com.  Amazon offers a small commission on products sold through their affiliate links.  Each of your purchases via our Amazon affiliation links supports our cause at no additional cost to you.

If a blogger links to an Amazon product (with a special code for affiliates embedded in the link), and a reader places an item in their “shopping cart” through that link within 24 hours of clicking the link, the blogger gets a small percentage of the sale.  Amazon links are not “pay per click.”  If you click on the product link and stay around Amazon and purchase something else, however, I will get a commission on that sale.

Slavetodiy.com is also a VigLink affiliate advertiser which works similarly.

How To Use All of Those Wine Bottles You Saved

I don’t know about you, but sometimes I collect things with some vague notion of re-purposing them in the future. Well, I’ll have to admit, I may have let the wine bottle collection get a little out of hand. So, I came up with a few ways to use them and even smuggle some of them out of the house, legitimately.  Check out this inspiration and maybe you too can get your collection under control.

*This post may contain affiliate links. Please see full disclosure at the end of the post.

The first step was gathering all of my collected bottles in one place and doing a mini-inventory. With the few ideas I had, I needed to sort them by shape, size, and color… and of course figure out what I was gifting and what I was keeping for me.


How To Use All of Those Wine Bottles You Saved


Having a usable workspace in the guest bedroom gave me a little time to be in work on this and not have to put everything away again.


How To Use All of Those Wine Bottles You Saved


1: Holiday Decorating

The first thing I did was weed out the bottles that I want to keep. I like interesting shapes and, of course, different heights, etc. I like a varied collection that adds interest in the display. I did a test order of some SUPER inexpensive fairy lights and used a few of the bottles in my fall decor.

Saved Wine Bottles: How To Use Them This Holiday Season
Saved Wine Bottles: How To Use Them This Holiday Season: As you can see by our cork collection, we’re committed to the process

They are really pretty! But, the real thing I’m looking forward to is seeing them in the Christmas decor. I think these will look spectacular on the stairs, especially once I get all of the greenery up! I used to sometimes think big foyers were a waste of space, but the look during the holidays makes it all worth it!

How To Use All of Those Wine Bottles You Saved


Now, we’ll see if the cats leave them alone. My guess is I’ll have some smashed glass to contend with, but we’ll see.

How To Use All of Those Wine Bottles You Saved

Here they are with some eucalyptus/fir garland! What do you think?

2: Holiday gifting

I’m always in search of Christmas gift basket ideas throughout the year, and I found a brilliant way to make my problem someone else’s. For my “extras”, *cough *cough, I’m going to do gift sets with tabletop wine bottle lanterns. There are very reasonable wick kits on Amazon to make these, and with bottles of lantern fluid, and a cute wrap job, what’s not to like? If you want to go SUPER thrifty, skip the lantern fluid and basket… a bottle with wick kit, a pretty ribbon, and a handwritten note works just as well!

How To Use All of Those Wine Bottles You Saved
How To Use All of Those Wine Bottles You Saved, Homemade Wine Bottle Lanterns in a Simple Gift Bag


How To Use All of Those Wine Bottles You Saved
How To Use All of Those Wine Bottles You Saved, Classic Gift Wrap in a Canvas Bag


3: Backyard lanterns

I’ve seen these lanterns mounted with brackets on backyard fences and I dig that too (especially with our evening mosquito problem)! I found some brackets that I am going to try with the smaller bottles around the interior of the pool enclosure and see how it looks, and more importantly, if it works. Of course, you can bring your bottle down to the hardware store and just fit the pieces together there. I had to laugh, finding these for sale without bottles was challenging. Me: Um, we’re good on bottles.

They also work brilliantly as tabletop outdoor lanterns.

How To Use All of Those Wine Bottles You Saved


4) Watering your plants!

With a wine bottle, and a terracotta watering spike, you can forget about your plants for weeks and they’ll still be going strong! These are essential for people like me, who have trouble not killing plants inside.

Winebottlewaterer

I know if I don’t get this wine bottle habit under control I will never hear the end of it. So, here goes!

Do you have any great uses for wine bottles? Please share in the comments below! And, of course, check out more great content on our blog!

Cheers!


*Legal stuff:

I am honest about my experiences with different products and write because I enjoy it.  I do however, have the opportunity to earn money for my writing, also.

Slavetodiy.com is a participant in the Amazon Services LLC Associates Program, an affiliate advertising program designed to provide a means for sites to earn advertising fees by advertising and linking to amazon.com.  Amazon offers a small commission on products sold through their affiliate links.  Each of your purchases via our Amazon affiliation links supports our cause at no additional cost to you.

If a blogger links to an Amazon product (with a special code for affiliates embedded in the link), and a reader places an item in their “shopping cart” through that link within 24 hours of clicking the link, the blogger gets a small percentage of the sale.  Amazon links are not “pay per click.”  If you click on the product link and stay around Amazon and purchase something else, however, I will get a commission on that sale.

Slavetodiy.com is also a VigLink affiliate advertiser which works similarly.

Classic, Elegant Christmas Decor Inspiration and Ideas on a Budget

I’ve been sneaking Christmas decor out of the closet, but I guess I’m not super stealthy. The thing is, I don’t have a lot a lot of energy, and I really have to pace myself. So, if everything but the tree is up before Thanksgiving, so be it. This is my favorite time of the year, and the little white twinkling lights just give me the Christmas feels! So, here is what I have done so far:

*This post may contain affiliate links. Please see full disclosure at the end of the post.

The exterior: If it was up to me, we’d be done. I have wreaths with red ribbons and window candles with automatic light sensors and flickering flames (for about $5 each, I thought these were a steal). Okay, maybe some lighted garland around the porch would be cool, but, we’ll see. Clark Griswold is already harassing me about adding more lights, but I’m standing my ground.

Classic Christmas Decor
Classic Christmas Decor: Wreaths with red ribbons in the windows and window candles


This is a great example of the unpredictable weather in Coastal NC: My roses are still blooming, my hydrangea leaves haven’t wilted yet, my Christmas stuff is out, and there are still tons of leaves falling.

Classic Christmas Decor
Classic Christmas Decor: Individual window wreaths with red velvet ribbon, pink roses, and a stacked stone garden.


This is a close up of the basic wreaths: Very basic but should hold up well outdoors, and they were cheap enough that it won’t break my heart if they’re ruined. They’re perfectly matched with the window candles!

Classic Christmas Decor
Classic Christmas Decor: Window Wreaths and Flickering Window Candles


This is a great example of “be where you are.” I am not in love with my fireplace set up currently, but it’s where we are, so I just decorated the crap out of it. I am REALLY proud of my garland I put together, with a willow/eucalyptus garland combined with a basic fir garland (if you don’t have any of these, go to Michael’s after Christmas when they’re pretty much giving them away. They’re on racks on the wall and I got the basic lighted garlands for about $5 each. The faux silver dollar eucalyptus and preserved roses arrangement I added as an afterthought and I love the combo. (Check out our great post on how to preserve roses!)

Classic Christmas Decor
Classic Christmas Decor: Eucalyptus/Willow Lighted Garland, Christmas Eucalyptus and Preserved Roses Arrangement, Classic Candlesticks and Candlebra, and Classic Oversized Ethan Allen Vase with Faux Cranberries


This awesome Ethan Allen Vase I use for every season with different stems because I ADORE it! The faux cranberries make a gorgeous, simple seasonal arrangement (tip: open them outside and let them air out a little… they have a heavy chemical scent but are beautiful once they’ve breathed a little they’re great!).

For the story of why our turtle inspires us, check out the story on Our Instagram!

Classic Christmas Decor
Classic Christmas Decor: Our Ethan Allen Vase with a faux cranberry arrangement and our trusty Mr. Turtle the tortoise feeling festive!


And finally, I’m still in work on these faux eucalyptus mixed garlands, and there is a great garland tutorial on our blog so you can make your own much more cheaply than buying them! And I’m just loving the cool led cork-bottle fairy lights, if you’re looking for what to do with all those bottles you saved.

How To Make Your Own Eucalyptus-Fir Mixed Christmas Garland For A Fraction Of The Price


I would love to hear what you think about our Christmas style in the comments below! Do you have any Christmas decor traditions at your house?

Check out more of our decor and project inspiration over on our blog.  Cheers!

*Legal stuff:

I am honest about my experiences with different products and write because I enjoy it.  I do however, have the opportunity to earn money for my writing, also.

Slavetodiy.com is a participant in the Amazon Services LLC Associates Program, an affiliate advertising program designed to provide a means for sites to earn advertising fees by advertising and linking to amazon.com.  Amazon offers a small commission on products sold through their affiliate links.  Each of your purchases via our Amazon affiliation links supports our cause at no additional cost to you.

If a blogger links to an Amazon product (with a special code for affiliates embedded in the link), and a reader places an item in their “shopping cart” through that link within 24 hours of clicking the link, the blogger gets a small percentage of the sale.  Amazon links are not “pay per click.”  If you click on the product link and stay around Amazon and purchase something else, however, I will get a commission on that sale.

Slavetodiy.com is also a VigLink affiliate advertiser which works similarly.

Mastering The Scene: Fall Decorating on a Dime

It’s that time of year again! The rest of you up North are probably enjoying cooler temperatures and those of us down South are decorating for Fall and still sweating our butts off. Anyway, by putting out my Autumn inspired decor it gives me hope that we will soon have cooler temperatures. Check out this awesome, easy entry table set up!

*This post may contain affiliate links. Please see full disclosure at the end of the post.

Here is the breakdown on the big pieces:

The demijohn is from Pottery Barn, but you can get an Imax Recycled Glass Demijohn quite a bit cheaper (but watch Pottery Barn for sales and free shipping)! The glass pumpkin cloches are also from Pottery Barn (I picked them up around March last year in their clearance section and they were a steal!). The lantern is also from Pottery Barn that I bought about ten years ago.

That beautiful black entry mirror you can get on Amazon now and it is REALLY a great find.  I love it!

The faux olive branchesfaux eucalyptus stems, and white pillar candles are all from Amazon. The pumpkins I got on sale last year at Michaels half price, and they’re always a steal at half off!


Fall Entry Table Decorating
Fall Entry Table Decorating on a Dime, from Pottery Barn, Michaels, and Amazon!


The other item you’ll see here is the linen tablerunner that I recently picked up, which gives it the right subdued hue and backdrop for a whitewashed pumpkin arrangement!


Fall Entry Table
Fall Entry Table Decorating on a Dime, from Pottery Barn, Michaels, and Amazon!


Then there’s the EVER versatile Faux Eucalyptus Arrangement that I use in pretty much EVERY season because it just works! It doesn’t get much easier than flattening out the leaves and arranging them a bit in a recycled florist vase. Simple. Easy. Classic.

Faux Eucalyptus Arrangement
Faux Eucalyptus Arrangement: Fall Decorating

What are you doing for Fall Decorating? Where do you stand on the neutral pumpkin debate? Let us know in the comments below!

Thanks for stopping by and check out more DIY and great projects on our Blog!  Cheers!


*Legal stuff:

I am honest about my experiences with different products and write because I enjoy it.  I do however, have the opportunity to earn money for my writing, also.

Slavetodiy.com is a participant in the Amazon Services LLC Associates Program, an affiliate advertising program designed to provide a means for sites to earn advertising fees by advertising and linking to amazon.com.  Amazon offers a small commission on products sold through their affiliate links.  Each of your purchases via our Amazon affiliation links supports our cause at no additional cost to you.

If a blogger links to an Amazon product (with a special code for affiliates embedded in the link), and a reader places an item in their “shopping cart” through that link within 24 hours of clicking the link, the blogger gets a small percentage of the sale.  Amazon links are not “pay per click.”  If you click on the product link and stay around Amazon and purchase something else, however, I will get a commission on that sale.

Slavetodiy.com is also a VigLink affiliate advertiser which works similarly.

The Classic Living Room of My Dreams

I am super excited to be sharing our completed living room with you!!!  It’s hard to believe that it’s come this far from where we started, but one of the reasons we bought this place was its overall improvability.  I like everything customized MY way, and it’s nice not have to make any structural changes to achieve results, or to pay a higher price for a home that’s finished, but not necessarily what you would have chosen.  So, now we have EXACTLY what I wanted and it turned out even better than I dreamed.  See the complete source list below each photo!

*This post may contain affiliate links. Please see full disclosure at the end of the post.

So, here’s a flashback to what this place looked like before we moved in (eeeeek!).  But, with the high ceilings and great windows, it was ripe for an elegant update.  The house was super clean and ready for a facelift.

ec032231-9fac-436c-b2e9-43cb91c3eeb6

It is difficult to believe that this is the same room, but I am completely in love.  Check out the incredible results:


Classic living room with Pottery Barn Chesterfield sofa, RH 19th Century Rococo Iron & Crystal Round Chandelier, and RH knock off (DIY) velvet curtains

The fantastic light fixture from RH is the crown jewel of the space and really takes it to another level.  It is the 19th Century Rococo Iron & Crystal Round Chandelier in Matte Natural Iron/Smoke Crystal and it is breathtaking.

I started out with a great foundation piece from Pottery Barn, this Grand Chesterfield Sofa in Vintage Cocoa Leather that has held up great to kids, two cats, and a dog that occasional jumps up when we’re not looking.

The curtain rods with marble end caps were super reasonable and I got them at my local Lowe’s.

Also from Lowe’s are the metal globe lamps that flank the couch.

The side tables are from wally-world and are decent (they’re not show-stoppers because they are playing a support role here).

The customized Bourbon Barrel top is from Etsy and the shop name is KYBourbonBarrel.  This was a gift for my husband for Christmas and we just love it.

The velvet curtains were sewn by my mother and you can find the source links and project tutorial here.

The rug is from Home Depot and it’s one of my favorite finds.  It doesn’t feel cheapy and it wasn’t a small fortune like similar ones I like from Pottery Barn.  I wish I had a sourced a few others from there that I got online and didn’t totally love.

The pillow covers and blanket are all from Amazon: the whalecompass rose pillow covers, dark gray corduroy pillow covers, and fuzzy light gray blanket and pillow covers.

Hemnes IKEA Builtins in Black with Custom Hardware

Above are the semi-custom IKEA builtins that Rainman built for me.  You can find the components on the IKEA website  and the tutorial here.

We updated them with Antiqued Brass Bin Pulls and Antique Brass Cabinet Latches from House of Antique Hardware and it really changed the look of the whole unit.  The tutorial is here.

The beautiful, solid (and did I mention heavy) dough bowl is from Pottery Barn, although I’m not totally sure they have this dark wood one anymore.  In it are found driftwood, a starfish, and Japanese Fishing Floats.

The room was designed around the curved television so that it can be viewed well from almost any angle.  Rainman researched and decided on the LG 4H in a curved model.  It’s pretty awesome.

Classic Living Room with black builtins, leather chesterfield sofa from Pottery Barn, and Chandelier from Restoration Hardware

Most of the items in the builtins are things that I’ve collected over the years but there are a few that I’ve purchased recently to fill in just a few areas.  I believe in builtins because you need them, not to arbitrarily spend money for storage and display space that you don’t need.


IKEA black builtins, brick veneer, custom wood shelves flanking the builtins, RH Chandelier

The little punches of green are super important on the builtins and I love getting REAL preserved boxwood.  My artisan of choice is on Amazon and Etsy, Door and Decor.  The wreath below is from her, also, and her work is stunning.  The prices are slightly less than West Elm or other online vendors and her creations are far superior.


Rainman’s chair, with Kim Taylor Reece photography in Koa wood frames, Preserved Boxwood Wreath from DoorandDecor (Etsy)

To match the chesterfield sofa, we purchased the Lansing Leather Recliner in Vintage Cocoa from Pottery Barn.

The tutorial for the dried rose arrangement is here and the table is an antique hand me down from my mom.

The Octopus Pillow Cover and Compass Rose Pillow cover are both from Amazon.  The lantern looks very nice but I wasn’t super excited about the construction, so I won’t recommend it.

So glad you came to check out our finished adult living room!  Thanks for stopping by and check out our other updates, projects, and design inspiration on our Blog.  Cheers!

*Legal stuff:

I am honest about my experiences with different products and write because I enjoy it.  I do however, have the opportunity to earn money for my writing, also.

Slavetodiy.com is a participant in the Amazon Services LLC Associates Program, an affiliate advertising program designed to provide a means for sites to earn advertising fees by advertising and linking to amazon.com.  Amazon offers a small commission on products sold through their affiliate links.  Each of your purchases via our Amazon affiliation links supports our cause at no additional cost to you.

If a blogger links to an Amazon product (with a special code for affiliates embedded in the link), and a reader places an item in their “shopping cart” through that link within 24 hours of clicking the link, the blogger gets a small percentage of the sale.  Amazon links are not “pay per click.”  If you click on the product link and stay around Amazon and purchase something else, however, I will get a commission on that sale.

Slavetodiy.com is also a VigLink affiliate advertiser which works similarly.

RH Restoration Hardware 19th C. Rococo Iron & Crystal Round Chandelier Product Review

Did you notice that it’s super hard to find reviews on RH light fixtures (or anything else Restoration Hardware sells)? I have to tell you, I was a little afraid… the shroud of secrecy surrounding the quality of the items, and lack of happy customer (or any) reviews, left me feeling a bit wary. So, I hope I can shed a little light on my RH “experience” and provide an honest review (I still have fear about a hypothetical RH strong arm guy coming to bust my knee caps, but here goes…): oh, by the way. I’m not an affiliate. I think their snobbery prevents affiliatery (dude, that’s not a word, I just made it up), so you can be sure of my unadulterated, completely honest opinion.

*This post may contain affiliate links. Please see full disclosure at the end of the post.

First, let’s be totally up front. Restoration Hardware’s marketing team and strategy are second to none. They are selling class. Period. It’s unbelievably brilliant and diabolically well executed. Every purchase says: welcome to the champagne life. But, is it true? Are their products that much better?

I’ve had my eye on a light fixture at RH for a while. I visited it at night on their website, shielding my iPad just in case Rainman was just pretending to be asleep and really wanted to know what I was cyber stalking.  Several times I almost caved and bought a knock off (everything that was similar had a lot of chrome, which was too glammy), but I stayed strong and finally bit the bullet. Enter the 19th century rococo chandelier in smoke into my life. It was the perfect piece to complete a recent adult living renovation and I just couldn’t say no.

RH Restoration Hardware 19th C. Rococo Iron & Crystal Round Chandelier Product Review

As we have been busy on a MAJOR DIY deck addition, the box sat unattended for several weeks before my Rainman discovered me looking sad one night and rolled up his sleeves. What we thought would be a simple installation was not quite, but I’ll tell you all about it.

RH Restoration Hardware 19th C. Rococo Iron & Crystal Round Chandelier Product Review

But, first, back to that deck renovation.  So, the deck needed to go in before child-next graduated from high school so there was an appropriately awesome place for his friends to hang out, not inside with all of the boring adults (and no one sued us when they fell through the old, rotting deck).  Surprise, surprise, as we were peeling back siding to install the ledger board, Rainman and my father in law discovered rot.  It went halfway up the back wall and surrounded the door.

RH Restoration Hardware 19th C. Rococo Iron & Crystal Round Chandelier Product Review

This was the same door that eventually I wanted to close in anyway, and was going to have a kitchen cabinet behind it, because we would also rip out windows and install custom steel doors instead.  Nevermind that this other renovation was nowhere near ready to start, financially or otherwise, I was like, “fill it in.”  We’re already doing this, and I’d rather not install a new door that we’re going to take out and close in later.  And, as anyone knows who has DIYed a kitchen reno, there’s no time like the present to start it, and no time like right before you sell the house to finish it!  Needless to say, I was a bully, and Rainman was not happy.

RH Restoration Hardware 19th C. Rococo Iron & Crystal Round Chandelier Product Review

Well, I couldn’t leave the blank wall without a cabinet.  And if you’re going to get the cabinet you might as well get the matching one for the base of the banquette island you planned.  And if you’re already paying the unlimited furniture delivery fee (which is unfortunately $399 in my area because I live out in the sticks), you might as well buy that fixture you’ve had your eye on.  It’s like I was saving us money already. (I feel like I’ve maybe been reading those “If You Give A Mouse A Cookie” books to the little one too much lately).

RH Restoration Hardware 19th C. Rococo Iron & Crystal Round Chandelier Product Review

So, I had my fixture.

RH Restoration Hardware 19th C. Rococo Iron & Crystal Round Chandelier Product Review

Rainman just wanted to make me happy, and generally, fixture hanging is a weekday evening type of deal.  Straightforward and satisfying.  Unless there are like 200 crystals that have to be individually attached.  But, it’s fine… it would be better if there were gloves but they’re not included (I still need to go back and get all of the fingerprints off the crystals). I ordered white cotton gloves from Amazon and they’re ready for me whenever I get to it (there was no way I was stopping progress to wait on gloves).

RH Restoration Hardware 19th C. Rococo Iron & Crystal Round Chandelier Product Review

So, the actual fixture installation was pretty straightforward (although the directions are a bit lacking). I believe the prevailing assumption is that anyone buying this is going to have a pro install it and not their own personal slave Rainman after work one evening, so I guess I get that the wiring diagrams weren’t totally great.  The real kicker was that the number of crystals doesn’t actually match the installation guide and you basically can’t get there from here.  But, it may be that it’s a matter of personal preference how you’d like the crystals to hang, I’m not totally sure.

RH Restoration Hardware 19th C. Rococo Iron & Crystal Round Chandelier Product Review

What I didn’t get from the product info before I received it (and you can’t see in their pictures) is that the body of the fixture is in matte iron – which sort of reminds me of industrial steel beams before they start rusting.  It’s beautiful, just not what I expected.  The black wrought iron seen in some of the pictures is only on the clear crystal option.  I love it just as much, I just figured it was worth noting since it wasn’t entirely apparent to me upfront.

RH Restoration Hardware 19th C. Rococo Iron & Crystal Round Chandelier Product Review

The verdict: (drumroll please) I would ABSOLUTELY recommend the fixture.  It’s gorgeous and dazzling (like, going to need a dimmer), it is the crown jewel in the living room that took it from nice to, OMG-where’d-you-get-that?  I love watching the light dance off of the beautiful smoke crystals in different patterns as the sun moves around the house during the day and the shadows it creates when the sun goes down.  It’s breathtaking.

Although we didn’t have any issues with this particular fixture, there were some blemishes on one of the cabinets.  I offered to have them send me replacement hardware, but as that was out of stock, they send a team to pick up the cabinet and bring me a whole new one.  No trouble, no fuss, no problem.  The customer service is fantastic, and their dedicated delivery teams are super professional and friendly.

Apparently they have some ludicrously good warranty on all of their stuff (which I honestly didn’t know when I hit “play” on the purchase), so even though the products are a bit *cough *cough on the pricey side, we’ll be buying from them again.  It’s well worth the extra money to have heirloom quality pieces.

Thanks for hanging out with us today and check out more of our DIY, projects, and decor on our blog.

Cheers!


*Legal stuff:

I am honest about my experiences with different products and write because I enjoy it.  I do however, have the opportunity to earn money for my writing, also.

Slavetodiy.com is a participant in the Amazon Services LLC Associates Program, an affiliate advertising program designed to provide a means for sites to earn advertising fees by advertising and linking to amazon.com.  Amazon offers a small commission on products sold through their affiliate links.  Each of your purchases via our Amazon affiliation links supports our cause at no additional cost to you.

If a blogger links to an Amazon product (with a special code for affiliates embedded in the link), and a reader places an item in their “shopping cart” through that link within 24 hours of clicking the link, the blogger gets a small percentage of the sale.  Amazon links are not “pay per click.”  If you click on the product link and stay around Amazon and purchase something else, however, I will get a commission on that sale.

Slavetodiy.com is also a VigLink affiliate advertiser which works similarly.

DIY Restoration Hardware Knock Off Velvet Curtains

Restoration Hardware

Can you hear me laughing maniacally from there? I believe once I added in the shipping it was five hundred dollars from Restoration Hardware! For TWO luxuriously wonderful curtain panels. Yes, TWO. Not two sets. Two panels. ON SALE. I swallowed my insanity, put down my wine glass, closed the tab, and let reality sink in. Allow me a moment to get my blood pressure back down. Look, I admire Restoration Hardware’s whole seductive look they have going on, but I’m apparently in the wrong tax bracket to be shopping there. They’re CURTAINS. As in, fabric that adds privacy and style to windows. Not exactly life or death. So, I did what I do best: I found a way around their ridonculous pricing. But, first let’s bask in the sexy glory of Vintage Velvet Drapery for just a moment.

*This post may contain affiliate links. Please see full disclosure at the end of the post.

Restoration Hardware

Luckily for us, Restoration Hardware likes to brag about their designers and suppliers. Woot! It ALSO turns out their velvet supplier, J.B. Martin, is available on Fabric.com and Amazon (let’s hear it for non-exclusive suppliers). And (even better) I have a mother that is awesome with a sewing machine. WIN.

I almost purchased the J.B. Martin Banker’s Gray Velvet on Amazon, but decided I wanted a darker gray. So, I found 54″ wide fabric instead J.B. Martin’s Velvet in Graphite, to EXACTLY match the curtains I couldn’t afford from RH, shipped them directly to her… And here they are… (DRUM ROLL, PLEASE)…

RH knock off, DIY Velvet Curtains with Pottery Barn Chesterfield Grand Sofa

So, we made two 96″X50″ exact duplicate panels for the jaw dropping low price of:

$169.05

We saved $330.95 off of retail RHs SALE price.

So, not cheap, but CHEAPER. And gorgeous. And happy me.

Here are some shots with fewer distractions:

RH knock off, DIY Velvet Curtains with Pottery Barn Chesterfield Grand Sofa

Yaaaas!  I just love them!

Check out more of our awesomeness on our blog! Cheers!


*Legal stuff:

I am honest about my experiences with different products and write because I enjoy it.  I do however, have the opportunity to earn money for my writing, also.

Slavetodiy.com is a participant in the Amazon Services LLC Associates Program, an affiliate advertising program designed to provide a means for sites to earn advertising fees by advertising and linking to amazon.com.  Amazon offers a small commission on products sold through their affiliate links.  Each of your purchases via our Amazon affiliation links supports our cause at no additional cost to you.

If a blogger links to an Amazon product (with a special code for affiliates embedded in the link), and a reader places an item in their “shopping cart” through that link within 24 hours of clicking the link, the blogger gets a small percentage of the sale.  Amazon links are not “pay per click.”  If you click on the product link and stay around Amazon and purchase something else, however, I will get a commission on that sale.

Slavetodiy.com is also a VigLink affiliate advertiser which works similarly.